by Joanne James2. December 2015 09:00It's Wednesday and you know what that means: a new collection of Wednesday Weekly Deals! These offers are valid for one week only. As always, a new collection of deals will be announced next Wednesday.
If you want to take advantage of any of the deals on offer, you can support my business by placing your order online by clicking here or using the link to my store on the right hand side of my blog page where it says 'Shop Online' or with me in person. Don't forget to add the new Hostess Code for December 99Y3W6CF if your order is under £150 and be sure to make sure that you don't check the 'no contact' box if you'd like to be kept updated with the progress of you order and receive a little thank you in the post from me.
Here's a summary of this week's one-week only Wednesday deals - click on each item to go to the online store to purchase:
I will be placing an order this evening, so if you live in or around Northampton and would like to save on postage, please get in touch and I will add your items on. I'll also be using this washi tape on my card tomorrow so pop back if you'd like to see how I use it.
Back later with today's creative project; until then, happy shopping!
by Joanne James1. December 2015 09:00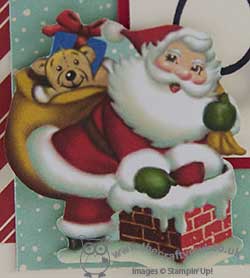
It's Tuesday and I'm a little later with my post today as I've had the first of my December technique classes this morning - more on those projects another day. Today I have a card for this week's Pals Paper Arts challenge. Before we get to it though, I would like to say thank you to the designers over there for choosing this card as a PPA Pick last week - challenges are fun and it's always nice to have your work recognised so thank you PPA Peeps! This week's sketch was intriguing:

I immediately saw this sketch rotated through 90 degrees as the two elements looked like a signpost to me; my card didn't finish up quite where I started out - here it is:
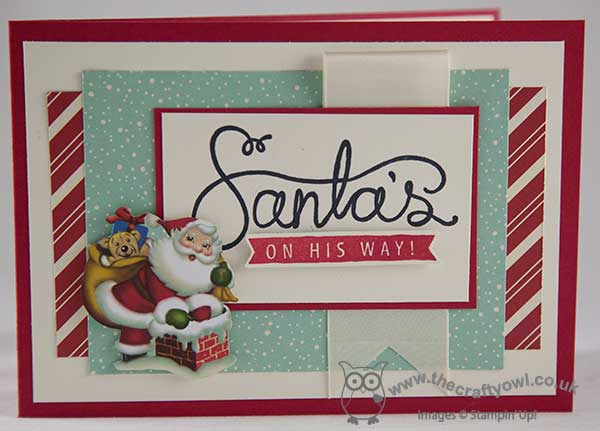
I decided to go with a sign of sorts using this fun sentiment from the 'Cup of Cheer' stamp set and a wide ribbon banner behind for some added texture - and of course I couldn't resist adding a fussy cut santa from the 'Home for Christmas' designer series paper to finish. This card uses surprisingly few supplies but has a real festive feel I think.
As today is the 1st of December, I want to remind you all that if you haven't already registered your Stampin' Up! Wishlist with me, you still have time to do so. It's the best way to ensure that you get the Christmas gifts that your heart desires - and still have a surprise on Christmas Day! The last date for orders to be received in time for Christmas is 13th December, so don't leave it too late to place your yours. Please give me a call on 07773 421446 or email me for more details - I will even gift wrap for you!
A quick visit from me today; off shortly on the school run and then piano lessons - it's all go here! Back tomorrow with another festive project; until then, happy stampin'!
Stampin' Up! Supplies Used:
by Joanne James30. November 2015 12:48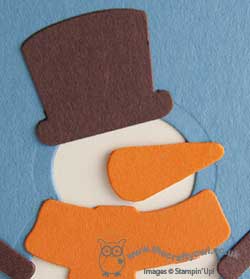
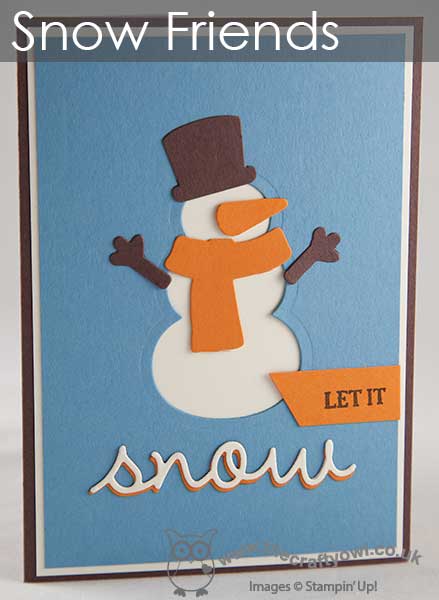
As promised - here is my second card of the day, this time for this week's challenge over at The Color Throwdown:

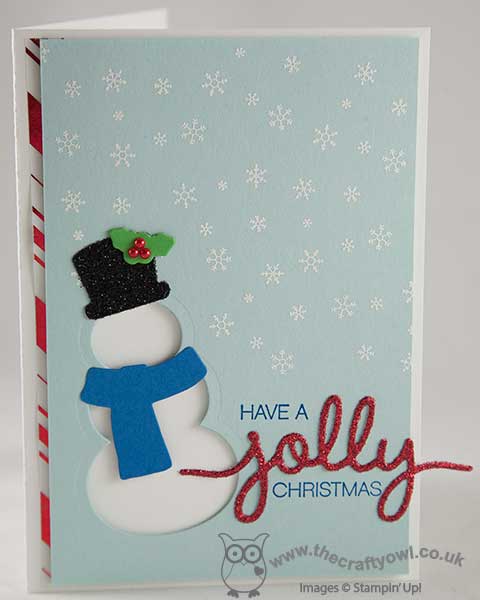
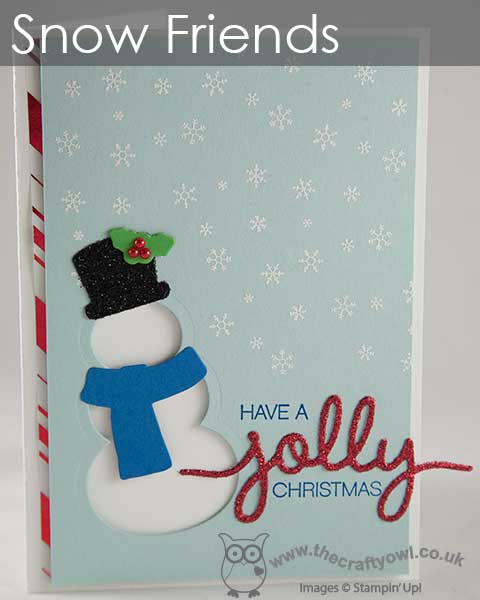
I saw the colours and those adorable snowman treats and knew that I had the perfect idea for a card to play along! The feedback on this card last Thursday where I used my Snow Friends framelits to create a 'negative space' graphic snowman was well received with lots of positive comments, so today I went one step further - and added in a carrot nose! Take a look:
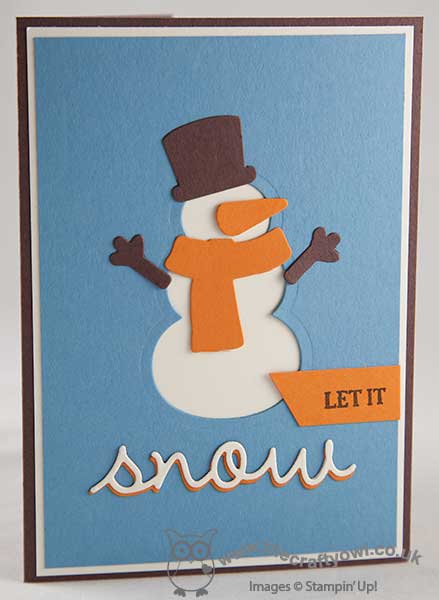
The best thing of all - I used one of my Snow Friends framelits to create it! Are you wondering which one? Yes, it was the ice cream cone - I simply trimmed away the icecream and it left a perfect carrot nose shape. I love it when you can multi-purpose things!! I also added in some twig arms on this card, because the colours worked so well. I think everything else is pretty self-explanatory - check out the layered die cut 'snow' too, cut using the die in the Seasonal Frame Thinlits set and adhered with ease using the fine tip glue pen - perfect for narrow elements like this! Any other questions, leave me a comment below - I read then all and will be sure to post you an answer if you have any queries on this or any of my cards!
Right, off to nurse the poorly one and hopefully fit in an hour or two at my desk before doing the school run. Back tomorrow with another project; until then, happy stampin'!
Stampin' Up! Supplies Used:
d38ac196-d6d7-4da0-8914-f80088104ca2|0|.0|96d5b379-7e1d-4dac-a6ba-1e50db561b04
Tags: Big Shot, Christmas, Shop online, Shop Stampin' Up online, Snow Friends Framelits, Seasonal Frame Thinlits Dies, Sparkly Season, Stampin' Up, Stampin' Up Card, Stampin' Up Card ideas, Stampin' Up Supplies
Cards | Shop Online | Stamping
by Joanne James30. November 2015 11:56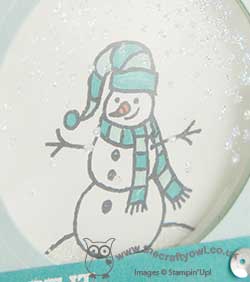
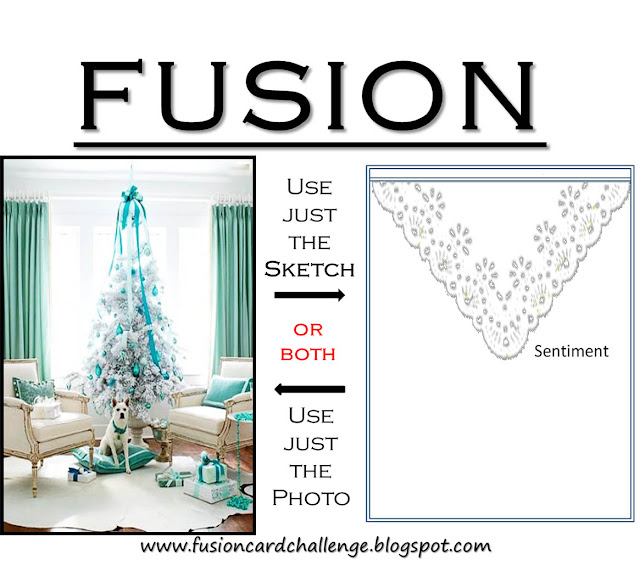
Happy Monday everyone! Happier for some than others - I'm working from home with one James Junior off school today fighting the seasonal lurgy - but for everyone reading this, your day is about to get better! I have a double post for you today (to make up for Saturday's lack of post!) with cards for a couple of challenges. The first is my card for this week's challenge over at Freshly Made Sketches where they have a great sketch - I combined with the theme inspiration of 'Blue Christmas' over at Fusion:

I love the simplicity of Jen T's sketch this week, although by the time I finished my card I wondered if I'd got just a little bit carried away - take a look:
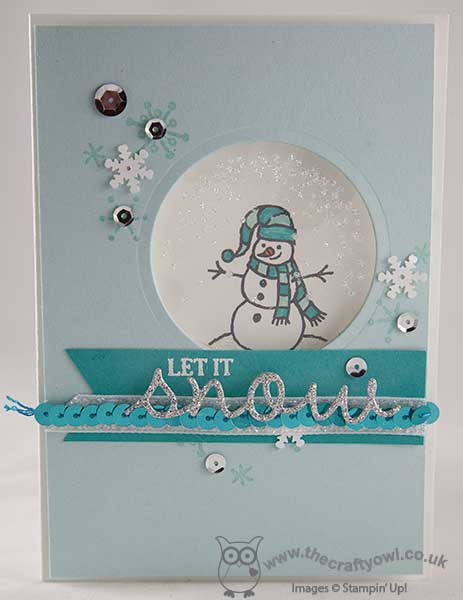
I made a cute 'faux shaker' card using the snowman image from the 'Sparkly Season' stamp set, stamping him in Memento Black and colouring him in with my Pool Party and Bermuda Bay markers, with Pumpkin Pie for his nose, then used my two-way glue pen to adhere some Dazzling Diamonds to the snow mound that the snowman is sat on. I then stamped the snowfall stamp in Versamark to my window sheet and applied Heat & Stick and Iridescent Ice to give it a lovely sparkle, before adhering behind the hole that I'd cut in my Pool Party top layer. On this layer I stamped a few clusters of snowflakes in Pool Party using the snowflake stamp in the Snow Place stamp set and highlighted these with some silver sequins along with a few retired snowflake sequins from last year's stash. To finish, I added a layered banner that contains a little of everything: white glitter ribbon, Bermuda Bay sequins and a dash of silver glimmer paper to boot! I just love the sparkle and shine of this card and the shades of blue - so very pretty!
Back shortly with another quick and easy card for today; I must be on a roll! Until then, happy stampin'!
Stampin' Up! Supplies Used:

7198e06d-39ee-451a-8225-93ee239c6905|0|.0|96d5b379-7e1d-4dac-a6ba-1e50db561b04
Tags: Big Shot, Christmas, Shop online, Shop Stampin' Up online, Stampin' Up, Stampin' Up Supplies, Stampin' Up Card ideas, Stampin' Up Card, Sparkly Season, Snow Place, Seasonal Frame Thinlits Dies, Shaker cards
Cards | Shop Online | Stamping
by Joanne James29. November 2015 10:00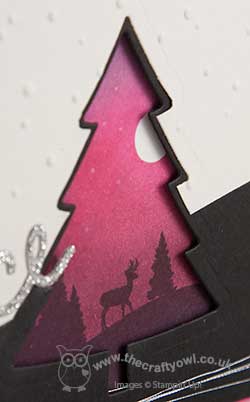
It's Sunday and time for a new challenge over at The Paper Players! This week it is the turn of the talented Sandy to host and she has a tic tac toe board to get our creative juices flowing this week:
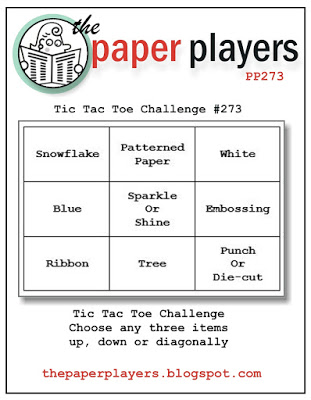


There were so many ways I could have gone with Sandy's board this week - the creative possibilities are endless! - but in the end I decided to go with the far-right column: white, embossing and punch or die cut. I used this week's colours over at Colour Me and the Friday Mashup sketch for today's card:
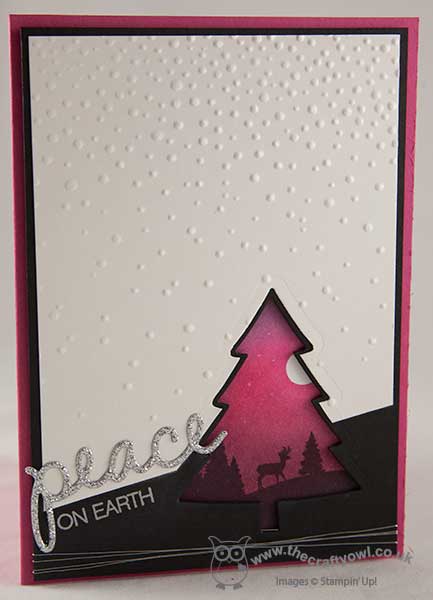
I used a base of Melon Mambo for my card then on a piece of Whisper White I stamped the silhouette from the 'To You and Yours' stamp set in Memento Black then sponged in my sky using each of the Colour Me challenge colours and masking off a small moon with a small circle of post-it note. I also added a few tiny white stars using my chalk pen. I then took a piece of Basic Black cardstock and diecut the tree using the medium-sized Perfect Pines framelit, wrapping some silver thread around the base of the card and securing behind. The top layer is a piece of Shimmery White cardstock - you can't really see the sparkle of this card in the photo, which is a shame as it's lovely! I embossed this piece with the Softly Falling embossing folder to add texture then used the largest Christmas tree framelit to cut an aperture in my card to frame the tree in the black layer. Finally I added my sentiment; I added the silver glimmer 'peace' from the Christmas Greetings thinlits (I trimmed down the ends) and heat embossed the 'on earth' in silver onto the black layer.
I've been wanting to use this silhouette stamp for ages and I like the idea of framing it with the diecut. Quite unconventional for a Christmas card, but I just love the colours of the pretty sunset too.
Before you reach for your ink and papers, check out what our amazing team has created to inspire you this week:
The Paper Players Design Team
Here's a quick recap of our challenge rules:
1. Create a new paper project
2. Upload your creation to your blog with a link back to us and provide a direct link to the post featuring your challenge submission.
3. Please link your card to no more than three challenges, TOTAL.
4. Have FUN!
I look forward to seeing how many tic tac toe combinations you can come up with this week. I'm off for a morning of basketball and then a quiet day for the James juniors, given that Rebecca has an awful cold and needs some R&R to prepare for the busy month ahead in the run up to Christmas. I'm hoping to work on a few projects and get a few jobs done - wish me luck!
Back tomorrow with another project; until then, happy stampin'!
Stampin' Up! Supplies Used:
d917e05b-ba85-44f4-8783-f31ef11d1308|0|.0|96d5b379-7e1d-4dac-a6ba-1e50db561b04
Tags: Stampin' Up, Stampin' Up Card, Stampin' Up Card ideas, Stampin' Up Supplies, The Paper Players, Shop online, Shop Stampin' Up online, To You And Yours Shaker Cards Project Kit, Perfect Pines, Holly Jolly Greetings, Christmas Greetings thinlits, Christmas
Cards | Shop Online | Stamping
by Joanne James27. November 2015 21:48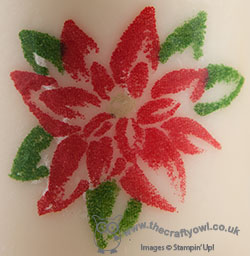
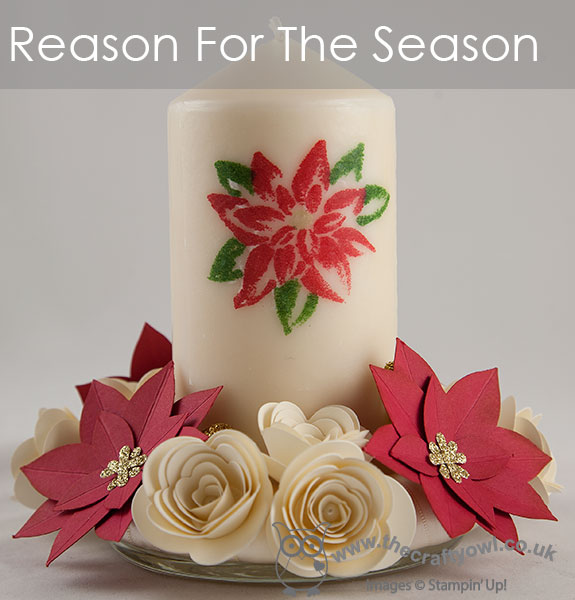
Yay - it's Friday - always a good day! I've had a busy one with a few errands, appointments and a pleasant afternoon watching Ben play rugby. Not much time for crafting today (I did help a friend make good progress on some Christmas bunting, but we still have a few finishing touches to make so I'll share that another time!) so I'm sharing a home decor project I made in a class with a lovely group of ladies last week. We decided to decorate a pillar candle and make a table centre, using the Festive Flower Punch and the Spiral Flower Originals Die to make a wreath of flowers around the base.
Here's my finished project, in Real Red with Very Vanilla roses:

I stamped the flower from 'Reason to the Season' on filter paper and melted it into the candle to set it, then covered a small polystyrene wreath with Very Vanilla satin ribbon before adhering my flower to it. A few gold glimmer and pearl flower centres and some loops of gold glitter ribbon interspersed in between completes the project.
The ladies in my class made their arrangements in a variety of colours; you can see their creations on my Facebook page here (feel free to give me a 'like' whilst your there!) for more colour inspiration. This was such a fun project to make and another way to show the versatility of the 'Reason for The Season' stamp set and co-ordinating Festive Flower Punch - this is one bundle that just keeps on giving, so many creative possibilities! The new Spring-Summer catalogue also offers another stamp set that co-ordinates with this useful punch - watch this space!
I'm linking up with the lovely ladies over at SUO Challenges too who are working with your favourite holiday colours - my traditional colour scheme remains a favourite, even though it's sometimes nice to step out of the creative comfort zone (see next Sunday's post for an example of that!) That's all from me today; back tomorrow with another project. Until then, happy stampin'!
Stampin' Up! Supplies Used:
1538a919-9b29-4077-8406-ebb92874c7f2|1|5.0|96d5b379-7e1d-4dac-a6ba-1e50db561b04
Tags: 3D Projects, Big Shot, Reason For the Season, Festive Flower Builder Punch, Shop Stampin' Up online, Shop online, Stampin' Up Supplies, Stampin' Up Card ideas, Stampin' Up Card, Stampin' Up, Spiral Flower Originals Die
3D Projects | Shop Online | Stamping
by Joanne James26. November 2015 08:05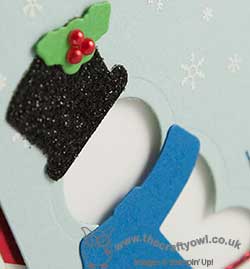
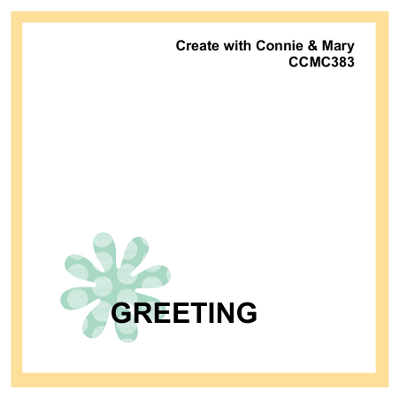
Today it's time for a new challenge over at Create With Connie and Mary and this week we have a great sketch for you:
I had lots of ideas about ways to use this sketch; I eventually settled on this fun card featuring a snowman with a difference:
Instead of stamping a snowman on my card, I decided to create a graphic snowman using my Big Shot and the Snow Friends framelits. I used a card base of extra-thick white cardstock and tucked a strip of red striped Holidays Fancy Foil Vellum don the left hand side. I then added a panel of Soft Sky, onto which I stamped the snowflakes from the Wonderland stamp set in Versamark and heat embossed them in white, before cutting out the snowman shape and scarf and hat, which adhered across the negative space for dimension. I then stamped part of the sentiment from Holly Jolly Greetings directly onto the cardbase in Pacific Point, adding a red glimmer 'jolly' cut from the co-ordinating Christmas Greetings Framelits dies to finish. I also used black glimmer paper for the snowman's hat - both add great sparkle to this card. To finish, I added a few pearls coloured with a red Sharpie as the holly berries for the leaves on the hat.
I love the subtle textures and layering on this card - and it's fun to look at framelits and dies to see how else they can be used beyond the straightforward cutting out of shapes.
Do visit the other Design Team members to see how they interpreted this week's sketch; there's lots of inspiration over on their blogs too!
Enjoy your day and I'll be back tomorrow with another project; until then, happy stampin'!
Stampin' Up! Supplies Used:
- Snow Friends Framelits Dies
- Holly Jolly Greetings Clear-Mount Bundle
- Wonderland Wood-Mount Stamp Set
- Embossing Buddy
- Versamark Pad
- Heat Tool (Uk)
- White Stampin' Emboss Powder
- Big Shot
- Whisper White A4 Thick Cardstock
- Holidays Fancy Foil Designer Vellum
- Soft Sky A4 Cardstock
- Pacific Point Classic Stampin' Pad
- Pacific Point A4 Cardstock
- Cucumber Crush A4 Cardstock
- Pearl Basic Jewels
- Red Glimmer Paper
- Black Glimmer Paper
f1729a10-d793-4de2-b586-a56e2bfae032|1|5.0|96d5b379-7e1d-4dac-a6ba-1e50db561b04
Tags: Create With Connie And Mary, Stampin' Up, Stampin' Up Card, Stampin' Up Card ideas, Stampin' Up Supplies, Big Shot, Snow Friends Framelits, Wonderland, Holly Jolly Greetings, Christmas, Christmas Greetings thinlits
Cards | Shop Online | Stamping
by Joanne James25. November 2015 09:00It's Wednesday and you know what that means: a new collection of Wednesday Weekly Deals! These offers are valid for one week only. As always, a new collection of deals will be announced next Wednesday.
If you want to take advantage of any of the deals on offer, you can support my business by placing your order online by clicking here or using the link to my store on the right hand side of my blog page where it says 'Shop Online' or with me in person. Don't forget to add the new Hostess Code for November SHRENCSC if your order is under £150 and be sure to make sure that you don't check the 'no contact' box if you'd like to be kept updated with the progress of you order and receive a little thank you in the post from me.
Here's a summary of this week's one-week only Wednesday deals - click on each item to go to the online store to purchase:
It's all about the metallics this week!
Back later with today's creative project; until then, happy shopping!
by Joanne James24. November 2015 08:00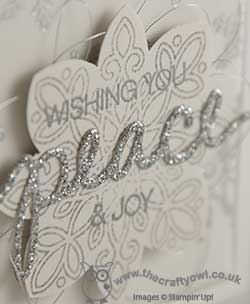
Today I'm sharing a card that I made for a couple of challenges this week, initially inspired by the intriguing sketch over at Pals Paper Arts but also with the theme over at TGIF Challenges in mind:


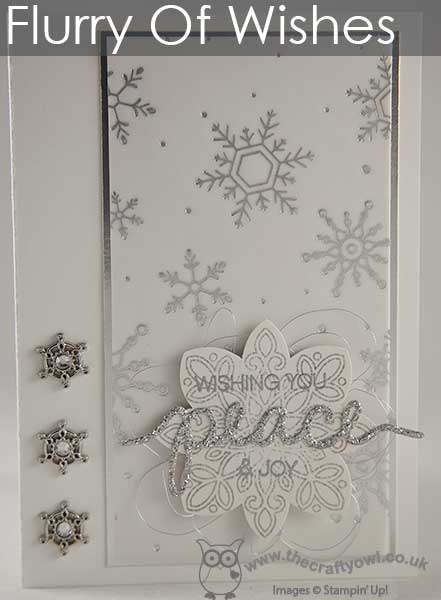
I'm also linking up with the talented team over at The Challenge - my card is definitely more contemporary than traditional, but it has snowflakes as per the inspiration photo; I might have to do another one for this challenge too with a little more red and green! Anyway - my card today is another of those so-difficult-to-photograph-yet-so-beautiful white and silver Christmas cards that I'm so fond of! here it is:
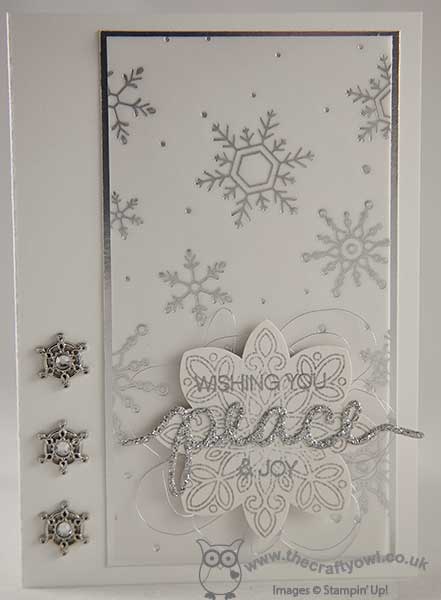
I used a base of extra-thick Whisper White and decided that the three circles in the sketch should be represented by a trio of Winter Wonderland Embellishments and the rest of my design came from there. I created a layered panel of silver foil, Whisper White and then the lovely snowflake patterned Holiday Fancy Foil Vellum. I stamped the medium sized Flurry of Wishes Snowflake in Smoky Slate onto Shimmery White cardstock, then stamped two of the three elements of my sentiment in Versamark and heat embossed in silver, then punched out the shape with my Flower Medallion punch. I added a silver glimmer die cut 'peace' and adhered the whole piece to my card using dimensionals, having added some thin silver metallic thread behind.
This is one of those cards that is so very pretty in real life - it has so much shimmer and sparkle, it's gorgeous! You can see the detail of the snowflake better in this close-up shot:
So many pretty snowflake elements too - embellishments, vellum and stamps!
That's all from me today; I'm looking forward to spending the day having some quality crafting time and a good catch up with a couple of friends.
Back tomorrow with another project; until then, happy stampin'!
Stampin' Up! Supplies Used:
by Joanne James23. November 2015 08:00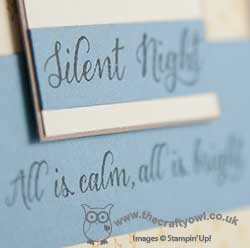
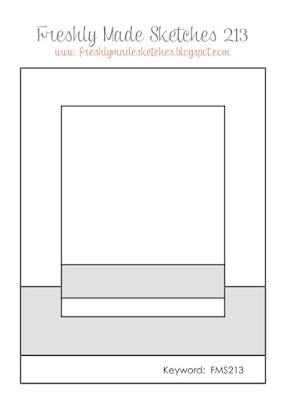
Happy Monday everyone - a new week begins! Today I'm sharing a card using this week's sketch over at Freshly Made Sketches:
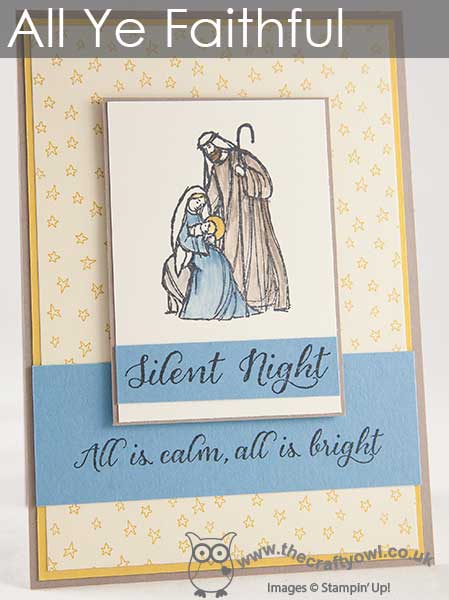
I decided the horizontal panels would work for a two-piece sentiment, so I chose to pair the Wonderland sentiments with the holy family image from 'All Ye Faithful' and some not so Christmassy designer series paper - take a look:
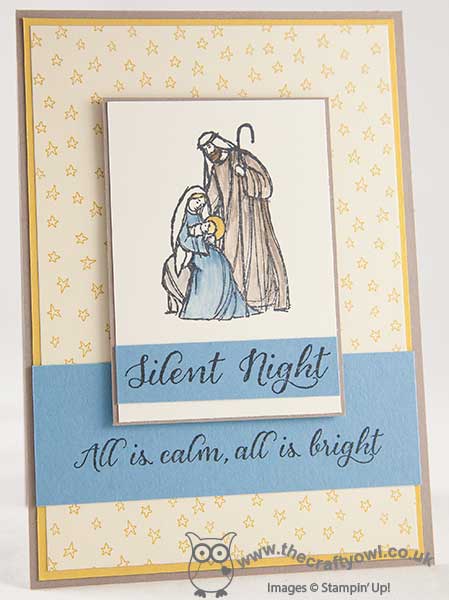
I used Tip Top Taupe for my card base, with a mat of Hello Honey and a piece of the Sweet Li'l Things starry paper for the background panels. I stamped my holy family in Memento Black and coloured it using my inks and blender pen, stamping my sentiment in black on two panels of Marina Mist. Not altogether tricky and I must say I love the pop of blue from the Marina Mist sentiment panels. Great to be able to use this paper in a non-baby way too. I've already had another idea for this sketch which, all being well, I will make up and share later in the week.
That's all from me today; a piano lesson, business meeting then hopefully some time at my desk crafting this afternoon. Enjoy your Monday - I'll be back tomorrow with another project; until then, happy stampin!
Stampin' Up! Supplies Used: