by Joanne James27. March 2015 14:34A quick card from me to share another four leaf clover card, this time for the 'green' challenge over at Addicted to CAS:
Here's my card:
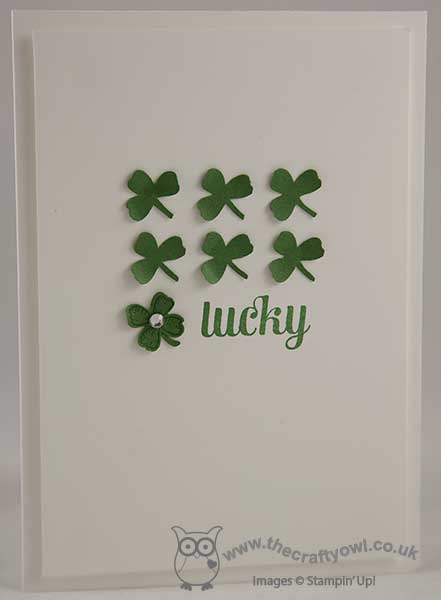
I actually made this card a couple of weeks ago and realised as I was sifting through my photos today that I had forgotten to blog and upload it, so here it is! A simple white background, with a couple of rows of three-leaf clovers, made by punching out some shapes out of Garden Green cardstock using the flower punch in the Itty Bitty Accents Punch Pack and cutting away one of the four petals. For my lucky four leaf clover, I stamped my flower image in green on green and punched it out, leaving all four petals intact and adding a stem and a rhinestone for added sparkle. My 'lucky' is stamped in Garden Green and is one of those ever-useful stamps in the Project Life 'Remember This' stamp set - yes, Project Life is for all your crafting, not just for memory-keeping!
That's all from me today; I've been busy catching up on paperwork and emails all day and I'm itching to get some 'real' crafting done! Back tomorrow with another project; until then, happy stampin'!
Stampin' Up! Supplies Used:
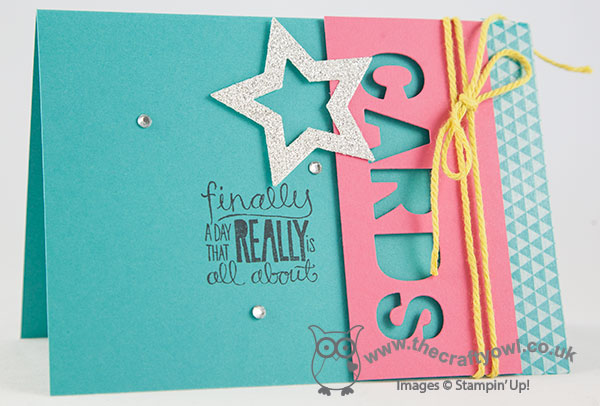
by Joanne James22. March 2015 20:18This is my second post today - you can see my Paper Players card here - as this should have been yesterday's card, but I was just too tired to type it up last night. I've been so busy and since I did not manage to get ahead of myself this week, tiredness won. Anyway, this is a card that I made for this week's Mojo Monday challenge and the current challenge over at The Card Concept:
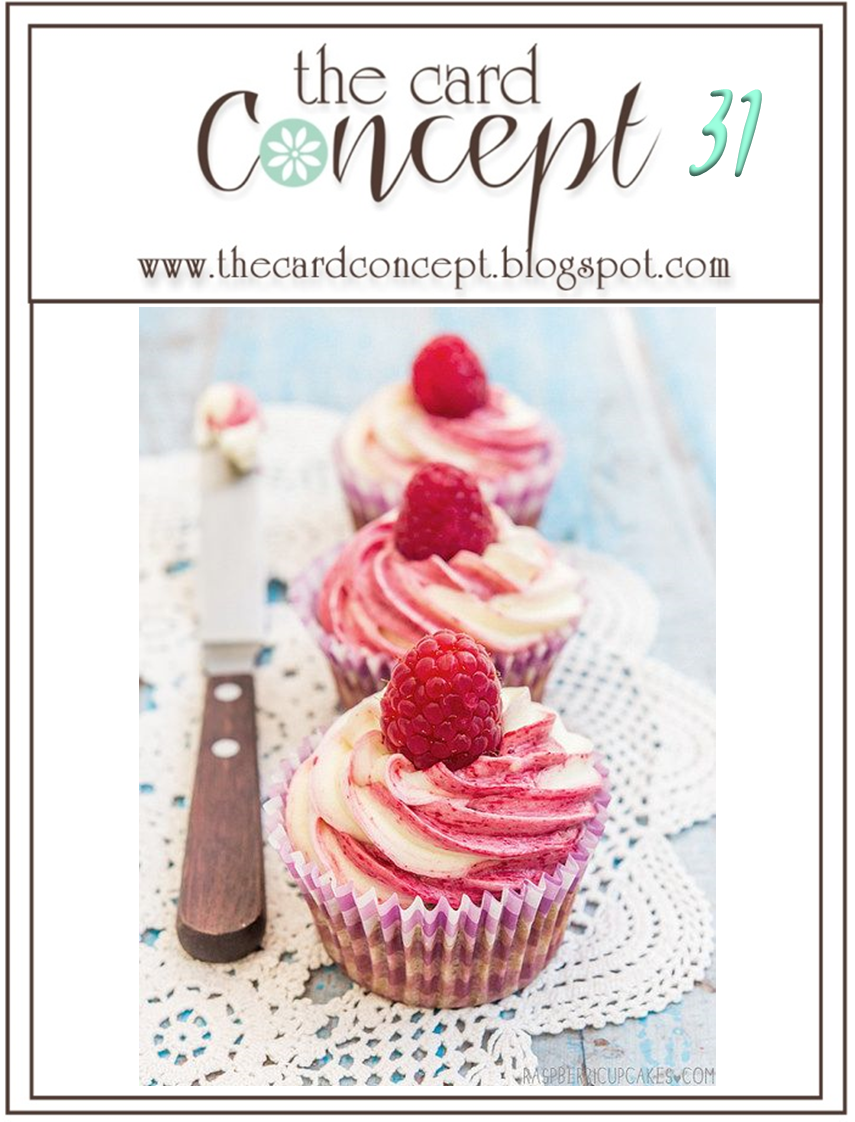
I love those swirled cupcakes and couldn't resist creating something pink and a similarly swirled cupcake using the Mojo sketch - here is my clean and layered card:
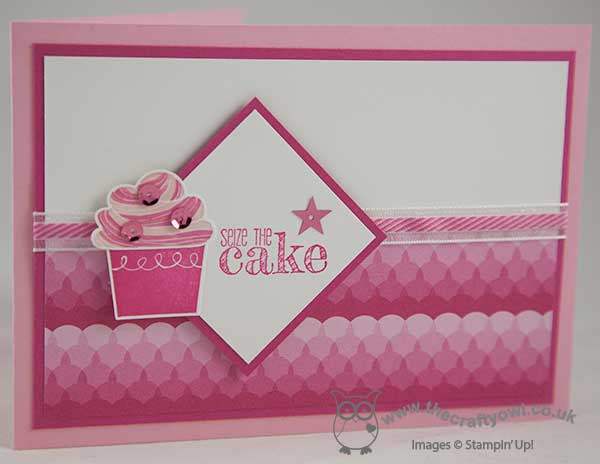
I used a couple of retired products on my card - some Pretty in Pink cardstock for my base, to tone down the Melon Mambo and the ribbon (it reminded me of the cupcake swirl). On a mat of Melon Mambo, I used Whisper White on the upper portion and a piece of pink ombre Sweet Taffy DSP on the lower portion (even the pattern reminded me of cupcakes!) and I covered the join with my retired melon Mambo ribbon. I stamped my sentiment from 'Something to Say' in Melon Mambo, and decided a stamped and punched cupcake was the perfect embellishment. I stamped the cupcake case in Melon Mambo on Whisper White and coloured the frosting stamp with my Pink Pirouette, Strawberry Slush and Melon Mambo markers before stamping to achieve the swirl effect. Both pieces were punched out using the Cupcake Builder punch. I decided to add a little bling to my cupcake with a trio of in-colour sequins in Strawberry Slush and added a single star in the same colour to the sentiment panel to even things up.
So a very pink card with a suitably pink and swirly cupcake - good enough to eat! I haven't used this punch or stamp set in ages and I like the inspiration photo so much, I might just have to have another go at this challenge but in a different style; watch this space!
Back tomorrow with an altogether more clean and graphic card. until then, happy stampin'!
Stampin' Up! Supplies Used:
by Joanne James4. March 2015 20:05Finally time for today's creative post! I was fortunate enough to be selected as the 'Top Pick' over at the As You See It Challenge last week - thank you ladies! - for this card here. Today I'm entering a card for this week's challenge which is another sketch-based one - you know how I love a good sketch:

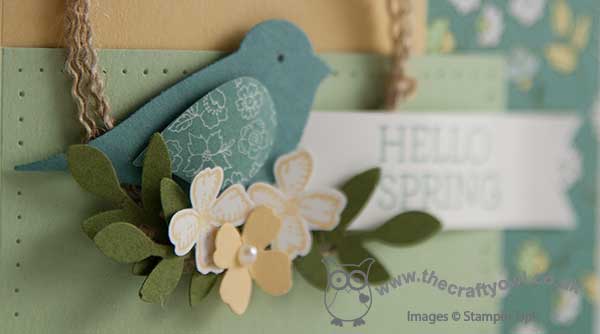
I was keen to interpret the ring in the sketch as a wreath in some way and since I had some leftover burlap on my desk from another project that I am currently working on, I knew which direction I wanted to go. My thoughts are definitely on Spring this week - here is my interpretation of the sketch:
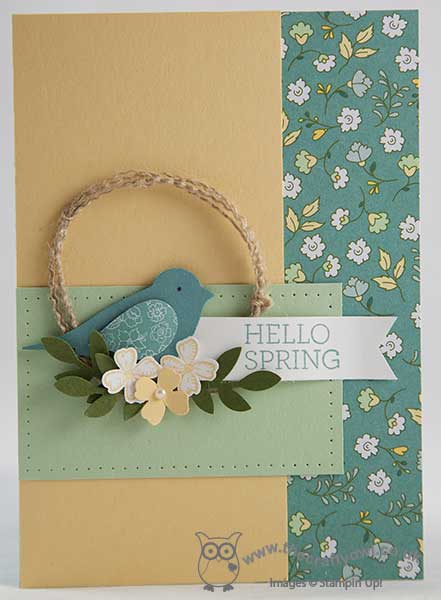
I started with a base of Lost Lagoon then added a piece of All Abloom DSP down the side. I overlapped this with a piece of So Saffron and added a Pistachio Pudding panel across the horizontal, that I pierced around the edge to add interest. To create my spring wreath, I used a few strands of burlap that I stripped from a length and tied it together at three points around the edge to hold everything together. To decorate, I added a few springs of leaves in Mossy Meadow punched from my bird punch, then punched my bird itself in Lost Lagoon. I added an eye with a Basic Grey marker and I punched his wing out of a snippet of All Abloom paper in a different stack design. I added a sentiment banner that I stamped using the Crazy About You' stamp set and to finish a trio of flowers, one in So Saffron with a pearl centre, and two that I stamped in So Saffron on Whisper White with the flower stamp from the 'Something to Say' stamp set and punched out with the co-ordinating Itty Bitty Accents punch.
I love the look and feel of this card - it's so fresh and says that Spring is on the way. I haven't used my bird punch in ages but this little fella looks quite at home sat on his burlap wreath. This would also make a nice Easter or Birthday card, with a change of sentiment.
Back tomorrow with another double-post day and some exciting news too! Until then, happy stampin'!
Stampin' Up! Supplies Used:
d85e6154-0322-4e9a-80ce-64ebefb6d975|1|5.0|96d5b379-7e1d-4dac-a6ba-1e50db561b04
Tags: 2-step bird punch, All Abloom, Itty Bitty Accents Punch Pack, Crazy About You, Shop online, Something To Say, Stampin' Up, Stampin' Up Card, Stampin' Up Card ideas, Stampin' Up Supplies, Paper Piercing
Cards | Punch Art | Stamping
by Joanne James11. October 2014 20:20A quick card from me today; I managed to squeeze in an hour of crafting this afternoon and thought I would have a play with this week's challenge over at Colour Q:

The colours for this week's challenge were chosen in honour of Breast Cancer Awareness Month and there is some great Design Team inspiration, so I thought I would have a little go at creating my own 'think pink' card. Here's my card:
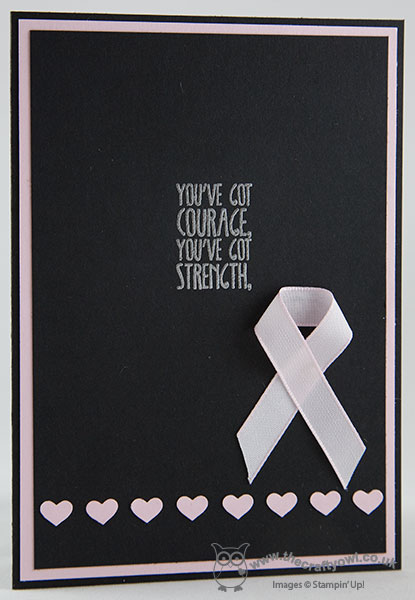
I used a Basic Black card base and top mat and substituted Pretty in Pink with Pink Pirouette for my interim layer and embellishments. I stamped my sentiment from 'Something to Say' in Versamark and heat embossed it in Silver, then added a row of punched hearts and a symbolic pink ribbon (retired, but you could use the new seam binding ribbon in the same colour) to the front of my card. The other half of the sentiment was stamped in black on the inside of the card, along with a pink heart:

A very simple card, but one that would be perfect to reach out to someone suffering from breast cancer and remind them you are there for them - and with breast cancer rates so high, unfortunately, most of us know someone that would be a worthy beneficiary of a card like this.
Back tomorrow with another project; until then, happy stampin'!
Stampin' Up! Supplies Used:
by Joanne James4. October 2014 22:09I've had such a busy day today however I did manage to squeeze in a couple of hours this afternoon for some cardmaking. I'm only just back from a swimming gala this evening and I almost didn't get time to blog, but as it's World Card Making Day this really is one day that I couldn't pass up on the opportunity to share with you the cards that I made.
The first card I made was a case of a fun card by Miranda Mols-Heidenrath that appeared on the Stampin' Up! UK Facebook page earlier this week, which I thought was such a fun card to celebrate WCMD:
I love the use of the negative space of the die cut and the partial stamp to make this card, so I decided to use the same layout to make another card in an alternative colourway for someone special whose birthday it is today - take a look:
Yes, today it's my dear hubby's birthday, although you'd almost never know it given that he's hardly had a look in, although we did manage to squeeze in a special birthday lunch and a birthday cake. This was the card from the James juniors, which of course more than met with their seal of approval due to the presence of the gold glimmer star (isn't everything better with glimmer?!)
I also made my card for tomorrow's new challenge over at The Paper Players, but you're going to have to wait until the morning to see that one!
I hope you all had fun days too and managed to squeeze in a little crafting; don't forget if you need to stock up on inks, cardstock or adhesives there are some great offers on this weekend, including 20% off selected stamp sets. Get the full details in my earlier post here and hop on over to my online store to purchase (don't forget to use this month's hostess code which can be found on the right hand side of this page).
Back tomorrow with my Paper Players Design Team card - until then, happy stampin'!
Stampin' Up! Supplies Used:
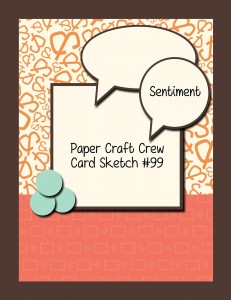
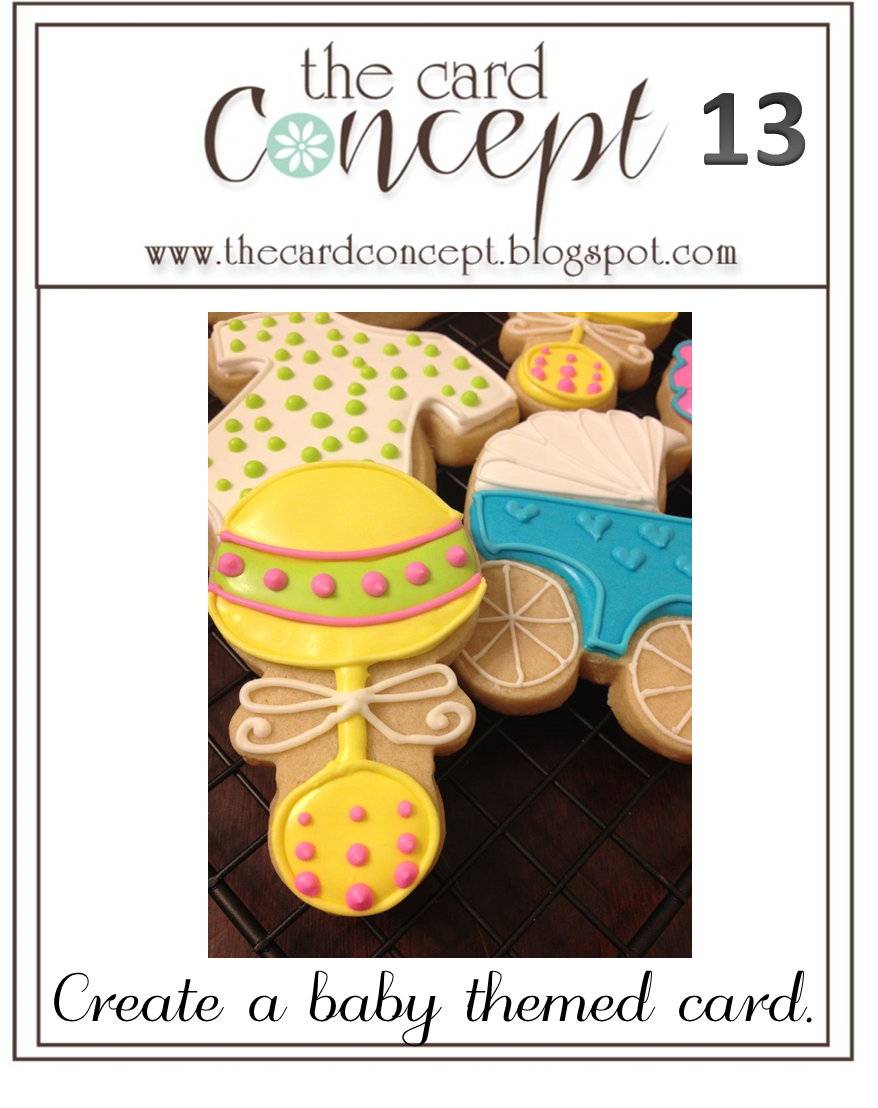
by Joanne James27. June 2014 10:18Yay it's Friday - what more is there to say?! Today I have another new catalogue sneak peek to share with you, this time a cute baby card that I made using this week's sketch layout over at The Papercraft Crew (I haven't managed to play along with these guys for a while and this week's sketch layout really appealed!) and I'm also linking up with The Card Concept, where the challenge is to create a baby-themed card (mine is in the 'clean and layered' style):
I wanted to use a set from the new catalogue called 'Something for Baby' - a lovely set with lots of baby motifs; not only that, it also has a set of matching framelits - perfect! My card is in fact stacked with new product - see if you can spot it all:
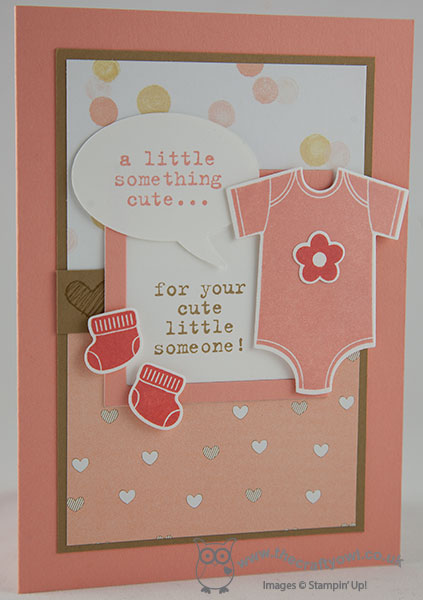
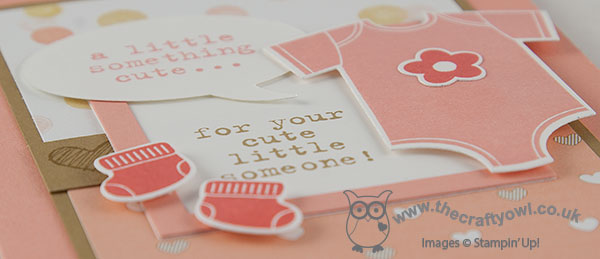
Did you get it all? My card base is Crisp Cantaloupe and I then matted two of the different patterns in one of the new DSP paper packs called 'Lullaby' onto a base of Baked Brown Sugar, and used a strip of the same colour to tie them together. I stamped the central strip with the heart stamp from the 'Something to Say' stamp set to echo the hearts on the bottom panel, although you can't really see them as they are obscured by the frame. I then created a frame using my Big Shot and square framelits and stamped the second half of my sentiment in the box. The first half I stamped in a contrasting colour onto a word bubble cut out with my framelits - I cut first and stamped second, which I don't usually do but I wanted my word bubble to 'hang' the opposite way (hope that makes sense!) - another sentiment from the 'Something To Say' set. I then embellished my card with a cute Crisp Cantaloupe babygro, complete with a Calypso Coral flower, and pair of booties, all popped up on dimensionals.
Hope you like my cute little baby girl card - lots of great sneak peeks there; only 5 more days to go until the new annual catalogue is here! And only 4 more days until my 2014-15 catalogue launch party: full details here and lots more to see so do come along!
Back tomorrow with a special project; until then, happy stampin'!
Stampin' Up! Supplies Used:
* Something for Baby stamp set and co-ordinating framelits - available 1st July
* Something to Say stamp set - available 1st July
* Lullaby Designer Series Paper - available 1st July
79323120-4cbb-44a9-b76b-5b88a30663df|0|.0|96d5b379-7e1d-4dac-a6ba-1e50db561b04
Tags: 2014 Annual Catalogue, Something To Say, Something For Baby, Lullaby, Word Bubbles Framelits, Square Framelits, Stampin' Up, Stampin' Up Card, Stampin' Up Card ideas, Stampin' Up Supplies, Shop online, Big Shot
Cards | Stamping
by Joanne James24. June 2014 13:00This week the peeps over at CAS(E) This Sketch and Fusion have joined forces on their challenge blogs with a great sketch and inspiration photo:
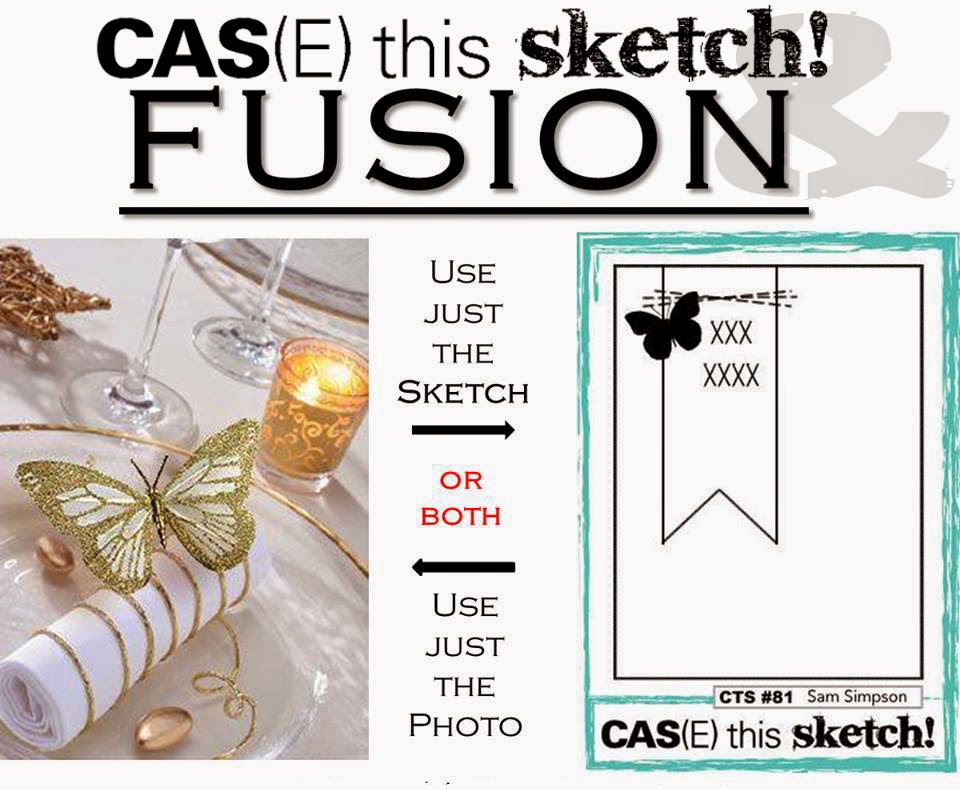
I took the inspiration for my card from both the photo and the sketch and came up with the following card:

For a largely white card, there's a lot going on here; all-white cards are also incredibly difficult to photograph well, so I hope you can see some of the more subtle elements of design. Firstly, I used a Whisper White card base and ran this through my Big Shot with the Wildflower Meadow Textured Impressions Embossing Folder to give a nice relief pattern that I thought worked well with the butterfly. I created a layered banner using my Banner Framelits, cutting one in Whisper White and another slightly longer one in gold foil to extend beyond the length of it. On the uppermost white banner, I stamped my sentiment in Versamark and heat embossed it with gold embossing powder - this sentiment is a 'sneak peek' from a new set called 'Something to Say', out next week (not long now!).
I then did something I've never done before: I glittered a butterfly! Now whilst my 9 year old daughter loves anything with glitter, I'm generally not a fan of the stuff. I love Stampin' Up!'s glimmer paper as this is a great no-shed alternative, and I've had 2 pots of glitter sitting in my drawer since before Christmas and until now unopened for fear of the ensuing mess that would be created! As my card came together, I knew that glitter was going to be the only way to go to get the look I was after and create the contrast in texture of all the gold elements. So, I was brave - out came the heat and stick powder and gold glitter, and this sparkly vellum butterfly is the result. And I love it - even though I think I will be brushing gold glitter out of my butterfly punch for some time to come. Lastly, I substituted the stitching in the sketch layout for two rows of sequins to add one last gold element to my card.
I made this card with my Mother-In-Law in mind; she is always there to help me out of a fix and last week was no exception: Rebecca came home from school the week before last with instruction to make a weasel costume for the forthcoming production of 'Wind In the Willows' - to be held this week! Not only did she need a weasel costume, this weasel required a brightly coloured waistcoat and cravat to look the part. Fortunately for me MIL came to the rescue and a few days later had managed to tailor the most amazing waistcoat and cravat I've ever seen just from bits and bobs in her sewing box. Rebecca is destined to be the best dressed weasel around at her production on Thursday (I'll post a picture of her in costume later in the week!); as for me - my Mother-In-Law's goodness does indeed make me very grateful, so Kathy this one is for you!
Back tomorrow with another project and this week's Wednesday Deals; until then, happy stampin'!
Stampin' Up! Supplies Used:
* Something To Say Stamp Set - available 1st July