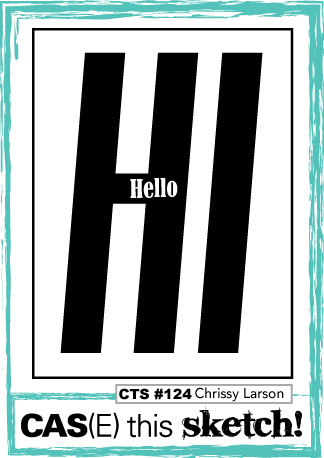
by Joanne James27. May 2015 21:42So I'm back with the second of my cards for this week's challenge over at CAS(E) This Sketch:

As the end of the school year will be upon us soon enough, I decided to combine this card with this week's theme over at The Challenge and get ahead and make a teacher thank you card:
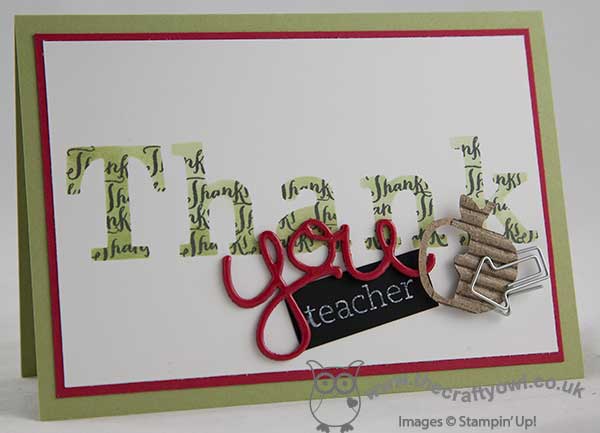
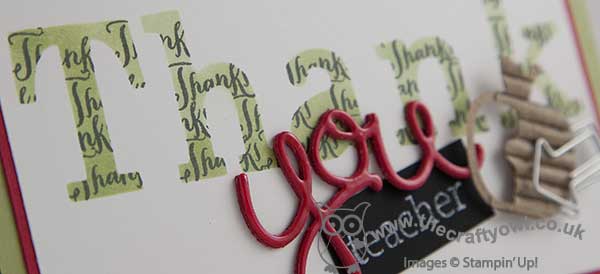
I used a base of Pear Pizzazz and a mat of real Red - apple colours! - and having cut a stencil of the word 'Thank' using my Silhouette e-cutter, I stamped the word Thanks from the 'Another Thank You' stamp set repeatedly in Memento Black into the space and sponged over the whole space in Pear Pizzazz to give the letters more definition. To complete the sentiment, I die cut the word 'you' using my Big Shot and 'Hello You' thinlits three times out of Real Red cardstock and stuck them together to create a raised piece, then painted it in Crystal Effects to give a glossy finish. I used a snippet of chalkboard paper and stamped the word 'teacher' in white kraft ink to give a chalkboard effect (the stamp is from the retired set 'for my family' - it's a keeper!) and added both to my card, along with a cardboard apple embellishment from my Project Life Playground accessory kit and also a 'vintage' wire paper clip. This final addition also enables me to link up to 'Less is More' this week, where the recipe is to add metal to your card.
I really love the way this card turned out; I like the collage feel it has, yet still retaining my clean and simple style - here's a close up of the stamping and stencilling detail:
It's a little more embellished than my usual LIM cards, so I'm hoping it will still be permissible although I know the lovely ladies over there will give me some pointers if I've strayed too far from the brief :-) This is however much more what I had in mind for the sketch, so I hope the CAS(E) This Sketch team like it! The James Juniors are already arguing about which of their teachers will be receiving it - I think I might have to make a few copies before the end of term approaches!
Back tomorrow with my card for this week's new challenge over at Create With Connie and Mary. Until then, happy stampin'!
Stampin' Up! Supplies Used:
f8c8a07b-8074-4f73-b004-3433f135861f|0|.0|96d5b379-7e1d-4dac-a6ba-1e50db561b04
Tags: Another Thank You, Really Good Greetings, Project Life, Hello You Thinlits Dies, For My Family, Teacher Thank Yous, Stampin' Up, Stampin' Up Card, Stampin' Up Card ideas, Stampin' Up Supplies, Shop online, Shop Stampin' Up online, Chalkboard
Cards | Stamping
by Joanne James4. October 2014 22:09I've had such a busy day today however I did manage to squeeze in a couple of hours this afternoon for some cardmaking. I'm only just back from a swimming gala this evening and I almost didn't get time to blog, but as it's World Card Making Day this really is one day that I couldn't pass up on the opportunity to share with you the cards that I made.
The first card I made was a case of a fun card by Miranda Mols-Heidenrath that appeared on the Stampin' Up! UK Facebook page earlier this week, which I thought was such a fun card to celebrate WCMD:
I love the use of the negative space of the die cut and the partial stamp to make this card, so I decided to use the same layout to make another card in an alternative colourway for someone special whose birthday it is today - take a look:
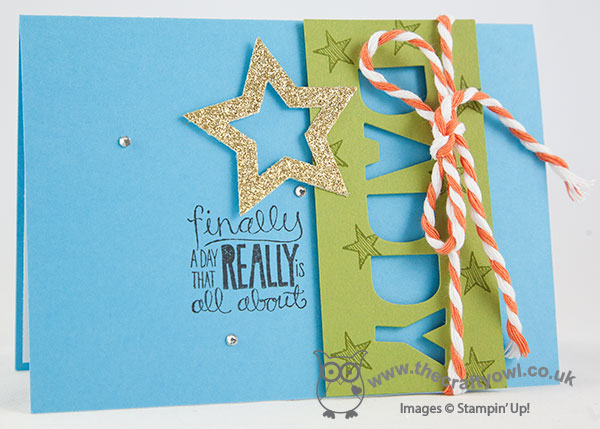
Yes, today it's my dear hubby's birthday, although you'd almost never know it given that he's hardly had a look in, although we did manage to squeeze in a special birthday lunch and a birthday cake. This was the card from the James juniors, which of course more than met with their seal of approval due to the presence of the gold glimmer star (isn't everything better with glimmer?!)
I also made my card for tomorrow's new challenge over at The Paper Players, but you're going to have to wait until the morning to see that one!
I hope you all had fun days too and managed to squeeze in a little crafting; don't forget if you need to stock up on inks, cardstock or adhesives there are some great offers on this weekend, including 20% off selected stamp sets. Get the full details in my earlier post here and hop on over to my online store to purchase (don't forget to use this month's hostess code which can be found on the right hand side of this page).
Back tomorrow with my Paper Players Design Team card - until then, happy stampin'!
Stampin' Up! Supplies Used:
by Joanne James9. August 2014 20:53Yesterday we spent a fun day with friends and I was out in the evening, so didn't manage to squeeze in a blog post. However today I'm sharing two cards to make up for it! These are a couple of cards I made for Stampin' Up! using the Traveler stamp set that I demonstrated at the Stampin' Up! UK Regional Training Day in Telford at the end of May. The Traveler stamp set consists of a number of travel-themed sketch images and I created the cards that I'm sharing today to show that masculine cards don't always have to be dark or brown colours - take a look at the first one:

Both cards follow the same basic design: this one has a Marina Mist card base, with a Wild Wasabi panel stamped with the World Map stamp in the same colour, then the Very Vanilla tag is punched with the Angle Tag Topper Punch, stamped in Versamark and heat embossed with Early Espresso embossing powder and the globe sponged with Marina Mist and Wild Wasabi. An early Espresso bker's twine double bow finished it off and it is adhered to the card with dimensionals. The final banner is cut from Marina Mist and stamped in Early Espresso and embellished with a tag left over from my Hip Hip Hooray Simply Created card kit.
I created exactly the same card, this time using a much brighter colour combination just to pep things up a bit:
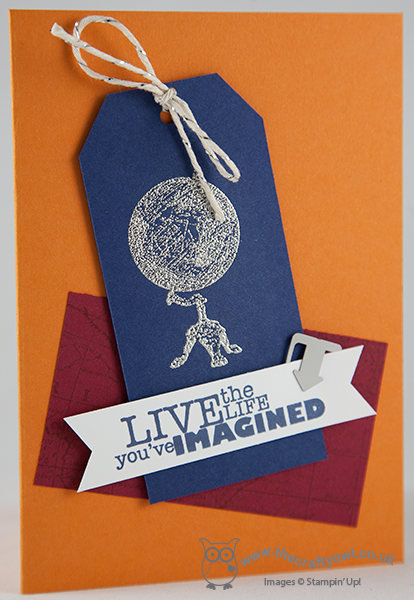
This time I used a Pumpkin Pie card base, stamped the map in Cherry Cobbler and embossed the tag in Silver on Night of Navy, tied with some silver baker's twine and finished with an Essentials Hardware Clip. As we enter the season for exam results during the next couple of weeks, I think these cards would make great congratulations cards for someone who has passed and is about to embark on a new phase - be that further study, travel, a new job.
So, thoughts - which colour scheme do you prefer? Leave me a comment below - I'd love to know what you think.
Back tomorrow with my design team card for this week's challenge over at The Paper Players; unitl then, happy stampin'!
Stampin' Up! Supplies Used:
by Joanne James22. June 2014 15:23Hello everyone! I can't quite believe it's Sunday already - the weekends truly go too fast these days! I've already been on a long bike ride this morning and following a BBQ lunch am actually typing today's post while sat in the garden enjoying the warm weather - bliss! Today I have another card featuring the octopus from the Sea Street stamp set, this time using this week's sketch over at Freshly Made Sketches:
There is a sheet of DSP in the new Maritime set that has a really busy pattern that can be difficult to incorporate into a project but when I saw this sketch, I thought it would provide the perfect opportunity to use it. Here is my card:
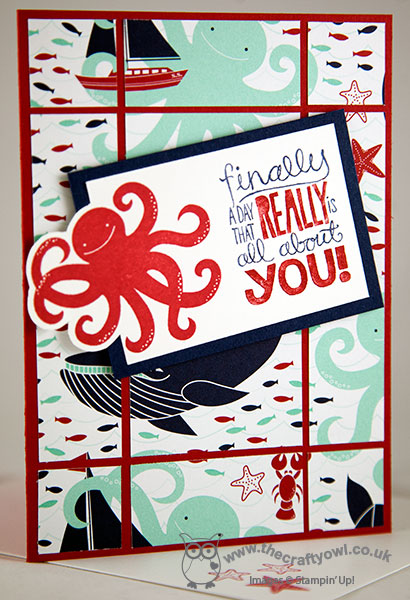
I cut a piece of DSP that showed a selection of the graphics and then sectioned it as per the sketch. I wanted to create a focal sentiment but figured it needed to be big and bold in order to stand out against the background, but at the same time not overwhelm it. I decided on a fun sentiment from the 'Really Good Greetings' stamp set which I inked up with my Stampin' Write markers alongside an off-the-edge octopus in Real Red. I matted this panel onto Night of Navy and popped up on Stampin' Dimensionals to make it stand out. I love the fun print of this DSP and am really pleased that I managed to incorporate it into today's card - these are the sheets that I normally end up keeping to admire, rather than use!
I'm also going to link this card up over at SUO Challenges where the theme is summer time - this card has a definite beach feel to me!
Back tomorrow with another project; until then, happy stampin'!
Stampin' Up! Supplies Used:
* Sea Street - Available 1st July
* Maritime DSP - Available 1st July
by Joanne James21. October 2013 20:22So following the excitement of yesterday's Christmas banner class, I'm back down to earth with a bump today with the first day of the half-term holiday for both James juniors and madness and mayhem about to ensue for the next two weeks! I will do my best to keep up with my blogging as there will be lots to share this week, not only in projects but also news: the 25th October is Stampin' Up's official 25th Anniversary day so there will be more announcements and special offers to share by way of celebration.
Today's project involves some stamping but is another 3D project - some clean and simple packaging for a birthday gift. As my regular blog readers know, I love the variety of packaging options that are available in the current annual and seasonal catalogues: bags and boxes in all shapes and sizes that turn gift-giving into an art form, but needn't take hours of time, effort or expertise to achieve. For my niece's birthday, I had a couple of awkward-shaped gifts that were just asking for a box to be wrapped in - the new extra-large gift boxes in the seasonal catalogue were just the thing. For the decoration, I took my inspiration from the seasonal catalogue and this is where I ended up:

Using my Melon Mambo marker pen and inkpad, I created a 'faux ribbon' by stamping one of the stamps from 'Really Good Greetings' directly onto the box, all the way around on four sides, then finished off with a double bow in some vintage Melon Mambo designer paper and a co-ordinating tag made using one of the Chalk Talk framelits and finished with a polka dot paper border.
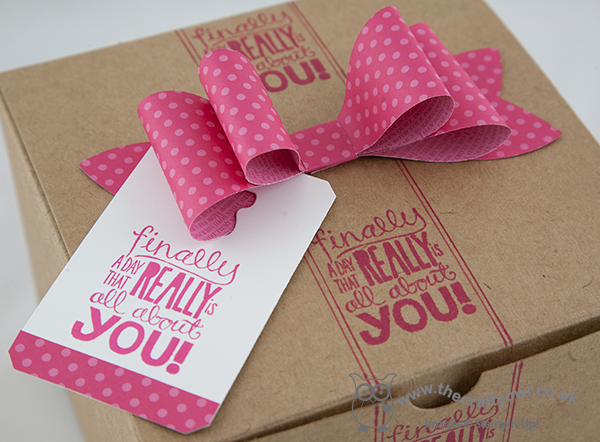
This box took no time at all to decorate, yet I love its simplicity. It seemed to hit the spot with its teenage recipient too - always a bonus! I'm linking today's post up with the team at CAS-ual Fridays where the challenge theme this week is 'Tags and Bags' CFC118, as this is about as CAS as packaging gets! Why don't you pop over to their sit and say 'hi' and look at the great projects that they are showcasing this week.
Lastly, today is the last day to take advantage of Stampin' Up's 'Join for £25' offer - you have until 10.50pm GMT this evening to sign up online if you would like to take advantage of this great deal and becoming a member of my growing team of Crafty Owls - I would love to welcome you to the parliament (that's the name for a collective group of owls, in case you didn't already know!) Just click the link from the 'Join My Team' section on the right hand side of the page.
Come back tomorrow for some very important news from Stampin' Up - I can't tell you what it is yet, but you are definitely going to want to hear it so be sure to call by for tomorrow's updates. It's going to be a busy Tuesday; until then, happy stampin'!
Stampin' Up Supplies Used:


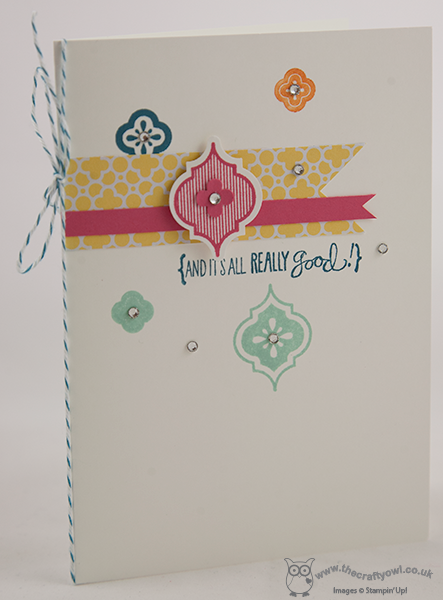
by Joanne James18. July 2013 21:09I'm back after another busy card class last night, which was great fun but I was home too late to post so am back on track this evening. We were using the 'Best of Flowers' set at yesterday's class and everyone made some great cards - I 'll share these another time. Today I have another Mosaic Madness card for you; something a little different:
To create this card, I used the mosaic stamp set along with the co-ordinating embossing folder and punch, but this time created a 'trellis' from the embossed sheet using the punch, and then stamping a two-tone pattern on the trellis so that it would really 'pop' against the Coastal Cabana ink and cardstock duo. I've been playing around with this idea in my head for a few days and having finally committed it to paper I'm really pleased with how it's turned out.
This set really is so versatile; I hope you're not tired of it yet, as there's lots more where this came from! I'll be featuring this stamp set in September's card class, so if you live in Northampton and would like to experience a little Mosaic Madness for yourself, then do get in touch for further details - whether an experienced crafter or first-time card maker, you will be more than welcome. We are not having a monthly card class in August due to the summer holidays, although on Saturday 3rd August I am holding an-all day Christmas Crafts Workshop, where we will be getting a headstart on our Christmas preparations - it pays to be organised, especially if you're a crafter!
Back tomorrow with another project; until then, happy stampin'!
Stampin' Up Supplies:
Stamps: Mosaic Madness, Really Good Greetings
Cardstock: Coastal Cabana, Whisper White
Ink/Stampin' Write Markers: Coastal Cabana, Strawberry Slush, Crisp Cantaloupe
Tools: Mosaic Punch, Mosaic Embossing Folder, Stamp-a-ma-jig
Finishing Touches: Basics Rhinestones
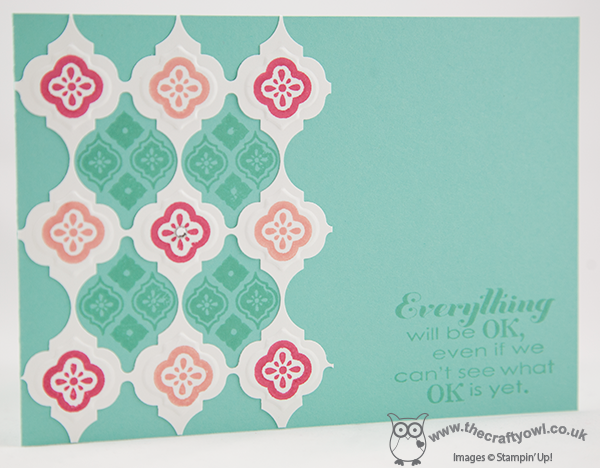
by Joanne James3. July 2013 20:00After all the excitement of yesterday's catalogue launch, today I'm sharing another mosaic card. This is a simple white card and features a small flag of the co-ordinating Quatrefancy Specialty paper:
This card was really easy to pull together and just goes to show you can get a nice card design without the need for a stamp-a-ma-jig to line up all the various mosaic tiles. The sentiment comes from a new greetings stamp set called 'Really Good Greetings' and is one of those general stamps that will suit lots of occasions.
Back tomorrow with another project; until then, happy stamping!
Stampin' Up Supplies:
Stamps: Mosaic Madness, Really Good Greetings
Cardstock: Strawberry Crush, Whisper White, Quatrefancy Specialty Designer Series Paper
Ink/Stampin' Write Markers: Pool Party, Island Indigo, Pumpkin Pie, Strawberry Crush
Tools: Mosaic Punch, Itty Bitty Punch
Finishing Touches: Basics Rhinestones, Island Indigo Bakers Twine