by Joanne James7. March 2016 14:57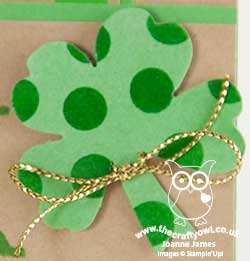
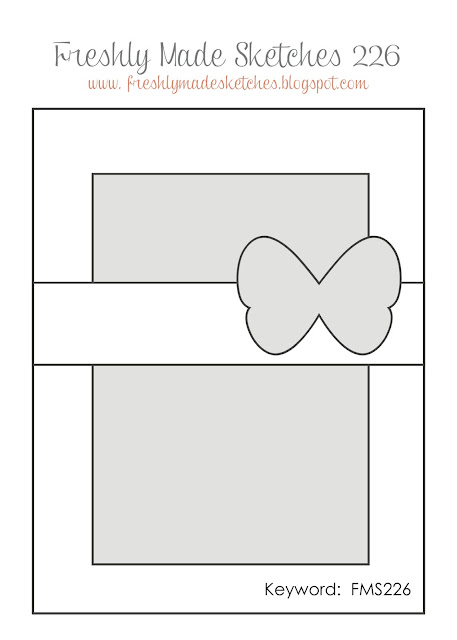
Yay it's Monday - where did that weekend go?! A hectic Mother's Day yesterday and today I'm back to it - with a card using this week's sketch over at Freshly Made Sketches:
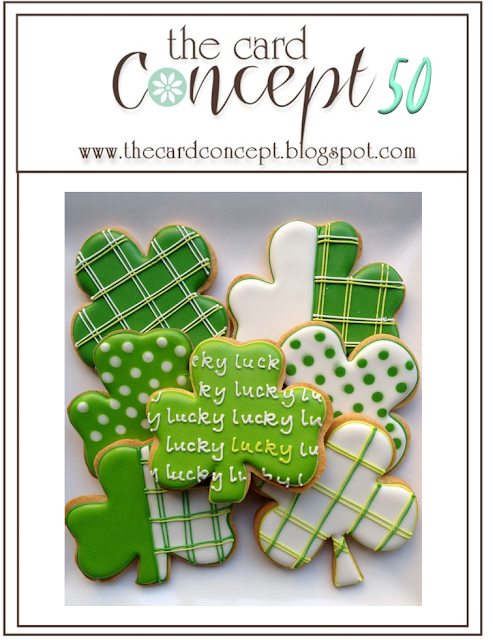
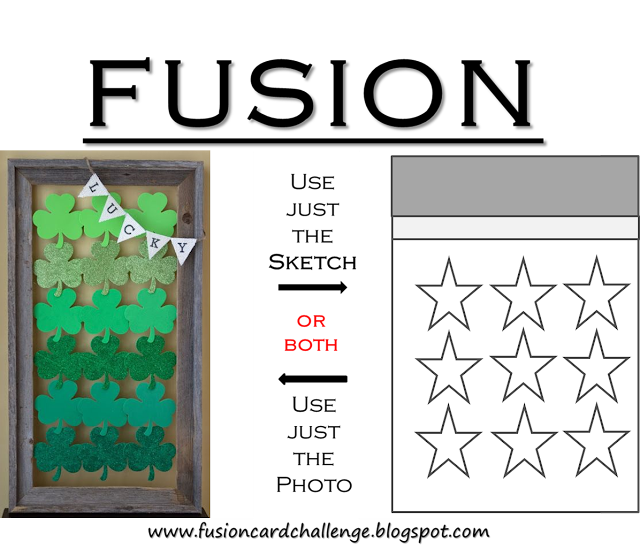
In addition to Rita's great sketch, I was also inspired by the photo images for the current challenges over at The Card Concept and Fusion, where luck, green and shamrocks are also the order of the day. I know a few young people about to sit their GCSEs and am in need of a few good luck cards, so these challenges gave me the perfect opportunity to make an appropriately-themed card:
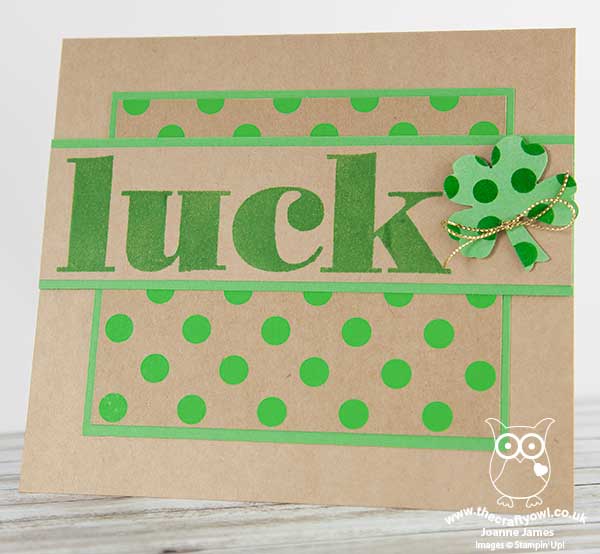
I decided to contrast the bright Cucumber Crush green with kraft for my card today and made a feature of a few different elements to pull together my 'clean and layered' card:
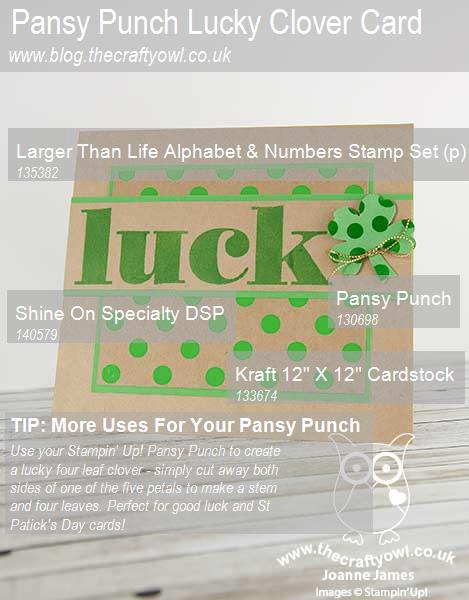
Shine On Specialty Designer Series Paper - Great for boxes and bags, this sturdy kraft paper also adds a bright pop of colour to cards, especially when bordered with some Cucumber Crush cardstock to really make it stand out.
Larger Than Life Alphabet and Numbers - These letters and numbers really are larger than life and are great for a statement sentiment as I've done here with the word 'luck'. Alphabet sets are useful for so many different types of projects and since they cost a little more than the average stamp set, Sale-A-Bration is a great time to invest in one and get a free gift into the bargain!
Pansy Punch Four Leaf Clover/Shamrock - Everyone knows that the four leaf clovers are the ones that are supposed to bring you luck. No punch for that? No problem - you can use your five-petal Pansy Punch to create a four leaf clover with ease! Just cut away part of one of the petals to create a stem as in the photo below:
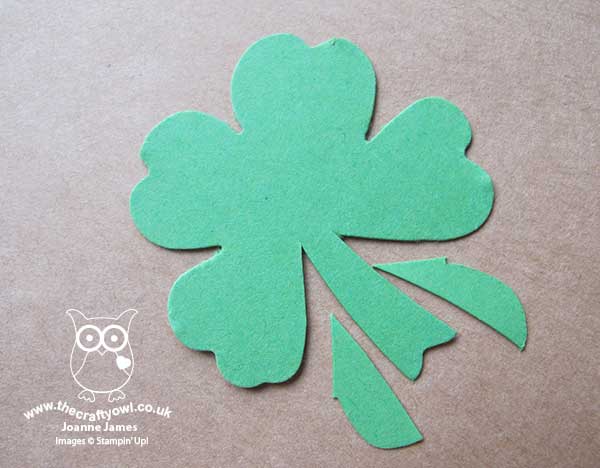
It's that easy! Inspired by The Card Concept photo, I stamped some spots using the spot stamp in the 'Celebrate Today' stamp set stamped in Versamark and heat embossed in clear to add pattern and shine to my lucky clover and tie it in with the rest of my card.
Envelope Punch Board - I altered the dimensions of the sketch and went for a more horizontal rather than vertical card to accommodate my sentiment. As such it gave me a finished card size of 6" x 6 3/4" - not a standard size. A sheet of 2015-17 In Color Envelope Paper in Cucumber Crush, my Envelope Punch Board and my handy Envelope Expert tool made light work of a solution though, and with a few clicks of the mouse and punches and scores and I had a beautifully co-ordinated envelope too - job done!
Here's today's visual summary for easy reference of the key supplies needed to make this card and today's top tip:
That's all from me today; I'll be back tomorrow with another project. Until then, happy stampin'!
Stampin' Up! Supplies Used:
6dd91caf-3bb0-4c77-bccd-e9798f4906ff|0|.0|96d5b379-7e1d-4dac-a6ba-1e50db561b04
Tags: Larger Than Life Alphabet and Numbers, Pansy punch, Shop online, Shop Stampin' Up online, St Patricks Day, Good Luck, Stampin' Up, Stampin' Up Card, Stampin' Up Card ideas, Stampin' Up Supplies, Envelope Paper, Envelope Expert, Envelope Punch Board
Cards | Envelope Punch Board | Shop Online | Stamping
by Joanne James17. May 2015 10:00It's Sunday and time for another challenge over at The Paper Players! There was some great inspiration using LeAnne's colour palette last week and this week it is the turn of the lovely Jaydee, who has a great CAS-themed challenge to get us creating this week:
Girly thanks - I immediately thought 'flowers' for this one and wanted to use some of the lovely 'Gold Soiree' specialty DSP. It's rather busy for a clean-and-simple card though, so I toned it down with a vellum overlay - take a look:
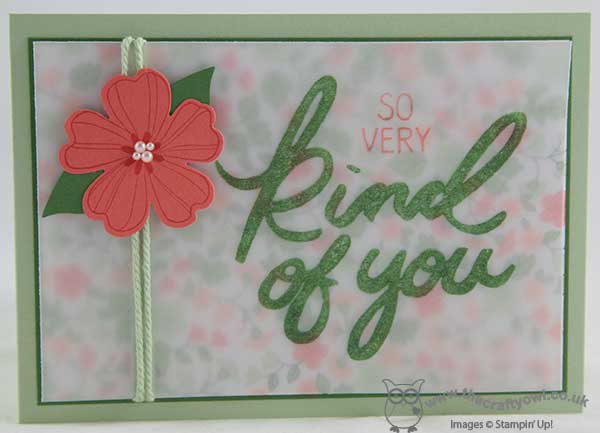
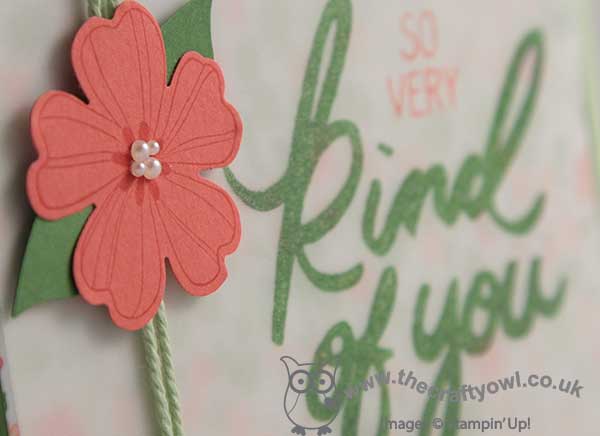
I matted a piece of DSP on some Garden Green with a base of Pistachio Pudding, then on a piece of vellum stamped my thank you sentiment from the 'Big on You' stamp set in Calypso Coral and Garden Green inks and then heat embossed with clear embossing powder to give it a lovely textured shine (although this is difficult to see in the photograph). I wrapped the vellum with a piece of Pistachio Pudding thick baker's twine and finished with single Calypso Coral flower stamped in the same colour using the 'Flower Shoppe' stamp set and punched out with the co-ordinating Pansy punch (the Garden Green leaves were a couple of wings punched with the Bird Punch) and a cluster of pearls. Here's a close-up of the flower, which echoes the pattern on the paper beneath the vellum overlay:
I then adhered the vellum overlay to the base using dimensionals, attached behind the flower and the stamped sentiment, so that they aren't visible on the top layer. I love these big, bold sentiment stamps and the floral DSP - both of which will be retiring at the end of the month, so if they're on your wishlist you should snap them up now before it's too late!
So that's my clean and simple floral thanks today - I'm also linking my card up over at SUO Challenges, where the current theme is 'fun flowers'. Before you reach for your inks and thank you stamps, check out what our amazing team has created to inspire you this week:
The Paper Players Design Team
Here's a quick recap of our challenge rules:
1. Create a new paper project
2. Upload your creation to your blog with a link back to us and provide a direct link to the post featuring your challenge submission.
3. Please link your card to no more than three challenges, TOTAL.
4. Have FUN!
I look forward to seeing your CAS creations this week. I'm looking forward to a quiet family day today as I recover from the yesterday's Stampin' Up! UK Regional Event.
Back tomorrow with another project; until then, happy stampin'!
Stampin' Up! Supplies Used:
by Joanne James6. May 2015 09:37Good morning everyone - today I have something a little different for you! I ran a very successful class a little while ago to make a beautiful home decor Spring flower wreath. I am demonstrating how to make this wreath at a Spring Open Evening at Bell Of Northampton this evening so thought this was a good opportunity to share it with you too:
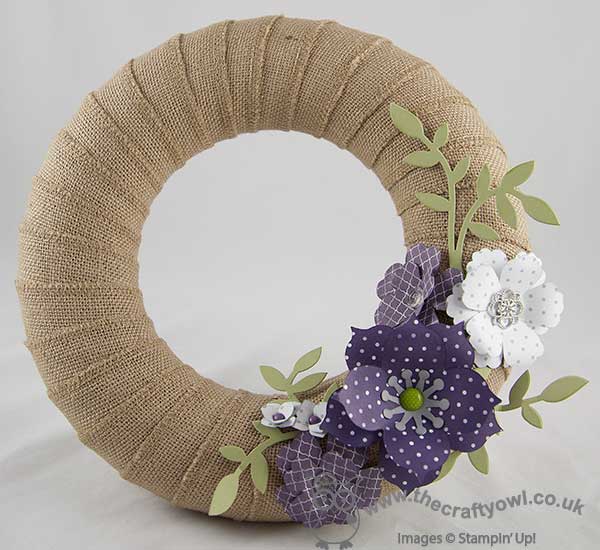
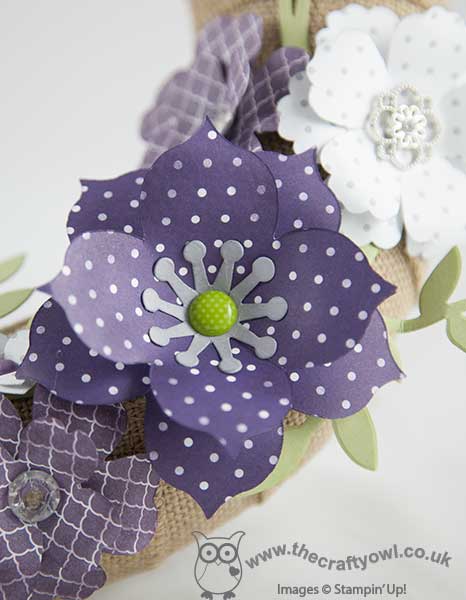
We started with a polystyrene wreath base and covered it with a roll of burlap, then decorated it with a selection of flowers made with a variety of dies and punches. The largest flower, leaves and the bases for the medium flowers were made using the Big Shot and Flower Frenzy Bigz L Die; the remaining flowers were made using a combination of the retiring Blossom punch, the Pansy punch and the Petite Petals punch. The Blossom punch and Flower Frenzy Bigz die are now out of stock, as is the patterend paper that I used, but you could make something similar with other punches and dies. We used a variety of buttons, brads and embellishments to decorate our flowers: I used Vintage Faceted Buttons, Something Borrowed Embellishments and some retired brads from my stash to decorate mine. I chose Elegant Eggplant, Smoky Slate and Pear Pizzazz as my colourway but each of the ladies tailored their colour choices and embellishments to their personal preferences. Here's a closeup of my flowers - I think they are gorgeous:
I created an album with pictures of their finished wreaths on my Facebook page here - you really should go and check them out as there are some amazing pieces and they all look so very different in the various colourways. If you haven't already, perhaps you could give me a 'like' whilst you're there - I'm only 10 away from my next milestone!
If you live in or around Northampton and would like to see me demonstrate how to make these flowers, do pop along to Bell's between 6-9pm this evening:
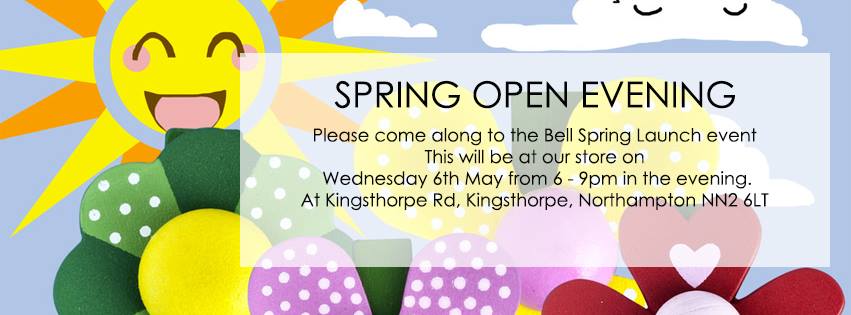
I hope you like today's project - it's one of my favourites! Back tomorrow with a card for this week's new challenge over at Create With Connie and Mary. Until then, happy stampin'!Full details via the link above and on my Facebook Page. There are lots of other demonstrations taking place - there will be someone fabulous chefs in residence cooking up delicious treats, a little pampering as well as other in-store delights that will all make for a pleasant browsing experience.
Stampin' Up! Supplies Used:
4946a4b9-930f-4216-b7d6-268e638019dd|0|.0|96d5b379-7e1d-4dac-a6ba-1e50db561b04
Tags: 3D Projects, Wreaths, Blossom Punch, Pansy punch, Petite Petals Punch, Big Shot, Flower Frenzy Bigz Die, Shop online, Stampin' Up! Demonstration, Stampin' Up, Stampin' Up Supplies, Something Borrowed
3D Projects | Classes | Promotions | Stampin' Up! Events
by Joanne James17. September 2014 07:00This is the first of a number of blog posts today - so get comfy, lovely readers!
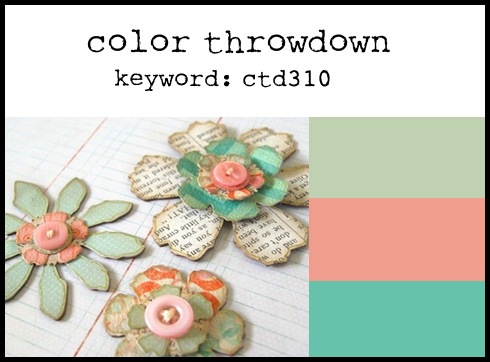
This is a bonus post for you today - following my card being chosen as the 'Featured Stamper' card at The Color Throwdown last week - you can see that card here - I was asked by the lovely Tammy Hershberger to be their Guest Star stamper this week for challenge number 310. So if you are reading my blog for the first time having popped over from CTD - welcome! Here is the colour palette and inspiration photo for this week's challenge:
I took the inspiration for my card from the colours and the photo and decided to go with something floral, featuring buttons and also some typeset designer series paper, albeit as the background for my flowers. Here is my card:
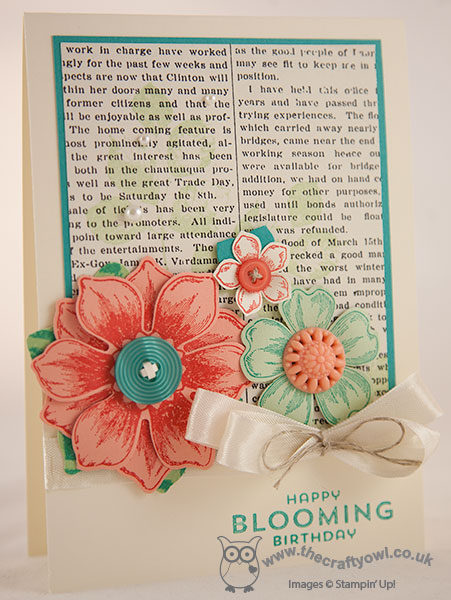
I used the leaves from the 'Kinda Eclectic' stamp set to stamp onto my typeset paper, then stamped a trio of flowers - Beautiful Bunch, Flower Shoppe and Petite Petals - in the challenge colours and created some nicely layered blooms with a variety of button centres to finish them off. I decided to finish off with something of a fussy bow using Vanilla seam binding ribbon tied with linen thread and the birthday sentiment from the Flower Patch stamp set. A bit of a departure from my usual style, and quite a product-heavy card too I'm afraid, but that's not always a bad thing!
Check out The Color Throwdown challenge page to see how the other designers have interpreted this week's challenge.
As for me, I have some work to do then a very important match to attend to this afternoon: my youngest is playing in his first rugby match at school so I'm off to cheer him along and remind him to wear his gumshield!!
Back tomorrow with another project; until then, happy stampin'!
Stampin' Up! Supplies Used:
dc6fd7c9-3a1f-4816-a88f-64139ba44a49|0|.0|96d5b379-7e1d-4dac-a6ba-1e50db561b04
Tags: Beautiful Bunch, Fun Flower Punch, Petite Petals Punch, Petite Petals, Pansy punch, Flower Shop, Typeset, Stampin' Up Supplies, Stampin' Up Card ideas, Stampin' Up Card, Stampin' Up, Shop online, Flower Patch
Cards | Stamping
by Joanne James5. July 2014 16:08Not quite the early card I'd hoped for today - no time between the theatre and swimming gala, but I'm here now! Today's card is made with the challenge over at Fusion in mind. I saw the inspiration photo and just had to have a go - I love the bold poppies and stripes on that dress!
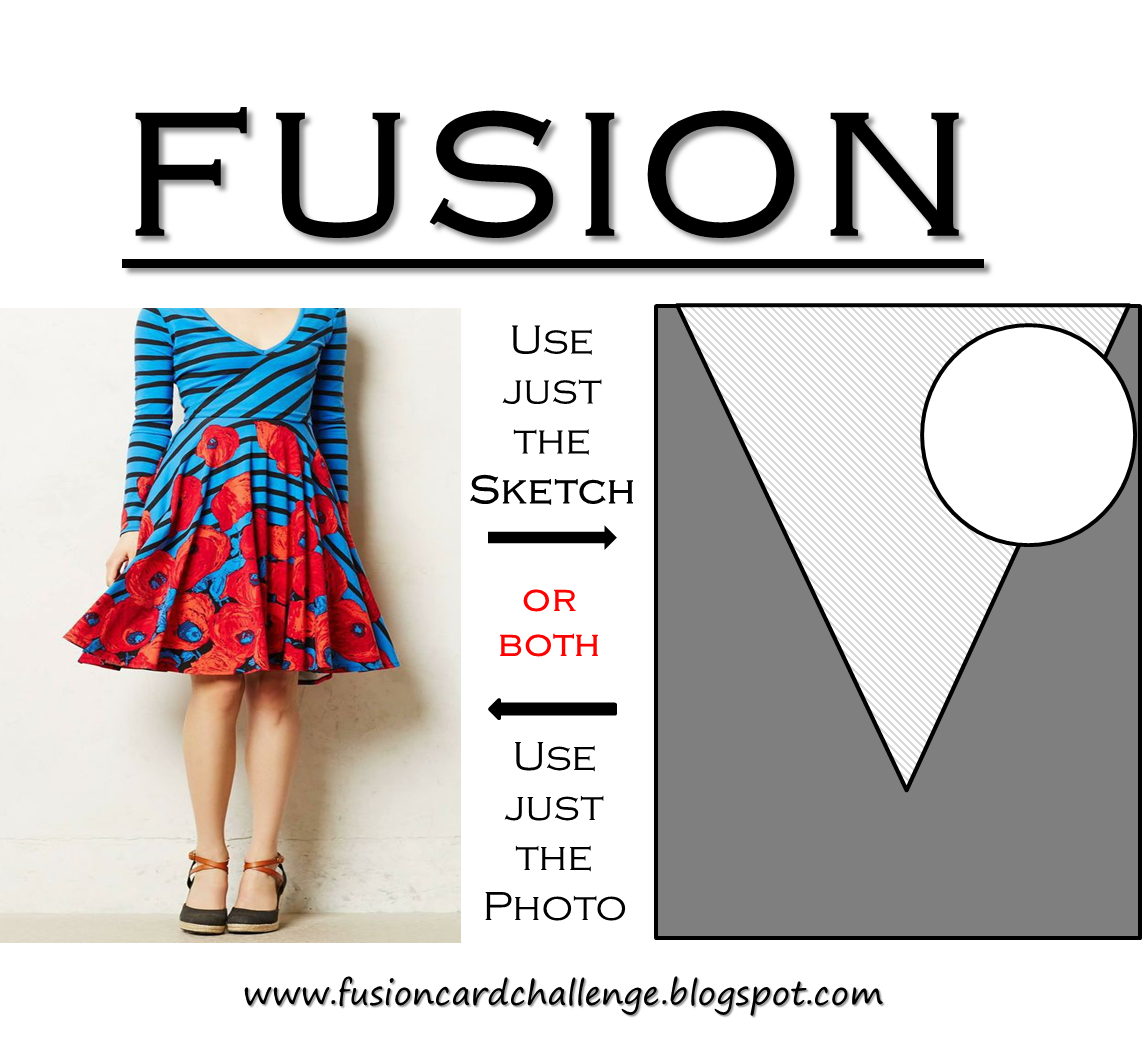
I decided the sketch wasn't for me so went with my own layout and this is what I came up with:
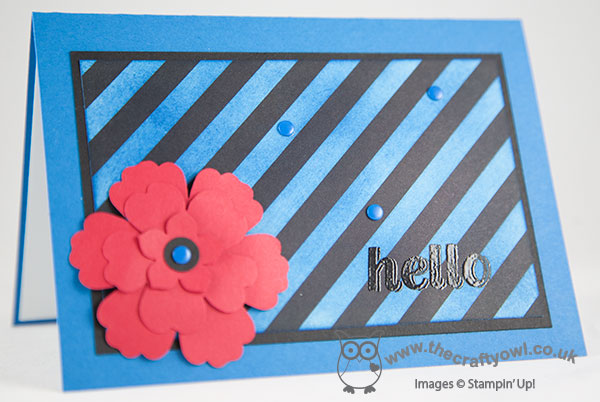
A bright and cheery 'hello' card, with a Real Red punched and layered flower set against the bold black and blue striped background. Wondering where I found my DSP? It's actually a piece of the retired Kaleidescope DSP which was originally black and white striped; I simply sponged the white stripes with Pacific Point ink to achieve the look I was after. Not a task for the faint-hearted - my hands were so blue afterwards I looked like I'd been Smurfed, but I was really pleased with the effect so it was worth it. I then finished it off with a simple 'hello' greeting (from the retired 'Simply Celebrate' stamp set) stamped in Versamark and heat embossed in black so that it would stand out against the striped background. A few blue candy dots just finish things off.
That's all from me today; back tomorrow with my first Design Team card for the Paper Players. until then, happy stampin'!
Stampin' Up! Supplies Used:
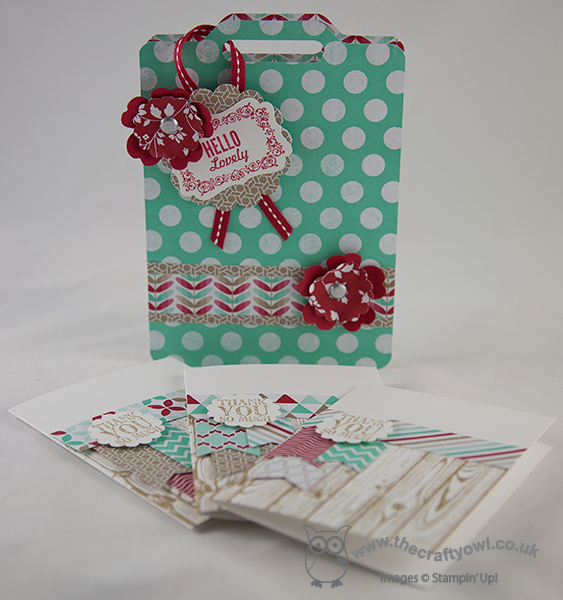
by Joanne James9. May 2014 20:39Good evening lovely blog readers! I've had a busy day today with lots of household chores and last minute preparations for an all day class that I'm running tomorrow with some of my favourite crafting ladies. Today I thought I would share with you one of the projects that we are making at our class tomorrow - a cute little tote made using the Envelope Punch Board:
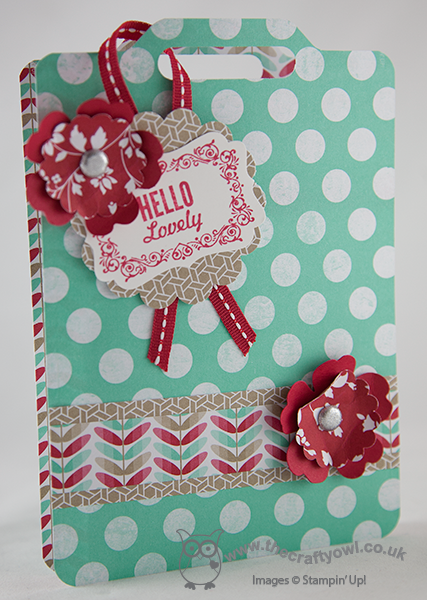
This project was designed by Monica Gale and is one that I made at our last team quarterly training day. It's made using the papers from the Fresh Prints DSP stack and decorated with a tag stamped from the 'Hello Lovely' stamp set. I just love the colours and patterns in this paper stack and as a card maker these papers offer such great value for money at just £6.25 for 48 sheets. We are also making a set of thank you notelets to go inside - this would make such a nice little gift for someone. I'm looking forward to making this and lots of other projects with my ladies tomorrow; if you live in or around Northampton and would be interested in attending any of my cardmaking or project classes, you can find my current class schedule here or just contact me for more information.
That's all from me; back tomorrow with another project. until then, happy stampin'!
Stampin' Up! Supplies Used:
a6422178-75d4-44d0-af72-a6fe6fdec35d|0|.0|96d5b379-7e1d-4dac-a6ba-1e50db561b04
Tags: 3D Projects, Classes, Decorative Label Punch, Envelope Punch Board, Fresh Prints DSP Stack, Hello Lovely, Lots of Thanks, scallop circle punch, Shop online, Stampin' Up, Stampin' Up Card, Stampin' Up Card ideas, Stampin' Up Supplies, Pansy punch, Word Window Punch, Hardwood
3D Projects | Cards | Classes | Envelope Punch Board | Stamping
by Joanne James9. December 2013 21:00So today is the start of the last week of school for the James' juniors, so there are lots of daily activities with Christmas in mind. I've just returned from watching my youngest in his Christmas school production, having given a stellar performance as the 'Bethlehem Census Man' (imagine town crier!) and delivered his one line with true dramatic style: "Hear ye, hear ye - census in Bethlehem! Your country needs you !" There's nothing like a Christmas production to make you feel like the festive season is upon us.
And so to today's creation with the Gift Bow Bigz Die: hot on the heels of yesterday's gift bow angel, a Christmas pudding tree ornament! Now, for my non-UK readers, you may not know that Christmas or plum puddings are a peculiarly British fayre, traditionally eaten after Christmas lunch on Christmas Day. They are eaten with either white sauce or brandy butter and are something of an acquired taste, or so my American friends told me after I sent them one for Christmas one year! So without further ado, here's a picture of the finished pudding:
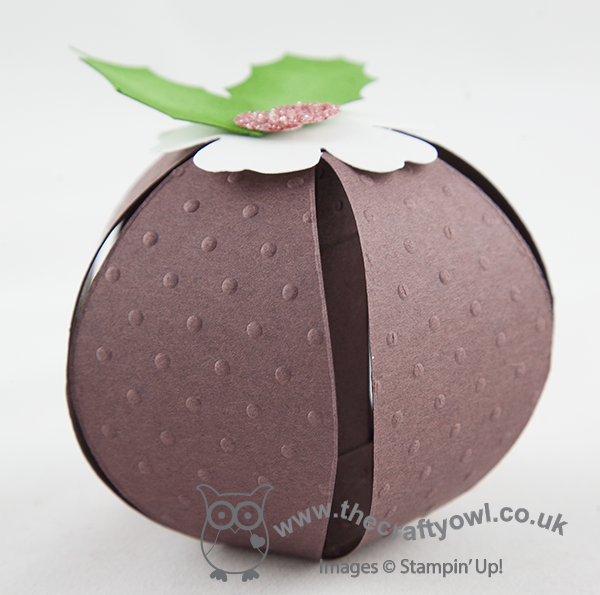
I made a few of these a while ago (tomorrow's post will explain all!) and I think they make another cute ornament for Christmas time. You could just follow the instructions to make a plain sphere out of patterned paper, but I decided mine needed dressing up, hence the Christmas pudding. I made a video showing you how easy they are to create using the Gift Bow Bigz Die from Stampin' Up!; the video also shares a handy technique for colouring your glimmer paper to match your product - did you know you can colour Stampin' Up!'s Glimmer Paper using your Stampin' Write markers? If not, watch the video to find out how:
I hope you like today's project - back tomorrow with something a little different, but still bow-related!
Until then, happy stampin'!
Stampin' Up! Supplies Used:
by Joanne James28. July 2013 19:50After all the excitement of yesterday's pop-up card, today I'm sharing another of the projects I made at my recent quarterly training. The new annual catalogue has some great new packaging options; today's project is a great way to dress up one of the bags from the 'Tag a Bag Gift Bag' kits for a quick gift:
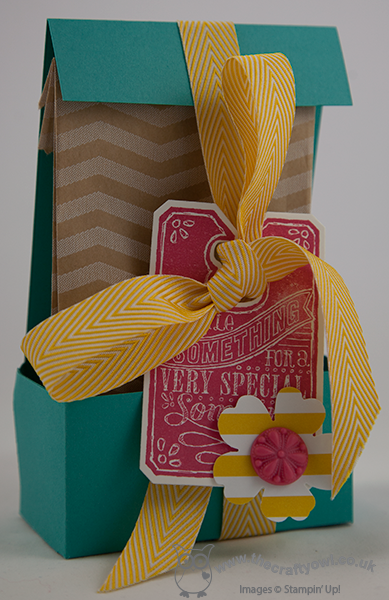
A simple outer open fronted box adds some structure and the addition of a bright Chalk Talk gift tag, with a flower punched from one of the tags in the gift bag kit, finished with a Strawberry Slush embellishment and a showy bow of Crushed Curry Chevron Ribbon; a simple bag is turned into something truly gift-worthy with little effort. Great for a small thank you or hostess gift.
Back tomorrow with another project featuring the Tag-a-Bags; until then, happy stampin'!
Stampin' Up Supplies:
Stamps: Chalk Talk
Cardstock: Bermuda Bay, Whisper White
Ink/Stampin' Write Markers: Strawberry Slush
Tools: Chalk Talk, Pansy Punch
Finishing Touches: Tag A Bag Gift Bag, Tag A Bag Accessory Kit, Crushed Curry 3/4" Chevron Ribbon, Strawberry Slush, In Colour Boutique Details
by Joanne James26. July 2013 20:51Today's card is one I made at my recent quarterly team training and features lots of new items from the 2013-14 annual catalogue: new colours, a new stamp set, new embellishments. Take a look a the finished card:
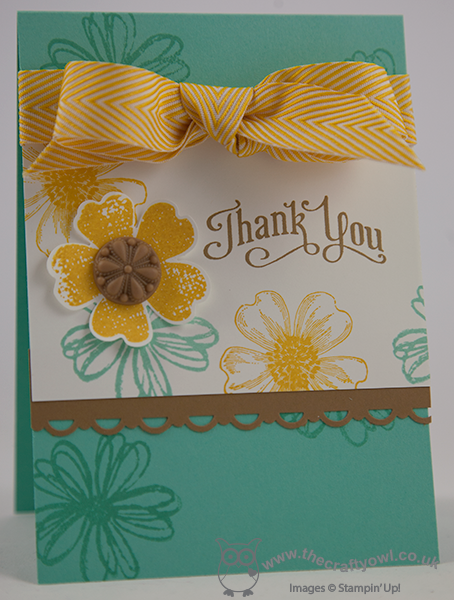
It features three of the lovely flower stamps from the Flower Shop stamp set, including one that has been punched out with the co-ordinating punch. This is one of the many great value bundles available in this year's catalogue: there are a number of items which when purchased together, such as the Flower Shop stamp set and co-ordinating Pansy Punch, will receive a 15% discount. The main card is in the new in-colour Coastal Cabana, and the punched flower is finished with one of the new in-colour embellishments in Baked Brown Sugar, which is echoed in the border edging. The rich yellow is the new Regal Crushed Curry, which is also the colour of the chevron ribbon bow - the star of the show as far as this card is concerned; I LOVE this ribbon!
This ribbon was one of my 'must haves' from the new catalogue; my only dilemma was exactly which colour I should purchase first! If you've now had a chance to look at the new annual catalogue and you too have a long wishlist of products you would like, why not get together with some friends and host a party? This is a great way to earn free products and you could make a version of the above card and have an evening of fun into the bargain. If you would like to host a party, please contact me today to book a date in the diary.
Back tomorrow with another project - a very special birthday card for a very special little boy. Until then, happy stampin'!
Stampin' Up Supplies:
Stamps: Flower Shop, Perfectly Penned
Cardstock: Coastal Cabana, Baked Brown Sugar, Whisper White
Ink/Stampin' Write Markers: Coastal Cabana, Crushed Curry, Baked Brown Sugar
Tools: Stamp-a-ma-jig, Pansy Punch, Scallop Trim Border Punch
Finishing Touches: Crushed Curry 3/4" Chevron Ribbon, Baked Brown Sugar In Colour Boutique Details
be12601a-cae5-4a50-9701-9b8120c8de65|0|.0|96d5b379-7e1d-4dac-a6ba-1e50db561b04
Tags: Earn Free Products, Host a Party, In Colours, Stamp-a-ma-jig, Stampin' Up, Stampin' Up Card, Stampin' Up Card ideas, Stampin' Up Supplies, Pansy punch, Flower Shop, Perfectly Penned, Scallop Trim Border Punch
Cards | Host a Party | Stamping