White Painted Lavender Clean and Simple

by Joanne James15. January 2024 12:10

Today I'm sharing a clean and simple card that I made using the current Color Throwdown colour palette (which coincidentally is very similar to our colour palette over at CC&S this week) and the layout over at Freshly Made Sketches, where the lovely Cecile has provided the sketch:


Anyone who reads my blog regularly know how much I love a Freshly Made Sketch layout and especially when it's designed by Cecile - I just love her clean and simple style and always feel that her sketches really challenge me to hone my CAS skills. I was so tempted to go with one of the foliage branches in the Gorgeously Made die bundle, but instead thought I would 'go white' with my new Painted Lavender Dies - take a look:


Here's the low-down on today's card:

Tackling The Sketch - The first thing I had to decide was what to do with the three straight elements in the sketch. There are so many ways these could be represented: designer paper offcuts, watercolour swooshes, stamps, stencils - so many possibilities! I decided to go with 'stamped swooshes' of colour to represent the petals and foliage of my lavender stems. I used a couple of retired stamp sets for my brushstrokes, as they really go where I want if I'm free forming and I like the finished effect. If you are interested in other alternatives, I would urge you to check out the FMS Design Team cards - they really have outdone themselves this week, with such a variety of takes on the sketch. 

White Lavender - Having laid down my colour, I decided to add a bunch of lavender stems cut from thick white cardstock. This really adds to the clean and simple feel and is a technique that Cecile often uses in her cardmaking. 

Finishing Touches - To finish, I added a couple of gems, a silver twine trim bow and a silver heat-embossed sentiment from the new 'Perennial Postage' set. This is slightly difficult to see on my main photo because of the lighting, but is clearer on the close-up below:

This is one of those cards that took much longer to make the first time than it would to make a second one, but I think sometimes that's the beauty of a good clean and simple card; just because a design is clean and simple, doesn't mean it is devoid of thought or care. And there endeth today's lesson!

Here is the visual summary of the key products used on today's project for you to pin for easy reference:


You can see all of my 'How To' summaries on my 'How To - Tips and Techniques' Pinterest board in case you've missed any. 

Enjoy your day and I'll be back tomorrow with another project. Until then, happy stampin'!


Stampin' Up! Supplies Used:

Table built using Product Table Builder by The Crafty Owl - Independent Stampin' Up! Demonstrator.

Clean and Simple Modern Heart PP487

by Joanne James19. April 2020 09:00

Today it's Sunday and time for this week's new challenge over at The Paper Players! It's the turn of the wonderful Anne Marie to host this week and she has a sparkly clean and simple challenge for you to work with:


I decided to go back to one of my annual catalogue favourites, Modern Heart, for today's card - take a look:
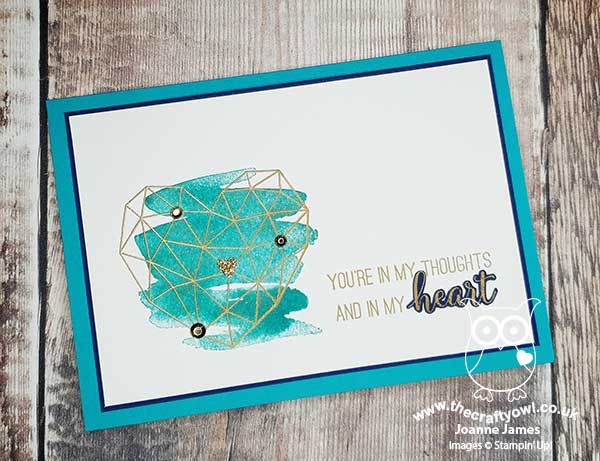
 

Here's the low-down on today's card:

A Touch of Sparkle - So with the emphasis on sparkle for today's card, I started with a base of Shimmery white. Difficult to see in the photos, the whole of the cardfront has a subtle sparkle which is so pretty in real life. I paired this with my modern heart, heat embossed in gold, that I decorated with a trio of gilded gems and a tiny geometrical heart fussy cut from gold glimmer paper. 

Clean and Simple - Whilst this week is all about sparkle, it's also 'clean and simple' week. So does today's card meet the guidelines? Minimal layers and embellishments - check. Plenty of open space, aka "white" space - check. Simple and uncluttered - check. Remember to follow this check list if you are going to play along this week!

Hearts of Blue - I decided to use blues for my card colour today; every other time I've used this set it has been with female cards in mind, so I thought it would be nice to create something with a more masculine feel. The unfussy nature of this card suits a more masculine card too - check out the detail on the heart itself:
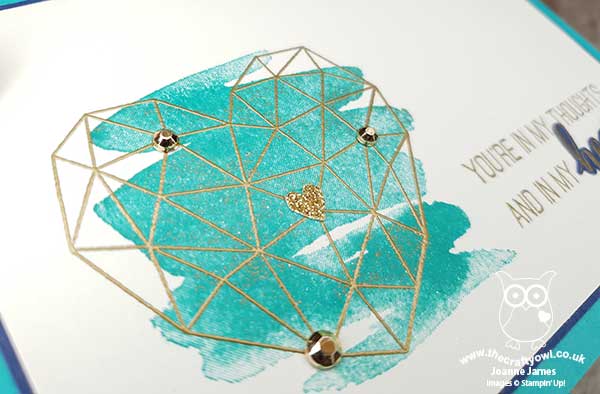
I added a little fussy cut detail to the sentiment too for an additional pop of navy blue. I'm linking today's card up over at SUO Challenges where they are featuring embossing - this time I'm going with heat embossing.

Here is the visual summary of the key products used on today's project for you to pin for easy reference:
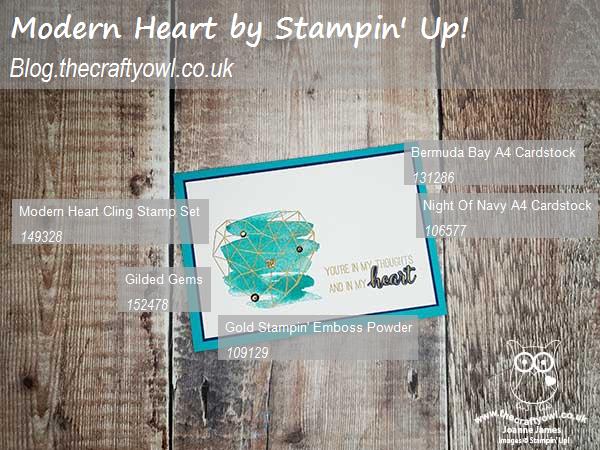
 

You can see all of my Product and 'How To' summaries on my 'How To - Tips and Techniques' Pinterest board in case you've missed any. 

Before you reach for your ink and papers, check out what our amazing team has created to inspire you this week:

Here's a quick recap of our challenge rules:
 
1.  Create a new paper project
2.  Upload your creation to your blog with a link back to us and provide a direct link to the post featuring your challenge submission.
3.  Please link your card to no more than four challenges, TOTAL.
4.  Have FUN!

You can see all of my 'How To' summaries on my 'How To - Tips and Techniques' Pinterest board in case you've missed any. 

Enjoy your day; yesterday was wet and miserable here, so perfect for crafting; I'm hoping today will be brighter and therefore offer more chance to get outside, but either way I'm sure there will be fun to be had in one form or another! I'll be back tomorrow with another project. Until then, happy stampin'!


Stampin' Up! Supplies Used: 

Table built using Product Table Builder by The Crafty Owl - Independent Stampin' Up! Demonstrator.

Modern Heart Heat Embossed Black Card

by Joanne James20. August 2019 20:45

Today I'm sharing a card for the current challenge over at TGIF Challenges where they have an interesting challenge this week:


 All on black - now this was a challenge! After much thought, I decided to use a new stamp set and the (now retired) 2018-20 In Color Embossing powders for a pop of bright colour and ended up creating not one but two cards! Here's my favourite - take a look:


 Here's the low-down on today's card:

A Modern Heart - This stamp set was one that I picked up because my daughter loves it, so it seemed only fair I made a card with her in mind. This card would work as an engagement card I guess, but I made it with congratulations in mind; she works so hard both at school and in her extra-curricular sports and music activities and I know it won't be long before we have another exam pass or success of some kind to celebrate and she will appreciate the sparkle and grown-up feel of this clean and graphic design.

Double Heat Embossing - In order to achieve my gold and Lovely Lipstick design, I stamped and heat embossed in two stages: first I stamped and heat embossed the gold heart, then I added the red hearts later. For the sentiment, I stamped in one go, the dipped the ends in gold first then carefully masked the ends off to add the coloured embossing powder to the word 'happy' before heat embossing both together.

Touches of Gold - To finish my card, I added some gold metallic pearls and gold sequins, along with a touch of gold glimmer paper and some (retired) gold thread for some texture and to add a little sparkle. I also added a few Lovely Lipstick enamel dots to complete my card.

Here is the visual summary of the key products used on today's project for you to pin for easy reference:


You can see all of my 'How To' summaries on my 'How To - Tips and Techniques' Pinterest board in case you've missed any. 

I so liked the effect of the bright colours against the black, I also made a second card using the Accented Blooms stamp set and some Pineapple Punch embossing powder, ribbon and DSP for another super bright card:


When the James Juniors wandered into my craft room to see what I'd been making, they declared the heart much nicer and the one that I should share here, but I thought I'd share this one too as I rather like it and if you have some coloured embossing powders in the back of your craft drawer, you may like to try it too!

Having braved the sports shop for rugby boots and hockey shoes yesterday, today we ventured further afield and braved the shops for new school shoes, trousers and other items of uniform needed in readiness for the return to school in a couple of weeks time. Thankfully we didnt need much and our trip was successful. We are rewarding ourselves tomorrow with a trip to the cinema! Enjoy your evening and I'll be back tomorrow with another project. Until then, happy stampin'!


Stampin' Up! Supplies Used:

Table built using Product Table Builder by The Crafty Owl - Independent Stampin' Up! Demonstrator.

Current Promotions

Stampin Cut and Emboss

Save up to 30% off on all your favourite kits from 1 to 31 October! 

Click here to see the current kits available and order yours online today.

Join My Team

It's always a great time to join Stampin’ Up! During October you can get even more in your starter kit! New team members can get £160 worth of products for only £99 + free business supplies + free shipping + all the fun being a part of Stampin’ Up! Stampin' Up! has something for everyone: join my growing team and benefit from my support to enjoy Stampin' Up! however you choose.

If you're interested, call me for a chat to understand how I can help you realise your goals. Alternatively, if you have already decided to sign up and you just can't wait, please click here for the link to the online form where you can sign up and order your starter kit right away! 

Shop Online

Access my online shop 24 x 7, 365 days of the year:

Current October hostess code:

4XPEYCB9

Shop Online

Scrapbooking

Stampin' Up! has introduced a new range of 12x12" scrapbooking product and kit - the full range is now available to purchase online. To download a copy of the new digital Scrapbooking Catalogue click here.

Mini Catalogue

BROWSE THE CATALOGUE

'Tis The Season - the new Stampin' Up! Mini Catalogue is here! For more details and to download your copy click here

2024-25 Annual Catalogue

BROWSE THE CATALOGUE

Click on the image to download your copy of the 2024-25 annual catalogue. For a full list of current SU! supplies, go to my online store. If you would like any help or advice, please drop me a line at joanne@thecraftyowl.co.uk or give me a call on 07773 421446 - I'd be happy to help.

Latest Kits!

Stampin Cut and Emboss

The Christmas Ornaments Kit and Card Keeper Kit are the latest kits in the online store - get yours here!

New Online Exclusives

There are new products available exclusively in the online store from 5 November - check them out here.

About Me

Hi I'm Joanne and live in Northampton and when I'm not looking after my husband and two beautiful children, am an avid crafter with a passion for all things Stampin' Up!

I must confess that I have never been a big rubber stamper - until I discovered Stampin' Up! that is. I love the fact that I can get such great results with co-ordinating stamps, inks, papers and punches - the possibilities are endless! Join me on my stamping journey as I share the things I love and be inspired to create amazing things yourself!

Follow Me

Monthly Newsletter

Box Builder

Click the button above to use Box Buster to create your custom box design using the Envelope Punch Board!

Kits Collection Now Available!

Stampin Cut and Emboss

The new Kits Collection from Stampin' Up! is now available!

Click here to see the current kits available and order yours online today.

I Design For


Stampin' Up Stuff

This is my personal blog and is not endorsed by Stampin’ Up! I hope you find it a plentiful source of ideas and personal inspiration but please don't copy my designs for contest submission or use for classes, publication or sale without express permission.