Label Me Pretty 2017-19 In-Colour Thank You Card

by Joanne James21. November 2017 21:30

I'm finally back with a post today! With my American friends celebrating Thanksgiving tomorrow, I thought today a card that expresses gratitude was in order. Today's card also fits for a few challenges that are happening at the moment too (click on the badges to go to the respective blogs):


My card uses an incredibly useful bundle from the annual catalogue - take a look:


Here's the low-down on today's card:

Be Thankful - I am thankful for many things and I love that the Label Me Pretty set has this wonderful sentiment that is perfect for giving thanks and showing appreciation to others - finished with a teeny, tiny heart - adorable! This is such a great set for layering, with so many options. I created a crib sheet for my open house ages ago which I've been sharing with my face-to-face customers in classes; it has been so well received I thought I would share it here so that you could all save it too:


Details, Details - In addition to my layered label, my card has some other neat details: the tiny scalloped edge on the left is courtesy of the Decorative Ribbon Border Punch and the scalloped edge was cut with the scallop thinlit in the Seasonal Layers Thinlits set; the curved flower detail from the 'Label Me Pretty' stamp set fits it perfectly, how convenient! 

Don't Forget The Pretty - My card has a very feminine feel to it, with the Powder Pink and Fresh Fig in-colours balancing beautifully against the white, along with the tiny florals and pretty detailing, all finished off with a tied Powder Pink ribbon. Not my usual style, yet nice to ring the changes once in a while.

Here is the visual summary of the key products used on today's project for you to pin for easy reference:


You can see all of my 'How To' summaries on my 'How To - Tips and Techniques' Pinterest board in case you've missed any. 

I'll be back tomorrow with another project. Until then, happy stampin'!


Stampin' Up! Supplies Used:

Table built using Product Table Builder by The Crafty Owl - Independent Stampin' Up! Demonstrator.

Label Me Pretty Sweet Cupcake Card

by Joanne James28. October 2017 19:00

It's the weekend - hurrah! It's always nice when the weekend rolls around, although I must confess this week has been a little easier than usual in terms of my usual activity schedule, with both James Juniors being on their half term holiday break. We have been enjoying time with friends, indoor climbing and outdoor play, making the most of the mild autumnal weather. I need to make the most of this weekend as that is all-change again come Monday with one of them at least back to school.

So, today I have a change from Christmas! I'm sharing a card for this week's challenge over at Just Add Ink where the challenge is all about cake:

 My card features cake two ways - take a look:


Here's the low-down on today's card:

A Neat Trick With Birthday Friends - The little girl holding the cupcake on my card has come straight from the Birthday Memories designer series paper (currently available as part of the 'buy3, get 1 free' paper promotion) but I didn't have to fussy-cut her; one of the framelits in the Birthday Friends Framelits set fits her shape perfectly. I simply lined them up on the big Shot, ran them through and voila - one little girl, complete with cupcake, and not a paper snip in sight!  

A Co-ordinated Background - I wanted to add some detail to my background without detracting from my sentiment or sweet little girl, so decided to continue the 'cake' theme with some tone-on-tone stamping in Blushing Bride using the cupcake in the 'Sweet Cupcake' stamp set to create a subtle background wallpaper.

From My Kitchen - I think the little girl has a slightly mischievious look about her and certainly looks like she is peeking around the side of something. I decided to make a feature of the sentiment and this one from the 'Label Me Pretty' stamp set is the perfect fit. 

All in all a sweet card - all I need now is a home-baked cupcake to go with it!

Here is the visual summary of the key products used on today's project for you to pin for easy reference:


You can see all of my 'How To' summaries on my 'How To - Tips and Techniques' Pinterest board in case you've missed any. 

So tomorrow it will be back to Christmas with my card for this week's new challenge over at The Paper Players, however in the meantime I would really like to hear your thoughts: I'm mindful that I have been sharing a lot of Christmas projects lately as it is often what I'm making at this time of year, but as my readers how do you feel about this? Are you happy to get as much Christmas inspiration as possible, or would you prefer a mix of projects? Do leave me a comment below - I'd really love to hear your thoughts on this. 

Until tomorrow - happy stampin'!


Stampin' Up! Supplies Used:

Table built using Product Table Builder by The Crafty Owl - Independent Stampin' Up! Demonstrator.

Label Me Pretty In-Colour Card Set

by Joanne James28. July 2017 06:00

Today I'm sharing a set of cards I made a while back to showcase the new in-colours at my Annual Catalogue launch event but just haven't got around to blogging. I also used this design as the basis for the cards that I sent out to my customers and anyone who had requested a catalogue from me with their copy of the new catalogue. Here's the first one:


 Here's the low-down on today's card:

Label Me Pretty - Label Me Pretty is one of the new bundles in the annual catalogue featured on page 27, comprising the 'Label Me Pretty' stamp set and the Pretty Label Punch. Just like the new daisy punch, the introduction of this punch to the Stampin' Up! punch collection has proved incredibly popular with demonstrators and customers alike, and it's easy to see why: this versatile label is great to use on cards or packaging alike, and the layering options that the stamp set and addition of a few circle punches gives allows for lots of creative possibilities.

In-Colour Quintet - As I mentioned above, I created the same card using each of the new in-colours. Having worked with them for some months now, my favourites are still Berry Burst and Lemon Lime Twist, the latter especially when combined with other colours such as Night of Navy - I just love it! Here's a shot showing glimpses of each of the cards in the collection:


Background Tip - The construction of my card is simple and the photograph fairly self-expanatory - well, it needs to be an easy make when mass-production is called for! I did just want to point out how I stamped the background flowers on the card base. If you look closely, you will see that they are the flowers from the 'Happy Birthday' stamp in the Label Me Pretty set, yet the wording isn't visible. I actually stamped the image, then turned it through 180 degrees so that the bottom of each image overlapped (you can't see this as it's covered by the label) to provide some extra florals to frame my label. This was a tip I picked up at Onstage in Amsterdam earlier this year from Donna Morgan at the Home Office I think, if my memory serves me correctly - so thank you Donna!

Here is the visual summary of the key products used on today's project for you to pin for easy reference:


You can see all of my 'How To' summaries on my 'How To - Tips and Techniques' Pinterest board in case you've missed any. 

So which of the in-colours is your favourite, or is there any one you find a real challenge to work with? Do leave me a comment below - I'd love to hear your thoughts!

Enjoy your day and I'll be back soon with another project. Until then, happy stampin'!


Stampin' Up! Supplies Used:

Table built using Product Table Builder by The Crafty Owl - Independent Stampin' Up! Demonstrator.

Label Me Pretty Birthday Card For PP348

by Joanne James11. June 2017 10:00

It's Sunday and time for this week's new challenge over at The Paper Players! It's my wonderful friend LeAnne's turn to host this week and she has a fun colour challenge for us to work with:


I love these summery colours this week! I almost went with something 'beachy' but instead cased a layout from page 18 of the new annual catalogue for my card and used the Pretty Label bundle - take a look:


Here's the low-down on today's card:

Label Me Pretty - The detailed florals on my Label Me Pretty label were perfect for today's colour scheme; mostly bright yellows and greens, with a single stem of bluebells to tie in with my card base. i also inked the floral sections of my stamp with my Pool Party Stampin' Write Marker and stamped them directly onto my card base for a little tone-on-tone interest. 

Pretty Label Punch Trick - Did you know the Pretty Label Punch can also be used to create mat layers for your label? Here I punched a second label in Lemon Lime Twist cardstock, cut it in half horizontally and added it to the base edges of your label to give a mat border edge. Neat, right?

Ribbons and Pearls - I added lots of 'pretties' to my card today and couldn't resist a twist of new bright yellow double stitched ribbon; the Daffodil Delight seems to tone down the brightness of the Lemon Lime Twist on this card too.  

Here is the visual summary of the key products used on today's project for you to pin for easy reference:


You can see all of my Product and 'How To' summaries on my 'How To - Tips and Techniques' Pinterest board in case you've missed any. 

Before you reach for your ink and papers, check out what our amazing team has created to inspire you this week:

The Paper Players Design Team
 
 
Here's a quick recap of our challenge rules:
 
1.  Create a new paper project
2.  Upload your creation to your blog with a link back to us and provide a direct link to the post featuring your challenge submission.
3.  Please link your card to no more than four challenges, TOTAL.
4.  Have FUN! 

I look forward to seeing what you create with this week's colour palette. Enjoy the rest of your weekend as it will be over all too quickly; we are all out and about today, with one of the James Juniors singing in a choir performance all day and the other headed to his school summer fete, complete with classic car show and bouncy castles and hopefully time for a cream tea!

I'll be back tomorrow with another project; until then, happy stampin'!


Stampin' Up! Supplies Used: 

Table built using Product Table Builder by The Crafty Owl - Independent Stampin' Up! Demonstrator.

Label Me Pretty Navy Pattern Thank You

by Joanne James23. May 2017 06:00

Today I'm sharing a card for the current challenge over at Fusion:

I went with both the sketch and photo inspiration for my card today - I loved the navy and white colour combination and the strong pattern influence in the inspiration photo:


Here's the low-down on today's card:

Label Me Pretty - The focal point for my card is a layered label from the new Label Me Pretty set. I featured one of the other labels in this set in my Saturday post (if you missed it you can see it here); for today's card I punched out my main label using the new Pretty Label Punch and added some additional layering to the circles in the centre. 

Floral Boutique - I love the patterns in the Floral Boutique designer series paper pack and will be sorry to see this paper retire. Fear not though, there is a silver lining: 4 of the patterns in this pack are returning in the new In-Colour Fresh Florals Designer Series Paper Pack, including the one I've used on my card today. Hooray - now I can re-create my card in the new in-colours too!

An Added Detail - In addition to some retired Sale-A-Bration metallic ribbon, I added one final detail to my card today; well actually, to the envelope! I took a co-ordinating piece of paper from the Floral Boutique stack and added it to my envelope flap for some pretty additional detail. This is a nice way to add a touch of colour to an otherwise plain envelope - after all, envelopes should never be naked!

Here is the visual summary of the key products used on today's project for you to pin for easy reference:


You can see all of my 'How To' summaries on my 'How To - Tips and Techniques' Pinterest board in case you've missed any. 

Enjoy your day and I'll be back tomorrow with another project. Until then, happy stampin'!


Stampin' Up! Supplies Used:

Table built using Product Table Builder by The Crafty Owl - Independent Stampin' Up! Demonstrator.

Label Me Pretty Homemade Jam #GDP087

by Joanne James20. May 2017 11:00

Happy Saturday everyone! A mix of old and new today and not a card but some cute packaging which is perfect for this week's Global Design Project challenge:

Many of my readers know that the James family are keen vegetable growers and we have a small kitchen garden which keeps us supplied with fresh vegetables through the summer months. We also have a collection of fruit trees and last year for the first time I started making my own jam. one of my James Juniors is an absolute jam addict - given the choice, Ben would live on jam on toast  - so much so, that his big sister once declared we should have called him 'Jam-in-Ben' rather than 'Ben-jam-in', something that sticks to this day!

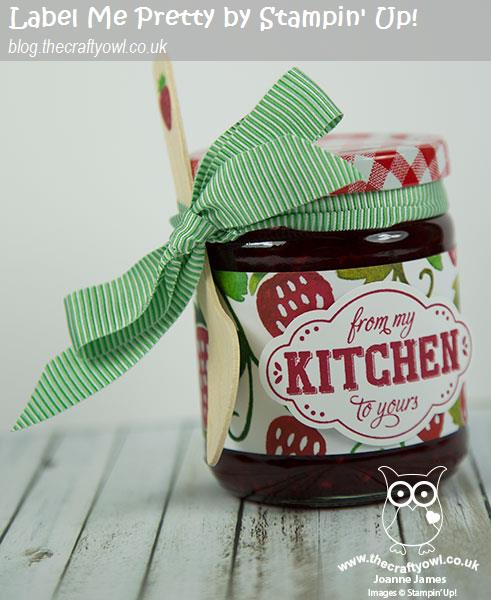
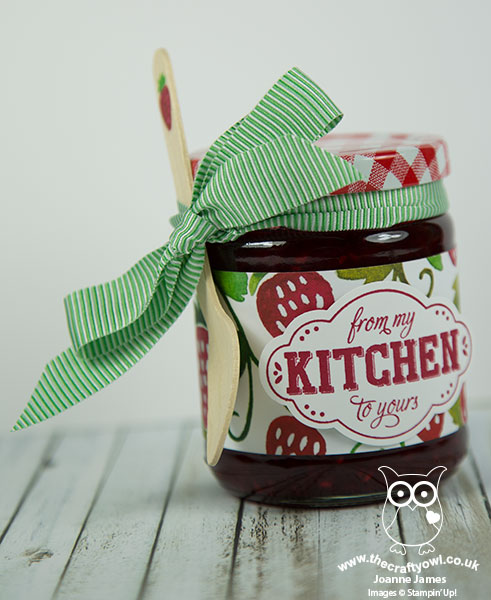
Anyway, I digress - making my own jam is a great way to make the most of our fruit and meet demand. I also love to give it away as a gift occasionally too and that's where today's project comes in; whilst Ben is all about the jam itself, if I'm gifting it I like to pretty up the packaging somewhat and there is a stamp set in the new catalogue that is perfect for me  - take a look:
 

Here's the low-down on today's card:

Label Me Pretty - The new 'Label Me Pretty' stamp set is just perfect for me and anyone else how likes to preserve or cook and pretty-up their gifts for giving; the label I've used today works for any kind of produce. The set includes lots of other stamps too, that would work for other types of gift giving or on cards too - look out for more featuring those another day. Wondering how I got it so beautifully cut out too? That would be the co-ordinating Pretty Label Punch  - love this! I will have my jams labelled in no-time!! 

Fruit Stand - I paired my label with a band of strawberry-patterned Fruit Stand paper; a great pack with images of apples, pears lemons and peaches too. This is retiring 31 May though so if you want to add this to your jam jars you need to stock up soon!

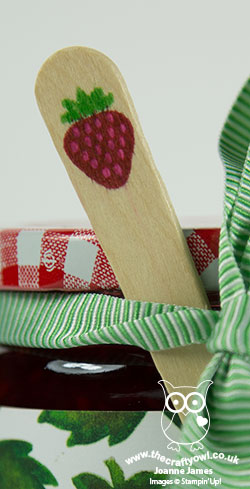
Add A Spoon - Lastly, I wanted to add a little something to my jar and added a little wooden spoon, stamped with a strawberry from the 'Cool treats' stamp set. This is a simple way to add a 'wow' to a plain spoon - and in the words of Ben, a great way to enable someone to tuck in to their jam as soon as they receive it! I simply tied it to my jar using some of the retiring Cucumber Crush 5/8" mini-striped ribbon - here's a close up of my spoon detail: 
 

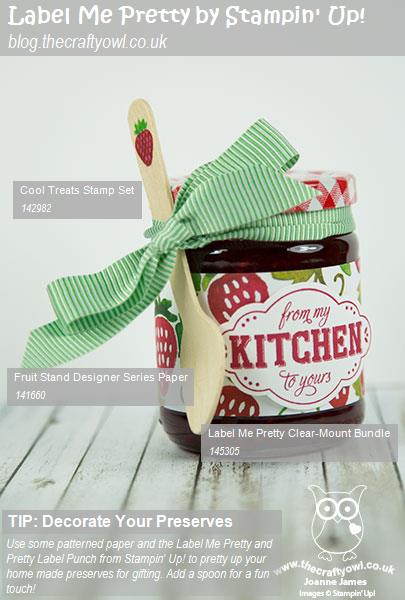
Here is the visual summary of the key products used on today's project for you to pin for easy reference:
 

You can see all of my 'How To' summaries on my 'How To - Tips and Techniques' Pinterest board in case you've missed any. 

Given the recent addition of four chickens to the James Household, my next challenge is to use some of our eggs to create homemade lemon curd, one of Rebecca's favourite treats. Watch this space for some lemon-inspired packaging at some point later in the year! Oh and if Stampin' Up! could provide some raspberry-patterned paper it would also be much appreciated!!

I'll be back tomorrow with another project for this week's new challenge over at The Paper Players. We have a busy day today - Rebecca has a big swimming meet and is racing all day (at the time of writing, she has already achieved two 100m personal bests for her breaststroke and individual medley, so that is great news) and Ben has a football-themed birthday party to attend followed by his swimming lesson. Enjoy your day and until tomorrow, happy stampin'!


Stampin' Up! Supplies Used:

Table built using Product Table Builder by The Crafty Owl - Independent Stampin' Up! Demonstrator.

Current Promotions

Stampin Cut and Emboss

Save up to 30% off on all your favourite kits from 1 to 31 October! 

Click here to see the current kits available and order yours online today.

Join My Team

It's always a great time to join Stampin’ Up! During October you can get even more in your starter kit! New team members can get £160 worth of products for only £99 + free business supplies + free shipping + all the fun being a part of Stampin’ Up! Stampin' Up! has something for everyone: join my growing team and benefit from my support to enjoy Stampin' Up! however you choose.

If you're interested, call me for a chat to understand how I can help you realise your goals. Alternatively, if you have already decided to sign up and you just can't wait, please click here for the link to the online form where you can sign up and order your starter kit right away! 

Shop Online

Access my online shop 24 x 7, 365 days of the year:

Current October hostess code:

4XPEYCB9

Shop Online

Scrapbooking

Stampin' Up! has introduced a new range of 12x12" scrapbooking product and kit - the full range is now available to purchase online. To download a copy of the new digital Scrapbooking Catalogue click here.

Mini Catalogue

BROWSE THE CATALOGUE

'Tis The Season - the new Stampin' Up! Mini Catalogue is here! For more details and to download your copy click here

2024-25 Annual Catalogue

BROWSE THE CATALOGUE

Click on the image to download your copy of the 2024-25 annual catalogue. For a full list of current SU! supplies, go to my online store. If you would like any help or advice, please drop me a line at joanne@thecraftyowl.co.uk or give me a call on 07773 421446 - I'd be happy to help.

Latest Kits!

Stampin Cut and Emboss

The Christmas Ornaments Kit and Card Keeper Kit are the latest kits in the online store - get yours here!

New Online Exclusives

There are new products available exclusively in the online store from 5 November - check them out here.

About Me

Hi I'm Joanne and live in Northampton and when I'm not looking after my husband and two beautiful children, am an avid crafter with a passion for all things Stampin' Up!

I must confess that I have never been a big rubber stamper - until I discovered Stampin' Up! that is. I love the fact that I can get such great results with co-ordinating stamps, inks, papers and punches - the possibilities are endless! Join me on my stamping journey as I share the things I love and be inspired to create amazing things yourself!

Follow Me

Monthly Newsletter

Box Builder

Click the button above to use Box Buster to create your custom box design using the Envelope Punch Board!

Kits Collection Now Available!

Stampin Cut and Emboss

The new Kits Collection from Stampin' Up! is now available!

Click here to see the current kits available and order yours online today.

I Design For


Stampin' Up Stuff

This is my personal blog and is not endorsed by Stampin’ Up! I hope you find it a plentiful source of ideas and personal inspiration but please don't copy my designs for contest submission or use for classes, publication or sale without express permission.