Hues of Happiness New Catalogue Sneak Peek FF107

by Joanne James15. April 2022 08:00


Today I have my card for the new challenge over at Festive Friday. I used the great sketch over at Sunday Stamps for my layout too:


The challenge that we are celebrating this week is 'International Dance Day' which is on 29th April. Remember the fun thing is that at Festive Friday you do not need to actually celebrate the occasion; your goal is to simply use three or more items from the inspiration list on your project. I received my new annual catalogue pre-order earlier this week and couldn't wait to open it and start creating! So on today's card I used blue, rhinestones, patterned paper and diecuts from the inspo list and I have a sneak peek of new products for you - take a look:


 Here's the low-down on today's card:

Hues of Happiness Suite - Today's card features a number of products from the new 'Hues of Happiness' Suite. Behind my layered circle I used the beautiful trellis patterned diecut from the Blossoming Happiness Dies, but the star of today's card is most definitely the beautiful flowers that were cut from the Hues of Happiness designer series paper. The Blossoming Happiness Dies fit the flowers and leaves on two of the paper patterns perfectly; beautifully coloured flowers that can be cut out with ease - bonus! Here's a close up of these beautiful blooms: 

Aren't they just gorgeous?! I have cut up a whole pack of this paper already and will definitely be needing more of it!!

Happiness Abounds - The sentiment on the front of my card is from the 'Happiness Abounds' set that is also part of this suite; I added another two to the inside of my card. along with some outline floral detail:


This stamp set will be great for colouring too - I am so looking forward to working with it again.

Finishing Touches - A sprinkling of iridescent rhinestones and a couple of strips of retiring Gorgeous Grape glimmer paper complete my card.

If you think you don't need any more florals, the Hues of Happiness Suite will most definitely change your mind! I can't wait to share more new products with you. 

Would you like a copy of the new Stampin' Up! Annual Catalogue? If you have placed an order with me in the last 6 months, then great news - you are already on my mailing list to receive a new annual catalogue. If you haven't and would like one, please do get in touch to request one and I can add you to my list!

Here is the visual summary of the key products used on today's project for you to pin for easy reference:


You can see all of my 'How To' summaries on my 'How To - Tips and Techniques' Pinterest board in case you've missed any. 

How does our board inspire you? I can’t wait to see what YOU create! For more inspiration, be sure to visit the rest of the  Festive Friday Challenge Design team:

Ann Schach
Beth McCullough
Sharon Hashimoto Burkert
Melanie Hungerford
Helen Jennings
Stephanie Lanzalotto
Melva Peters
Jaydee
Diane Evans
Joanne James

Enjoy your day and I'll be back tomorrow with another project. Until then, happy stampin'!


Stampin' Up! Supplies Used:

Table built using Product Table Builder by The Crafty Owl - Independent Stampin' Up! Demonstrator.


Painter's Palette For World Art Day F106

by Joanne James1. April 2022 09:00

Yay - the end of the week! Today I have my card for the new challenge over at Festive Friday:


The challenge that we are celebrating this week is 'World Art Day' which is on April 15th. Remember the fun thing is that at Festive Friday you do not need to actually celebrate the occasion; your goal is to simply use three or more items from the inspiration list on your project. This week I decided to go all-out with the theme of our challenge and used paint splats, easel, primary colours and a little masking and this is what I came up with:


Here's the low-down on today's card:

I delved into my collection of retired stamps for today's card - the retired 'Painter's Palette' set from a few years ago had everything I needed! I stamped a bunch of paint splats onto my white card base in primary colours (along with a little green for good measure) along with an easel, then stamped the easel along with a birthday sentiment and decorated with a few more paint splats (this is where the masking came in so that the dots stayed within the frame) and added this to my card base with dimensionals: 


A few retired enamel dots, along with some additional paint splats both inside my card and on the envelope completed my card - perfect for the budding artists amongst us!

How does our board inspire you? I can’t wait to see what YOU create! For more inspiration, be sure to visit the rest of the  Festive Friday Challenge Design team:

Ann Schach
Beth McCullough
Sharon Hashimoto Burkert
Melanie Hungerford
Helen Jennings
Stephanie Lanzalotto
Melva Peters
Jaydee
Diane Evans
Joanne James - that's me!

Enjoy your day and I'll be back tomorrow with another project. Until then, happy stampin'!


Stampin' Up! Supplies Used:

Table built using Product Table Builder by The Crafty Owl - Independent Stampin' Up! Demonstrator.

Sweet In Symmetry Birthday Card FF105

by Joanne James18. March 2022 08:00

Today I have my card for the new challenge over at Festive Friday. 


The challenge that we are celebrating this week is 'World Party Day' which is on April 3rd. Remember the fun thing is that at Festive Friday you do not need to actually celebrate the occasion; your goal is to simply use three or more items from the inspiration list on your project. This week I used bright colours, twine, a celebratory sentiment and lots of layers, along with the intriguing sketch layout over at Sunday Stamps and this is what I came up with:


Here's the low-down on today's card:

Sweet Symmetry - When I think about bright colours, I am drawn to the Sweet Symmetry papers in the suite of the same name. Full of brights and bold patterns, I knew this would be the set to work with today. I particularly like the navy-based patterns in this pack, so chose one and cut a panel, making sure to centre the pattern to my base and added it to a Just Jade mat and Night of Navy card base.  

In Symmetry Blooms - Those triangles on the Sunday Stamps sketch really got me thinking; I settled on a collection of flowers, roughly placed in a triangular shape, and mirrored and offset around my sentiment and twine-wrapped layered circle base. The symmetrical nature of the stamps in the 'In Symmetry' set are perfect for creating mirror images or structured, stylised designs such as this.

Bold Colour - The eagle-eyed amongst you may have realised that my flowers are not stamped on white cardstock, rather on paler tones of the same colour. I saw a great card by one of the Stampin' Up! UK Artisans, Martin Stone, using this technique and I love the added brightness and intensity it gives the colours. This card is very much a 'go bold or go home' type of card - you can see the detail on the flowers better on the close-up below:

If you're interested in specifics, I listed the colours I used in the supplies table at the bottom of today's post. This might not be a card for everyone, but I really love it!

Here is the visual summary of the key products used on today's project for you to pin for easy reference:


You can see all of my 'How To' summaries on my 'How To - Tips and Techniques' Pinterest board in case you've missed any. 

How does our board inspire you? I can’t wait to see what YOU create! For more inspiration, be sure to visit the rest of the  Festive Friday Challenge Design team:

Ann Schach
Beth McCullough
Sharon Hashimoto Burkert
Melanie Hungerford
Helen Jennings
Stephanie Lanzalotto
Melva Peters
Jaydee
Diane Evans
Joanne James - you are here!

Enjoy your day and I'll be back tomorrow with another project. Until then, happy stampin'!


Stampin' Up! Supplies Used:

Table built using Product Table Builder by The Crafty Owl - Independent Stampin' Up! Demonstrator.


Quiet Meadow Honeybee Home Card FF104

by Joanne James4. March 2022 09:00

Today I have my card for the new challenge over at Festive Friday:


The challenge that we are celebrating this week is 'World Planting Day' which is on 20th March. Remember the fun thing is that at Festive Friday you do not need to actually celebrate the occasion; your goal is to simply use three or more items from the inspiration list on your project. This week I used flowers, green, brick and bugs/insects and this is what I came up with:

Here's the low-down on today's card:

Quiet Meadow Honeybee - This card is something of a departure from my usual style, as I don't tend to go in for collage-style stamping, but I think the images in both the 'Quiet Meadow' and 'Honeybee Home' stamp sets really lend themselves to this style. I used a Bumblebee coloured cardbase and added some tone-on-tone stamping in the same colour, along with some bees and splatter in black and used a blender brush to add colour to the outer edges. I also stamped a single flower on one circle, and for my main focal point I used my markers to add a buttercup in Bumblebee with a Just Jade stem. I also added a little extra collage-style stamping to the inside of my card: 


Layers and Textures - This card is all about textures and layers. In addition to my stamping, I added layered circles and diecut flower stems to build up my design. The circles were a combination of hive embossed gold vellum, some embossed brick and some (retired) Harvest Meadow designer series paper, along with a few in-colour enamel dots. This give lots of visual interest, despite the limited colour palette. 

A Trinket To Finish - Even though I added stamped bees to my background, I couldn't resist adding a gold bumblebee trinket to my stamped circle focal point:

A sentiment from the 'Honeybee Home' set completes my card. So what do you think? Not my usual style, but I had a lot of fun putting it together and stepping outside my comfort zone for a while. I've had a head cold this week and have definitely found myself being drawn to yellow - I think I've subconsciously been cheering myself up! It's also perfect for the current challenge over at The Alphabet Blog, where they are on the letter 'X is for xanthic' - which apparently means 'relating to the colour yellow' - who knew?! I am a bit of a logophile (that means lover of words if it's not a word you are familiar with) so I am delighted to add this one to my collection!

Here is the visual summary of the key products used on today's project for you to pin for easy reference:


You can see all of my 'How To' summaries on my 'How To - Tips and Techniques' Pinterest board in case you've missed any. 

How does our board inspire you? I can’t wait to see what YOU create! For more inspiration, be sure to visit the rest of the  Festive Friday Challenge Design team:

Ann Schach - out this week
Beth McCullough
Sharon Hashimoto Burkert
Melanie Hungerford
Helen Jennings
Stephanie Lanzalotto
Melva Peters
Jaydee
Diane Evans
Joanne James

Enjoy your day and I'll be back tomorrow with another project. Until then, happy stampin'!


Stampin' Up! Supplies Used:

Table built using Product Table Builder by The Crafty Owl - Independent Stampin' Up! Demonstrator.


Nothing's Better Than Cookies Card FF103

by Joanne James18. February 2022 09:00

Happy Friday everyone! Today I have my card for the new challenge over at Festive Friday:


The challenge that we are celebrating this week is 'National Peanut Butter Lovers Day' which is on 24th January each year. Remember the fun thing is that at Festive Friday you do not need to actually celebrate the occasion; your goal is to simply use three or more items from the inspiration list on your project. This week I used baked goods, brown and enamel dots for my clean and simple cookie card today - check it out:


Here's the low-down on today's card:

Nothing's Better Than ... - I love the sentiment combinations in the 'Nothing's Better Than' stamp set - I mean, coffee, chocolate, cookies and cocktails!! I'm a tea drinker over coffee, but that would disrupt the 'c's, so I'm good with it! Today's card of course features cookies as my baked goods; the fun thing about the sentiments in this set is that they can be used inside and outside to make fun combinations - this is how I finished the inside of today's card:


... Cookies - I used a simple layered square for the sentiment on the front of my card, backed with a strip of (retired) pink plaid paper, and accented my sentiment with a couple of diecut cookies, complete with crumbs:


A trio of pink enamel dots complete today's card.

Here is the visual summary of the key products used on today's project for you to pin for easy reference:


You can see all of my 'How To' summaries on my 'How To - Tips and Techniques' Pinterest board in case you've missed any. 

How does our board inspire you? I can’t wait to see what YOU create! For more inspiration, be sure to visit the rest of the  Festive Friday Challenge Design team:

Ann Schach
Beth McCullough
Sharon Hashimoto Burkert
Melanie Hungerford
Helen Jennings
Stephanie Lanzalotto
Melva Peters
Jaydee
Diane Evans
Joanne James

Enjoy your day; it's the last day of half-term today however with the impending storm the James Juniors and I shall be battonning down the hatches and spending the day indoors! and I'll be back tomorrow with another project. Until then, happy stampin'!


Stampin' Up! Supplies Used:

Table built using Product Table Builder by The Crafty Owl - Independent Stampin' Up! Demonstrator.


Abstract Beauty Yay For Love Valentine FF102

by Joanne James4. February 2022 09:00

Today I have my card for the new challenge over at Festive Friday:


The challenge that we are celebrating this week is Valentine's Day which is on February 14th. Remember the fun thing is that at Festive Friday you do not need to actually celebrate the occasion; your goal is to simply use three or more items from the inspiration list on your project. This week I used pink, romantic sentiment, hearts, watercolour and aperture and this is what I came up with:


Here's the low-down on today's card:

I decided to create a Valentine's card using a combination of both paper and pre-cut pieces from the Abstract Beauty Ephemera pack, based around the gold and white frame and watercoloured heart, layering them onto my cardfront until I was happy with the balance of elements. I added some black adhesive-backed hexagons and gold twine bow and finished my card with a fun sentiment from the 'Happy & Heartfelt' set, stamped in Magenta Madness to match my cardbase and fussy cut:

I added another sentiment from the same set and an offcut strip of paper to decorate the inside of my card to finish: 

I really like that this card with its modern, rather eclectic, feel - a change from the more traditional red and pink, hearts and flowers - although I still have some of those to share with you too! I'm linking today's card up with the lovely ladies over at SUO Challenges where they are asking us for Valentines-themed projects too.

Here is the visual summary of the key products used on today's project for you to pin for easy reference:


You can see all of my 'How To' summaries on my 'How To - Tips and Techniques' Pinterest board in case you've missed any. 

How does our board inspire you? I can’t wait to see what YOU create! For more inspiration, be sure to visit the rest of the  Festive Friday Challenge Design team:

Ann Schach
Beth McCullough
Sharon Hashimoto Burkert
Melanie Hungerford
Helen Jennings
Stephanie Lanzalotto
Melva Peters
Jaydee
Diane Evans
Joanne James - you are here!

Enjoy your day and I'll be back tomorrow with another project. Until then, happy stampin'!


Stampin' Up! Supplies Used:

Table built using Product Table Builder by The Crafty Owl - Independent Stampin' Up! Demonstrator.

Relax At The Oceanfront FF101

by Joanne James21. January 2022 09:00

Happy Friday everyone - the weekend will soon be here! Today I have my card for the new challenge over at Festive Friday. The challenge that we are celebrating this week is 'International Wetland Day' which is on 2nd February and here's our inspiration board:


Remember the fun thing is that at Festive Friday you do not need to actually celebrate the occasion; your goal is to simply use three or more items from the inspiration list on your project. This week I used grasses, green, brown, water and blue from the inspo list along with this week's sketch layout over at Inspire.Create - but my card is more coastal than wetlands, with a distinctly Caribbean influence - take a look: 


Here's the low-down on today's card:

An Ocean Scene - I decided to break open my new 'Oceanfront' stamp set and create a tranquil coastal scene for my card. This set is so fun with endless creative possibilities! I inked my stamps then brushed additional colour onto them with a blending brush to even the tones and stamped straight onto my panel of white cardstock, beginning with the sky and working downwards until my scene was complete.  

Relax On The Horizon - Oceanfront is a sentiment-free set, so I made my banner sentiments from the 'On The Horizon' stamp set, stamping the 'Relax enjoy your day!' wording twice, once in Early Espresso for the bottom banner and once in Granny Apple Green, so that I could fussy-cut the word detail, which I then backed with a scrap of green and white gingham check from my bits box:


I played around with the banner lengths in relation to the sketch to make them work for my design and added some linen twine and a simple bow to add to the beachy feel of my card.

Another stamp from within the same set was used to finish the inside, with some added grasses:

Pick A Pebble - Finally, I added a trio of shiny brown enamel pebbles to the base of my scene for added interest - these make a great added detail for the seaside theme.

Here is the visual summary of the key products used on today's project for you to pin for easy reference:


You can see all of my 'How To' summaries on my 'How To - Tips and Techniques' Pinterest board in case you've missed any. 

I just love this card; it reminds me of many vacations in the Caribbean where I used to enjoy deserted beaches, warm waters and sunshine and escape the worst of the British winter each February 'BC' (before children, that is!)

How does our board inspire you? I can’t wait to see what YOU create! For more inspiration, be sure to visit the rest of the  Festive Friday Challenge Design team:

Ann Schach
Beth McCullough
Sharon Hashimoto Burkert
Melanie Hungerford
Helen Jennings
Stephanie Lanzalotto
Melva Peters
Jaydee
Diane Evans
Joanne James

Enjoy your day and I'll be back soon with another project. Until then, happy stampin'!


Stampin' Up! Supplies Used:

Table built using Product Table Builder by The Crafty Owl - Independent Stampin' Up! Demonstrator.

Party Puffins For A Birthday Celebration FF100

by Joanne James7. January 2022 09:00

Today I have my card for the new challenge over at Festive Friday and this week we are celebrating something very special:
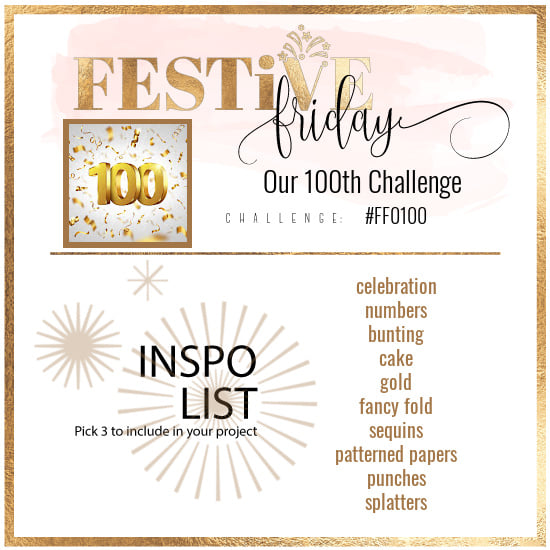
 

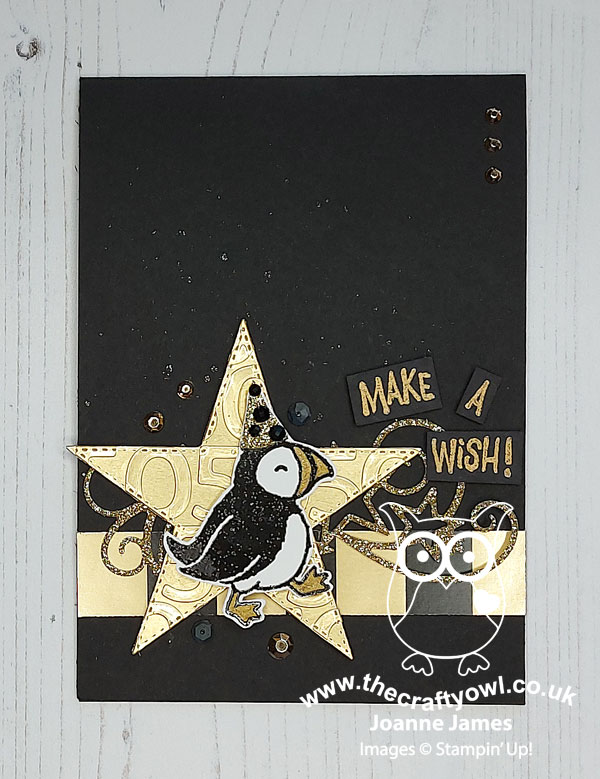
Our 100th challenge - woohoo! Whilst you do not need to actually celebrate the occasion to play along - your goal is to simply use three or more items from the inspiration list on your project - this week's list is sure to generate lots of celebratory cards!  This week I really went to town with the inspo list; I used celebration, numbers, gold, sequins, patterned paper and splatters (I even included a cake on the inside!) and this is what I came up with:
 

 Here's the low-down on today's card:

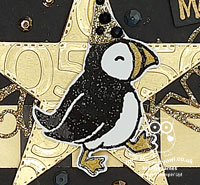
A Special Party Puffin - I decided to add a puffin from the 'Party Puffins' stamp set as the focal point for my card today, but a special celebration definitely requires a special puffin, so this one is dressed to impress! I heat embossed him in black, colouring his beak and feet with gold Wink of Stella and fussy cutting him a hat from gold glimmer paper with black jewels for added pizzazz! This little fella is so sparkly! 

Two Reasons To Celebrate - You may be wondering why when we are celebrating our 100th challenge at Festive Friday, why my card has 50s on it. Well, later this year I will be celebrating a milestone birthday - my 50th, to be exact. I was the oldest in my year at school so will be the first of my school peers to reach this momentous occasion; what this means though is that starting in September I will be needing a large number of 50th birthday cards to send out during the 12 months thereafter, so I thought I'd start making now so that I was prepared! I created a fun faux-embossed star by cutting a bunch of 5s and 0s with my Playful Alphabet Dies and adhering them to gold foil, before cutting a star with my Stitched Star Dies to create a subtle nod to this birthday milestone:
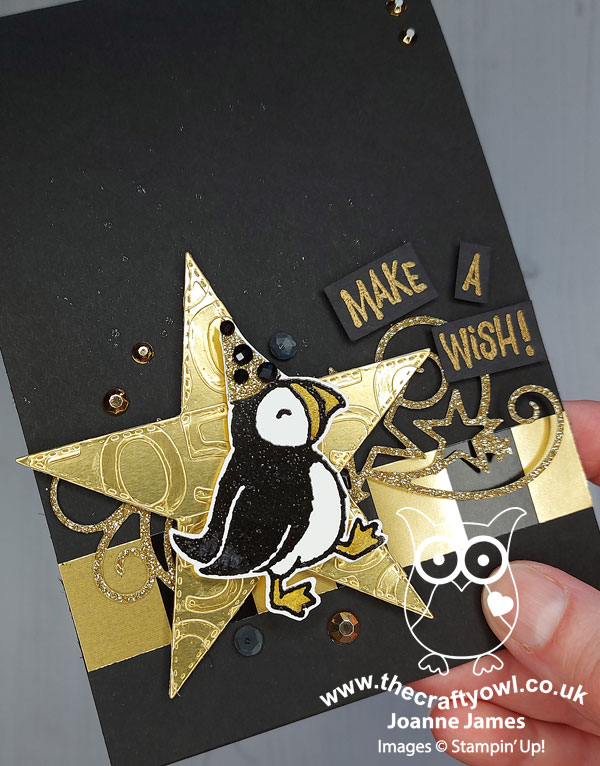
 

I thought this would make a good masculine card design - what you do think?

Gold, Gold and More Gold - With a solid black background, I majored on gold to give this card birthday bling: gold foil, gilded gems, gold glimmer paper and a touch of black and gold (retired) striped designer paper, along with some subtle gold Wink of Stella splatters on the base of my card (difficult to see on the photos, but so sparkly in real life!). I also added a gold-on-black heat-embossed sentiment; and along with a simple birthday greeting inside my card, a birthday cake topped with gold icing and sparkly candles: 
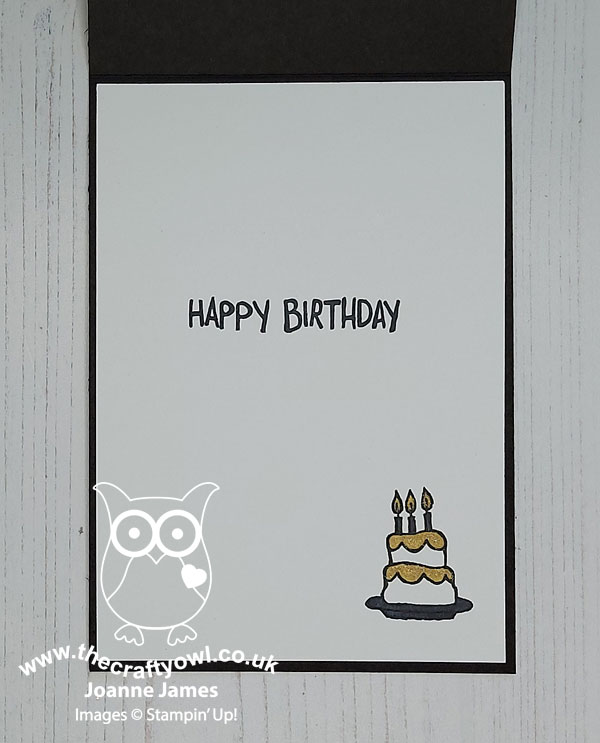
So what do you think - a suitably glamourous sparkly birthday card to celebrate a milestone birthday alongside our milestone challenge this week? Do leave me a comment below - I'd love to hear your thoughts!

Here is the visual summary of the key products used on today's project for you to pin for easy reference:
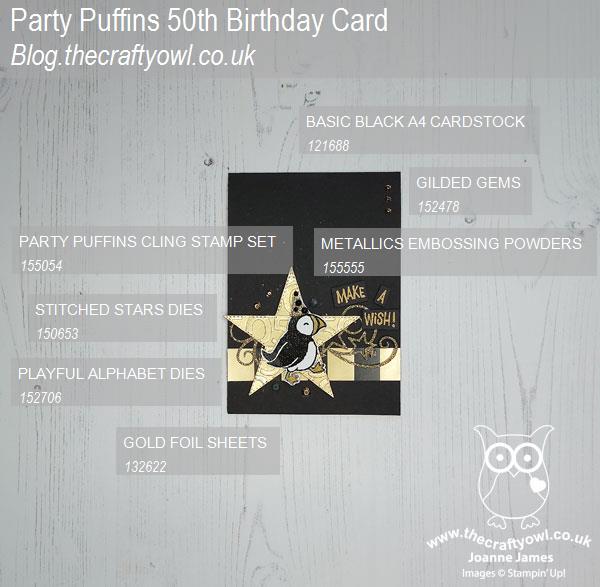
 

You can see all of my 'How To' summaries on my 'How To - Tips and Techniques' Pinterest board in case you've missed any. 

How does our board inspire you? I can’t wait to see what YOU create! For more inspiration, be sure to visit the rest of the  Festive Friday Challenge Design team:

Ann Schach
Beth McCullough
Sharon Hashimoto Burkert
Melanie Hungerford
Helen Jennings
Stephanie Lanzalotto
Melva Peters
Jaydee
Diane Evans
Joanne James

I am also playing along with Color Throwdown (I used black, white and gold) and over at Try Stamping on Tuesday where they have a great sketch this week - and of course I'm playing with the optional theme of 'celebrate' too.


Enjoy your day and I'll be back tomorrow with another project. Until then, happy stampin'!


Stampin' Up! Supplies Used:
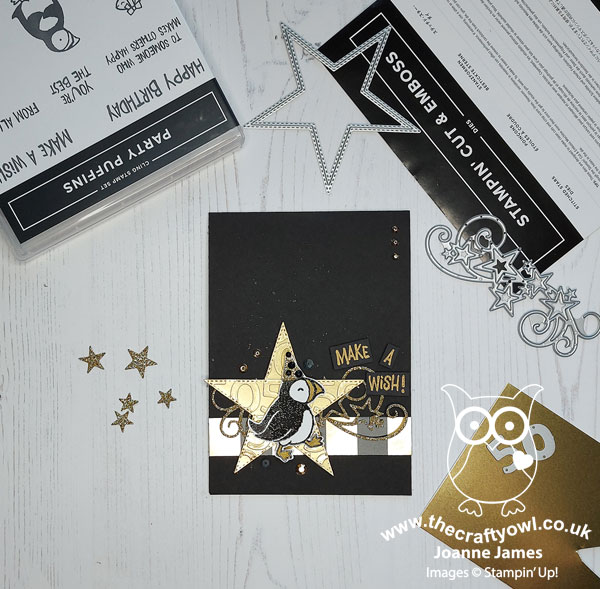
Table built using Product Table Builder by The Crafty Owl - Independent Stampin' Up! Demonstrator.


Giving Gifts CAS Ombre Snowflakes FF00099 and AYSI265

by Joanne James10. December 2021 09:00

This week I've managed to combine both my card for the new challenge over at Festive Friday and my design team card for our new challenge over at As you See It and also used the idea I had brewing for my entry  over at AAA Cards too:


The challenge that we are celebrating this week at Festive Friday is 'New Year's Day' which is on 1st January and at As You See it we are ending the year on a timely speed stamping challenge with the theme of 'snowflakes'. Remember at Festive Friday you do not need to actually celebrate the occasion; your goal is to simply use three or more items from the inspiration list on your project. I don't usually send cards to celebrate New Year; this week I used sparkle, rhinestones and diecuts from the FF inspo list and this is what I came up with:


Here's the low-down on today's card:

Giving Gifts Of Snowflakes - If you read Wednesday's blog post (if you didn't, you can see it here) you will recognise the snowflake border on my card. This was actually the first card in this pair that I made - clever positioning of these dies makes it easier to create this fun snowflake border detail. In keeping with the clean and simple feel of my card, I added a simple sentiment from the 'Snowflake Wishes' stamp set in Night of Navy and positioned it in the centre of my panel. I also had time for some quick stamping on the inside of my card too:


Blue Ombre Sparkle - I am having something of a love affair with the Night of Navy blue ombre glimmer paper at the moment - I could do with a whole pack of this colour on its own! I think it works really well when balanced against lots of white for a touch of festive sparkle, especially when paired with snowflakes (you can see another example of that here) so I couldn't resist using it for the inset panel behind my snowflakes. Check out the sparkle:


The Need For Speed - This card was super quick to put together: I finished at 6 minutes and 5 seconds and was feeling pretty pleased with my self in meeting my AYSI brief. It was at this point that I realised that having used diecuts and sparkle, I only needed one more thing from the Festive Friday inspo list and I would meet both briefs and save myself even more time, so I spent another 20 seconds adding some blue faceted gems (aka blue rhinestones!) to my snowflake centres and managed at 6 minutes 25 seconds to meet the AYSI speed brief using three things from the FF inspo list whilst still meeting the AAA Cards CAS brief, and with the option of snow too! Just 6 products, 3 challenges and less that 10 minutes - I'd say that's a result at this super-busy time of year!

Here is the visual summary of the key products used on today's project for you to pin for easy reference:


You can see all of my 'How To' summaries on my 'How To - Tips and Techniques' Pinterest board in case you've missed any. 

We all need to save a little time at this time of year, so I hope you are inspired to create something speedy today - or maybe even get a head start on your New Year cards too!

For more inspiration, be sure to visit the rest of the  Festive Friday Challenge Design team:

Ann Schach
Beth McCullough
Sharon Hashimoto Burkert
Melanie Hungerford
Helen Jennings
Stephanie Lanzalotto
Melva Peters
Jaydee
Diane Evans
Joanne James

And here's a summary of the As You See It challenge rules:

  • Create any card, scrapbooking page, 3D project or packaging project that fits the challenge.
  • Please include the challenge graphic and link back to the challenge in your blog post. Turn off word verification so we can leave you lots of lovely comments. Make sure you link the post not the whole blog to the Linky. Use #AYSIXXX when uploading to a public gallery.
  • If you’re unsure about ‘the rules’, check the details under the Challenge Guidelines tab on the As You See It Challenge homepage.
  • In a speed stamping challenge, please time yourself and say in your post how long your card took to complete. 
We look forward to seeing your creations in the FF and AYSI galleries.

Enjoy your day; I am interrupting my usual day of Friday chores with a coffee with a friend I haven't seen in a super long time and my pre-Christmas haircut, so it's all happening here!! I'll be back tomorrow with another project. Until then, happy stampin'!


Stampin' Up! Supplies Used:

Table built using Product Table Builder by The Crafty Owl - Independent Stampin' Up! Demonstrator.

Delivering Cheer in Christmas Plaid FF00098

by Joanne James26. November 2021 09:00

This is my first post of a two-post Friday and I'm here with my card for the new challenge over at Festive Friday. 


The challenge that we are celebrating this week is 'Christmas Jumper Day' which is on 10th December this year. Remember the fun thing is that at Festive Friday you do not need to actually celebrate the occasion; your goal is to simply use three or more items from the inspiration list on your project. No jumpers for me this week; instead I used red, green, gold, plaid and glitter as my starting point and this is what I came up with:


Here's the low-down on today's card:

Wrapped In Plaid - First up - I based my card today around a scrap of retired Wrapped in Plaid designer series paper that I found in my scraps box. I just loved the mix of colours and not only did it feature gold, red and green so use three items on the inspiration list straight off the bat, it is perfectly festive to ... 

Delivering Cheer - ... paper-piece onto the skirt of my 'Delivering Cheer' party girl. For the top half I used the armful of gifts, all coloured with my Stampin' Blends to coordinate with her skirt. This is such a fun stamp set with so many mix and match options. It reminds me of the paper dressing up dolls I had as a child! I added another scrap of plaid along with a sentiment from the same set to the inside of my card:


All That Glitters - I heat embossed my cover sentiment in gold, added a gold Wink of Stella bow to my parcel pile and added a trio of gold gilded gems, but the real glitter comes from the retired Be Dazzling paper that I used for my mat layer - I can't tell you what a fabulous sparkle this adds in real life:

I love the finished look of this card; this is how I imagine I look on Christmas Day, although I'm sure my family would disagree!

Here is the visual summary of the key products used on today's project for you to pin for easy reference:


You can see all of my 'How To' summaries on my 'How To - Tips and Techniques' Pinterest board in case you've missed any. 

How does our board inspire you? I can’t wait to see what YOU create! For more inspiration, be sure to visit the rest of the Festive Friday Challenge Design team.

Ann Schach

Beth McCullough

Sharon Hashimoto Burkert

Melanie Hungerford

Helen Jennings

Stephanie Lanzalotto

Melva Peters

Jaydee

Diane Evans

Joanne James


Enjoy your morning and I'll be back later with my project for the new challenge over at As You See It. Until then, happy stampin'!


Stampin' Up! Supplies Used:

Table built using Product Table Builder by The Crafty Owl - Independent Stampin' Up! Demonstrator.

Current Promotions

Stampin Cut and Emboss

Save up to 30% off on all your favourite kits from 1 to 31 October! 

Click here to see the current kits available and order yours online today.

Join My Team

It's always a great time to join Stampin’ Up! During October you can get even more in your starter kit! New team members can get £160 worth of products for only £99 + free business supplies + free shipping + all the fun being a part of Stampin’ Up! Stampin' Up! has something for everyone: join my growing team and benefit from my support to enjoy Stampin' Up! however you choose.

If you're interested, call me for a chat to understand how I can help you realise your goals. Alternatively, if you have already decided to sign up and you just can't wait, please click here for the link to the online form where you can sign up and order your starter kit right away! 

Shop Online

Access my online shop 24 x 7, 365 days of the year:

Current October hostess code:

4XPEYCB9

Shop Online

Scrapbooking

Stampin' Up! has introduced a new range of 12x12" scrapbooking product and kit - the full range is now available to purchase online. To download a copy of the new digital Scrapbooking Catalogue click here.

Mini Catalogue

BROWSE THE CATALOGUE

'Tis The Season - the new Stampin' Up! Mini Catalogue is here! For more details and to download your copy click here

2024-25 Annual Catalogue

BROWSE THE CATALOGUE

Click on the image to download your copy of the 2024-25 annual catalogue. For a full list of current SU! supplies, go to my online store. If you would like any help or advice, please drop me a line at joanne@thecraftyowl.co.uk or give me a call on 07773 421446 - I'd be happy to help.

Latest Kits!

Stampin Cut and Emboss

The Christmas Ornaments Kit and Card Keeper Kit are the latest kits in the online store - get yours here!

New Online Exclusives

There are new products available exclusively in the online store from 5 November - check them out here.

About Me

Hi I'm Joanne and live in Northampton and when I'm not looking after my husband and two beautiful children, am an avid crafter with a passion for all things Stampin' Up!

I must confess that I have never been a big rubber stamper - until I discovered Stampin' Up! that is. I love the fact that I can get such great results with co-ordinating stamps, inks, papers and punches - the possibilities are endless! Join me on my stamping journey as I share the things I love and be inspired to create amazing things yourself!

Follow Me

Monthly Newsletter

Box Builder

Click the button above to use Box Buster to create your custom box design using the Envelope Punch Board!

Kits Collection Now Available!

Stampin Cut and Emboss

The new Kits Collection from Stampin' Up! is now available!

Click here to see the current kits available and order yours online today.

I Design For


Stampin' Up Stuff

This is my personal blog and is not endorsed by Stampin’ Up! I hope you find it a plentiful source of ideas and personal inspiration but please don't copy my designs for contest submission or use for classes, publication or sale without express permission.