Easter Bunnies Are Not Just For Easter PP634

by Joanne James2. April 2023 08:00

Today it's Sunday and time for this week's new challenge over at The Paper Players! It's the turn of the fabulous Jaydee to host this week and she has a theme challenge for us to work with:


The animals came in two by two - feature two animals on your card, how fun! I actually have two cards to share with you today: I made my Paper Players card after I made the first one, so I'll share that one first so that the second one makes a bit more sense! My first card is an Easter card using Jen T's layout over at Freshly Made Sketches and the current Colour Inkspiration colour palette:

    May be an image of text

I thought the oval layout would be perfect for two bunnies and the colour palette would be just the ticket for a dark chocolate brown bunny and some floral decoration courtesy of the Dainty Delight Dies - take a look:


Whilst the layout worked beautifully for one bunny, two were definitely a squeeze, so having added some soft clouds and grass to surround my single bunny, I decided to add an Easter sentiment from the retired set 'Crazy About You'. This is such a pretty colour combo and I love the embossed detail on the Dainty Delight flowers and leaves too:


I then moved on to card two. I punched another bunny so that I had another pair and also had the country gingham oval left over from my first card that I still wanted to use up, so this time I switched to the current Sketch Saturday layout and decided to play along with the challenge over at TGIF Challenges and look at what other scraps and offcuts I had that would co-ordinate with my gingham oval.


I actually had quite a few! A strip of Country Floral designer paper leftover from a previous project, an offcut of Mint Macaron and some offcut strips of Wisper White that were just wide enough to cut a couple of borders with my Penned Flowers Dies and a scrap of Poppy Parade. This is what I came up with:


I used a Petal Pink card base and this time positioned my bunnies mirroring each other, with a punched heart between them. I really wanted a 'Some bunny loves you' sentiment but alas, I don't have one in my collection so went with this one from the retired Sale-A-Bration set 'Thanks A Bunch' instead:


I think this would make a sweet anniversary card;. It actually came together quite quickly by collecting up a bunch of leftover bits and pieces and more importantly - I managed to accommodate my two bunnies this time!

Here is the visual summary of the key products used on today's projects for you to pin for easy reference:


You can see all of my Product and 'How To' summaries on my 'How To - Tips and Techniques' Pinterest board in case you've missed any. 

Before you reach for your ink and papers, check out what our amazing team has created to inspire you this week:

Here's a quick recap of our challenge rules:
 
1.  Create a new paper project
2.  Upload your creation to your blog with a link back to us and provide a direct link to the post featuring your challenge submission.
3.  Please link your card to no more than four challenges, TOTAL.
4.  Have FUN!

Enjoy your day; I am off to an extra hockey game today and then we have the start of the Easter holidays, which for us means the start of serious revision season in the James household - not much in the way of excitement here! I'll be back tomorrow with another project. Until then, happy stampin'!


Stampin' Up! Supplies Used: 

Table built using Product Table Builder by The Crafty Owl - Independent Stampin' Up! Demonstrator.


Beside Me Quick Father's Day Card AYSI295

by Joanne James24. March 2023 12:00

Today I'm sharing my design team card for our new challenge over at As you See It where it's time for our monthly speed challenge, this time with a theme chosen by Jan - I also used one of the current Try Stamping On Tuesday sketches for my layout and the fresh colour palette over at Sunday Stamps ( I used dark blue, light blue and red):
    

The great outdoors! I decided I didn't want to go with anything floral or scenic for my card, so my mind wandered to sport and outdoor pursuits and I decided to ink up a new and as yet unused stamp set called 'Beside Me' and make a Father's Day card; I know Father's Day is still some time away here in the UK (it falls on 18th June) but the 'Beside Me' stamp set has such great images and if not carried over will be retired by then, so I'm getting in on the action now. Here's the card I came up with:
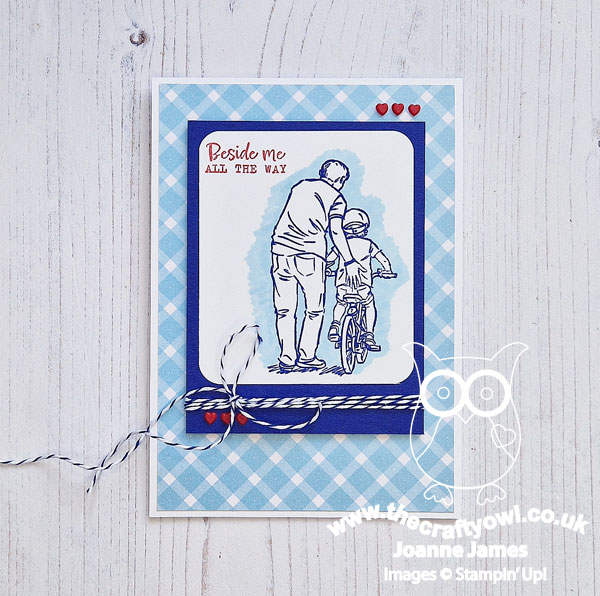
 

Here's the low-down on today's card:

It's All In The Preparation - As we always say when we have a speed challenge, the key is to be prepared. Gather all your supplies up front and plan what you are going to do - this can all be done before the stopwatch starts. I decided on my design and colour scheme and got everything ready, including my cardstock, paper, twine, embellishments, Stampin' Blends, ink pads and tools such as mu Stamparatus. My cardbase was already cut as I keep a stack of white ones ready as these are the ones I use most and the large piece of DSP was already cut to size as I had this cut for a previous project but didn't use it. I worked out the sizes needed for my other two layers, mounted my stamps on my platform, then started my stopwatch!

A False Start - The first thing I planned to do was stamp and colour my image. I thought my design would allow me time to roughly colour this small image, but alas - my timer went off just as I finished colouring. Here's the first image I coloured - this alone took me 10 minutes:
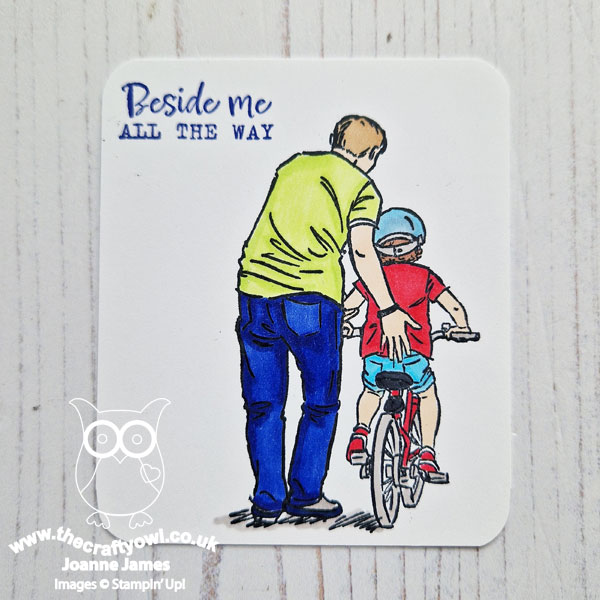
 

I know colouring can be time-consuming, but I clearly under-estimated this one! So I set that image aside, thought about how I could use way less time, got a new piece of black white cardstock and reset the timer. Take two!

Back To The Drawing - or Colouring - Board - I decided that the key to speedy colouring would rely on focusing on the outline of the image along, rather than colouring it, so I changed up the colours and stamped it in Starry Sky instead of black and stamped the sentiment in Sweet Sorbet. This was so quick, I decided to then just add some rough highlighting to the image and scribbled my lightest Balmy Blue Blend around the image to highlight it. No blending, just a rough colour - I think it works though, what do you think?
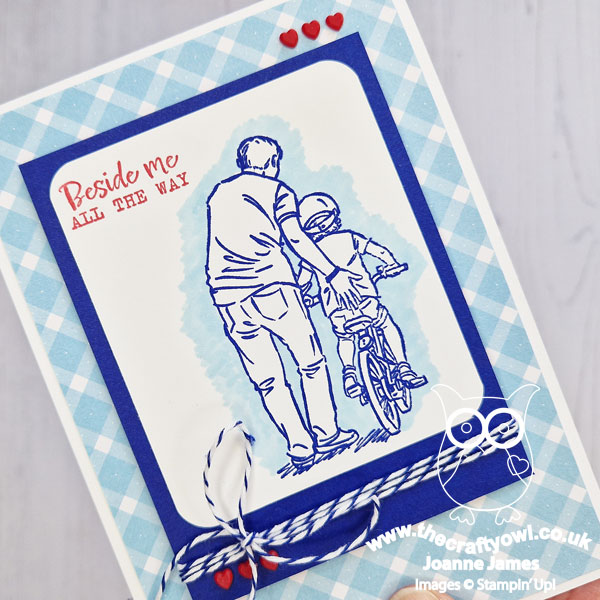
 

I then quickly rounded the corners and put the whole thing together, adding my baker's twine and two trios of heart embellishments to finish. I quickly stopped my timer - 9 minutes and 58 seconds, get in! Most of the time was spent trying to get the hearts straight!! This is such a simple way to use a line image designed for colouring and it's perfect for a quick card or if you're just not a fan of colouring with markers or pencils. 

I so love the images in this set - this one reminds me of when my husband was teaching Ben to ride his bike, so I just had to have it!

Here is the visual summary of the key products used on today's project for you to pin for easy reference:
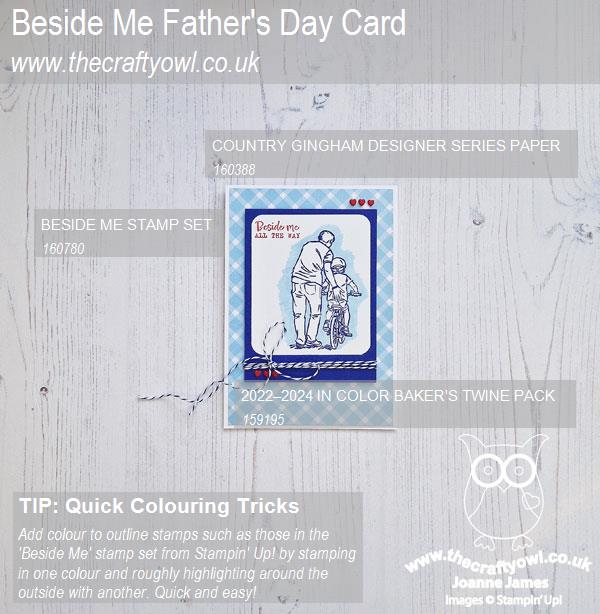
 

You can see all of my 'How To' summaries on my 'How To - Tips and Techniques' Pinterest board in case you've missed any. 

Here's a summary of our challenge rules:

  • Create any card, scrapbooking page, 3D project or packaging project that fits the challenge.
  • Please include the challenge graphic and link back to the challenge in your blog post. Turn off word verification so we can leave you lots of lovely comments. Make sure you link the post not the whole blog to the Linky. Use #AYSIXXX when uploading to a public gallery.
  • If you’re unsure about ‘the rules’, check the details under the Challenge Guidelines tab on the As You See It Challenge homepage.
  • In a speed stamping challenge, please time yourself and say in your post how long your card took to complete
We look forward to seeing your creations in the AYSI gallery.

Enjoy your day and I'll be back tomorrow with another super clean and simple project. Until then, happy stampin'!


Stampin' Up! Supplies Used:

Table built using Product Table Builder by The Crafty Owl - Independent Stampin' Up! Demonstrator.

Adorable Owls Baby Card PP627

by Joanne James12. February 2023 08:00

Today it's Sunday and time for this week's new challenge over at The Paper Players! It's the turn of the fabulous Ann to host this week and she has a fresh colour challenge for us to work with:


I thought these colours were perfect for a card to welcome a new baby so I grabbed Linda's layout over at Freshly Made Sketches and my 'Adorable Owls' stamp set and set to work. I This is what I came up with:


Here's the low-down on today's card:

I added a piece of Balmy Blue Country Gingham to the lower portion of my cardfront, then added a horizontal panel of clouds cut using the Basic Borders Dies. I stamped and coloured two owls in the challenge colours with my Stampin' Blends, then fussy cut them out. I sat my baby owl on her own cloud, courtesy of the Give It A Whirl Dies, popped up on dimensionals, then added my second owl. My baby owl has a pink bow since Rebecca's piano teacher has just become a father to a beautiful daughter named Harriet, so this card will be winging its way to him to congratulate the family on their new arrival. My heat-embossed sentiment is from the 'Charming Sentiments' bundle, which I diecut with the co-ordinating dies: 

These sentiments come in two halves - I used the second one on the inside of my card:

'Adorable Owls' is such a cute stamp set and even better because it's free with a £45 order during Sale-A-Bration which runs until the end of the month - got to love a free stamp set, right?!

Here is the visual summary of the key products used on today's project for you to pin for easy reference:


You can see all of my Product and 'How To' summaries on my 'How To - Tips and Techniques' Pinterest board in case you've missed any. 

Before you reach for your ink and papers, check out what our amazing team has created to inspire you this week:

Here's a quick recap of our challenge rules:
 
1.  Create a new paper project
2.  Upload your creation to your blog with a link back to us and provide a direct link to the post featuring your challenge submission.
3.  Please link your card to no more than four challenges, TOTAL.
4.  Have FUN!

Enjoy your day; the James Juniors are on half term this week, so this will be a week of exam revision mixed with a little R&R before getting back to it. I'll be back tomorrow with another project. Until then, happy stampin'!


Stampin' Up! Supplies Used: 

Table built using Product Table Builder by The Crafty Owl - Independent Stampin' Up! Demonstrator.

Around The Bend CAS Thank You Card CCS 504

by Joanne James7. February 2023 13:00

It's Tuesday and time for a new challenge over at CAS Colours & Sketches. We are into the second month of the year and I am your hostess for February! Our first challenge is a colour challenge: 


For my card today I took the opportunity to have another play with my Around the Bend Dies and create a clean and simple thank you card - take a look:


Here's the low-down on today's card:

Today's card features the detailed corner die. I added a piece of Country Gingham Balmy Blue check to my Balmy Blue card base, then overlaid a piece of white featuring the corner diecut on top. Onto this white panel, I stamped a simple 'thanks' from the 'Biggest Wish' stamp set and added a diecut flower with leaves using other dies in the set:

 I love the embossed detail on the diecuts in this set - it adds interest and allows a single flower to take centre stage, with nothing else needed to compliment that pretty corner detail.

Here is the visual summary of the key products used on today's project for you to pin for easy reference:


You can see all of my 'How To' summaries on my 'How To - Tips and Techniques' Pinterest board in case you've missed any. 

As a reminder, for our colour challenges, you must use all of the stated challenge colours. You may also use neutral colours; however, the challenge colours should be the most noticeable ones featured on your card. We use Stampin' Up! color names for reference, but you are welcome to use any other companies' products as long as you match the challenge colours as closely as possible.

Enjoy your day; I'm looking forward to catching up on some crafting before a super-late school run this evening; the youngest of the James Juniors is having to forgo his weekly club hockey practice in order to participate in a whole school House Singing competition. Apparently his house is singing 'I Will Survive' by Gloria Gaynor - having listened to the practice, I'm not sure the audience will, but there we are!!

I'll be back tomorrow with another project. Until then, happy stampin'!


Stampin' Up! Supplies Used:

Table built using Product Table Builder by The Crafty Owl - Independent Stampin' Up! Demonstrator.
 

Country Floral Lane With Love Stitched Panels Card

by Joanne James14. January 2023 09:00

Today I'm sharing a card showcasing more of the lovely Country Floral Lane and Country Gingham papers for a card made using this week's Try Stamping on Tuesday sketch:

Here's my card:


Here's the low-down on today's card:

There's really not much to say about this card - it features two more designs from packs you've seen me use already; I simply diecut a number of stitched rectangles and layered them as per the sketch, adding in some (retired) white cotton ribbon for the vertical element and a simple heat-embossed sentiment from the Country Bouquet stamp set:


I just love the fresh blue and white colour scheme of this card - I am yearning for spring! - and a great quick and easy card for you to recreate if you have some crafty time this weekend. 

Here is the visual summary of the key products used on today's project for you to pin for easy reference:


You can see all of my 'How To' summaries on my 'How To - Tips and Techniques' Pinterest board in case you've missed any. 

Enjoy your day; both of the James Juniors are playing hockey away today, so hubby and I will be dividing and conquering to ensure everyone gets to where they need to be. I'll be back tomorrow with another project for this week's new challenge over at The Paper Players and will be sharing something new that I think you'll like so you you won't want to miss it. Until then, happy stampin'!


Stampin' Up! Supplies Used:

Table built using Product Table Builder by The Crafty Owl - Independent Stampin' Up! Demonstrator.

Love Cats Meet Country Gingham Clean and Simple

by Joanne James11. January 2023 20:54

Today I'm sharing a quick clean and simple card for this week's colour challenge over at TGIF Challenges:


I thought this trio of colours would be perfect for a card using the new 'Love Cats' stamp set and a piece of Country Gingham paper in Balmy Blue - take a look:


This card really did come together in a flash; I stamped the cat image partially onto white cardstock and partially onto the gingham (your Stamparatus will make light work of this) and butted both pieces together and adhered to a thick white cardbase:


I masked off the hearts so that I could stamp them in separately in pink and masked and partially stamped the sentiment - this is a great way to make what is a Valentine's sentiment something more generic.

I really love this set - I am not a cat lover at all, but these quirky felines are so fun!

Here is the visual summary of the key products used on today's project for you to pin for easy reference:


You can see all of my 'How To' summaries on my 'How To - Tips and Techniques' Pinterest board in case you've missed any. 

Enjoy your day and I'll be back tomorrow with another project. Until then, happy stampin'!


Stampin' Up! Supplies Used:

Table built using Product Table Builder by The Crafty Owl - Independent Stampin' Up! Demonstrator.

Country Floral Lane Friendship Tag Card

by Joanne James8. January 2023 08:00

Today it's Sunday and time for this week's first challenge of the new year over at The Paper Players! We have three fabulous new guest designers Suzy, Fran and Tara, and this week it's the turn of the fabulous Ann to host and she has a fun theme challenge for us to work with:


Use a tag on your project! I decided to go all-out with the Country Floral Lane Suite for today's card and use lots of different elements to create a pretty card for a friend - take a look:


Here's the low-down on today's card:

Country Floral Lane - Today's card features both the Country Gingham and Country Floral Lane DSPs, both of which feature in this suite. Hearts, flowers and gingham in co-ordinating colours of Balmy Blue, Sweet Sorbet, Mint Macaron and Petal Pink - what's not to love?! 

Seasonal Labels - I made a bespoke tag for my project, using the Seasonal Labels Dies and cutting a straight age across the bottom so that it made a tag as opposed to a label shape. I cut my tag from one of the floral patterns and used it as the base element for the focal point of my card, using an additional (shortened) label from the same set to add my sentiment.

Finishing Touches - I decorated my tag with another heart-shaped flower (you will be seeing a lot of these in coming weeks!), this time punched directly from the Country Floral Lane designer paper and added some foliage from the Country Bouquet set that I stamped and fussy cut, along with a scattering of a few tiny hearts fussy cut from the Country Floral Lane paper:

A little (retired) ribbon tied with some in-colour baker's twine complete my tag and card. I love that this set can be used in so many ways and embraces 'love' in the broadest sense. I'm linking today's card up over at SUO Challenges where the theme is Designer's Choice - this is definitely mine!

Here is the visual summary of the key products used on today's project for you to pin for easy reference:


You can see all of my Product and 'How To' summaries on my 'How To - Tips and Techniques' Pinterest board in case you've missed any. 

Before you reach for your ink and papers, check out what our amazing team has created to inspire you this week:

Here's a quick recap of our challenge rules:
 
1.  Create a new paper project
2.  Upload your creation to your blog with a link back to us and provide a direct link to the post featuring your challenge submission.
3.  Please link your card to no more than four challenges, TOTAL.
4.  Have FUN!

Enjoy your day; nothing special happening here today; it is officially the last day of the school holidays so with the return of the James Juniors to school this week I should see something of a return to a normal schedule. I'll be back tomorrow with another project. Until then, happy stampin'!


Stampin' Up! Supplies Used: 

Table built using Product Table Builder by The Crafty Owl - Independent Stampin' Up! Demonstrator.

Mini Catalogue

BROWSE THE CATALOGUE

The mini catalogue is now live! Read and download your copy here.

Shop Online

Access my online shop 24 x 7, 365 days of the year:

Current April hostess code:

VDKNV7BH

Shop Online

Join My Team

It's always a great time to join Stampin’ Up! New team members can get £130 worth of products for only £99 + free business supplies + free shipping + all the fun being a part of Stampin’ Up! Stampin' Up! has something for everyone: join my growing team and benefit from my support to enjoy Stampin' Up! however you choose.

If you're interested, call me for a chat to understand how I can help you realise your goals. Alternatively, if you have already decided to sign up and you just can't wait, please click here for the link to the online form where you can sign up and order your starter kit right away! 

Latest Kit!

Stampin Cut and Emboss

The Rock Legend Kit has all you need to make 8 cards with coordinating envelopes. Along with the new Panda Friends Kit, both are available from January 4th for just £14 each - get yours here!

2023-24 Annual Catalogue

BROWSE THE CATALOGUE

Click on the catalogue for a full list of current SU! supplies - if you would like to order any of the items featured, please drop me a line at [email protected] or give me a call on 07773 421446 - I'd be happy to help.

New Online Exclusives

There are new products available exclusively in the online store from 5 March - check them out here.

About Me

Hi I'm Joanne and live in Northampton and when I'm not looking after my husband and two beautiful children, am an avid crafter with a passion for all things Stampin' Up!

I must confess that I have never been a big rubber stamper - until I discovered Stampin' Up! that is. I love the fact that I can get such great results with co-ordinating stamps, inks, papers and punches - the possibilities are endless! Join me on my stamping journey as I share the things I love and be inspired to create amazing things yourself!

Follow Me

Monthly Newsletter

Box Builder

Click the button above to use Box Buster to create your custom box design using the Envelope Punch Board!

Kits Collection Now Available!

Stampin Cut and Emboss

The new Kits Collection from Stampin' Up! is now available!

Click here to see the current kits available and order yours online today.

I Design For


Stampin' Up Stuff

This is my personal blog and is not endorsed by Stampin’ Up! I hope you find it a plentiful source of ideas and personal inspiration but please don't copy my designs for contest submission or use for classes, publication or sale without express permission.