Bird Ballad Shadow Box Birthday Card For PP448

by Joanne James30. June 2019 09:00

Today it's Sunday and time for this week's new challenge over at The Paper Players! It's my turn to host this week and as it's the fifth Sunday in the month I have a tic-tac-toe challenge for you to work with:


I have been on a bit of a creative roll lately with the lovely Bird Ballad suite and I couldn't resist using it again for my birthday card today - take a look:


Here's the low-down on today's card:

Hello Sunshine - Yellow is one of my favourite colours to work with; I always think there is something so cheery about sending a yellow card, so I couldn't resist including this colour on the board and I decided to use Daffodil Delight for the base of my card. I'm also linking today's card up over at Festive Friday #FF037 where they have the design element of yellow as part of their current challenge:

#festivefridaychallenge, #FF0037, World Emoji Day, Yellow

A Fancy Fold - The outside of my card looks simple enough, with just a hint of embossing and a fussy cut bird and branch to highlight my sentiment, with a little linen thread and a Bird Ballad trinket for decoration. You could even be forgiven for wondering which line on the tictactoe board I completed (I actually followed the middle vertical line and the diagonal bottom left to top right). This card is no ordinary card though - it's a shadow box card and it opens to reveal this pretty stepped inside, courtesy of some windows cut with the Stitched Nested Label Dies and featuring a rear panel of the Bird Ballad DSP:


Not Just  A Label - The Stitched Nested Labels Dies are useful for framing and make great labels for sentiments - but you can also use them to make a fun lidded box too. Here's one I made using the second largest die for the base:


This box measures approx. 1 1/2" x 3" x 2" deep so is the perfect size for a few chocolates or a small gift. This is what it looks like inside:


The base and lid have a lipped edge, slide neatly together and I used colours to tie in with my card - I love when things co-ordinate! I've been working on a whole set of these boxes in different sizes and am planning to share those with you soon (maybe even with a video tutorial!)

This little card and gift combo is heading to my running buddy, whose birthday it is the week after next - she loves something handcrafted! I'm linking up with the team over at SUO Challenges today too where the current theme is 'birthdays'.

Here is the visual summary of the key products used on today's project for you to pin for easy reference:


You can see all of my Product and 'How To' summaries on my 'How To - Tips and Techniques' Pinterest board in case you've missed any. 

Before you reach for your ink and papers, check out what our amazing team has created to inspire you this week:

Here's a quick recap of our challenge rules:
 
1.  Create a new paper project
2.  Upload your creation to your blog with a link back to us and provide a direct link to the post featuring your challenge submission.
3.  Please link your card to no more than four challenges, TOTAL.
4.  Have FUN!

You can see all of my 'How To' summaries on my 'How To - Tips and Techniques' Pinterest board in case you've missed any. 

Enjoy your day; we will be collecting the youngest of the James Juniors from a sleepover and hoping the sun and high temperatures last long enough to enjoy a BBQ lunch. then having a quiet-ish day before his final week of school this year before he breaks for summer - eek!  I'll be back tomorrow with another project. Until then, happy stampin'!


Stampin' Up! Supplies Used: 

Table built using Product Table Builder by The Crafty Owl - Independent Stampin' Up! Demonstrator.

Bird Ballad Spotlight Friendship Card for PCC341

by Joanne James24. June 2019 08:20

Happy Monday everyone! Today I'm sharing a card that I made for my monthly technique class last week featuring the Bird Ballad Suite that uses the current sketch over at The Paper Craft Crew as the inspiration for the layout:

Paper Craft Crew Sketch Challenge PCC341

I was intrigued by the oval shape as I don't tend to use ovals on my cards often and I wanted to incorporate a few different techniques. This is what I came up with:


Here's the low-down on today's card:

A Spotlight on Fussy Cutting - The Bird Ballad Designer Series Paper is beautiful and just like the co-ordinating 'Free As A Bird' stamp set, offers a ton of fussy cutting possibilities - no co-ordinating shaped framelits for these feathered friends I'm afraid! I fussy cut one of the birds and backed him with a Crumb Cake stitched oval shape. If you look closely at the photo below, you will see that I didn't remove all of the paper - for the really tricky bits, such as around the legs and branches, I simply coloured the paper with my Crumb Cake Blends marker to blend in with the background. 


Background Birds on a Branch - The sketch shows some background stamping behind the banner and this inspired me to get out my watercolour pencils and add a very subtle row of birds using one of the stamps in the 'Free As A Bird' stamp set. I did some tone-on-tone stamping, stamping the image in So Saffron, then delicately coloured with my watercolour pencils and blended with a blender pen. Only the outer edges of the image are visible behind the oval, but I really like the way this detail adds interest to the background and spotlights the fussy cut bird and oval. 

Stamp and Emboss - Once I had completed all of the stamping and colouring on my card base, I ran the whole thing through my diecutting machine and embossed it with the Subtles 3D embossing folder. The texture this adds is so subtle it doesn't distort the stamping at all, but adds an almost silky feeling to the cardstock. I love it! Some lace and pearls and a little envelope decoration complete my card. 

Here is the visual summary of the key products used on today's project for you to pin for easy reference:


You can see all of my 'How To' summaries on my 'How To - Tips and Techniques' Pinterest board in case you've missed any. 

Enjoy your day; I have a lot to achieve today so need to get on with it! I'll be back tomorrow with another project. Until then, happy stampin'!


Stampin' Up! Supplies Used:

Table built using Product Table Builder by The Crafty Owl - Independent Stampin' Up! Demonstrator.

One Sketch Three Ways For The Paper Players PP447

by Joanne James23. June 2019 09:00

Today it's Sunday and time for this week's new challenge over at The Paper Players! I am hosting this week on behalf of the lovely Jaydee who had a fall a few weeks ago and is taking a few weeks off from crafting to recuperate. Jaydee has my favourite, a sketch challenge, for us to work with this week:


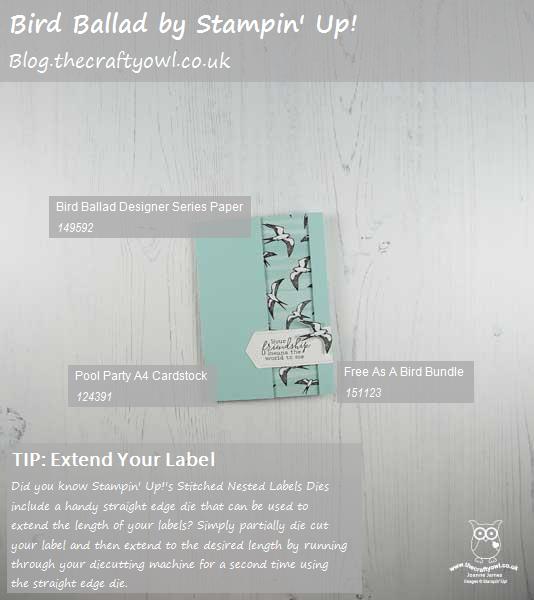
My regular readers will know how much I love a good sketch and this is one that can be used time and again. I liked it so much I made not one, not two but three cards with it to share with you this week (I'm making up for my lack of blog posts in recent days!) This is the first card I came up with using one of the Bird Ballad papers that I had yet to use:


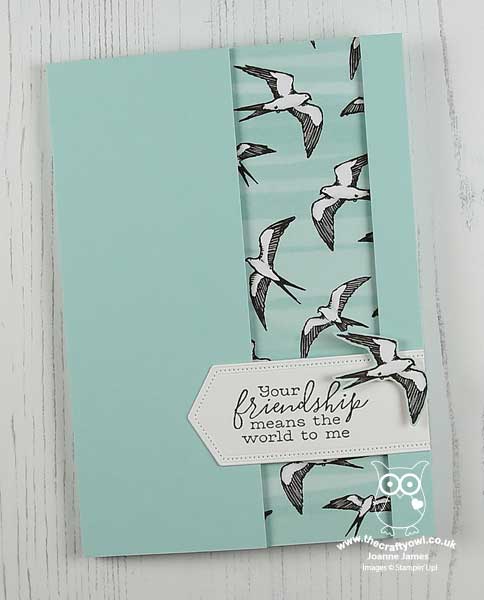
A simple card with an inset panel of DSP; the neat feature on this card is that I cut off the shaped end and extended one of the nested stitched labels for the sentiment and then added a bird I fussy cut from the paper itself.

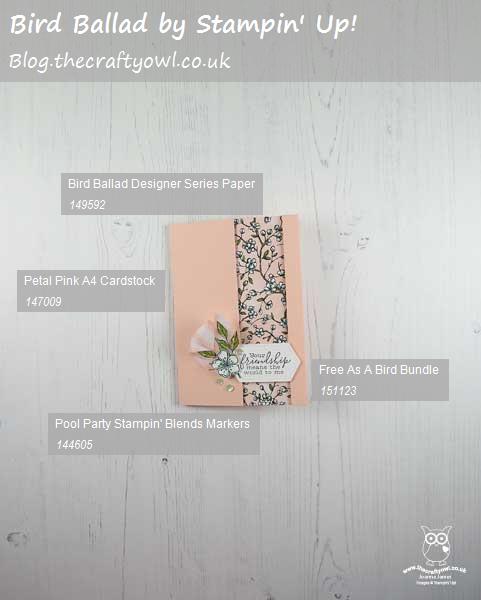
My second card uses the reverse of this bird patterned DSP for a soft floral card that is delicate and pretty:


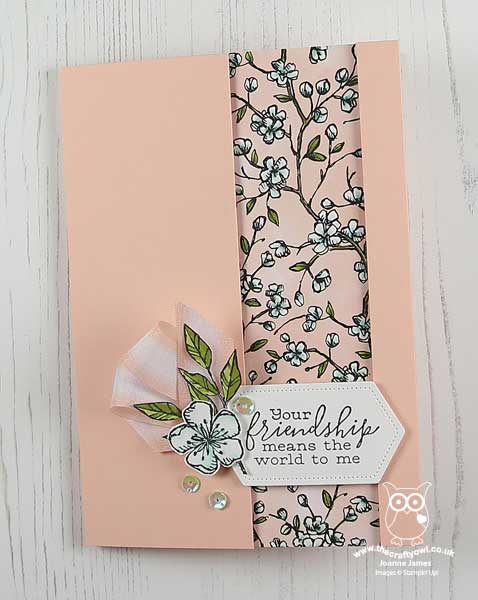
I used a basic nested stitched label for my sentiment this time but added a ruffle of ribbon (retired but I've linked below to a current one that would make a great substitute) and a fussy-cut flower and leaves with a few sparkly self-adhesive sequins. This one is much more girly and pretty!

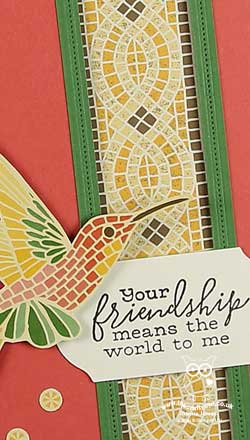
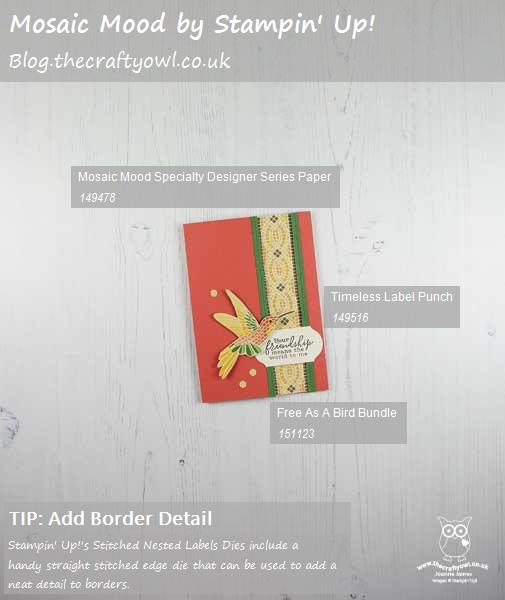
My third and final card uses both a border and fussy cut hummingbird from the Mosaic Mood paper set and highlights a new in-colour - Terracotta Tile:


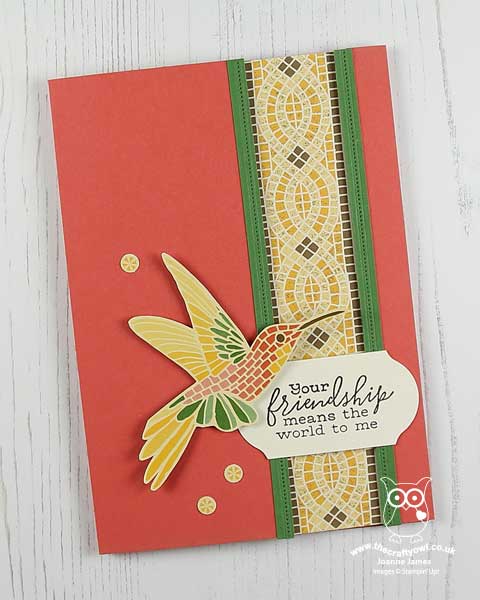
I am on a mission to use these papers as the main feature of my cards by simply co-ordinating with a variety of different sentiments. I used the same sentiment on this card from the 'Free As A Bird' stamp set that I used on the previous cards above, but this time punched it out of Very Vanilla cardstock using the new Timeless Label Punch. This is going to be a really useful punch for sentiments - the longer length makes it very versatile. I also picked up the green colour from my hummingbird and added a contrasting edge border to my top layer using the straight stitched die that can be found in the Stitched Nested Labels Die Set. We have a Facebook Group for Stampin' Up! demonstrators that has had lots of discussion as to how you would use this particular die, so I thought I would give you another example!

So which of today's cards is your favourite? I think I'm leaning towards the pretty pink florals with the ruffle of ribbon, which was inspired by this week's TGIF Challenge (badge at bottom of post). I buy lots of ribbon but often don't use it enough on my cards so I'm hoping to find the time to have another go at their challenge this week with something that features ribbon as the main focus, so do pop back later in the week for another idea. I'd love to know which one gets your vote - as always, feel free to leave me a comment below.

Here is the visual summary of the key products used on today's projects for you to pin for easy reference:

Card Number 1:


Card Number 2:


 Card Number 3:


You can see all of my Product and 'How To' summaries on my 'How To - Tips and Techniques' Pinterest board in case you've missed any. 

Before you reach for your ink and papers, check out what our amazing team has created to inspire you this week:

Here's a quick recap of our challenge rules:
 
1.  Create a new paper project
2.  Upload your creation to your blog with a link back to us and provide a direct link to the post featuring your challenge submission.
3.  Please link your card to no more than four challenges, TOTAL.
4.  Have FUN!

You can see all of my 'How To' summaries on my 'How To - Tips and Techniques' Pinterest board in case you've missed any. 

Enjoy your day; finally the sun is shining here in the UK for the second day in a row, so I will be spending mine enjoying a BBQ lunch and pottering in the garden. I might even take my laptop outside and prep some of this week's blog posts! I'll be back tomorrow with another project. Until then, happy stampin'!


Stampin' Up! Supplies Used: 

Table built using Product Table Builder by The Crafty Owl - Independent Stampin' Up! Demonstrator.
 

Bird Ballad Suite Onstage Make and Take

by Joanne James19. June 2019 21:00

I have the second of this month's technique classes tomorrow and it features the Bird Ballad suite. As I'm a little pressed for time today, I thought I'd share with you the 'make and take' we made using products from this suite at Stampin' Up!'s Onstage event when the annual catalogue was launched  - take a look:


Super pretty papers and a stamp set that is perfect for colouring, this suite is great for everything from super-simple cards through to more complicated creations. My card class is focusing on fancy folds, colouring and fussy cutting and I'll share these creations with you later thi week. For now though, this card shows how easy it is to create something pretty with some DSP, a little colouring and a lacy bow.

Here is the visual summary of the key products used on today's project for you to pin for easy reference:

 to follow

You can see all of my 'How To' summaries on my 'How To - Tips and Techniques' Pinterest board in case you've missed any. 

Enjoy your evening and I'll be back tomorrow with another project. Until then, happy stampin'!


Stampin' Up! Supplies Used:

to follow

Hello Rainbow Birds

by Joanne James10. June 2019 20:30

I had a lovely class this morning with a group of ladies featuring the Stitched Labels bundle and spent the rest of the day running errands in the rain - a typical day of British weather here in the UK today! Today I'm sharing a card that was inspired by the photo over at Fusion and the fun technique that the team over at Just Add Ink are playing with this week and uses the new sketch over at Fab Friday:


Those rainbow birds were sugary sweet an I wanted to see what I could create inspired by them with my 'Free As A Bird' set - take a look:


 Here's the low-down on today's card:

The emboss resist technique was perfect for creating my rainbow panel. I stamped the birds in Versamark onto Whisper White cardstock then heat embossed them with clear embossing powder. I then sponged my rainbow using a selection of inks and finally rubbed the whole of the image with white craft ink to soften the colours slightly, before removing any excess ink and allowing the white cardstock beneath the clear embossed lines of the bird image to shine through. I added a little tag greeting and some Gorgeous Grape striped ribbon, along with a diecut border from the Flourish die set in the same colour. 

I really like this pretty card; I love it when a challenge (or three!) pushes you beyond your  comfort zone and makes you create something different.

Here is the visual summary of the key products used on today's project for you to pin for easy reference:


You can see all of my 'How To' summaries on my 'How To - Tips and Techniques' Pinterest board in case you've missed any. 

Enjoy your evening and I'll be back tomorrow with another project. Until then, happy stampin'!


Stampin' Up! Supplies Used:

Table built using Product Table Builder by The Crafty Owl - Independent Stampin' Up! Demonstrator.

Free As A Bird for PP445

by Joanne James9. June 2019 09:00

I've had a busy few days with the launch of the new Stampin' Up! catalogue and lots going on in the world of the James family and no time to blog, however today it's Sunday and time for this week's new challenge over at The Paper Playersso here I am! It's the turn of the fabulous Anne-Marie to host this week and she has a colour challenge for you to work with:


Anne Marie's palette choice includes three of my favourite colours and I couldn't wait to create with them this week! Using this week's Freshly Made Sketches layout I decide to go for a fresh and summery card featuring the gorgeous new stamp set from the Bird Ballad Suite - take a look:


Here's the low-down on today's card:

I stamped the birds from the 'Free As A Bird' stamp set and coloured them with my Stampin' Blends and added a sentiment from the same set to a stitched rectangle in Highland Heather. I also added a  piece of Highland Heather gingham paper behind to add a hint of contrasting colour and some texture to the base using the Subtles embossing folder. I'm not sure if you can get purple birds with yellow tummies, but I guess when they are being coloured, anything goes!  

Here is the visual summary of the key products used on today's project for you to pin for easy reference:


You can see all of my Product and 'How To' summaries on my 'How To - Tips and Techniques' Pinterest board in case you've missed any. 

Before you reach for your ink and papers, check out what our amazing team has created to inspire you this week:

Here's a quick recap of our challenge rules:
 
1.  Create a new paper project
2.  Upload your creation to your blog with a link back to us and provide a direct link to the post featuring your challenge submission.
3.  Please link your card to no more than four challenges, TOTAL.
4.  Have FUN!

You can see all of my 'How To' summaries on my 'How To - Tips and Techniques' Pinterest board in case you've missed any. 

Enjoy your day; I will be spending mine getting some jobs done and preparing for the busy week ahead: tomorrow is the first of this month's card classes and the oldest of the James Juniors has 3 performances of Andrew Lloyd Webber's 'CATS' to perform in at school this week (she is playing the role of Gus, the Theatre Cat). We also have cricket, summer hockey, a visit from my parents, 3 birthdays and Father's Day this week amongst other things - I think it's going to be a busy one! I'll be back tomorrow with another project featuring these feathered friends, so do pop by and take a look. Until then, enjoy your day and happy stampin'!


Stampin' Up! Supplies Used: 

Table built using Product Table Builder by The Crafty Owl - Independent Stampin' Up! Demonstrator.

Mini Catalogue

BROWSE THE CATALOGUE

The mini catalogue is now live! Read and download your copy here.

Shop Online

Access my online shop 24 x 7, 365 days of the year:

Current March hostess code:

S9F2XJJW

Shop Online

Join My Team

It's always a great time to join Stampin’ Up! New team members can get £130 worth of products for only £99 + free business supplies + free shipping + all the fun being a part of Stampin’ Up! Stampin' Up! has something for everyone: join my growing team and benefit from my support to enjoy Stampin' Up! however you choose.

If you're interested, call me for a chat to understand how I can help you realise your goals. Alternatively, if you have already decided to sign up and you just can't wait, please click here for the link to the online form where you can sign up and order your starter kit right away! 

Latest Kit!

Stampin Cut and Emboss

The Rock Legend Kit has all you need to make 8 cards with coordinating envelopes. Along with the new Panda Friends Kit, both are available from January 4th for just £14 each - get yours here!

2023-24 Annual Catalogue

BROWSE THE CATALOGUE

Click on the catalogue for a full list of current SU! supplies - if you would like to order any of the items featured, please drop me a line at [email protected] or give me a call on 07773 421446 - I'd be happy to help.

New Online Exclusives

There will be new products available exclusively in the online store from 5 March - check them out here.

About Me

Hi I'm Joanne and live in Northampton and when I'm not looking after my husband and two beautiful children, am an avid crafter with a passion for all things Stampin' Up!

I must confess that I have never been a big rubber stamper - until I discovered Stampin' Up! that is. I love the fact that I can get such great results with co-ordinating stamps, inks, papers and punches - the possibilities are endless! Join me on my stamping journey as I share the things I love and be inspired to create amazing things yourself!

Follow Me

Monthly Newsletter

Box Builder

Click the button above to use Box Buster to create your custom box design using the Envelope Punch Board!

Kits Collection Now Available!

Stampin Cut and Emboss

The new Kits Collection from Stampin' Up! is now available!

Click here to see the current kits available and order yours online today.

I Design For


Stampin' Up Stuff

This is my personal blog and is not endorsed by Stampin’ Up! I hope you find it a plentiful source of ideas and personal inspiration but please don't copy my designs for contest submission or use for classes, publication or sale without express permission.