Christmas Already? No, but the new Stampin' Up! Seasonal Catalogue is on it's way!

by Joanne James26. August 2015 19:30


Good evening lovely blog readers! You may well have to bear with me this week; I am away spending some quality time with the James juniors before returning to school in a couple of weeks time, but our coastal location is virtually devoid of a mobile phone signal and even the local wifi is hit and miss, so even with pre-prepared blog posts communicating with the online world is proving something of a challenge! Likewise I am struggling with sending and receiving emails, so if you have emailed me in the last few days, bear with me - it may take a few days longer than usual for me to respond to you!

I did send out some good old snail mail before I left for our mini-vacation; my seasonal catalogues were shipped to all of my online mail order customers, and I know from the texts and emails that have managed to get through that you are liking what you are seeing! That's all great news - there is lots be excited about! If you are reading this and don't already have yourself a Stampin' Up! demonstrator and you would like a seasonal catalogue, do email me at [email protected] and I will pop one in the post to you. 

So along with the catalogue, I had to send out a little card showcasing some of my favourite 'sneak peek' Christmas product and I though you might like to see it today - here it is, featuring the adorable penguin from the 'Snow Place' stamp set:

I stamped the penguin and sentiment in the new Basic Black Archival ink onto an extra-thick Whisper White card base, then ran the card front through the new 'Gently Falling' Textured Impressions Embossing Folder - this is the perfect finish for falling snow, so pretty! Lastly, I added some earmuffs and a matching scarf in a variety of colours - the one above is Rich Razzleberry and the one below is Watermelon Wonder (beak and feet coloured with a Pumpkin Pie Stampin' Write marker):

Here's a shot showing the rainbow of colours I used - how lovely are they?! The little earmuffs and scarfs were so easy to cut out using my Big Shot and the co-ordinating Snow Frames framelits - this is also one of the many great product bundle deals on offer in the new seasonal catalogue too, making them great value. 

So not Christmas already, but we are definitely well on the way! I can guarantee you'll be seeing lots more of this little fella, along with his snowman friends, throughout the festive season; in fact, he is also making an appearance tomorrow, so come back for another great sneak peek!

Until then, happy stampin'!


Snow Place Penguin Christmas Card

by Joanne James24. August 2015 07:20

Well it's Monday and whilst I'm off on my way to the beach today, I couldn't go without squeezing in an entry for this week's Freshly Made Sketches challenge - they are afterall celebrating their 200th sketch challenge, what an achievement! This is their sketch - so many possibilities:

I decided to use the line as the top of a brick wall, with a peeking penguin in the style of Kilroy/Chad graffiti of old (here's the Wikipedia link if you have no idea what I'm talking about!):

Using a base of thick Whisper White cardstock, I adhered a piece of Soft Suede cardstock embossed with the Brick Wall TIEF and some Dazzling Diamonds which I cut freehand as snow on top of the wall. I stamped my penguin and sentiment from the 'Snow Place' stamp set in the new Archival Black ink directly onto my card base, then stamped the penguin's ear muffs and scarf in Real Red and cut them out with the co-ordinating 'Snow Friends' framelits and pooped them up on dimensionals for a little extra lift. 

So what do you think of today's card? I am loving the little penguin in the new 'Snow Place' stamp set - you will be seeing lots more of him this week! You still have time to link up to FMS if you want to have a go at this week's challenge and you should certainly check out this week's gallery, it is absolutely amazing!

I'll be back tomorrow with another festive project. Until then, happy stampin'!


Stampin' Up! Supplies Used:

* Snow Place - available September 1st

*Snow Friends - available September 1st 

*Archival Black ink - available September 1st

Table built using Product Table Builder by The Crafty Owl - Independent Stampin' Up! Demonstrator.


Howl-o-ween Treat Halloween Card For The Paper Players

by Joanne James23. August 2015 10:00

It's Sunday and you know what that means: time for a new challenge over at The Paper Players! This week it is my turn to host and I have my very first sketch challenge for you:


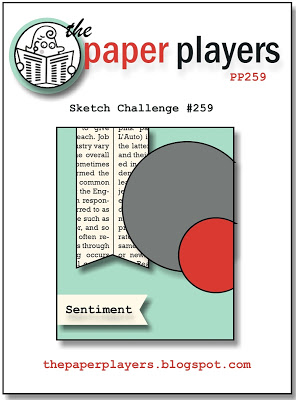
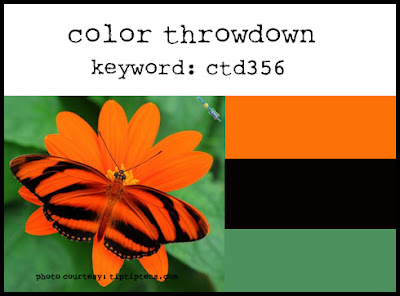
You know how much I love a sketch challenge - it's so exciting to have designed my first one for you to play along with this week! I am still pre-occupied with my pre-order goodies, so I decided to use this week's Color Throwdown colours to create not something floral as per the inspiration photo, rather a decidedly spooky Halloween treat for you. Here's my card:

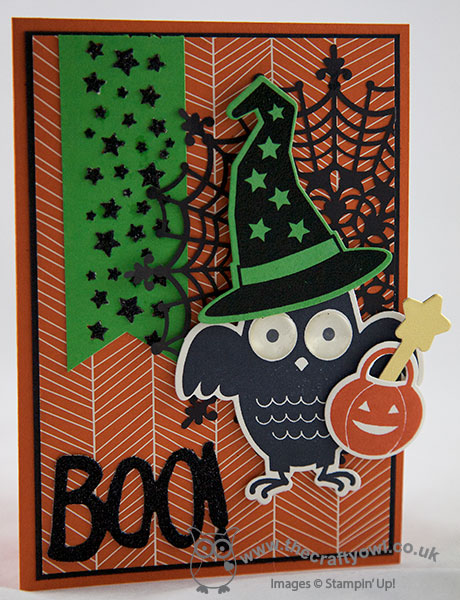
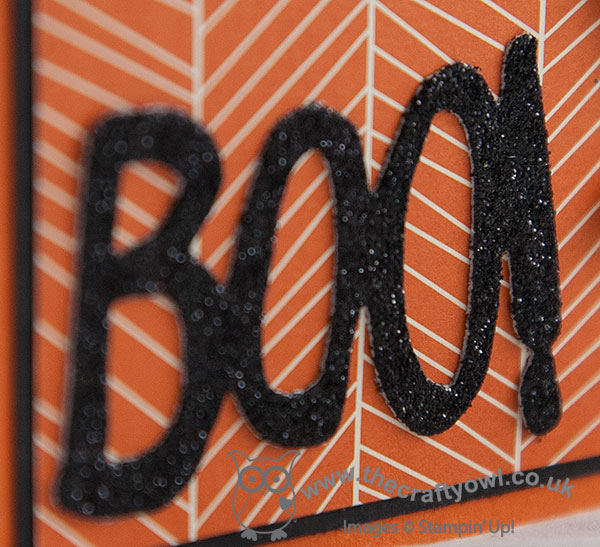
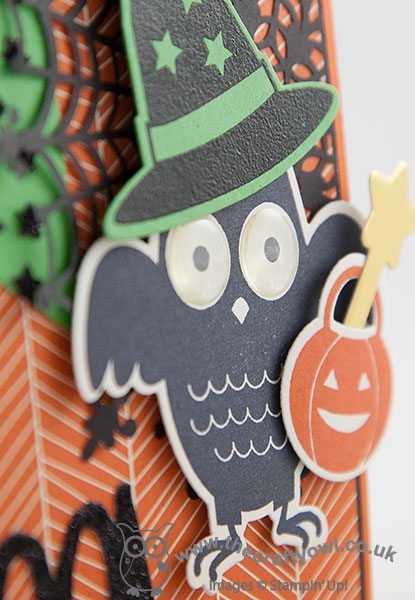
So many lovely things to share on my card this week! The background paper is a piece of the new Halloween DSP pack 'Happy Haunting' - there are some great patterns in this pack. For the large circle on my sketch, I used one of the new Spider Web doilies - I think these may be my actual most favourite Halloween product in the new catalogue! They are so dramatic and such great value, at just £4.25 for a pack of 24. I will be using these everywhere! for the smaller circle, I just had to use the owl from the Howl-o-ween Treat set - isn't he adorable?! The stamp set comes with a co-ordinating set of 'Boo To You' framelits dies and what's more they are available as a bundle too - great news! The framelits are a must as they make cutting out the shapes, such as the wand, the pumpkin basket and the hat, so easy. This card is choc full of texture too: I accented the eyes with a couple of round Itty Bitty Epoxy Sticker Accents and stamped the hat in Versamark and heat embossed it in black to add a lovely shine against the Cucumber Crush cardstock of the hat - you can see it better here in this close-up photo:

I also used the awesome new black glimmer paper for my sentiment, again cut out using my Big Shot and the 'Boo To You' framelits. Just look at how sparkly it is: 

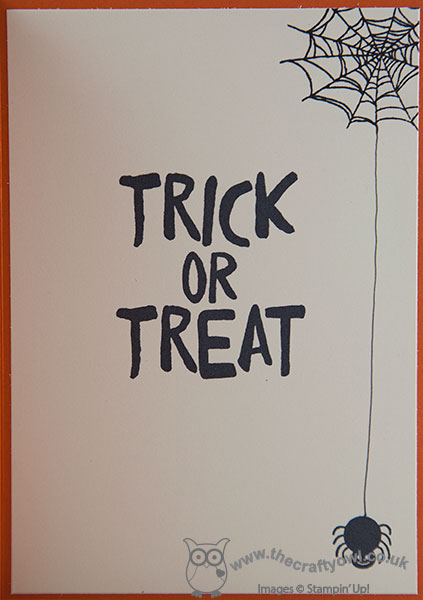
Lastly, I added a Cucumber Crush banner punched with my Triple Banner Punch and the Confetti Stars Border Punch and I infilled the star shapes by paper-piecing with black glimmer paper stars for added sparkle. I also decorated the inside of my card and what's more, remembered to take a photo of it:

How cute is that?! I hope you like today's Halloween card and that it has you even more excited for the fun things still to come in the new seasonal catalogue. Before you reach for your ink and papers, check out what our amazing team has created to inspire you this week:

The Paper Players Design Team
Anne Marie Hile - on leave
 
 
Here's a quick recap of our challenge rules:
 
1.  Create a new paper project
2.  Upload your creation to your blog with a link back to us and provide a direct link to the post featuring your challenge submission.
3.  Please link your card to no more than three challenges, TOTAL.
4.  Have FUN! 


I look forward to seeing how you choose to interpret my sketch on your cards in the gallery this week. I'll be spending today in the garden; yesterday's BBQ and vegetarian menu was a huge success, so today we are following that with another lunch of vegetables from our garden - with sausages too though, of the meat variety! 

Back tomorrow with another project; until then, happy stampin'!


Stampin' Up! Supplies Used:

* Howl-o-ween treat - available September 1st

* Boo To You Framelits - available September 1st

* Spider Web Doilies - available September 1st

* Happy Haunting Designer Series Paper - available September 1st

* Black Glimmer Paper - available September 1st

Table built using Product Table Builder by The Crafty Owl - Independent Stampin' Up! Demonstrator.


Witches Night Halloween Card

by Joanne James21. August 2015 20:59

Today I'm breaking from my run of Christmas cards, however never fear, I have another 'sneak peek' for you, this time of some of the new Halloween products that are on the way. I used this week's Retrosketches challenge for my layout:

I used the main stamp in the set 'Witches Night' set; this is the set that accompanies the Witching Decor Project Kit (more on that another time!) but the stamps in the set can be used on lots more projects besides. Here's my card: 

I used Tangelo Twist for my base, with a piece of Basic Black Color Me Irresistible Specialty Designer Series Paper on top raised on dimensionals. I tucked a spider web doily behind so that it peeked out across the orange, then stamped my main sentiment greeting on Memento Black onto Very Vanilla cardstock, and cut out with one of the Lots of Labels framelit dies. To finish, I stamped a spider from the new 'Cheer All year' set in Versamark onto Tangelo Twist and heat embossed in black to give it a lovely shine. I punched this out with a 1" circle punch and attached to the black panel with some of the retired SAB Tangelo Twist thick baker's twine. 

This card came together quite quickly - the large decorative sentiment certainly makes a statement!

That's all from me today; I'll be back tomorrow another 'sneak peek', this time showcasing some of the lovely new Autumnal range. Until then, happy stampin'!


Stampin' Up! Supplies Used:

* Witches Night - available September 1st

*Cheer All Year - available September 1st

*Spider Web Doilies - available September 1st

Table built using Product Table Builder by The Crafty Owl - Independent Stampin' Up! Demonstrator.


O Come All Ye Faithful Winter Wonderland Christmas Card

by Joanne James20. August 2015 08:05

Today it's time for a new challenge over at Create With Connie and Mary and this week we have a great sketch challenge for you:


As I'm still excited to be working may way through my box of seasonal preorder goodies, I have another Christmas card to share with you today using the All Ye Faithful stamp set and Winter Wonderland Specialty Designer Sseries Paper and washi tape. Here's my card: 

My colour scheme today was inspired by the Winter Wonderland product suite - a mix of black, white and gold, with foil accents and real sparkle. Using Basic Black for my base with a mat of gold foil, then used a piece of Winter Wonderland DSP with a crackle-glaze pattern for the front of my card. I edged a piece of Whisper White with gold striped washi tape, then stamped my sentiment in Memento Black on the right hand edge. This sentiment does actually come on one line, so in order to make it work for my card and the sketch I carefully masked off parts of it to enable me to stamp it in three separate sections. For the oval, I stamped Mary and Joseph in Versamark onto Basic Black card and heat embossed it in gold. I backed this with an oval that was cut to the same size using my Big Shot and Ovals Framelits, then cut in half vertically; this then creates a frame that enables the oval to stand out, but isn't too wide, as it would have been if I'd used the next size framelit up. To finish, I added a trio of flags punched using my Tripe Banner Punch, featuring more of the patterns in the Winter Wonderland DSP suite. 

Whilst this isn't a colourway I would necessarily have been drawn to of my own accord, it is very on-trend and I do love the way the entire suite of products make co-ordination so easy - good old Stampin' Up! I love the All Ye Faithful stamp set too - one of my favourite religious sets in the new catalogue, it comes with two other feature stamps and a verse sentiment too that I used on the inside of my card:


I hope you like today's card. Do visit the other Design Team members to see how they used this week's challenge sketch; there's lots of inspiration over on their blogs too!

Enjoy your day and I'll be back tomorrow with another sneak-peek project, one for Halloween this time. Until then, happy stampin'!


Stampin' Up! Supplies Used:

 * All Ye Faithful - available September 1st

* Winter Wonderland Specialty Designer Series Paper - available September 1st

*Winter Wonderland Washi Tape - available September 1st

  • Big Shot
  • Magnetic Platform
  • Ovals Collection Framelits Dies
  • Banner Triple Punch
  • Gold Foil Sheets
  • Whisper White A4 Cardstock
  • Embossing Buddy
  • Versamark Pad
  • Gold Stampin' Emboss Powder
  • Heat Tool (Uk)
  • Basic Black A4 Cardstock
  • Tuxedo Black Memento Ink Pad


Home For Christmas Edgelits Christmas Card

by Joanne James19. August 2015 09:05

As promised, today I have another sneak-peek Christmas card for you using another of the Sleigh Ride Edgelits, using this week's CAS(E) This Sketch layout for inspiration:

As soon as I saw this sketch, I knew it would work perfectly with the new Sleigh Ride Edgelits. Here's my interpretation with today's card:

I went again with my favourite festive colour combination of navy, whisper white and silver and this time used the negative cut of the edgelit to look like a snowy sky, again embossed with the Softly Falling Textured Impressions Embossing Folder, having first stamped my sentiment in Night of Navy along from the houses. These edgelits offer so many different ways to use them to achieve different looks, depending on whether you use the positive or negative cut out - I just love them! A loop of silver corded trim completes my card.

Clean and simple, yet rather effective. This card came together quickly and would look great in a wide range of colour combinations.

Back tomorrow with another card for this week's new challenge over at Create With Connie and Mary. Until then, happy stampin'!


Stampin' Up! Supplies Used:

* Sleigh Ride Edgelits - available September 1st


* Softly Falling TIEF - available September 1st

Table built using Product Table Builder by The Crafty Owl - Independent Stampin' Up! Demonstrator.


Making Spirits Bright Sleigh Ride Edgelits Christmas Card

by Joanne James18. August 2015 08:00

Today I'm sharing the second card I made this week using the sketch over at Mojo Monday. You can see the other card here and as I mentioned in my original blog post, I didn't enter this one which was the first one I created as when I went to upload and perused the gallery there was another card that was very similar - you can see the card in question, designed by Lisa Pretto, here. That hasn't happened to me before when entering a challenge, but what can I say other than great creative minds think alike! Here is my card using probably my most favourite product from the new seasonal catalogue, the Sleigh Ride Edgelits:

Oh there is so much I love about this card! It uses probably my favourite festive colour combo - navy, white and silver - but check out the fab new products that are coming your way on September 1st:

The Sleigh Ride Edgelits - these come as a set of three, featuring a sleigh, houses and trees, and co-ordinate with a stamp stamp called 'Jingle all the Way'. These can be used in so many ways to create beautiful cards; in fact I have another card for you tomorrow using one of the other Edgelits in the set and the co-ordinating stamp set, so stay tuned!

Making Spirits Bright - this is from a versatile set called 'Among The Branches'. I used the spooky Halloween stamp from this set on my LIM card last week (see it here) and it also includes an Autumn set, along with lots of fun embellishments that co-ordinate with the new Woodland TIEF. I love a set that transcends the seasons and this is definitely that kind of set.

Softly Falling Textured Impressions Embossing Folder - there are some great new embossing folders in the new seasonal catalogue, but I think the Softly Falling TIEF will be my favourite; proper falling snow adding a delightful delicate texture to cards.

Winter Wonderland Embellishments - Did you spot the cute little snowflake embellishment? Big enough to add some sparkle (sometimes foil and glimmer paper is just not enough!) yet small enough to not add too much bulk, these adorable little embellishments come in a pot of 20 - plenty for all your festive card making, but wouldn't look out of place on something less festive either.

I hope you like today's card; quite different to my earlier interpretation of this sketch and very 'me'. Which one do you prefer? Do let me know in the comments section below - I love hearing what you think!

Right, I'm back to squeeze in some more work before the James Juniors return exhilerated from this morning's basketball camp exertions. Back tomorrow with another festive sneak-peek and news of this week's Wednesday Deals - don't miss it! Until then, happy stampin'!


Stampin' Up! Supplies Used:

* Sleigh Ride Edgelits - available September 1st

* Among The Branches - available September 1st

* Softly Falling TIEF - available September 1st

* Winter Wonderland Snowflake Embellishments -  available September 1st

Table built using Product Table Builder by The Crafty Owl - Independent Stampin' Up! Demonstrator.


Lighthearted Leaves And The Joys of Colouring!

by Joanne James17. August 2015 09:49

Happy Monday everyone! Today I have a card for a couple of challenges: Freshly Made Sketches and Colour Q:


I love the Colour Q colours this week and I was inspired by the pattern in the inspiration photo and since this week's Freshly Made Sketch can be interpreted in so many ways, I decided to marry the two together with my Autumn-inspired cards. Yes, not one but two cards today - both similar but different and showcasing one of my favourite non-Christmas sets from the new seasonal catalogue - Lighthearted Leaves. Here is my first card:

So time for a confession: I have been mourning the loss of my Blendabilities for months now and as a result haven't done much colouring. However, this set made me decide I needed to snap out of it and revisit my Stampin' Write markers properly and get down to some serious colouring. I spent a pleasant few hours on Saturday just colouring in and was pleasantly reminded of just how relaxing it can be to just sit and colour.

Colouring in is a proven and recommended activity to de-stress (you can read an interesting article about the benefits of colouring as a method of relaxation here) and with our dual-tipped, refillable Stampin' Write markers, in a rainbow of 48 colours to choose from, it's not tricky to get amazing results! For the card above, I used a base of Early Espresso with a mat of Pumpkin Pie, followed by a mat of Very Vanilla which I background stamped with one of the small leaf designs from the set. The new permanent Basic Black and Basic Grey archival inks that are arriving with the seasonal catalogue are perfect for stamping images to colour in (especially if you want to watercolour - more on those another day!), however to tone in with my card I stamped the large maple leaf in Early Espresso on a separate piece of Very Vanilla cardstock and cut it out with my Big Shot and the co-ordinating Leaflets Framelits (gotta love co-ordinating framelits!) and coloured this leaf in each of the challenge colours. After adhering a panel of Early Espresso along the bottom of the panel, and my sentiment stamped onto a banner flag of Pumpkin Pie, I adhered my maple leaf with dimensionals to the front of my card.

I also created another card using the same set but with an alternative sentiment and a background created with one of the other leaves in the set:

This was actually the first card I created and is slightly more inspired by the Colour Q photo, but I decided I wanted a background that was more neutral to allow my multi-coloured leaf to stand out more.  I so enjoyed myself, I even stamped and coloured the inserts and co-ordinating Very Vanilla envelopes for both cards - how about that?! Opinion in my house is divided though as to which one is preferred, with the card above proving slightly more popular than the one I'm entering for the challenges today. So what do you think? Which one is your favourite? Do let me know today in your comments below.

I am enjoying a week of child-free mornings this week, as both James Juniors are taking part in Basketball Camp each day, so hopefully this will mean nice early blog posts and that I can get ahead of myself a little for once. I'm making the most of a few hours of me-time each day - a rare thing during the summer holiday season!

Back tomorrow with another card and a sneak-peek of some great new Christmas products. until then, happy stampin'!


Stampin' Up! Supplies Used:

* Lighthearted Leaves - available September 1st

Table built using Product Table Builder by The Crafty Owl - Independent Stampin' Up! Demonstrator.


Cup of Cheer Meets Home For Christmas Card

by Joanne James15. August 2015 22:14

Here's today's post - a little later than planned due to the activities of the day! - with a Christmas card I made for this week's Mojo Monday challenge:

Having unpacked my new seasonal pre-order goodies (demonstrator perks - let me know if you would like to know more!!), I have been keen to use some of new supplies. There's nothing like some new goodies to get you in the crafting mood! Here is my card, featuring the gorgeous holly pattern from the 'Home For Christmas' DSP and one of the stamps in the new 'Cup Of Cheer' stamp set:

I matted my paper with Mossy Meadow on a Real Red card base and in addition to a thin circle of Real Red cut with my Circle Framelits, I used my framelits to cut another circle of Mossy Meadow which I used to mat my focal sentiment - this gorgeous stamp from the 'Cup of Cheer' stamp set. I stamped this sentiment in two stages, firstly masking off the outer wreath and stamping the centre with Versamark, then removing the mask and colouring the outer wreath in Mossy Meadow using my Stampin' Write marker. I then heat embossed the centre using gold embossing powder and added a few tiny pearl berries that I coloured with my red copic marker to finish, before punching out with my 2 1/2" circle punch. This card looks so lovely in real life - the sentiment is so shiny and the wreath has a dusting of gold too where the green ink was also slightly wet still prior to embossing. The photo really doesn't do it justice! Did you notice my bow too? This is some of the new Gold Cording Trim (it comes in silver too!) - love this!

This is actually the second card I made using this sketch; having made the first one, when I went to upload it to the gallery I saw one that was very similar to it, so I decided to go back to the drawing board to come up with something different. I love my first card though - rest assured I will be sharing it with you later this week!

Back tomorrow with a new challenge over at The Paper Players - and not a Christmas card in sight! Until then, happy stampin'!


Stampin' Up! Supplies Used:

*Cup Of Cheer - available September 1st

*Home for Christmas Designer Series Paper - available September 1st

*Cording Trim - available September 1st

Table built using Product Table Builder by The Crafty Owl - Independent Stampin' Up! Demonstrator.


Football Circle Thinlit Birthday Card

by Joanne James14. August 2015 09:00

Today I'm sharing the birthday card I made for Ben to celebrate his 8th birthday. Basketball and football are his two sporting passions and lately he has been football mad. He also has a belief that pop-up cards are the best; whilst this isn't quite a pop-up, it does have a fun flip element with the Circle Thinlit card base - here's my card:

I used Soft Sky for my base and built my football out of a 2 1/2" circle punch and black and white hexagons and decorated my card with some grass cut with my fringe scissors and a bunting banner and greeting from Celebrate today, complete with personalisation using the Epic Alphabet set.

This card actually came together surprisingly quickly and Ben loved it - I'd forgotten quite how much fun a circle thinlit card could be! Here is a picture of the birthday boy blowing out the candles on his amazing birthday cake, made by one of my extended family, the super-talented Helen Vowles:


Ben declared his basketball cake the best ever and was mighty impressed. If you live in Northampton I would urge you to check out Helen's Facebook page here - she really does make the most amazing cakes! Here's another photograph of him in the garden trying out his new goalie gloves (don't look too closely at my lawn, it really doesn't appreciate being used as a football pitch!):


8 years old - my, where did those years go??!

That's all from me today; back tomorrow with another project - a Christmas card, no less! Until then, happy stampin'!


Stampin' Up! Supplies Used:

Table built using Product Table Builder by The Crafty Owl - Independent Stampin' Up! Demonstrator.


Mini Catalogue

BROWSE THE CATALOGUE

The mini catalogue is now live! Read and download your copy here.

Shop Online

Access my online shop 24 x 7, 365 days of the year:

Current March hostess code:

S9F2XJJW

Shop Online

Join My Team

It's always a great time to join Stampin’ Up! New team members can get £130 worth of products for only £99 + free business supplies + free shipping + all the fun being a part of Stampin’ Up! Stampin' Up! has something for everyone: join my growing team and benefit from my support to enjoy Stampin' Up! however you choose.

If you're interested, call me for a chat to understand how I can help you realise your goals. Alternatively, if you have already decided to sign up and you just can't wait, please click here for the link to the online form where you can sign up and order your starter kit right away! 

Latest Kit!

Stampin Cut and Emboss

The Rock Legend Kit has all you need to make 8 cards with coordinating envelopes. Along with the new Panda Friends Kit, both are available from January 4th for just £14 each - get yours here!

2023-24 Annual Catalogue

BROWSE THE CATALOGUE

Click on the catalogue for a full list of current SU! supplies - if you would like to order any of the items featured, please drop me a line at [email protected] or give me a call on 07773 421446 - I'd be happy to help.

New Online Exclusives

There will be new products available exclusively in the online store from 5 March - check them out here.

About Me

Hi I'm Joanne and live in Northampton and when I'm not looking after my husband and two beautiful children, am an avid crafter with a passion for all things Stampin' Up!

I must confess that I have never been a big rubber stamper - until I discovered Stampin' Up! that is. I love the fact that I can get such great results with co-ordinating stamps, inks, papers and punches - the possibilities are endless! Join me on my stamping journey as I share the things I love and be inspired to create amazing things yourself!

Follow Me

Monthly Newsletter

Box Builder

Click the button above to use Box Buster to create your custom box design using the Envelope Punch Board!

Kits Collection Now Available!

Stampin Cut and Emboss

The new Kits Collection from Stampin' Up! is now available!

Click here to see the current kits available and order yours online today.

I Design For


Stampin' Up Stuff

This is my personal blog and is not endorsed by Stampin’ Up! I hope you find it a plentiful source of ideas and personal inspiration but please don't copy my designs for contest submission or use for classes, publication or sale without express permission.