Today it's Sunday and time for this week's new challenge over at The Paper Players! It's the turn of the fabulous Sandy to host this week and she has my favourite, a sketch challenge, for you to work with:
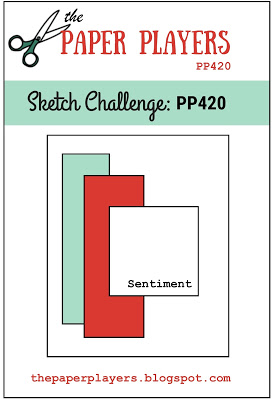

I struggled a bit with Sandy's sketch this week - I've had a super busy week and not managed to get much time in my craft room; this is never good for the crafting mojo! Those panels were screaming out for some designer series paper and I was sorely tempted to break out my new Spring-Summer goodies, but as I'm still in need of Christmas cards I decided against it and instead challenged myself to use some of the paper that I had been hoarding - take a look:
Here's the low-down on today's card:
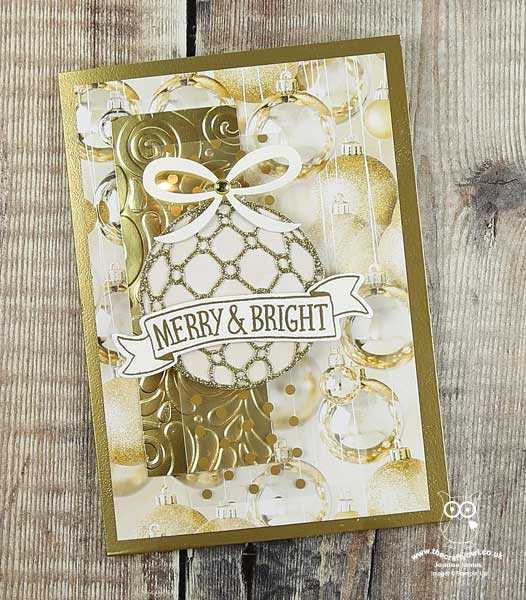
All Is Bright - I love this piece of paper featuring a photographic image of lots of baubles in shades of gold that features in the All Is Bright designer series paper pack but had been waiting for the right card on which to use it. I decided that today was the day and I went all in, covering the front of my card with it. Even with the vertical panels and diecut bauble, this paper shines through - so pretty.
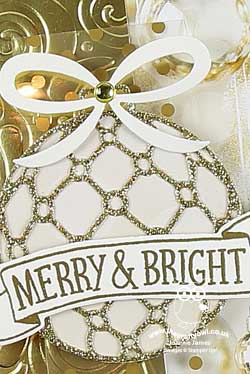
A Beautiful Bauble - I used the Beautiful Bauble Thinlits to diecut a bauble from gold glimmer paper and I backed it with a circle of DSP with a subtle bokeh print that is also from the All Is Bright DSP pack, as I didn't want to lose the intricate details against the panels. I added a retired sentiment ot my banner and a bow cut using the Pretty Pines Thinlits to finish it off.
Shades of Gold - My card features lots of gold today so I'm also linking up with the team over at CAS-ual Fridays as this ties in with their theme perfectly: the baubles in my chosen paper are lots of shades of gold, along with a gold foil panel embossed with the Swirls and Curls Embossing Folder and a second panel of retired acetate that is patterned with gold polka dots, in addition to my gold glimmer border and gold heat embossed sentiment banner. You would be forgiven for thinking that I used one of the gold foil-edged cards for my base card today, although as I only have silver ones in the house I employed a neat trick to create my own: I simply sponged the edge of my card with Versamark and then heat embossed with gold embossing powder to create a similar effect.
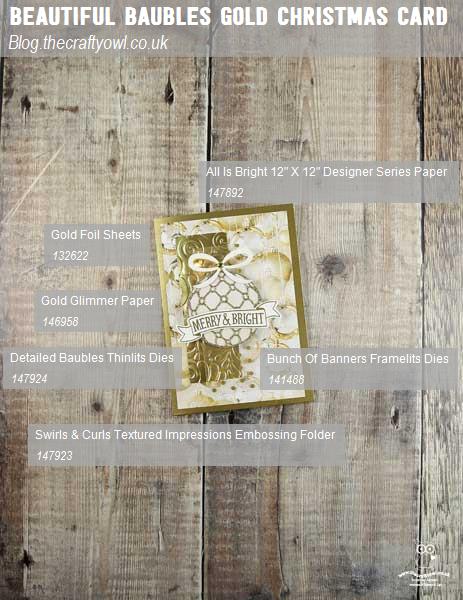
Here is the visual summary of the key products used on today's project for you to pin for easy reference:
You can see all of my Product and 'How To' summaries on my 'How To - Tips and Techniques' Pinterest board in case you've missed any.
Before you reach for your ink and papers, check out what our amazing team has created to inspire you this week:
The Paper Players Design Team
Here's a quick recap of our challenge rules:
1. Create a new paper project
2. Upload your creation to your blog with a link back to us and provide a direct link to the post featuring your challenge submission.
3. Please link your card to no more than four challenges, TOTAL.
4. Have FUN!
You can see all of my 'How To' summaries on my 'How To - Tips and Techniques' Pinterest board in case you've missed any.

In addition, a reminder that today also heralds the start of the second of Stampin' Up's three online extravaganzas. Today and tomorrow it's the turn of stamps and kits - you can read all about it in last week's blog post here and shop directly for everything that is included in the sale via the dedicated page in my online store. if ordering online please be sure to include the current hostess code BPCXMYGW. If you are local and would like to reduce your P&P costs, please get your order to me by 8pm tomorrow evening and I will add them to a collective order.
Enjoy your day; we are minus one James Junior, as Rebecca is spending the weekend in Bath playing in a school hockey tournament (all yesterday's matches were wins or draws, so let's hope the team is similarly successful today); I will be spending the day doing homework with the other one and then attending the first of the season's Christmas parties - ice skating with our swimming club. I'll be back tomorrow with another project. Until then, happy stampin'!
Stampin' Up! Supplies Used: