Father's Day Captain America Hero Card

by Joanne James14. June 2016 14:45

I'm back again! Apologies for yesterday's lack of blog post; at this time of year the last few weeks of the academic year are always busy, so it sometimes means my daily blog schedule is disrupted. Do bear with me - it's often not for want of things to share and more the time to write the posts, in amongst other commitments to my family, customers and team. There will always be posts to coincide with my design team commitments; there just might be the odd day when I don't make it to the laptop! Anyway today I do have a fun share that uses this week's colours over at The Paper Players again and the sketch layout at CAS Colours and Sketches:


My fellow Paper Player LeAnne, who chose this week's colours, also chose to use this sketch for her Sunday card (you can check it out along with the other Paper Player Team cards here) and whilst I was working on my team card, I also came up with this one that would make a fun last-minute Father's Day card:


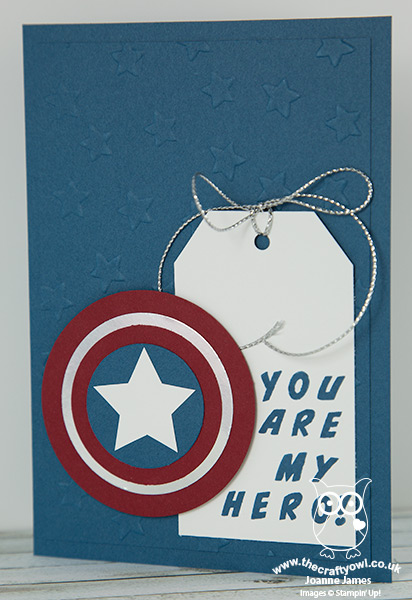
I am using a few retired products on today's card, but you could quite easily substitute these with other similar products such as the scalloped tag topper punch, layered circle thinlits and an alternative alphabet stamp set such as the new Labeler Alphabet. Here's the low-down on today's card:

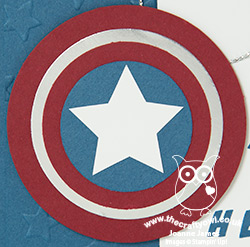
My Hero Captain America - The layered circle element on my card is inspired by the shield belonging to that all-American superhero Captain America. I used my circle framelits and the challenge colours, with a circle of silver foil card, to create my shield. I decided to make this card into a Father's Day card, but the sentiment could also be adapted for a younger boy's birthday card, which given the popularity of Marvel comic book heroes with my 8 year old and his friends currently is something I definitely need to look into!

Calling All Heroes - I used the Retired 'Calling All Heroes' stamp set for my custom sentiment on my tag; this comic book script adds just the right feel for my card. For my UK readers who might be thinking 'what set?' this set was available only in the USA. I was sent a set by the lovely LeAnne (thank you again!) and I knew that I would get lots of use from it with its fun comic book and superhero images. I also used other images from the set to decorate the inside of my card. For me it's a keeper!

It's In The Stars - Lastly, I punched a white star for the centre of my shield using the medium star punch and embossed the background panel for my cardfront using the Lucky Stars embossing folder to add texture and interest and tie in with my overall theme. 

Here is the visual summary of the key products used on today's project for you to pin for easy reference:


You can see all of my 'How To' summaries on my 'How To - Tips and Techniques' Pinterest board in case you've missed any. 

Enjoy your evening. I'm off to bake and ice some cupcakes for a very special birthday girl who will be celebrating tomorrow. I'll be back then with another project; until then, happy stampin'!


Stampin' Up! Supplies Used:

Table built using Product Table Builder by The Crafty Owl - Independent Stampin' Up! Demonstrator.

Tone on Tone Mother's Love Tag Card

by Joanne James1. May 2015 19:57

Yay - it's Friday! I've been a busy bee out and about today so am only just getting around to my blog post. I'm squeezing in a card to join the lovely ladies over at Less Is More this week where we need to have a tag on our card and I'm using this week's Color Throwdown colours, which I love:


I decided to 'go bold' with colour today and use the aqua in Coastal Cabana as my background for both my card and tag, to give a tone-on-tone look - take a look:

I order that my sentiment and flower would have an impact, I stamped both in Versamark and heat embossed in white which gives a lovely sheen. I then used my aquapainter to paint the detail of the flower petals and leaves with white craft ink and when it was dry, I painted them again with Strawberry Slush and Pear Pizzazz ink respectively. I punched my tag with the angle tag topper punch and added some white seam binding ribbon tied with some Strawberry Slush thick baker's twine to finish, before popping up with some dimensionals for a little extra lift. A super clean and simple card and I love the white on the aqua background, with the delicately watercoloured flower. Not to mention that lovely sentiment pairing from 'Mum's Love' - a favourite of mine. I'm also going to link today's card up with SUO Challenges, where the current challenge is to make a Mother's Day card, although this card would also work for a Mum's birthday card too.

I hope you like today's card; back tomorrow with another project. Until then, happy stampin'!


Stampin' Up! Supplies Used:

Table built using Product Table Builder by The Crafty Owl - Independent Stampin' Up! Demonstrator.


Tags: , , , , , , ,

Cards | Stamping

Snowman Tag Christmas Card

by Joanne James28. November 2014 21:09

It's Friday and the end of the working week - hurrah! Today's card is a triple challenge card; it's not often that happens! I'm using the sketch over at Retrosketches, with this week's Color Throwdown colour palette and the tag and snowman mean it also fits with the challenge over at The Card Concept (clean and layered):


I didn't intentionally set out to create a tag card, but as I was working with the sketch and colour palette, I thought a tag would look quite cute. Here is my card:

I used Coastal Cabana for my base, stamped one of the Gorgeous Grunge stamps in the same colour across the front and edged this with some red Beach House washi tape. I then layered a couple of pieces of now-retired DSP stack (the colours were perfect for this card and although this was a Spring/Summer paper stack, this pattern has always reminded me of snowflakes), some silver glimmer paper and then my tag. I punched my tag using the angle tag topper punch from Coastal Cabana cardstock, stamped the tree from the 'White Christmas' stamp set onto the tag then stamped it again onto a piece of Whisper White and paper-pieced the snowscape and snowman onto it. I coloured the tree with my Crumb Cake Stampin' Write marker and added some snow with my chalk pen, then added some detail to the snowman with my markers and stamped some snow across the rest of the tag with white kraft ink. I finished my tag with some Crumb Cake seam-binding ribbon and Real Red cotton ribbon tied in a bow, and stamped my Holidays' sentiment in Real Red onto Crumb Cake cardstock and adhered this to my tag, along with a silver glimmer star. 

Hope you like today's card; I have a busy weekend of fun and frolics planned, so an early night in store for me!

Back tomorrow with another project; until then, happy stampin'!


Stampin' Up! Supplies Used:

Table built using Product Table Builder by The Crafty Owl - Independent Stampin' Up! Demonstrator.


Live The Life You've Imagined

by Joanne James9. August 2014 20:53

Yesterday we spent a fun day with friends and I was out in the evening, so didn't manage to squeeze in a blog post. However today I'm sharing two cards to make up for it! These are a couple of cards I made for Stampin' Up! using the Traveler stamp set that I demonstrated at the Stampin' Up! UK Regional Training Day in Telford at the end of May. The Traveler stamp set consists of a number of travel-themed sketch images and I created the cards that I'm sharing today to show that masculine cards don't always have to be dark or brown colours - take a look at the first one:


Both cards follow the same basic design: this one has a Marina Mist card base, with a Wild Wasabi panel stamped with the World Map stamp in the same colour, then the Very Vanilla tag is punched with the Angle Tag Topper Punch, stamped in Versamark and heat embossed with Early Espresso embossing powder and the globe sponged with Marina Mist and Wild Wasabi. An early Espresso bker's twine double bow finished it off and it is adhered to the card with dimensionals. The final banner is cut from Marina Mist and stamped in Early Espresso and embellished with a tag left over from my Hip Hip Hooray Simply Created card kit.

I created exactly the same card, this time using a much brighter colour combination just to pep things up a bit:

This time I used a Pumpkin Pie card base, stamped the map in Cherry Cobbler and embossed the tag in Silver on Night of Navy, tied with some silver baker's twine and finished with an Essentials Hardware Clip. As we enter the season for exam results during the next couple of weeks, I think these cards would make great congratulations cards for someone who has passed and is about to embark on a new phase - be that further study, travel, a new job.

So, thoughts - which colour scheme do you prefer? Leave me a comment below - I'd love to know what you think.

Back tomorrow with my design team card for this week's challenge over at The Paper Players; unitl then, happy stampin'!


Stampin' Up! Supplies Used:

Table built using Product Table Builder by The Crafty Owl - Independent Stampin' Up! Demonstrator.


Tags: , , , , , , ,

Cards | Stamping

Today's Wednesday Weekly Deals

by Joanne James2. July 2014 07:00

As if there wasn't enough Stampin' Up! goodness to tempt us all this week, today is Wednesday so that means a new collection of Wednesday Weekly Deals too! This week's deals are included below - they will be available for one week only, before a new collection of deals is announced.

As always, if you want to take advantage of any of the deals on offer, you can support my business by placing your order online by clicking here or using the link to my store on the right hand side of my blog page where it says 'Shop Online' or with me in person. Don't forget to add the Hostess Code for July (you can find this under the 'Shop Online' section on the right). 

Here's a summary of this week's one-week only Wednesday deals - click on each item to go to the online store to purchase:

Table built using Product Table Builder by The Crafty Owl - Independent Stampin' Up! Demonstrator.

 Sequins, buttons and best of all punches included this week - race you to the shop! Back later with today's creative post; until then, happy shopping!

Good as Gold ... and then some!

by Joanne James18. March 2014 20:24

So, who's loving Sale-A-Bration 2014? All my customers are for sure - it's the best time of the Stampin' Up! year, with a free gift each and every time you spend £45 and so much to choose from. You can click on the 'Sale-A-Bration' icon on the right of my home page for a complete overview of all the gifts on offer, however today I'm going to share with you one of my favourites if you are short on time, but still want cards that are high on impact: the Good As Gold card kit. The kit comes complete with everything you need to make 8 cards with co-ordinating gold-lined envelopes, even pre-stamped sentiments; here's what the finished cards will look like straight out of the kit:

Pretty, right? As is often the way though with Stampin' Up! card kits, the packs are very generous and include lots of bits and pieces, but with a few extra envelopes and card bases, you can make your card kit go even further. Here's an example of a slightly altered version of the basic kit card:

I simply cut the card in half and used it as a piece of DSP, picking out one of the feature colours (in this case Tangerine Tango) and using it for a card base. The pre-stamped tags in the kit come in 3 different languages and you could simply stamp your own additional tags, but since I think everyone is familiar with 'thanks' in both French and German, I figured I would just use the additional pennants in the kit. The stars are those punched out from the gold pennants that come in the pack and the gold banner is cut from an offcut of gold foil and you can even cut down the envelope liners and make two from one, to insert into a standard SU! notecard envelope. I also added some leftover baker's twine from a Tag a Box kit.

I made 10 cards out of my kit, but if you really wanted to stretch your kit, you could easily make 16 cards with a few extra bits and pieces. Here's my full collection of completed cards: 

I'm using my cards as thank yous to pop in with my next customer orders; when I went to make my carrier bag labels too, I decided to create my tags using the same colour scheme: 

If you would like to get your hands on a Good As Gold card kit, you have only 13 more days to place a £45 order to get this or one of the other Sale-A-Bration items free. So what are you waiting for? Follow the links below to place an order in my online store or contact me if you live locally - I'm always on hand to help.

Back tomorrow with another card; until then, happy stampin'!


Stampin' Up! Supplies Used:

Table built using Product Table Builder by The Crafty Owl - Independent Stampin' Up! Demonstrator.


Mini Catalogue

BROWSE THE CATALOGUE

The mini catalogue is now live! Read and download your copy here.

Shop Online

Access my online shop 24 x 7, 365 days of the year:

Current April hostess code:

VDKNV7BH

Shop Online

Join My Team

It's always a great time to join Stampin’ Up! New team members can get £130 worth of products for only £99 + free business supplies + free shipping + all the fun being a part of Stampin’ Up! Stampin' Up! has something for everyone: join my growing team and benefit from my support to enjoy Stampin' Up! however you choose.

If you're interested, call me for a chat to understand how I can help you realise your goals. Alternatively, if you have already decided to sign up and you just can't wait, please click here for the link to the online form where you can sign up and order your starter kit right away! 

Latest Kit!

Stampin Cut and Emboss

The Rock Legend Kit has all you need to make 8 cards with coordinating envelopes. Along with the new Panda Friends Kit, both are available from January 4th for just £14 each - get yours here!

2023-24 Annual Catalogue

BROWSE THE CATALOGUE

Click on the catalogue for a full list of current SU! supplies - if you would like to order any of the items featured, please drop me a line at [email protected] or give me a call on 07773 421446 - I'd be happy to help.

New Online Exclusives

There are new products available exclusively in the online store from 5 March - check them out here.

About Me

Hi I'm Joanne and live in Northampton and when I'm not looking after my husband and two beautiful children, am an avid crafter with a passion for all things Stampin' Up!

I must confess that I have never been a big rubber stamper - until I discovered Stampin' Up! that is. I love the fact that I can get such great results with co-ordinating stamps, inks, papers and punches - the possibilities are endless! Join me on my stamping journey as I share the things I love and be inspired to create amazing things yourself!

Follow Me

Monthly Newsletter

Box Builder

Click the button above to use Box Buster to create your custom box design using the Envelope Punch Board!

Kits Collection Now Available!

Stampin Cut and Emboss

The new Kits Collection from Stampin' Up! is now available!

Click here to see the current kits available and order yours online today.

I Design For


Stampin' Up Stuff

This is my personal blog and is not endorsed by Stampin’ Up! I hope you find it a plentiful source of ideas and personal inspiration but please don't copy my designs for contest submission or use for classes, publication or sale without express permission.