Dad You Make The World A Better Place

by Joanne James8. June 2014 21:36

This has been the busiest of weekends, with so much going on: we bought Ben a new bike as an early birthday present yesterday - it has become quite apparent as we've been cycling since this year that he had outgrown his previous one and the middle of August was such a long time to wait - and he doesn't seem to have been off it since, along with the usual homework, swimming and a special golden wedding anniversary party today. Not much time for crafting although I did make a quick card using this week's Mojo Monday sketch layout and Pals Paper Arts colours, so a really quick post from me to share it with you:


I haven't played along with Mojo Monday for a while and saw this sketch and had a few ideas of what to do with it and thought that this week's PPA colours would work well for a brighter masculine card. I must confess that things didn't come together quite how I planned though and with limited time I eventually settled on this card:

Some simple layers and patterns in So Saffron and Baked Brown Sugar and a pop of Pacific Point in the stamp from Starburst Sayings, echoed in the mat for the So Saffron panel with 'Dad' in a double-layer of sketched and outline alphabets. I made this card with Father's Day in mind and the thing I like most about the card is the sentiment - there are two James children in this house who absolutely would agree with this statement.

Back tomorrow with another project; until then, happy stampin'!


Stampin' Up! Supplies Used:

Table built using Product Table Builder by The Crafty Owl - Independent Stampin' Up! Demonstrator.


Mum You're The Best!

by Joanne James27. March 2014 22:12

It's all go in the office of The Crafty Owl - I've been busy finishing my last Mother's Day cards today and I've recorded two video tutorials, along with all of the other things mothers do in a day. I won't bore you with that list, but I'm sure lots of you are reading this thinking "I know what you mean!" :-) Anyway, today I have a Mother's Day card to share with you, which I made using this week's sketch over at The Paper Players. This is Sandy's sketch:

I loved the layered circles on this sketch and it allowed me to get out on paper an idea I've had floating around in my head for a while (love it when that happens!) So here is my card:

I used Coastal Cabana for my base, then cut out a 'window' using my Word Bubble framelits through to the stamped sentiment "You're the best!" on the inside, used my largest circle for my bespoke 'Mum' sentiment where I used two circles cut with my Circles framelits to create an inset so that I have a border without an extra layer here. I then added an ‘xoxo’ cut out with my Circle Card thinlit set, attached with rolled glue dots, and lastly my final layer with the ‘love ya’ word bubble, stamped, cut and mounted with dimensionals for height. The cut-out on the front gives a glimpse of what’s inside – here’s the close-up:

Now I know this is not such a typical Mother's Day card: not traditional colours, no flowers in sight. It's quite clean and graphic in nature, but I really like it! I think it’s a great card for a Mum who likes something a little different; I for one would be thrilled to receive this card (hint, hint James Juniors!)


That’s me for today; come back tomorrow to see my entry for this week’s Less is More challenge. Until then, happy stampin’!


Stampin’ Up! Supplies Used:
 

Table built using Product Table Builder by The Crafty Owl - Independent Stampin' Up! Demonstrator.

Scalloped Tag Top Punch Concertina Card - Mother's Day

by Joanne James19. March 2014 20:33

Today I want to share with you another use for one of my new favourite punches - the scalloped tag top punch. This really is such a versatile punch that can be used in so many ways. There are lots of variations on how it can be used to make an unusual card closure - today's card is a fun, concertina style Mother's Day card, where the scalloped tag top punch is used to add detail to the closure. I saw a similar card to this on Julie Kettlewell's blog here and liked it so much I decided to create one. This is what the card looks like 'closed':

Ribbon is threaded through the punch out hole and around the card and tied in a bow to keep it shut, then when you undo the ribbon and open the card out, you see the message inside:

These cards are such fun to make and so easy. All you need is one sheet of 12" x 12" for the basic card. I used a sheet of the Gingham Garden DSP for my card, and layered the inside panels with Whisper White matted on Daffodil Delight. I cut the letters for 'Mothers' with my Typeset Alphabet die, but you could easily use an alphabet stamp set such as Morning Post or Notable Alphabet if you have one instead. I took the word 'Happy' from one of the 'See Ya Later' Sale-A-Bration stamp sets and the letters for 'Day' from my Sketched Alphabet individual stamps before punching out and layering on a mini banner. I then decorated with flowers stamped and punched from the Petite Petals bundle and the Itty Bitty Punches set in colours that co-ordinated with my chosen DSP. The last panel is left blank for you to write your personalised Mother's Day message.

I had intended to shoot a video tutorial on how to make one of these cards to accompany my series of Scalloped Tag Top Punch video tutorials, but time has not been on my side so I haven't managed it yet; I will look to complete one in the next week or so and when I do will update my blog with the link. Updated 8/5/14 - here is my video tutorial on how to make this card:


The best bits about this card: it's one of those projects where you don't have to deliberate over which side of your DSP to use, as you see both sides (dilemma avoided, for once) and also because of the closure, you don't need an envelope - this is a card and envelope in one! This style of card would work for lots of other occasions too - why not have a go and see what you come up with.

Back tomorrow with another project; until then, happy stampin'!


Stampin' Up! Supplies Used:

Table built using Product Table Builder by The Crafty Owl - Independent Stampin' Up! Demonstrator.


Scalloped Tag Top Punch Concertina Card - Mother's Day

by Joanne James19. March 2014 20:33

Today I want to share with you another use for one of my new favourite punches - the scalloped tag top punch. This really is such a versatile punch that can be used in so many ways. There are lots of variations on how it can be used to make an unusual card closure - today's card is a fun, concertina style Mother's Day card, where the scalloped tag top punch is used to add detail to the closure. This is what the card looks like 'closed':

Ribbon is threaded through the punch out hole and around the card and tied in a bow to keep it shut, then when you undo the ribbon and open the card out, you see the message inside:

These cards are such fun to make and so easy. All you need is one sheet of 12" x 12" for the basic card. I used a sheet of the Gingham Garden DSP for my card, and layered the inside panels with Whisper White matted on Daffodil Delight. I cut the letters for 'Mothers' with my Typeset Alphabet die, but you could easily use an alphabet stamp set such as Morning Post or Notable Alphabet if you have one instead. I took the word 'Happy' from one of the 'See Ya Later' Sale-A-Bration stamp sets and the letters for 'Day' from my Sketched Alphabet individual stamps before punching out and layering on a mini banner. I then decorated with flowers stamped and punched from the Petite Petals bundle and the Itty Bitty Punches set in colours that co-ordinated with my chosen DSP. The last panel is left blank for you to write your personalised Mother's Day message.

I had intended to shoot a video tutorial on how to make one of these cards to accompany my series of Scalloped Tag Top Punch video tutorials, but time has not been on my side so I haven't managed it yet; I will look to complete one in the next week or so and when I do will update my blog with the link.

The best bits about this card: it's one of those projects where you don't have to deliberate over which side of your DSP to use, as you see both sides (dilemma avoided, for once) and also because of the closure, you don't need an envelope - this is a card and envelope in one! This style of card would work for lots of other occasions too - why not have a go and see what you come up with.

Back tomorrow with another project; until then, happy stampin'!


Stampin' Up! Supplies Used:

Table built using Product Table Builder by The Crafty Owl - Independent Stampin' Up! Demonstrator.


Undefined Take 1: In The Swim

by Joanne James16. March 2014 20:52

Good evening lovely readers! No blog post from me yesterday as I had a rare 'night off': James Juniors had a sleepover at Grannies' house and I was treated to a night at the movies (we saw 'Non Stop' with Liam Neeson - great action movie!) To make up for it, I have a whole set of cards to share with you today: my very first set of Undefined hand-carved stamps.

If you're a Facebook follower of The Crafty Owl, you may have seen today's thread that has been about what would you carve with yours followed by some guesses as to what I carved with mine. The Undefined Carving Kit is a great set with everything you need to cut and mount four stamps. This first set I carved was for Rebecca, who given her passion for swimming had a clear idea of what she wanted her stamps to feature - water, in a big way. So after much sketching and carving, this is what we came up with:

All of our stamps had something to do with swimming - the stamps themselves don't look that interesting, so I made a simple card to showcase each of the designs to give you a better idea of what they look like. So here's the first one, an abstract swimmer:

I simply mounted him with some paper pierced circles on a watery blue background. Here's a close up of the carved stamped image:


You can tell it's a hand carved stamp as it's nowhere near as sharp as a traditional SU! stamp, but then it's great fun to be able to create something unique that you carved yourself. Here is the second stamp - this time, a diver: 

 I used my Borders scoring plate and Large Scallop Edgelit to create my waves in the background. The next one was actually the first stamp I carved and it shows - take a tip from me, if you're carving words, which is quite tough, don't start with a curved letter such as 'S' - in hindsight I needed a little more practice before I started this one!

 I love the message of this card though - it was something I read on the internet as an inspirational quotation and I thought it was really apt; sometimes it's as much about the motivation and belief that you can achieve, as it is the winning itself. Our last stamp was a fun one - do you recognise this famous fish cameo? 

This is my take on Dory from the Disney movie 'Finding Nemo', a definite James family favourite and whilst it might look complicated, as the last of my stamps to carve I had had a little practice by this point, so think it turned out quite well.

I hope you like my first foray into the world of 'Undefined' - it really was fun and Rebecca LOVES her stamps, which is the main thing! I will have more to share with you another time as I still have Ben's set and mine to carve. if you would like more 'Undefined' inspiration, check out Stampin' Up!'s Undefined Pinterest page, where you will see lots of amazing creations!

Back tomorrow with another project; until then, happy stampin'!


Stampin' Up! Supplies Used:

Table built using Product Table Builder by The Crafty Owl - Independent Stampin' Up! Demonstrator.


You're One In A Minion!

by Joanne James14. October 2013 20:28

Today I'm sharing another birthday card that I made last week, this time for my daughter to give to one of her school friends who celebrated his birthday yesterday. After much consultation, we decided that we would go with something fun. They've both seen the Dispicable Me movies, so I decided to have a go at creating my very own punch art minion. Here is the end result:

He was actually quite easy to make with the aid of a selection of circle punches and I'm very pleased with the result. I particularly like the striped embossing on his dungarees and the white stitching to add definition. The hair was made following a tip by Tanya Bell of StampingT.com.au by stripping some standard black ribbon into strands and threading through some holes. I've never been one for sewing, but as far as cards are concerned I think this is about as far as it gets! The only stamping on this card was on the inside - I don't have a photo, but I used my ABC 123 Sketch Alphabet to stamp 'You're One In A Minion!' A perfect sentiment to finish off this fun card.

Before I go, a quick reminder that we are 7 days in to the 14 day 'Join Stampin' Up! for £25'. This is a once in a lifetime offer to celebrate Stampin' Up's 25th anniversary and is unlikely to be repeated. You can find more information in my previous post here - if you're thinking of signing up, do give me a call to talk about the benefits that being a part of Stampin' Up and my team has to offer.

Back tomorrow with another project. Until then, happy stampin'!


Stampin' Up Supplies Used:

 Stylish Stripes Textured Impressions Embossing FolderBig Shot Die-Cut Machine - by Stampin' Up!

1/2 Inch Circle Punch - by Stampin' Up!1-1/4 Inch Circle Punch - by Stampin' Up!1-3/4 Inch Circle Punch - by Stampin' Up!Uni-Ball Signo Gel Pen - by Stampin' Up!

Top Secret Spy Birthday Card

by Joanne James5. October 2013 21:42

So I almost didn't blog today for the second day in a row, I've had such a busy couple of days (husband's birthday, daughter's hockey match and swimming gala, birthday lunch, theatre outing and more!) but since today is World Cardmaking Day, I felt I couldn't end the day without sharing a card.

Here's one I made for one of the childrens' friends who celebrated his 8th birthday this week. He was having a spy-themed birthday party, so since we had decided on a suitably themed gift, I had to make a card that was in keeping too. This is what I came up with:

A simple black card base, with a 'Top Secret' stamp on a label fixed with dimensionals and a magnifying or 'spy' glass, made using my Circles Framelits and a piece of clear window sheet. The inside of the card is stamped with 'Happy 8th birthday' which is visible through the magnifying glass. This is quite a cute little card and I'm not sure the photo does it justice; also made a nice change as it's been a few weeks since I last made a boy card!

Hope you've all managed to get more cardmaking done than me today - good job I have a few in reserve! Hoping that I'll manage to squeeze in some time tomorrow to do a little more.

Happy World Cardmaking Day and until next time, happy stampin'.


Stampin' Up Supplies Used:

 Circles Collection Framelits DiesABC-123 Sketch Alphabet & NumbersReal Red Classic Stampin' PadMedium Window Sheets - by Stampin' Up!


The Great Outdoors and Other Things!

by Joanne James10. September 2013 19:52

Well, I can't believe it's actually been six days since I last posted a blog entry, but it has! It's not that I've not been 'making', far from it; just that I've had some urgent makes that I sent even before photographing (oops!) and it was my birthday at the weekend and whilst I didn't make myself a card, my parents celebrated their 45th wedding anniversary on the same day and I have two friends who also share my birthday so I was busy sorting cards for them. I have lots of friends and family with birthdays in September, so am still trying to finish these cards before I really get into the Christmas spirit! And this week I have two card classes too, so busy, busy!

Anyway, today's share is a quick 'make' and birthday card with the 'Great Outdoors' stamp set. I play an active role in the Parents' Association at James Juniors' school and last weekend was the now annual Dads, Lads and Lasses Camping Weekend. No Mums allowed, except to help with the planning, organising and shopping beforehand! The weekend was choc-full of great activities: a treasure hunt, mini beast hunt, stargazing and campfire breadmaking to name but a few. Another of the activities was to create a mini camp journal; everyone had a mini journal to stamp, colour and decorate and the 'Great Outdoors' stamp set was just perfect for this. Here's the simple one I created to give the children some inspiration:
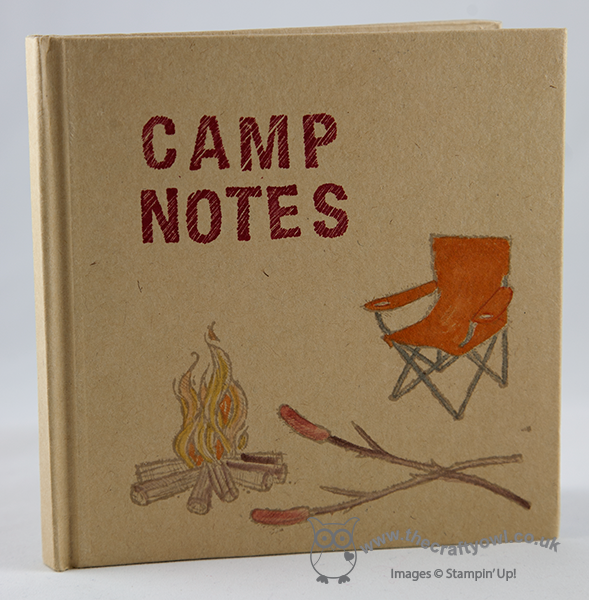
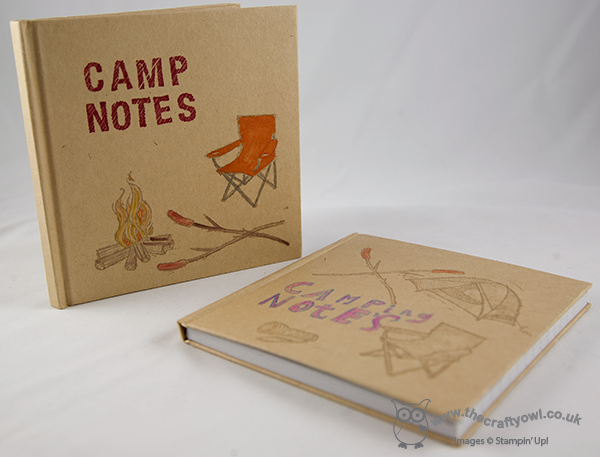
The children created some fantastic journals and filled them with tales and memories of their weekend. The photo at the end of the post shows Rebecca's 'work in progress' (and this is just the outside of the book!) alongside mine.

I have one other photo to show you from the weekend; not a great picture I'm afraid, but it was a last-minute one taken with my phone - shock, horror!! One of the young campers was celebrating his birthday on the Sunday, so I made a themed card for the children to sign collectively as a special way to remember how he spent his 7th birthday. Here it is: 

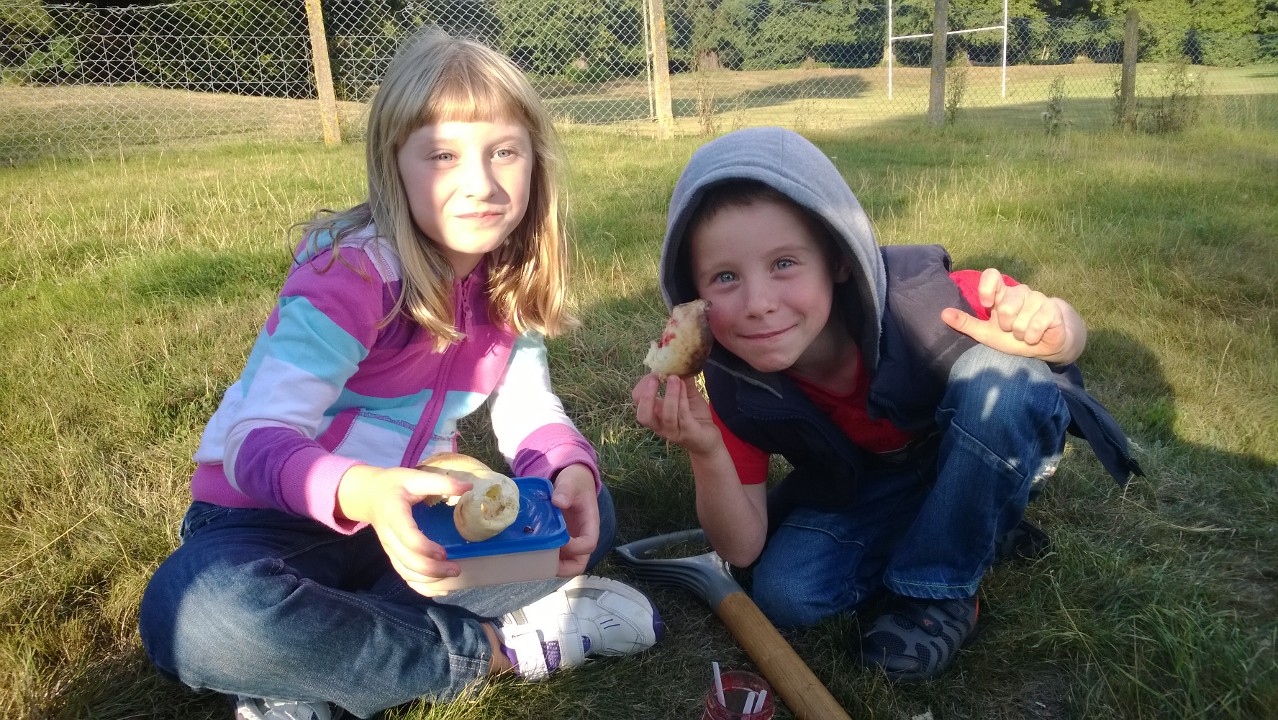
I made a mask to enable me to stamp the tents in a row and fussy-cut the campfire and popped it up on dimensionals. Lastly, here's a picture of my happy campers eating their campfire-baked bread with jam:
I will be back tomorrow with another of my recent cards; hopefully blog normality is about to be restored! Until then, happy stampin'!


Stampin' Up Supplies:

Stamps: The Great Outdoors, ABC-123 Sketch Alphabet, Memorable Moments

Cardstock: Whisper White, Old Olive

Ink/Stampin' Write Markers:  Old olive, Soft Sky, Cherry Cobbler, Pumpkin Pie, Daffodil Delight, Crumb Cake, Chocolate Chip

Tools: Scallop Circle Punch, Circle Punch
 

Look Who's Turning 40!

by Joanne James18. August 2013 20:08

Another 40th birthday card today, this one showcasing lots of new products. This was the birthday card from my children to their uncle, so I wanted it to fauna fun design; this is what I came up with:

I used the Birthday Basics Designer Series Paper as the inspiration for the colour scheme for this card - that and the fact that I already had Bermuda Bay out on my desk (I love this new colour!) I built the sentiment from my Simply Sketched Alphabet stamps and added a fun element by replacing the 'OO' with a pair of spectacles and googly eyes. I stamped the spectacles by inking up one pair on my 'Spectacular' single stamp - I have been having lots of fun with this stamp (as a specs wearer it really appealed to me!); this, and the other single stamps, are still available to purchase until the end of the month. See the box on the right of my blog page for more details and make sure you contact me before the end of the month if you'd like to order one.

My children thought this card was really funny, although I'm not sure that I would have got away with it as far as my specs-wearing brother-in-law is concerned, were I not a specs wearer myself!

Back soon with another project; until then, happy stampin'!


Stampin' Up Supplies:

Stamps: ABC-123 Sketch Alphabet and Numbers, Spectacular

Cardstock: Summer Starfruit, Bermuda Bay, Raspberry Ripple, Very Vanilla, Birthday Basics Designer Series Paper (SAB - retired)

Ink/Stampin' Write Markers: Bermuda Bay, Raspberry Ripple

Tools: Simply Scored, Big Shot, Typeset Alphabet Die, Stamp-a-ma-jig

Finishing Touches: Googly eyes (non SU)


Scrapbooking

Stampin' Up! has introduced a new range of 12x12" scrapbooking product and kit - the full range is now available to purchase online. To download a copy of the new digital Scrapbooking Catalogue click here.

Mini Catalogue

BROWSE THE CATALOGUE

'Tis The Season - the new Stampin' Up! Mini Catalogue is here! For more details and to download your copy click here

Shop Online

Access my online shop 24 x 7, 365 days of the year:

Current September hostess code:

JQEHTZGK

Shop Online

2024-25 Annual Catalogue

BROWSE THE CATALOGUE

Click on the image to download your copy of the 2024-25 annual catalogue. For a full list of current SU! supplies, go to my online store. If you would like any help or advice, please drop me a line at joanne@thecraftyowl.co.uk or give me a call on 07773 421446 - I'd be happy to help.

Join My Team

It's always a great time to join Stampin’ Up! New team members can get £130 worth of products for only £99 + free business supplies + free shipping + all the fun being a part of Stampin’ Up! Stampin' Up! has something for everyone: join my growing team and benefit from my support to enjoy Stampin' Up! however you choose.

If you're interested, call me for a chat to understand how I can help you realise your goals. Alternatively, if you have already decided to sign up and you just can't wait, please click here for the link to the online form where you can sign up and order your starter kit right away! 

Latest Kits!

Stampin Cut and Emboss

The Christmas Ornaments Kit and Card Keeper Kit are the latest kits that will be arriving in the online store later this month - get yours here!

New Online Exclusives

There are new products available exclusively in the online store from 3 July - check them out here.

About Me

Hi I'm Joanne and live in Northampton and when I'm not looking after my husband and two beautiful children, am an avid crafter with a passion for all things Stampin' Up!

I must confess that I have never been a big rubber stamper - until I discovered Stampin' Up! that is. I love the fact that I can get such great results with co-ordinating stamps, inks, papers and punches - the possibilities are endless! Join me on my stamping journey as I share the things I love and be inspired to create amazing things yourself!

Follow Me

Monthly Newsletter

Box Builder

Click the button above to use Box Buster to create your custom box design using the Envelope Punch Board!

Kits Collection Now Available!

Stampin Cut and Emboss

The new Kits Collection from Stampin' Up! is now available!

Click here to see the current kits available and order yours online today.

I Design For


Stampin' Up Stuff

This is my personal blog and is not endorsed by Stampin’ Up! I hope you find it a plentiful source of ideas and personal inspiration but please don't copy my designs for contest submission or use for classes, publication or sale without express permission.