Three Important Updates For September - Read On

by Joanne James1. September 2020 09:00

Good morning everyone! I will be back later with a creative post but it's the start of a new month and there's lots happening, so time for an update post first!

Firstly - the clearance rack in the online store has been updated! Bargains are selling out fast but there are some great discounts to be had, especially in terms of kits: the Bird Ballad Laser Cut Cards and Tin is reduced from £17 to £6.80 - add a pack of Bird Ballard Designer Paper which is also reduced to £4.30 and you have the makings of a project in itself for under £12! 

BIRD BALLAD LASER-CUT CARDS & TIN   BIRD BALLAD DESIGNER SERIES PAPER   LOTS OF HAPPY CARD KIT (EN)

The Lots of Happy All-Inclusive Card Kit is also reduced to just £13.20 - almost £20 off! This kit would make a great gift for a crafty friend - time for a little early Christmas shopping, perhaps?


The second news of the day is that during the month of September there is a great 'Get and Go' joining promotion for anyone wishing to join Stampin' Up! that is totally geared to helping you get your Stampin' Up! business off the ground. In addition to the already great value Starter Kit, new recruits will receive pre-cut paper, stamps, and embellishments to use in their first event. 

In addition to the regular starter kit (for £99, new recruits choose £130 worth of products) new recruits will also receive enough cardstock pieces to make 16 cards, a pack of Rhinestone Basic Jewels, the So Much Love stamp set, and the Queen Anne’s Lace stamp set—all for their first event. 8 packs of pre-cut cardstock in Coastal Cabana will be provided, and 8 packs of pre-cut cardstock in Granny Apple Green, for a total of 16 cards (packs include envelopes). You can choose what samples to replicate and how to distribute your packs to your customers. (Important note: ink, adhesive, cutting tool, and clear block for stamping must be purchased separately, however these products may be included as part of the Starter Kit product selection.) You will also receive instructions on how to recreate the samples shown, access to promotional materials and support from me to hold your first event and get your business off the ground. If this is something that appeals to you, please get in touch - I would love to help you realise your potential! Or simply click on the 'join my team' link on the right hand column on my blog and start your journey today.


The third piece of news today is that the Stampin' Cut and Emboss Machine (standard size) is finally here and available at last for you to purchase! This durable machine is easy to use, lightweight and portable yet simple to store - and it can be yours from today! Just click on the link to my online store below to get your hands on one! Here's a short video that shows it in action:

The mini Stampin' Cut and Emboss is still in production having experienced COVID-related manufacturing delays so you will have to wait a little longer to get your hands on this one's little sister; in the meantime, the standard size machine has you covered!

Right, that's a lot of information for one post - I'll be back later with today's creative musings! 


Table built using Product Table Builder by The Crafty Owl - Independent Stampin' Up! Demonstrator.


CASEing The Catalogue With Snowflake Splendor PP506

by Joanne James30. August 2020 09:00

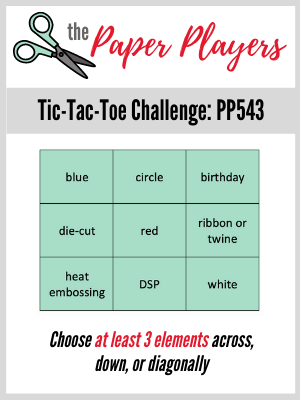
Today it's Sunday and time for this week's new challenge over at The Paper Players! It's the fifth week of the month and the turn of the amazing Ann to host this week with a fun TicTaToe challenge board for you to work with:
    

My cards today feature lots of products from the Snowflake Splendor Suite in the Autumn-Winter mini catalogue. Take a look:


Here's the low-down on today's card:

TicTacToe - I love a tic tac toe board - they offer such a wealth of creative possibility and always result in an interesting gallery. I went along the diagonal bottom left to top right - diecut, embossing and patterned paper - for my card today, but realised afterwards it also works for the middle horizontal row of ribbon, embossing and gems - check out the sparkly blue faceted gem I used to centre my diecut layered snowflake:


CASEing The Catalogue - Does the layout I chose for today's card look familiar? The team over at SUO Challenges are challenging us to CASE (Copy And Share Everything or Copy And Selectively Edit, you choose) either of the cards featuring the 'Whale Done' Suite on page 94 of the catalogue:

I often use my Stampin' Up! catalogue for inspiration in terms of colours or layouts and this was a fun challenge to show how you can take inspiration from the catalogue to create something fresh and new. I actually made both of the cards I'm sharing today live in a Zoom demonstration with the ladies in my Online Classes Facebook Group during last week's session, as I wanted to explain my process and encourage them not to discount pages that featured products that might not be of interest to them, but instead look to see what other inspiration they could take. My card uses the same layout as the one on page 94 and includes all of the same elements: patterned paper, a central banner with contrasting stamping, a feature diecut image, diecut vellum pieces behind the banner and an embossed sentiment backed with ribbon - yet my card looks quite different to the one on page 94 as it uses a completely different product suite.

Snowflake Splendor Times Two - Having made this card, I then went on to CASE the second card on this page, that highlights an inked embossing folder technique:


I used the Winter Snow embossing folder and instead of a stamped panel, used a couple of pieces of contrasting designer series paper for the feature panel, embellished with some rhinestones and Whale of a Time sequins, along with a sentiment created from stamping two of the greetings from the 'Peace And Joy' stamp set next to each other to create a single one; this one is slightly different in layout to the catalogue sample, yet the similarities in layout still make it recognisable. 

Here's both of my CASEd cards together: 


Here is the visual summary of the key products used on today's project for you to pin for easy reference:


You can see all of my Product and 'How To' summaries on my 'How To - Tips and Techniques' Pinterest board in case you've missed any. Do you ever use layouts from the catalogue as a starting point for your card making? Do let me know in the comments below - I'd love to hear what inspires you to create! Equally, if you would like to watch the video of me making both of these cards, do get in touch for more details on how to join my Online Classes group - I would love to have you join me.

Before you reach for your ink and papers, check out what our amazing team has created to inspire you this week:

Here's a quick recap of our challenge rules:
 
1.  Create a new paper project
2.  Upload your creation to your blog with a link back to us and provide a direct link to the post featuring your challenge submission.
3.  Please link your card to no more than four challenges, TOTAL.
4.  Have FUN!

You can see all of my 'How To' summaries on my 'How To - Tips and Techniques' Pinterest board in case you've missed any. 

Enjoy your day; my day today will be a busy one, for a Sunday. Rebecca is back to hockey for the first time in 6 months for pre-season training so is very excited about that and I have hours of content to catch up on from Stampin' Up!'s Leader Summit this past few days, much of which I didn't do live because we were otherwise engaged as a family celebrating young Master James' finishing of prep school. Thank heavens for online recordings and catch-up - where would we be without it?! I also have a mound of raspberries to make into jams, jellies and more - the weather here these last few days has been positively autumnal so I have some very soft and squishy fruit that has been rather battered by the high winds! I'll be back tomorrow with another project. Until then, happy stampin'!
 

Stampin' Up! Supplies Used: 

Table built using Product Table Builder by The Crafty Owl - Independent Stampin' Up! Demonstrator.


Snowflake Wishes Shaker Card for AYSI 233

by Joanne James28. August 2020 12:00

Today I'm sharing my design team card for our new challenge over at As you See It where it's time for a 'fill in the blank' challenge:


There are lots of colour combinations that I love, but must confess that one of my current favourites is Balmy Blue and Highland Heather. I have always been a fan of purple, but the beautiful papers featuring this combo in the Snowflake Splendor Suite have me creating a lot with this colour combo at the moment. For today's card I decided to share one of the cards that I created on one of my live Zoom demonstration sessions with my lovely customers last week that showed them how to step up their shaker cards with embossing folders - take a look:


Here's the low-down on today's card:

Snowflake Splendor - I've mentioned previously how much I love this suite; having started creating with it for my class last month, I am quite hooked and have been using it for lots of projects lately, some of which I've shared here already. I love the papers, that give the patterns a hand-painted feel, with wonderful watercoloured patterns too.  

A Fresh Winter Colour Combo - I love the way the colours combine in the Snowflake Splendor papers and I think the addition of Highland Heather amongst the blues really rings the changes and freshens up this wintery colour scheme. For my shaker, I paired a watercolour design frame with a background printed with white snowflakes, and added a fussy cut snowflake stamped in my colour duo (in the interests of full disclosure, I did also add a little Pacific Point to this particular snowflake), along with some diecut snowflakes in Balmy Blue glimmer paper for added sparkle:


A Winter Snow Shaker - Before mounting my shaker window, I ran my window sheet through the Winter Snow Embossing folder. This was a tip I saw recently shared by one of Stampin' Up!'s artisan designers, Stesha Bloodhart, using the Seabed 3D embossing folder, and couldn't wait to try it with the snowflakes. If you look carefully at the photo below you can see the snowflake impressions:


I think this is such a great way to step up a shaker card as it adds lovely texture and detail.

If you'd like to see a little video clip of my shaker in action, in all its snowflake shaker glory, you can see that on my Facebook page here.

Here is the visual summary of the key products used on today's project for you to pin for easy reference:


You can see all of my 'How To' summaries on my 'How To - Tips and Techniques' Pinterest board in case you've missed any. 


Here's a summary of our challenge rules:

  • Create any card, scrapbooking page, 3D project or packaging   project that fits the challenge.
  • Fill in the blanks with the words that are right for you and then create your project with those words in mind. Tell us, in your blog or on your site, what words you used.
  • Please include the challenge graphic and link back to the challenge in your blog post. Turn off word verification so we can leave you lots of lovely comments. Make sure you link the post not the whole blog to the Linky. Use #AYSIXXX when uploading to a public gallery.
  • If you’re unsure about ‘the rules’, check the details under the Challenge Guidelines tab on the As You See It Challenge homepage.

We look forward to seeing your creations in the AYSI gallery.

Enjoy your day. Mine is going to be a rather special one, as young Master James finally gets to attend his Year 8 Prize Giving Ceremony today. For him and the other year 8 pupils, this year has not been full of the post-Common Entrance Examination rewards that might have been in different times, but today we will have a special year 8 only socially-distanced Speech Day, with Prize Giving and picnic lunch, followed by family cricket (weather permitting) and then the children will be having a disco and hog roast in the evening, in lieu of their Leaver's Ball. They are all very much looking forward to it and it will be a wonderful way to end this special period of his educational journey before moving to his new school and the next chapter.

I'll be back tomorrow with another project. Until then, happy stampin'!


Stampin' Up! Supplies Used:

Table built using Product Table Builder by The Crafty Owl - Independent Stampin' Up! Demonstrator.

Have A Hoot Punny Owl I Want For Christmas Card

by Joanne James25. August 2020 08:00

Today I'm sharing a card for this week's Inspired By challenge where it's all about the punny sentiment:


I love a good punny sentiment and a quick perusal of current stamp sets and I knew exactly where I was headed. I used the sketch layout this week too - take a look:


Here's the low-down on today's card:

Have A Hoot - Yes, this adorable pair of loved-up owls and that festive punny sentiment 'owl I want for Christmas is you!' were a perfect fit for the challenge! I coloured my little scene with Blends and diecut my feathered friends and popped them up on dimensionals for a little lift, within their framed circle. I also added a little simple stamped detail inside my card:

Plaid Tidings - The colour scheme for my card was inspired by one of the many lovely patterns in the Plaid Tidings set, with a combination of Crumb Cake, Shaded Spruce, Cherry Cobbler and Whisper White. I used each of the colours in my layers, finishing with the Cherry Cobbler top panel for a festive touch. 

It's All In The Details - I added a sprig of mistletoe, complete with pearl berries and tied with some retired baker's twine, to the top of my window, perfectly positioned above my owls, and I also added some small rhinestones to the snowflakes for a little festive sparkle:


I'm also sharing today's card over at Christmas Kickstart where the challenge is 'Christmas Birds' - in truth, I'm not sure whether an owl constitutes a Christmas bird but these two are definitely set for Christmas so hopefully the ladies over there will appreciate it!

Here is the visual summary of the key products used on today's project for you to pin for easy reference:


You can see all of my 'How To' summaries on my 'How To - Tips and Techniques' Pinterest board in case you've missed any. 

Enjoy your day and I'll be back tomorrow with another project. Until then, happy stampin'!


Stampin' Up! Supplies Used:

Table built using Product Table Builder by The Crafty Owl - Independent Stampin' Up! Demonstrator.

Trimming the Town Horizontal Card Three Ways

by Joanne James24. August 2020 08:00

Another Monday, another week! Lots happening this week so I need to be even more organised that usual! Today I'm sharing a card (or 3!) using this week's sketch over at The Paper Craft Crew:

Remember when I cut up that 12" x 12" sheet of scene DSP from the Trimming The Town pack I cut up to make 4 slimline cards here? I showed you the other 3 smaller pieces of DSP I had leftover and this week's sketch was perfect for me to use these to complete my set of cards. Here is each of my cards in turn:


Card 2:


Card 3 - I flipped the sketch on the vertical for this one as the sentiment worked better on the left side of my framed scene:


Here's the low-down on today's card:

Each of my cards uses a Misty Moonlight card base, with a panel of snowflake paper followed by a piece of the scene, which is framed in a Poppy Parade border cut with the scallop-edged Layered Squares dies. The sentiments have also been cut from the Trimming The Town DSP and popped up on dimensionals, along with a fussy cut tree and also a small ribbon bow on one of my cards:


I did a little stamping on the inside of my card, but the outside was all about snipping with my scissors and some diecut frames - nice and straightforward and I've used my whole sheet of DSP.

Here is the visual summary of the key products used on today's project for you to pin for easy reference:


You can see all of my 'How To' summaries on my 'How To - Tips and Techniques' Pinterest board in case you've missed any. 

Enjoy your day and I'll be back tomorrow with another project. Until then, happy stampin'!


Stampin' Up! Supplies Used:

Table built using Product Table Builder by The Crafty Owl - Independent Stampin' Up! Demonstrator.

Gilded Autumn Patterned Paper Trio of Thank You Cards for PP505

by Joanne James23. August 2020 09:00

Today it's Sunday and time for this week's new challenge over at The Paper Players! It's the turn of the amazingly talented LeAnne to host this week and she has my favourite, a sketch challenge for you to work with:


LeAnne's sketch is perfect to showcase some designer series papers and I couldn't resist another card using the Gilded Autumn speciality designer series papers - take a look:


Here's the low-down on today's card:

Gilded Autumn Goodness - The Gilded Autumn papers are beautiful, with some fabulous foil detailing. I paired my chosen patterns with a sentiment and label from the 'So Sentimental' bundle and added some of the ribbon from the suite to my label too.

A Copper Acorn - I used some retired dies for my diecut leaves (from the Beautiful Bouquet die set) as they had a shape that works well with the patterns on the paper and added a double linen thread bow. I stopped there on my two additional cards as I wanted them to be post-friendly, however I couldn't resist adding one of the lovely copper acorn trinkets from the suite to one of my cards - these are just so pretty:


I'm going to link this card up over at Hand Stamped Sentiments too - I just love their inspiration photo this week, it's so perfect for the season!

And Two Makes Three - As I mentioned above, having cut 3 rectangular pieces of DSP, and then cut all three together at the same angle on my guillotine, I made another two cards to use up all of the pieces. Here's my second card:


And my third card:


A little simple stamping using the 'Beautiful Autumn' set inside finished each card:


Here's all three of my cards together - do you have a favourite? Leave me a comment, I would love to hear your thoughts.


Here is the visual summary of the key products used on today's project for you to pin for easy reference:


You can see all of my Product and 'How To' summaries on my 'How To - Tips and Techniques' Pinterest board in case you've missed any. 

Before you reach for your ink and papers, check out what our amazing team has created to inspire you this week:

Here's a quick recap of our challenge rules:
 
1.  Create a new paper project
2.  Upload your creation to your blog with a link back to us and provide a direct link to the post featuring your challenge submission.
3.  Please link your card to no more than four challenges, TOTAL.
4.  Have FUN!

You can see all of my 'How To' summaries on my 'How To - Tips and Techniques' Pinterest board in case you've missed any. 

Enjoy your day; I'll be back tomorrow with another project. Until then, happy stampin'!


Stampin' Up! Supplies Used: 

Table built using Product Table Builder by The Crafty Owl - Independent Stampin' Up! Demonstrator.

Gilded Autumn Suite Layered Thank You Card

by Joanne James21. August 2020 20:00

Today I'm sharing another card that uses this week's Global Design Project sketch and this time the inspiration photo over at Hand Stamped Sentiments:


The #GDP254 sketch has so many possibilities and I couldn't resist those autumnal colours, leaves and acorns on the HSS photo. This is the original card I made with the sketch (if you missed it I shared another one yesterday here), along with my first outing with the fabulous Gilded Autumn Suite of products - take a look:


Here's the low-down on today's card:

Gilded Autumn - The catalogue describes the Gilded Autumn Suite as 'nature-inspired imagery, with gold and copper foiling to give autumn an infusion of elegance' - this totally sums up the beauty of the products in this suite, especially the papers. I used a piece of gold-foiled Cajun Craze paper for my card base, then added a layer of brushed gold cardstock before adding a Stitched Rectangle with the reverse of my base pattern, featuring a variety of coloured autumn leaves. 

Leaves and Acorns - I used a trio of gold heat-embossed leaves and acorns to decorate my sentiment label, each of which was easily punched out using the autumn punch pack punches. These punches are quite a decent size; I thought they would be small, like the itty bitty punches we've had previously, but they are more like the size of the small bloom punch. They also co-ordinate with some of the paper patterns - bonus! They are two-step stamps, with an outline and infill and are easy to align - I even used them to decorate the inside of my card: 


Gold, Gold and More Gold - I couldn't resist adding more touches of gold to my card: the designer paper, the heat embossed sentiment and punched leaves, along with the brushed gold cardstock border and a tiny gold twine bow on my acorn give the whole thing a wonderful warm glow:

I think I've fallen in love with the foil detailing on these papers and all of the lovely coordinating products in this suite. Looking forward to creating more with them!

Here is the visual summary of the key products used on today's project for you to pin for easy reference:


You can see all of my 'How To' summaries on my 'How To - Tips and Techniques' Pinterest board in case you've missed any. 

Enjoy your evening and I'll be back tomorrow with another project. Until then, happy stampin'!


Stampin' Up! Supplies Used:

Table built using Product Table Builder by The Crafty Owl - Independent Stampin' Up! Demonstrator.

So Much Happy Happy Birthday Balloons TTT78

by Joanne James20. August 2020 18:00

It's Thursday and time for a new challenge over at TicTacToe! It's the turn of Team X to host this week and the lovely Felicita is our featured designer this week. This is the fun board that we are playing along with: 


I went with the right hand column balloon/any shape die/free, but my card also works for the diagonal balloon/celebration/any colour ink. I needed some birthday cards for my stash so took this opportunity to break out my So Much Happy Bundle for a bold and bright card - take a look:


Here's the low-down on today's card:

That fabulous HAPPY Die is the starting point for my card, set at a jaunty angle. I then added the rest of my sentiment using the coordinating 'So Much Happy' stamp set and stamped a whole bunch of balloons in a variety of sizes and patterns, some of which I diecut and added strings to also, before adding to my card.

I popped a few up on dimensionals to add to the effect - you can see that more closely here:


And finally I added a little extra stamping inside my card to finish:


The dies really make this card a step-up from what is otherwise a collection of stamps, ink and paper - and easy to create in so many different colourways! What colours would you use to recreate this card? Do leave me a comment - I'd love to hear your thoughts!

Here is the visual summary of the key products used on today's project for you to pin for easy reference:


You can see all of my Product and 'How To' summaries on my 'How To - Tips and Techniques' Pinterest board in case you've missed any. 

A tictactoe board offers so many creative possibilities - how does this week's board inspire you? Why not have a go? We would love to see you in the gallery and who knows - you might be selected for Designer's Choice and be eligible to be a guest designer on a future challenge. 

Enjoy your evening; I'll be back tomorrow with another project. Until then, happy stampin'!


Stampin' Up! Supplies Used: 

Table built using Product Table Builder by The Crafty Owl - Independent Stampin' Up! Demonstrator.


Peace and Snowflakes Times Two

by Joanne James20. August 2020 13:00

Today's second and third cards came about following my online card class earlier this week where we were making cards using the Snowflake Wishes Suite and I had the urge to make another card featuring the gorgeous papers. I had already made a card for this week's Global Design Project #GDP254 that I will be sharing later this week, but I could resist another go with that sketch:


I decided to go full-on snowflakes and used a trio of retired snowflake trinkets to embellish my sentiment:


I also added some In-Color Misty Moonlight ribbon beneath my label for an added splash of blue.

Here is the visual summary of the key products used on today's project for you to pin for easy reference:


Having deliberated over which paper pattern to showcase on my card, I realised that the reverse of my chosen design had a fabulous watercolour effect; so I decided to create another card using this that was inspired by the sketch challenge over at TGIF Challenges this week:

I had been musing for a few days over whether or not to brave a watercolour background, but decided this paper would be the perfect cheat. So I paired it  with the fabulous Peace and Joy bundle to create another Christmas card - take a look: 


A fabulous stacked diecut on a vellum wrap and a trio of heat embossed and epoxy 'stars' complete this rather pretty card, even if I say so myself!

Here is the visual summary of the key products used on today's project for you to pin for easy reference:


You can see all of my 'How To' summaries on my 'How To - Tips and Techniques' Pinterest board in case you've missed any. 

Enjoy your day and I'll be back later with my post for this week's new TicTacToe challenge. Until then, happy stampin'!


Card 1 - Stampin' Up! Supplies Used:

Table built using Product Table Builder by The Crafty Owl - Independent Stampin' Up! Demonstrator.
 
Card 2 - Stampin' Up! Supplies Used:
Table built using Product Table Builder by The Crafty Owl - Independent Stampin' Up! Demonstrator.

Whale of A Time Porthole Birthday Card

by Joanne James20. August 2020 12:00

Thursday? Where has the week gone?! I have had a class this week and another online demonstration session this morning and it's the summer holidays of course; I did some making on Tuesday but am super behind with my blogging, so you will see a few posts from me today as I'm in catch-up mode! The first is this card that I made using this week's CAS(E) This Sketch layout and if I'm quick I can just squeeze in a link up:

The minute I saw that sketch I knew it would be perfect for one of the papers I had in my Whale of a Time paper pack - take a look:


Here's the low-down on today's card:

That shoal of colourful swimming fish was crying out to be framing a 'faux porthole' that I used to highlight my embossed sentiment, then decorated with a stamped and punched whale and some sea coral. Check out my co-ordinating inside decoration too:


Here is the visual summary of the key products used on today's project for you to pin for easy reference:


You can see all of my 'How To' summaries on my 'How To - Tips and Techniques' Pinterest board in case you've missed any. 

Enjoy your day and I'll be back later with another couple of projects. Until then, happy stampin'!


Stampin' Up! Supplies Used:

Table built using Product Table Builder by The Crafty Owl - Independent Stampin' Up! Demonstrator.
 

New Online Exclusives

There are new products available exclusively in the online store from 5 November - check them out here.

Latest Kits!

Stampin Cut and Emboss

The Layered Landscapes Kit and Nature's Paintings Kit are the latest kits in the online store - get yours here!

Shop Online

Access my online shop 24 x 7, 365 days of the year:

Current November hostess code:

9NKXDTTR

Shop Online

Mini Catalogue

BROWSE THE CATALOGUE

'Tis The Season - the new Stampin' Up! Mini Catalogue is here! For more details and to download your copy click here

Scrapbooking

Stampin' Up! has introduced a new range of 12x12" scrapbooking product and kit - the full range is now available to purchase online. To download a copy of the new digital Scrapbooking Catalogue click here.

2024-25 Annual Catalogue

BROWSE THE CATALOGUE

Click on the image to download your copy of the 2024-25 annual catalogue. For a full list of current SU! supplies, go to my online store. If you would like any help or advice, please drop me a line at joanne@thecraftyowl.co.uk or give me a call on 07773 421446 - I'd be happy to help.

Join My Team

It's always a great time to join Stampin’ Up! New team members can get £130 worth of products for only £99 + free business supplies + free shipping + all the fun being a part of Stampin’ Up! Stampin' Up! has something for everyone: join my growing team and benefit from my support to enjoy Stampin' Up! however you choose.

If you're interested, call me for a chat to understand how I can help you realise your goals. Alternatively, if you have already decided to sign up and you just can't wait, please click here for the link to the online form where you can sign up and order your starter kit right away! 

About Me

Hi I'm Joanne and live in Northampton and when I'm not looking after my husband and two beautiful children, am an avid crafter with a passion for all things Stampin' Up!

I must confess that I have never been a big rubber stamper - until I discovered Stampin' Up! that is. I love the fact that I can get such great results with co-ordinating stamps, inks, papers and punches - the possibilities are endless! Join me on my stamping journey as I share the things I love and be inspired to create amazing things yourself!

Follow Me

Monthly Newsletter

Box Builder

Click the button above to use Box Buster to create your custom box design using the Envelope Punch Board!

Kits Collection Now Available!

Stampin Cut and Emboss

The new Kits Collection from Stampin' Up! is now available!

Click here to see the current kits available and order yours online today.

I Design For


Stampin' Up Stuff

This is my personal blog and is not endorsed by Stampin’ Up! I hope you find it a plentiful source of ideas and personal inspiration but please don't copy my designs for contest submission or use for classes, publication or sale without express permission.