by Joanne James2. May 2014 20:28Hello everyone - yes, it's Friday at last! And a three day weekend here in the UK too, so bonus! I've been busy working on wedding cards for commissions today so will share those another time. Today I'm sharing one of the cards I made with my ladies in my card class this month. The cards we made all featured the Happy Watercolour stamp set - today's card is a simple card stamped with the poppy stamp:
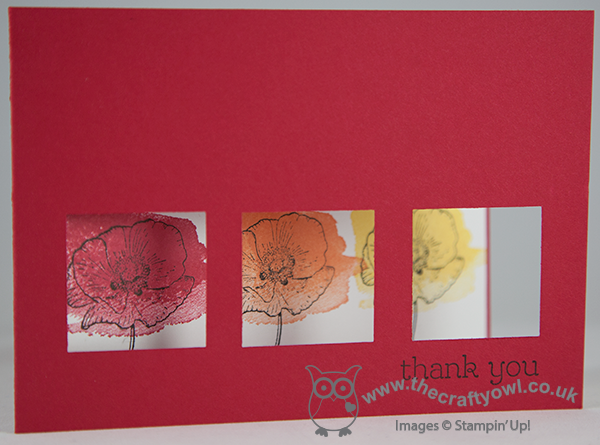
We punched three squares out of the front of the card (I used a retired square punch for this but you could use the Squares framelits as an alternative), then using the stamp-a-ma-jig to align the images on the inside of the card, we stamped the poppies in black so that they could be seen through the punched 'windows'. Each of the poppies was then overstamped with the large watercolour 'splodge' stamp (I think that is a genuine technical term!) like so:
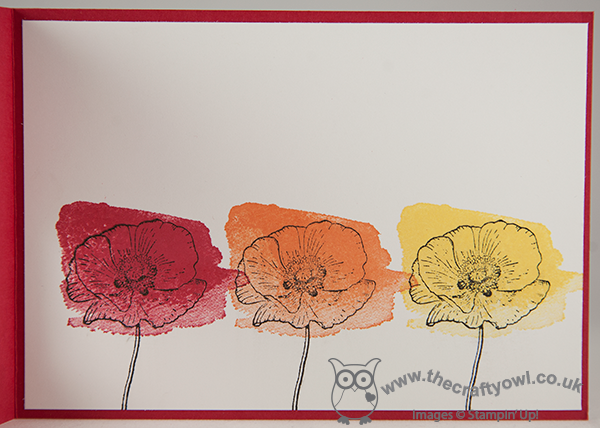
A simple thank you sentiment on the front of this card provides the finishing touch. This card was as much about getting my ladies used to using a stamp-a-ma-jig; many of them own one, but weren't confident in using it so I've been making sure that at least one card in each class offers the opportunity to practice. You know what they say - practice makes perfect :-) I wouldn't be without mine, that's for sure.
Back tomorrow with another card; until then, happy stampin'!
Stampin' Up! Supplies Used:
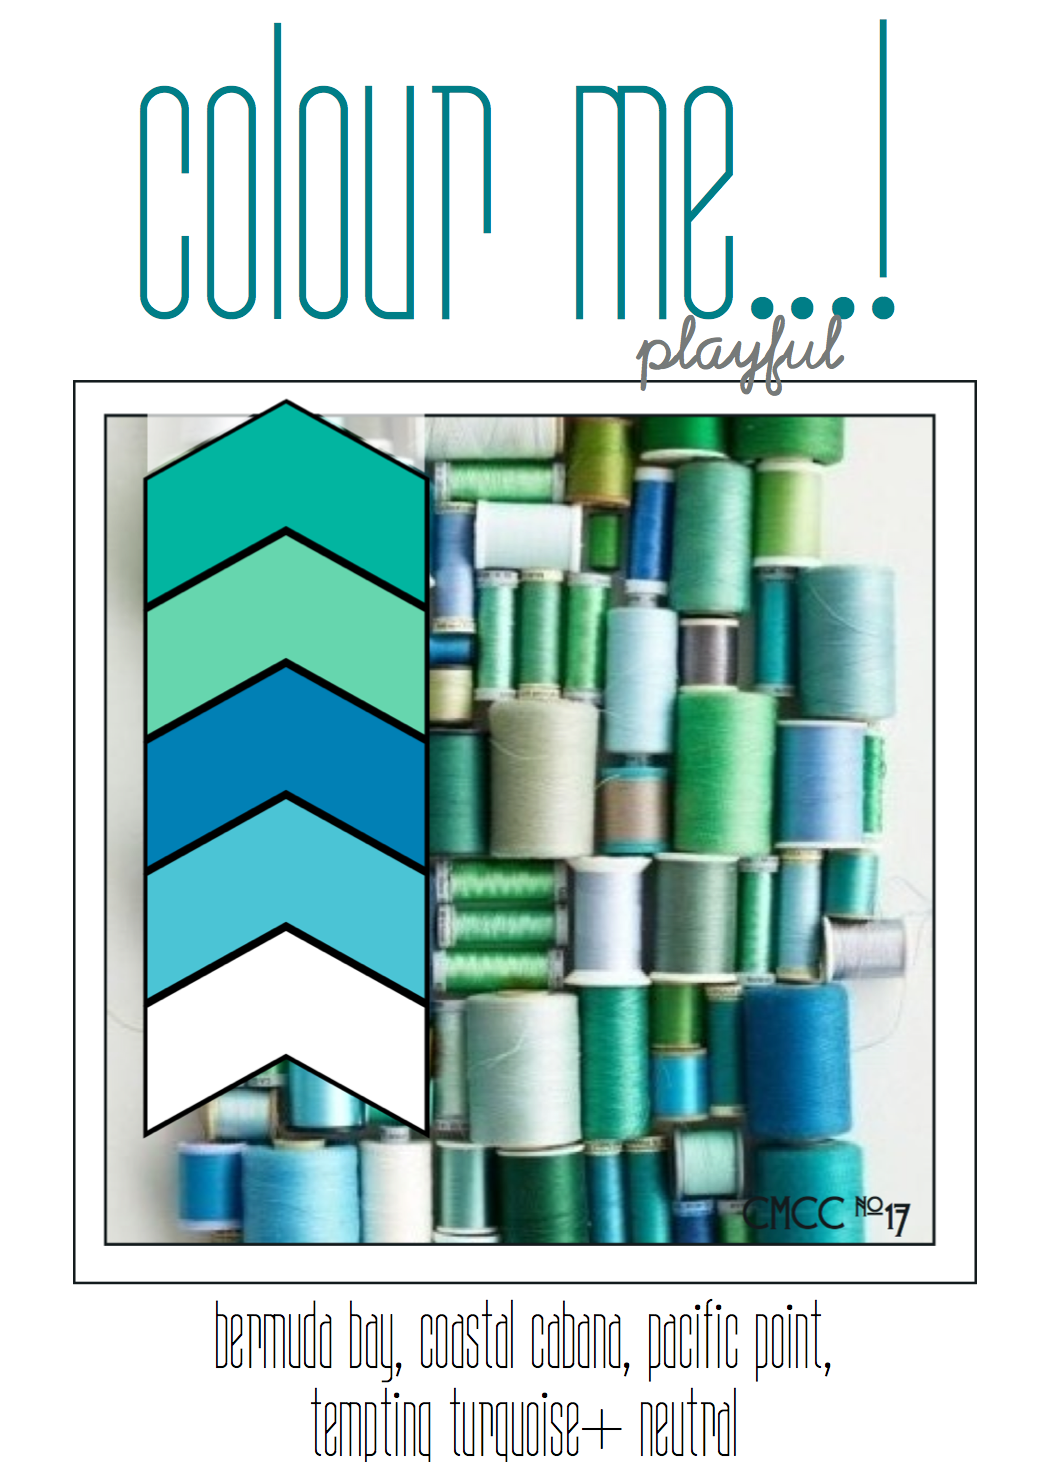
by Joanne James27. April 2014 21:35Good evening lovely blog readers! I hope you have all had enjoyable weekends; mine has been pretty good, with the final finishing touches to Ben's Lego bedroom, a little crafting and even a bike ride in between the showers today. More on the bedroom later, but for now today's card is my entry for this week's Colour Me Card Challenge, where there is lovely colour palette of blues on the menu:
For today's card, I also took my inspiration from the picture of the cotton reels and went with a sewing-themed card - here it is:

The Six-Sided Sampler set has always reminded me of quilts - the hexagon pattern has to be one of the most popular quilting shapes, or at least one of the most iconic to me. I decided the colour palette would lend itself to a quilt, so set about laying out mine. I stamped from top and bottom opposing corners - my stamp-a-ma-jig was invaluable in getting them all aligned - and stamped my sentiment in the centre in Pacific Point. For fun, I also added a needle threaded with Pacific Point stamped from a retired set called 'Hoop La', just to add to the 'stitched' effect.
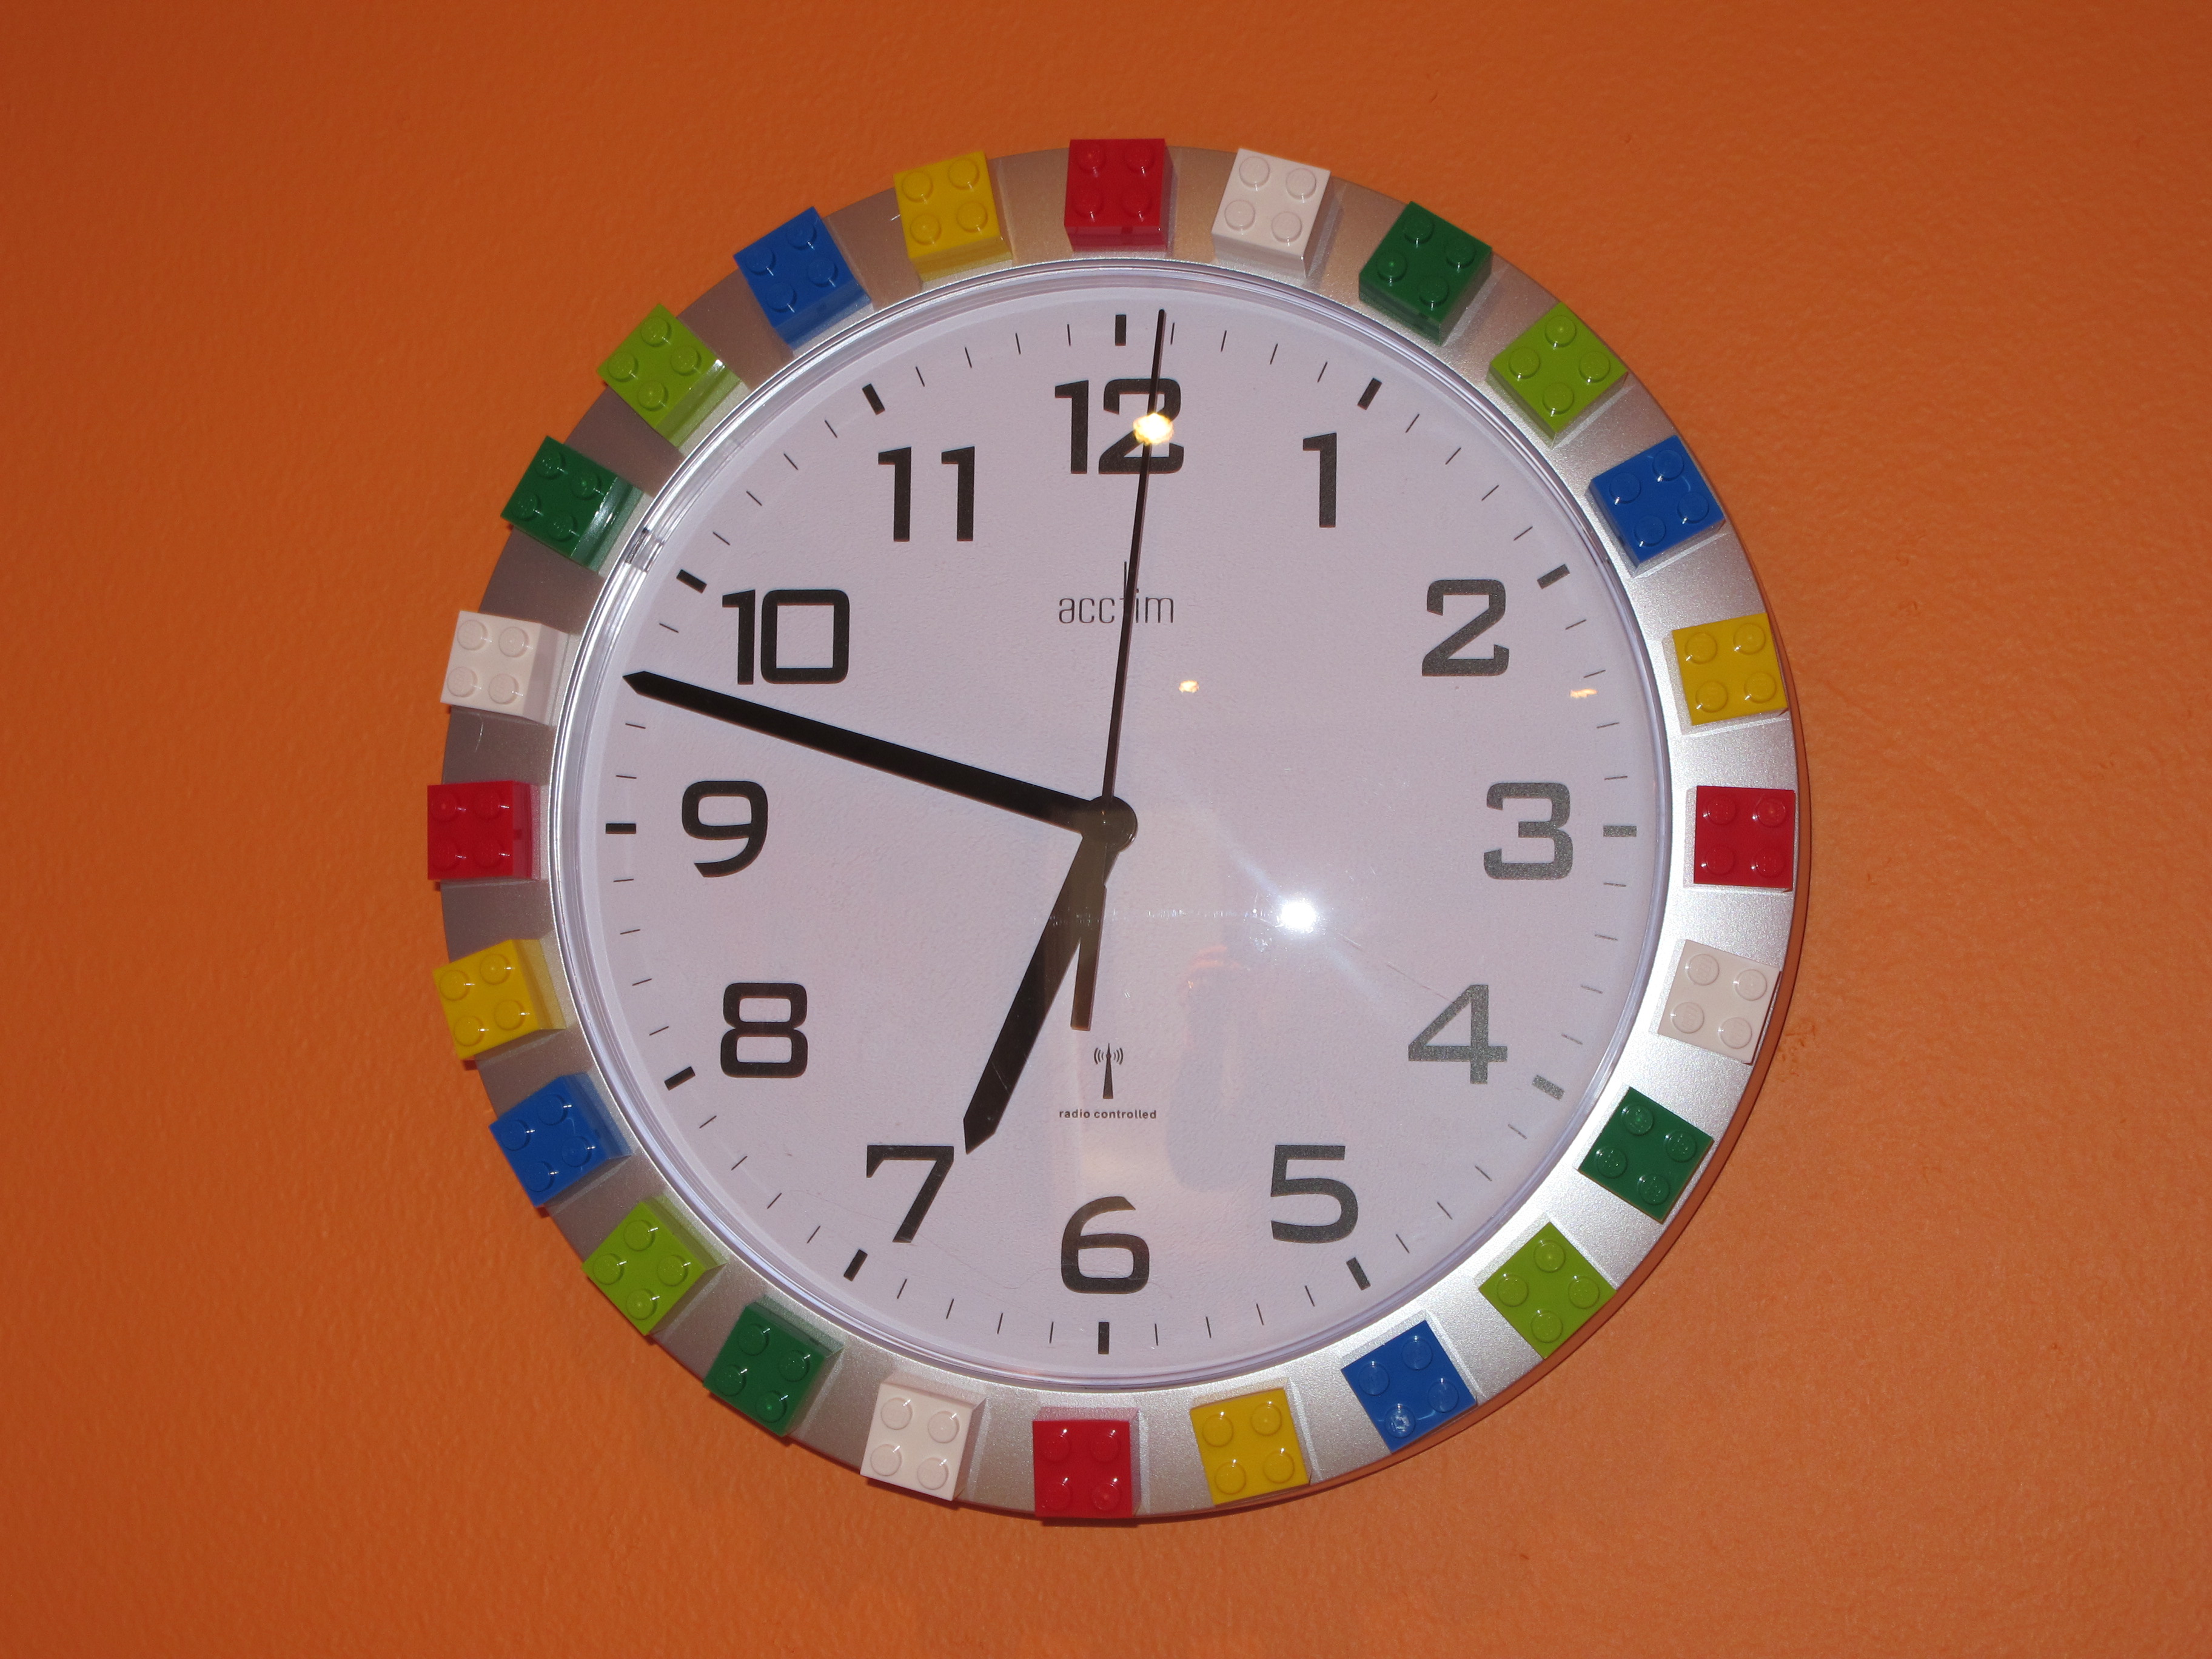
Just before I go, I wanted to share with you some of the photos of Ben's Lego-themed bedroom, featuring Lego City Firemen (of course!) - he chose a three colour wall combination, but the most fun was in customising the decoration, all of which were inspired by various photos on Pinterest:
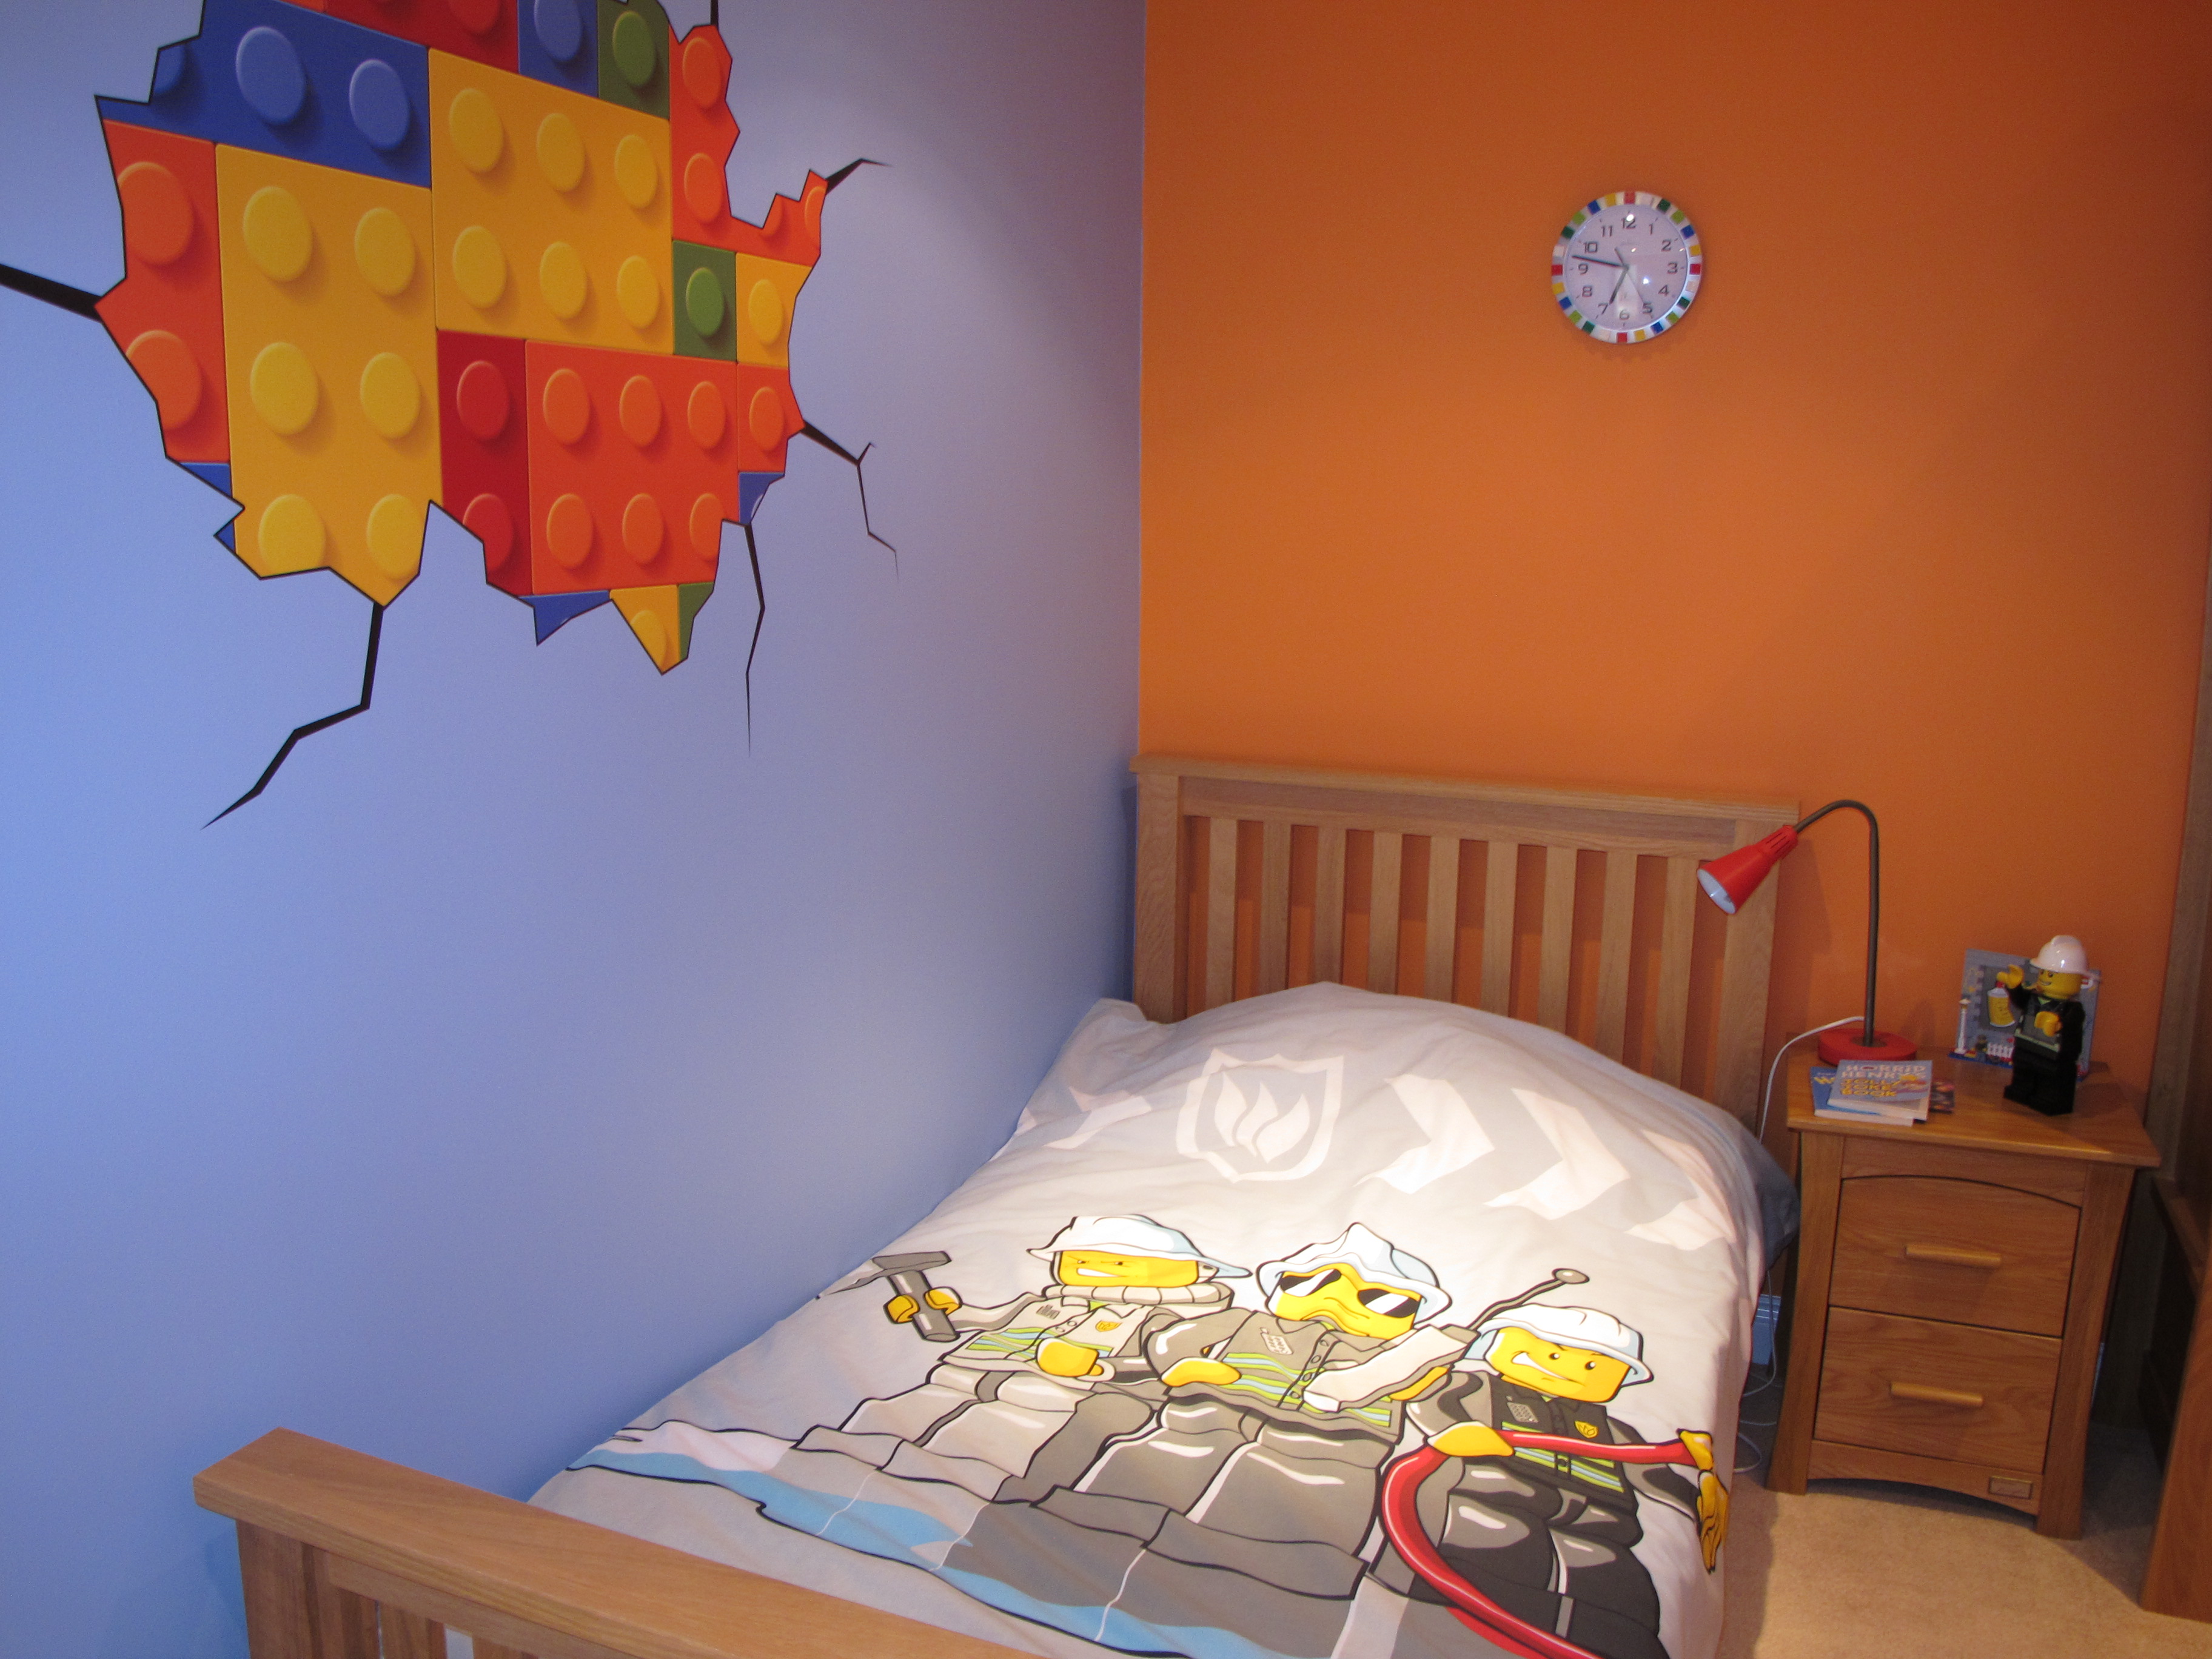
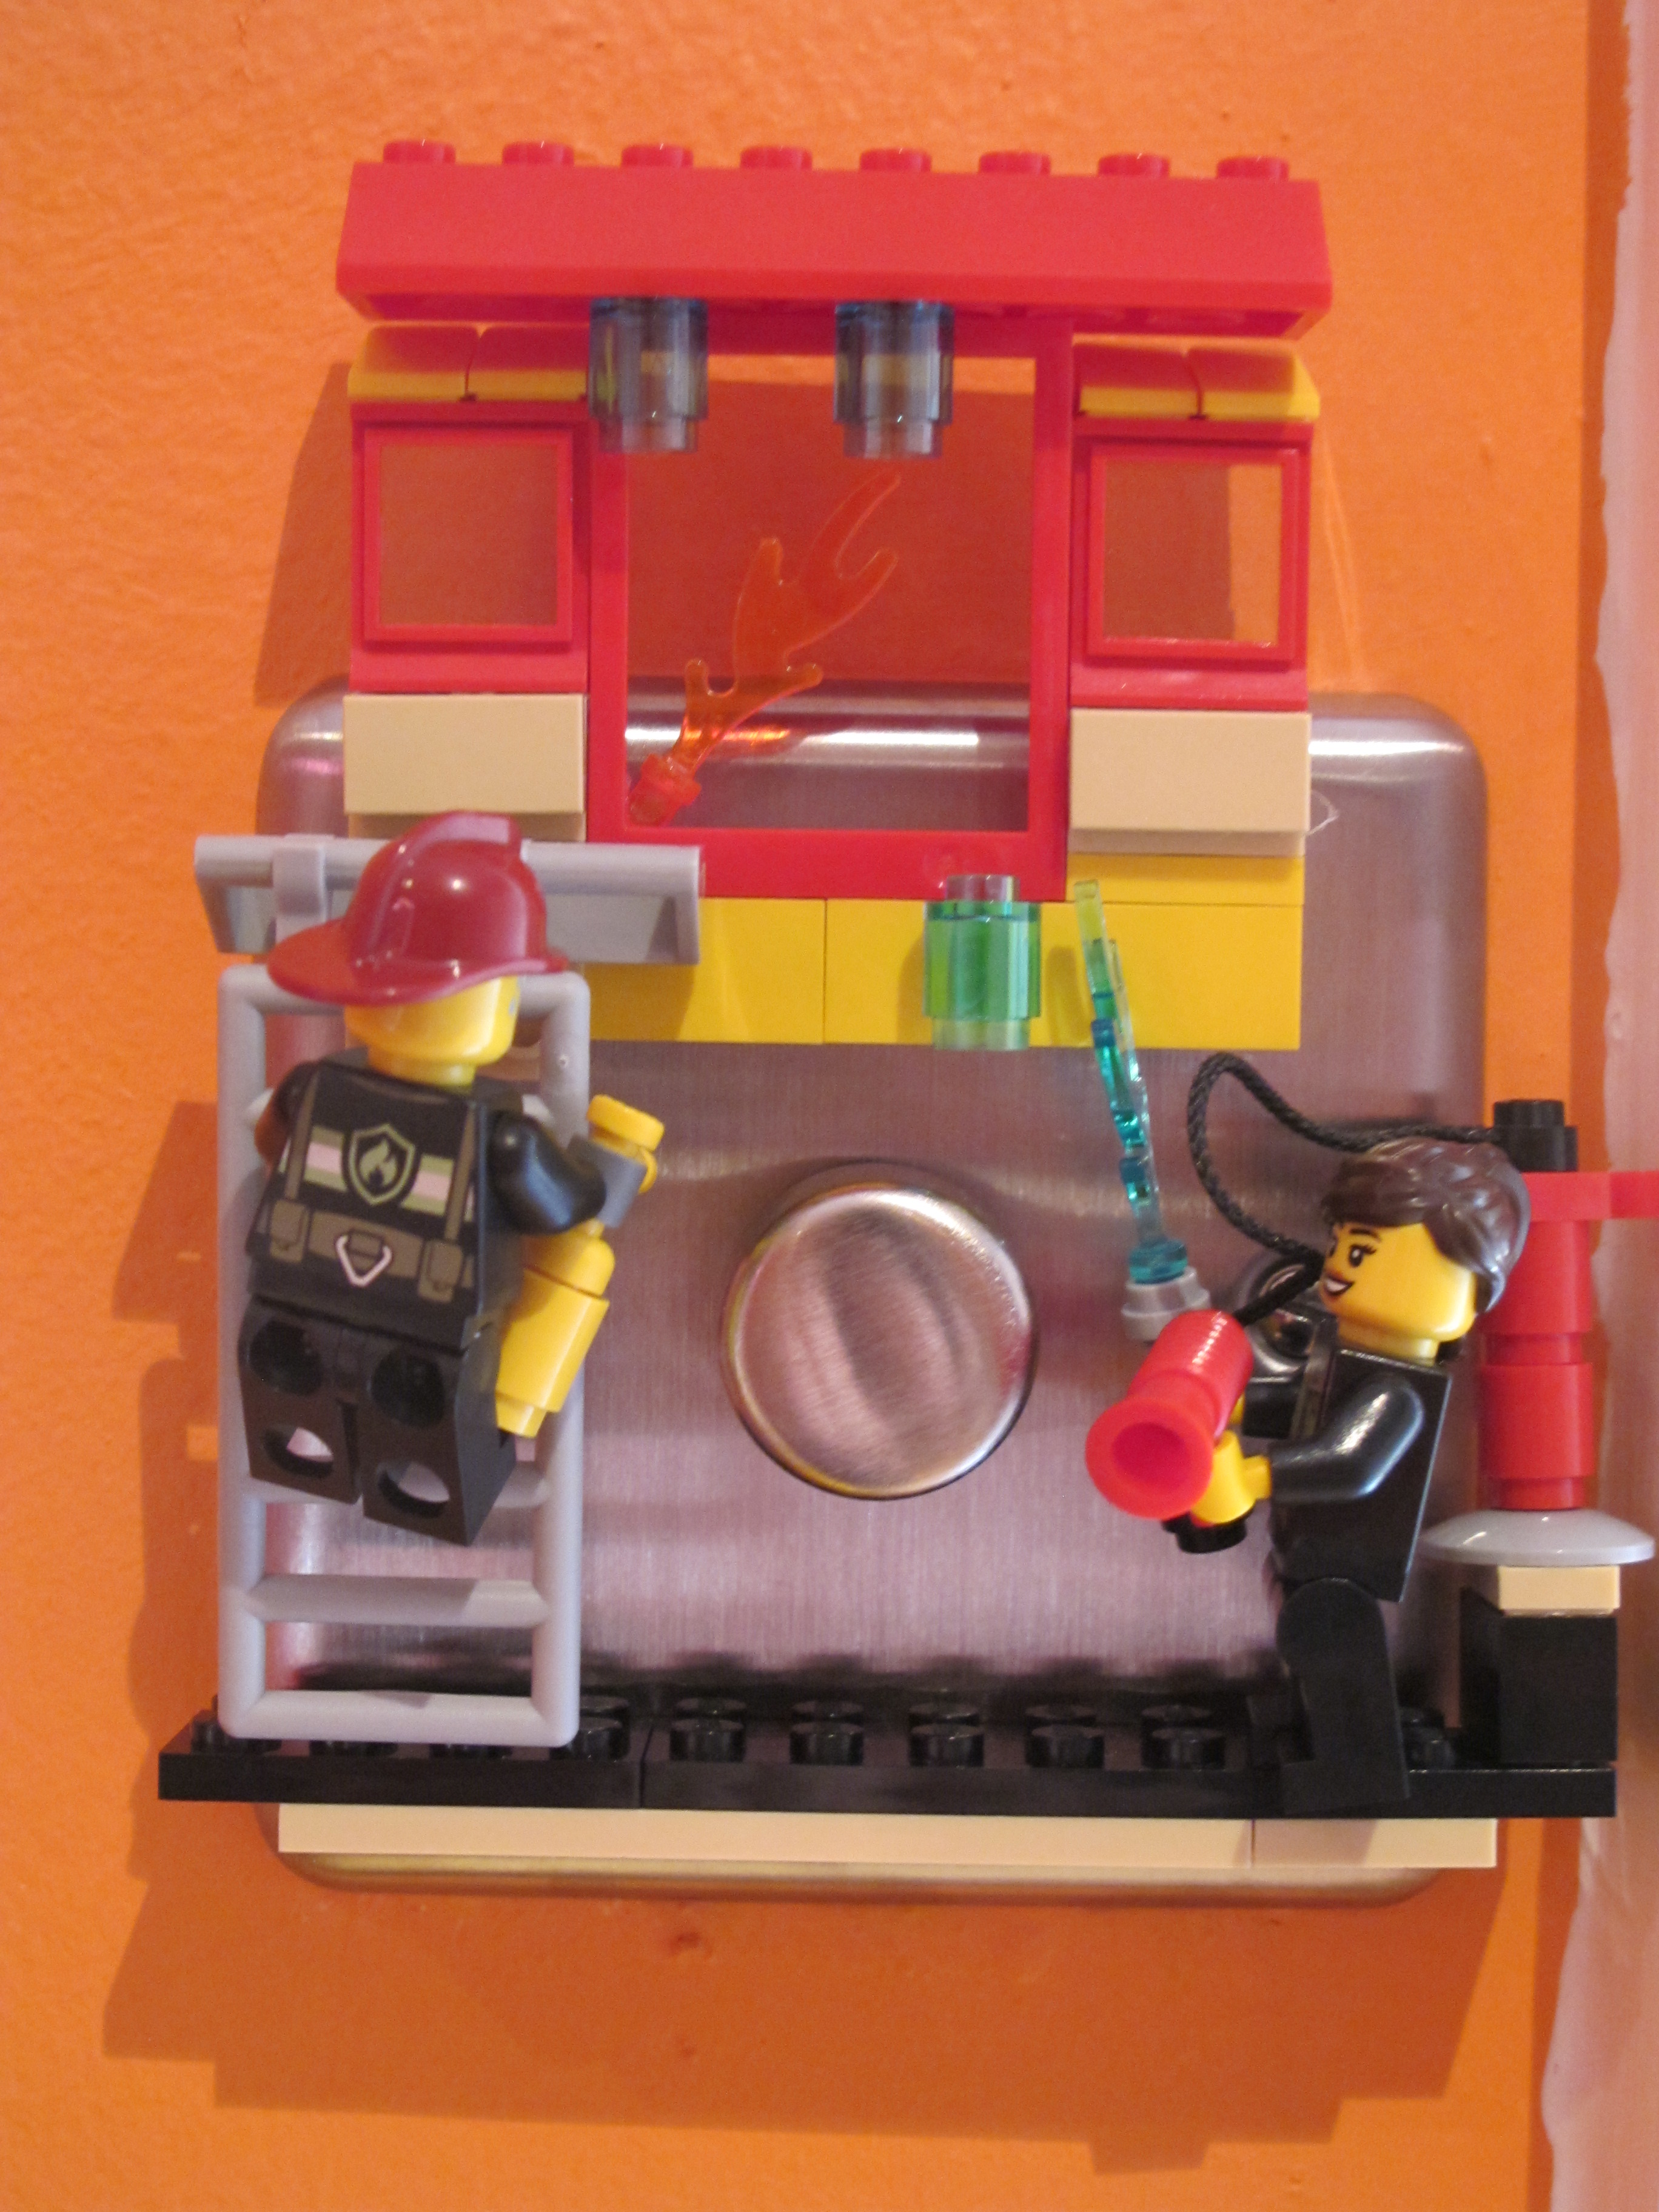
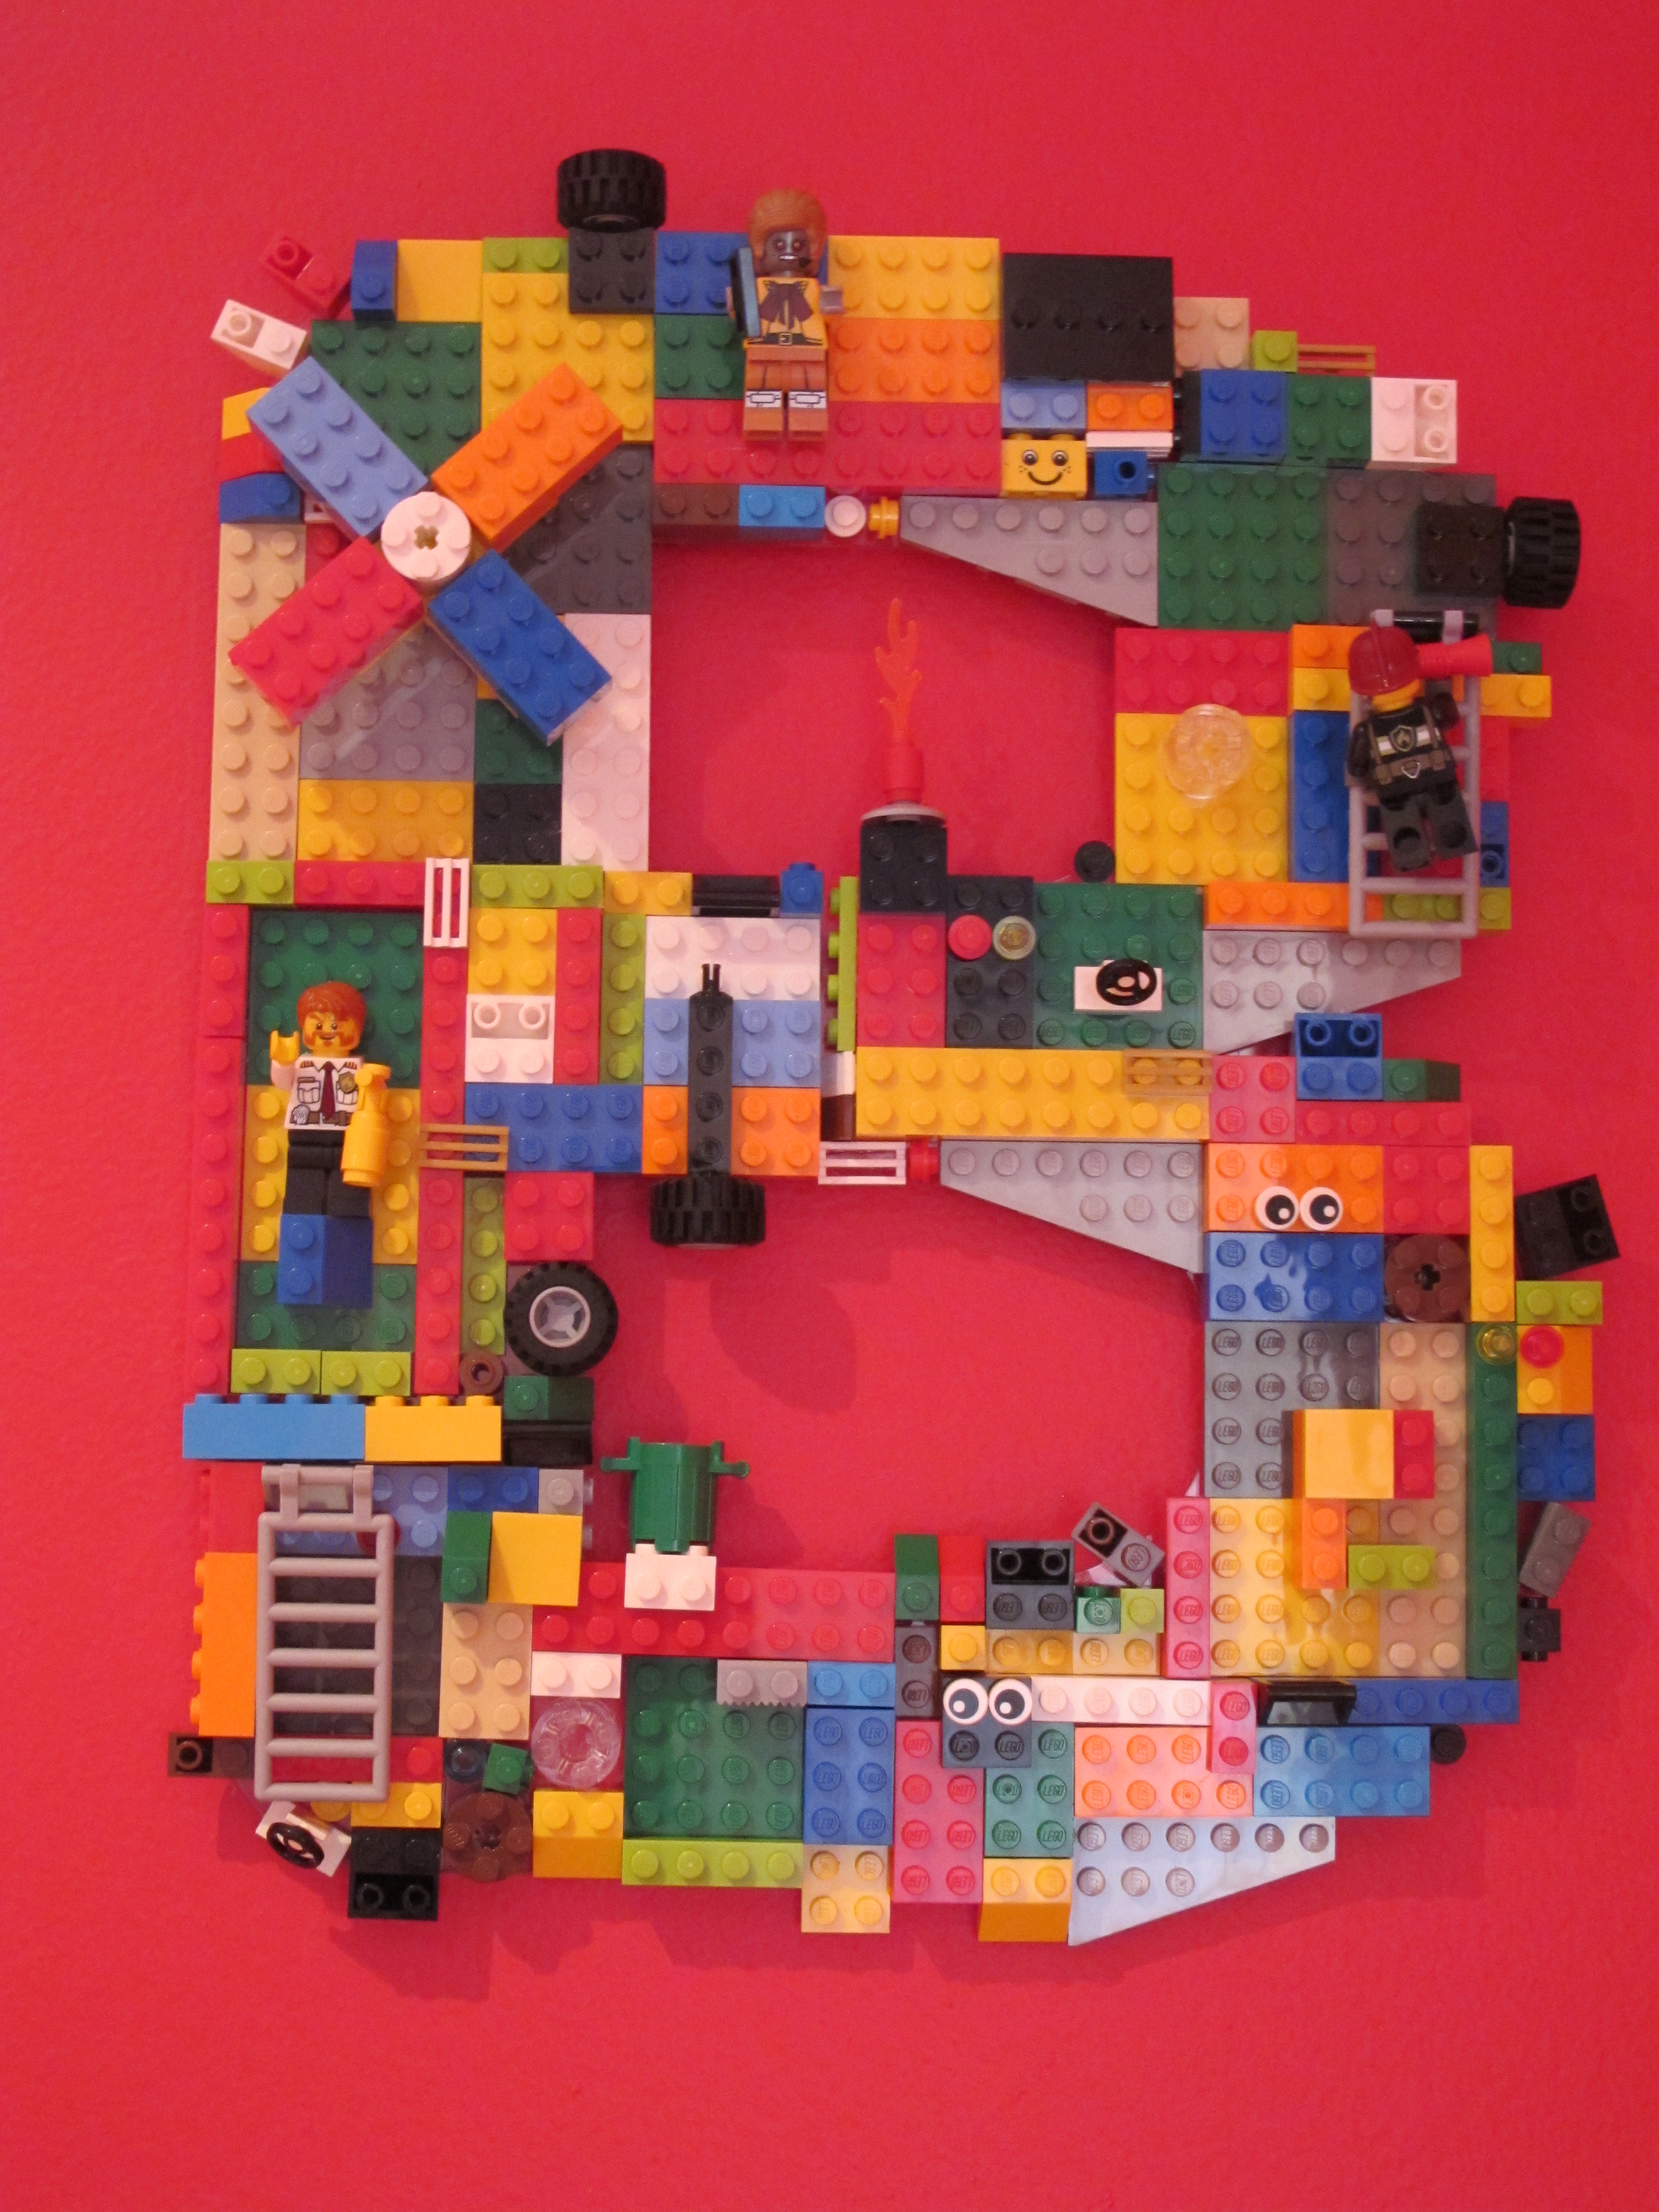
The letter 'B' is my favourite - the windmill rotates, the wheels turn and the firemen and surface bricks can all be changed out as desired. Working wall art - how cool is that?!
Back tomorrow with something very exciting that you are not going to want to miss!! Until then, happy stampin'!
Stampin' Up! Supplies Used:
by Joanne James23. April 2014 08:00My James juniors are back at school today after a long Easter break, but I assure you that's not the reason behind the sentiment for today's card ;-) I started off with an idea in mind for this week's Less Is More challenge, where the theme is 'something that makes you smile'; unintentionally, I ended up combining this with the colour challenge this week over at CAS Colours and Sketches, where black and shades of grey are the order of the day:

I knew immediately that my 'something that makes me smile' would have to be that cute little mouse from the Life in the Forest stamp set that I used on this card last week; I decided to use him in conjunction with the word 'smile' from the Happy Day stamp set and position him as if he was standing just behind the word and peering around. I stamped 'smile' in Versamark and heat embossed in black embossing powder, as I wanted the sentiment to really stand out and look solid, then stamped the mouse using black stazon and coloured him with the greys and my blender pen. I sometimes struggle with the simplicity of 'less is more', but this card seems to tick all the boxes for clean and simple: lots of white space, few layers (none) and minimal embellishments (none). I think this may be my 'zen' of CAS cards!
I love this card for all its black and white one-layered simplicity, but couldn't help play around with an initially discarded version where I sought to introduce some colour - this card is so far out of my comfort zone, I just couldn't help it. If you'd like to see a more colourful version, check out the post on my Facebook page today - I'd love to know which one you prefer. For me, the one above wins; as for the mouse, he makes me smile every time, with or without!
I'm off to my office for a nice early start: lots to do today, including amongst other things start preparing next week's classes. Back tomorrow with another project, until then happy stampin'!
Stampin' Up! Supplies Used:
by Joanne James22. April 2014 08:00This week the Pals Paper Arts Card Challenge is celebrating its 200th anniversary - a whole 200 challenges! To celebrate this milestone, they have a sketch along with a twist - to complete your card in a monochromatic colour scheme. Here is the sketch:
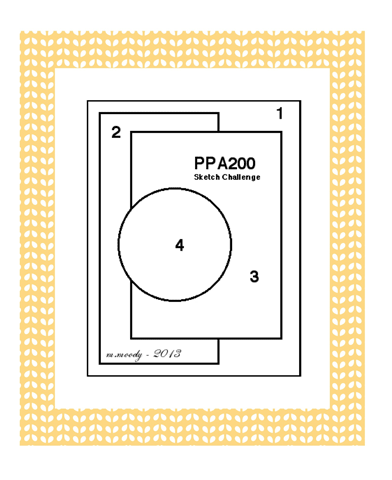
Both design teams have designed cards to inspire this week; initially I was really tempted to use the Starburst Sayings stamps and framelits which lend themselves totally to this sketch and worl with my favourite Brights colour palette, but as lots of the designers had the same idea and I couldn't see how I was going to create something suitably unique, I decided to go with something completely different - a baby card using the 'Baby We've Grown' stamp set in Blushing Bride pastel pink:
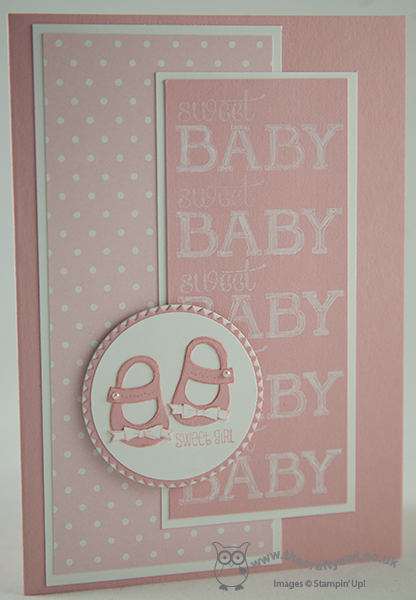
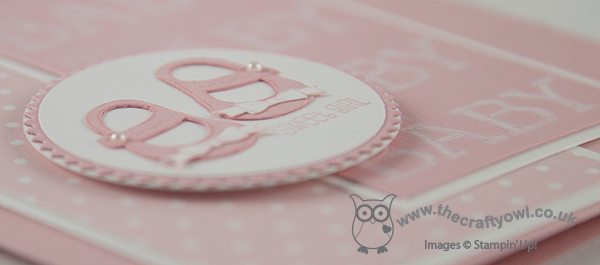
Using a pink base, I matted both of my cardstock layers on Whisper White and used a piece of Polka Dot DSP from the Subtles DSP stack for panel 2, whilst for panel 3 I stamped the 'sweet baby' stamp repeatedly in Whisper White onto Blushing Bride cardstock - a stamp-a-ma-jig is essential for this - and coloured the word 'baby' with my chalk marker to give it a powdery look. Lastly, my focal point panel 4 is a triumph of layers and fussy cutting: I stamped the shoe stamp 3 times, twice on Whisper White and once on Blushing Bride, then I fussy cut the shoes from the pink and glued them to the white base; with the other image stamped on white, I fussy cut the bows from the shoes and adhered them on top. I finished the shoes with two tiny seed pearls for fastenings, and layered this circle on a pink starburst mat and a further white circle. My card has 10 separate layers in total - this must be something of a record!
This card took a little while to create, but I love it - and only Blushing Bride and Whisper White used throughout. Do check out the other monochromatic cards at the Pals paper Arts this week - there is a mass of inspiration.
Back tomorrow with another card; until then, happy stampin'!
Stampin' Up! Supplies Used:
be73746b-d8f5-41a8-98bb-b97ab519a2ff|0|.0|96d5b379-7e1d-4dac-a6ba-1e50db561b04
Tags: Baby We've Grown, Baby cards, Starburst Framelits, Big Shot, Magnetic Platform, Stamp-a-ma-jig, Stampin' Up, Stampin' Up Card, Stampin' Up Card ideas, Stampin' Up Supplies, Shop online
Cards | Stamping
by Joanne James18. April 2014 10:00Yay, it's Friday - where did that week go?! Today I'm sharing my entry for this week's challenge over at The Paper Players, where Ann has laid down the following colour challenge:
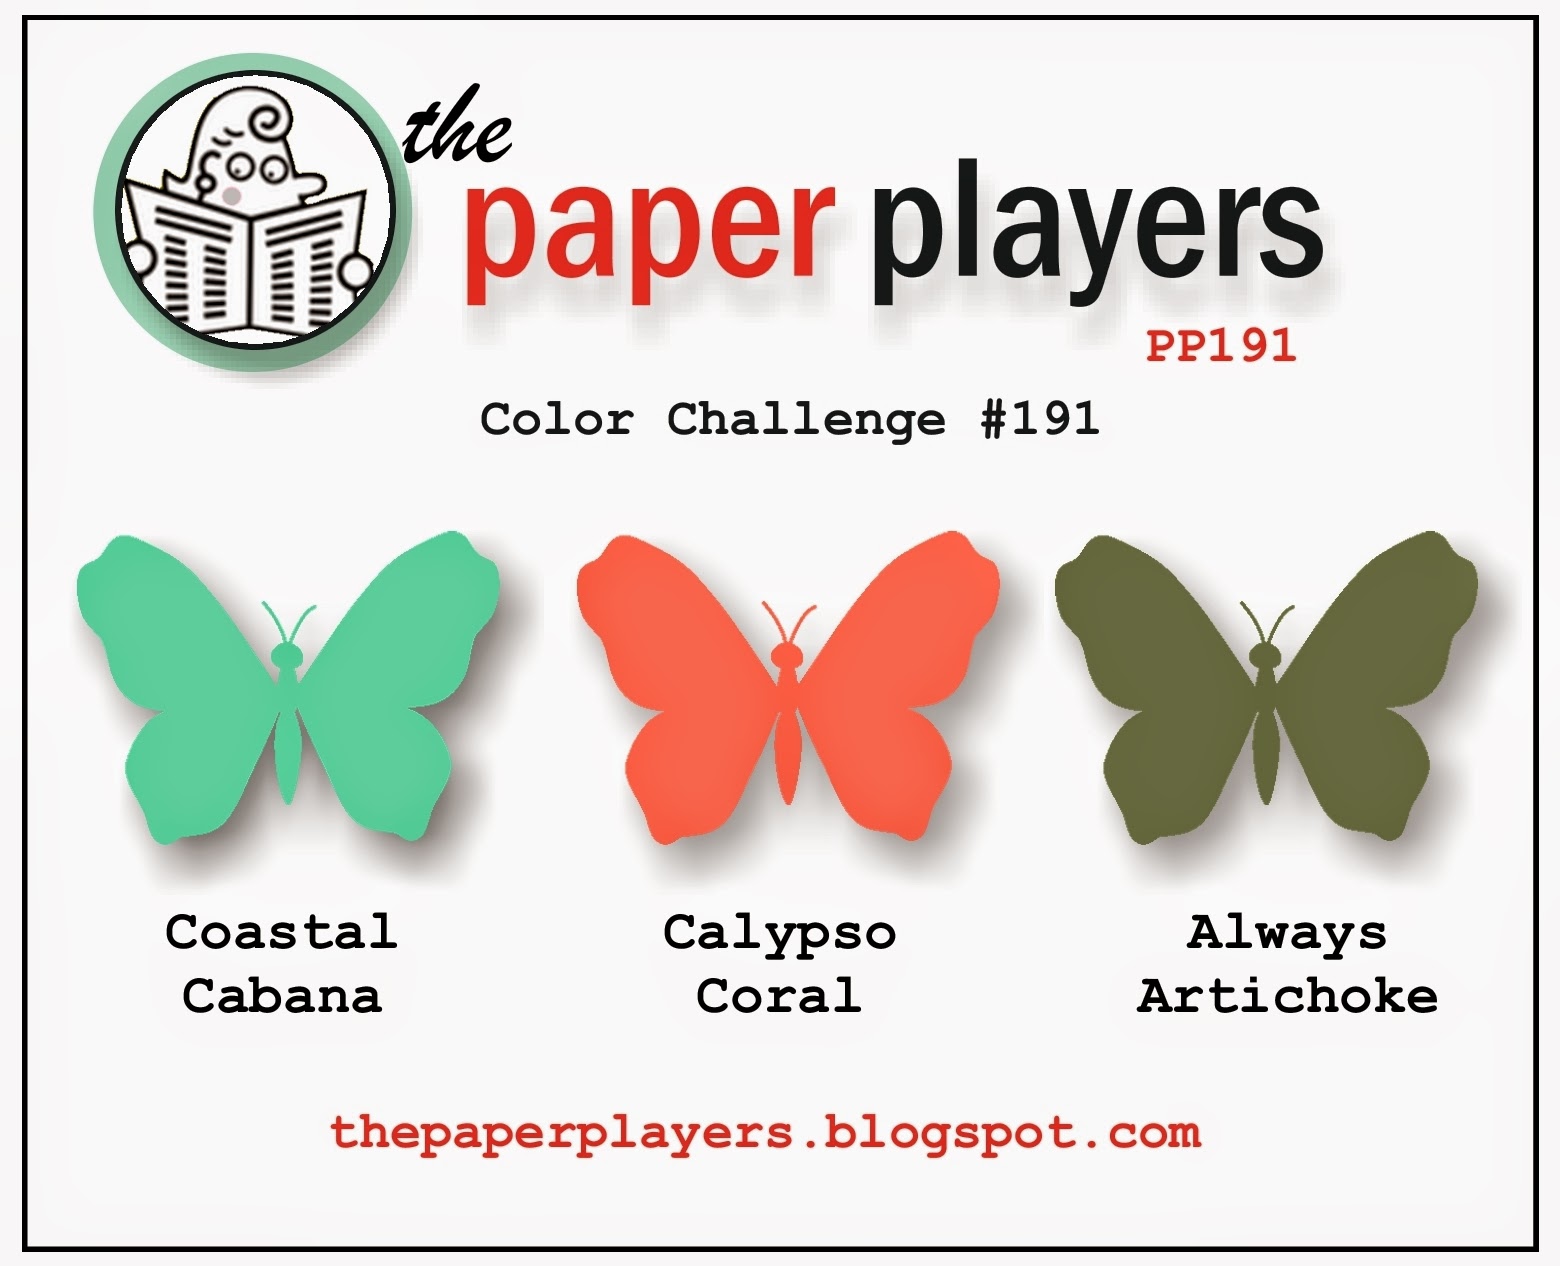
I really wanted to enter this week's challenge as I missed last week's, however this colour combination filled me with some dread: I use Coastal Cabana a lot, I use Calypso Coral less so; as for Always Artichoke - I've only used this colour ONCE before - EVER!! The design team provided such great and varied inspiration this week though that I thought I should endeavour to rise to the challenge and have a go. It took a long while, but eventually this is what I came up with - that I'm prepared to share with the world, anyway :-):
After much (unsuccessful) experimentation with a variety of designer series paper, I decided that simple was the way to go and I reached for my 'Oh, Hello' stamp set which I haven't used in a while. I stamped the oval chevron background in Coastal Cabana on the same colour base and paper pierced the outline for added interest. Then I split the sentiment, stamping part of it directly onto the card base and part of it onto a layered vellum banner that I popped up on some dimensionals. I then decorated this with a flower that I stamped twice, once on Calypso Coral Cardstock and once onto Always Artichoke, then carefully cut both out with my paper snips and paper-pieced them together.
Not an overly complicated card, but one of those that took way longer to execute than anticipated! Always nice to move outside of one's comfort zone though, and I like the result even though this is a colour combination I would never ordinarily choose.
Right - I'm off for some serious painting today - the preparation has been done, so today the nursery walls of Ben's bedroom will be officially transformed into a Lego-lovers paradise!
Back tomorrow with another project; until then, happy stampin'!
Stampin' Up! Supplies Used:
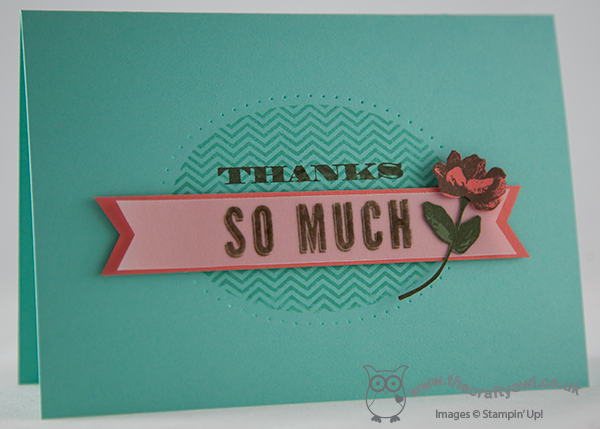
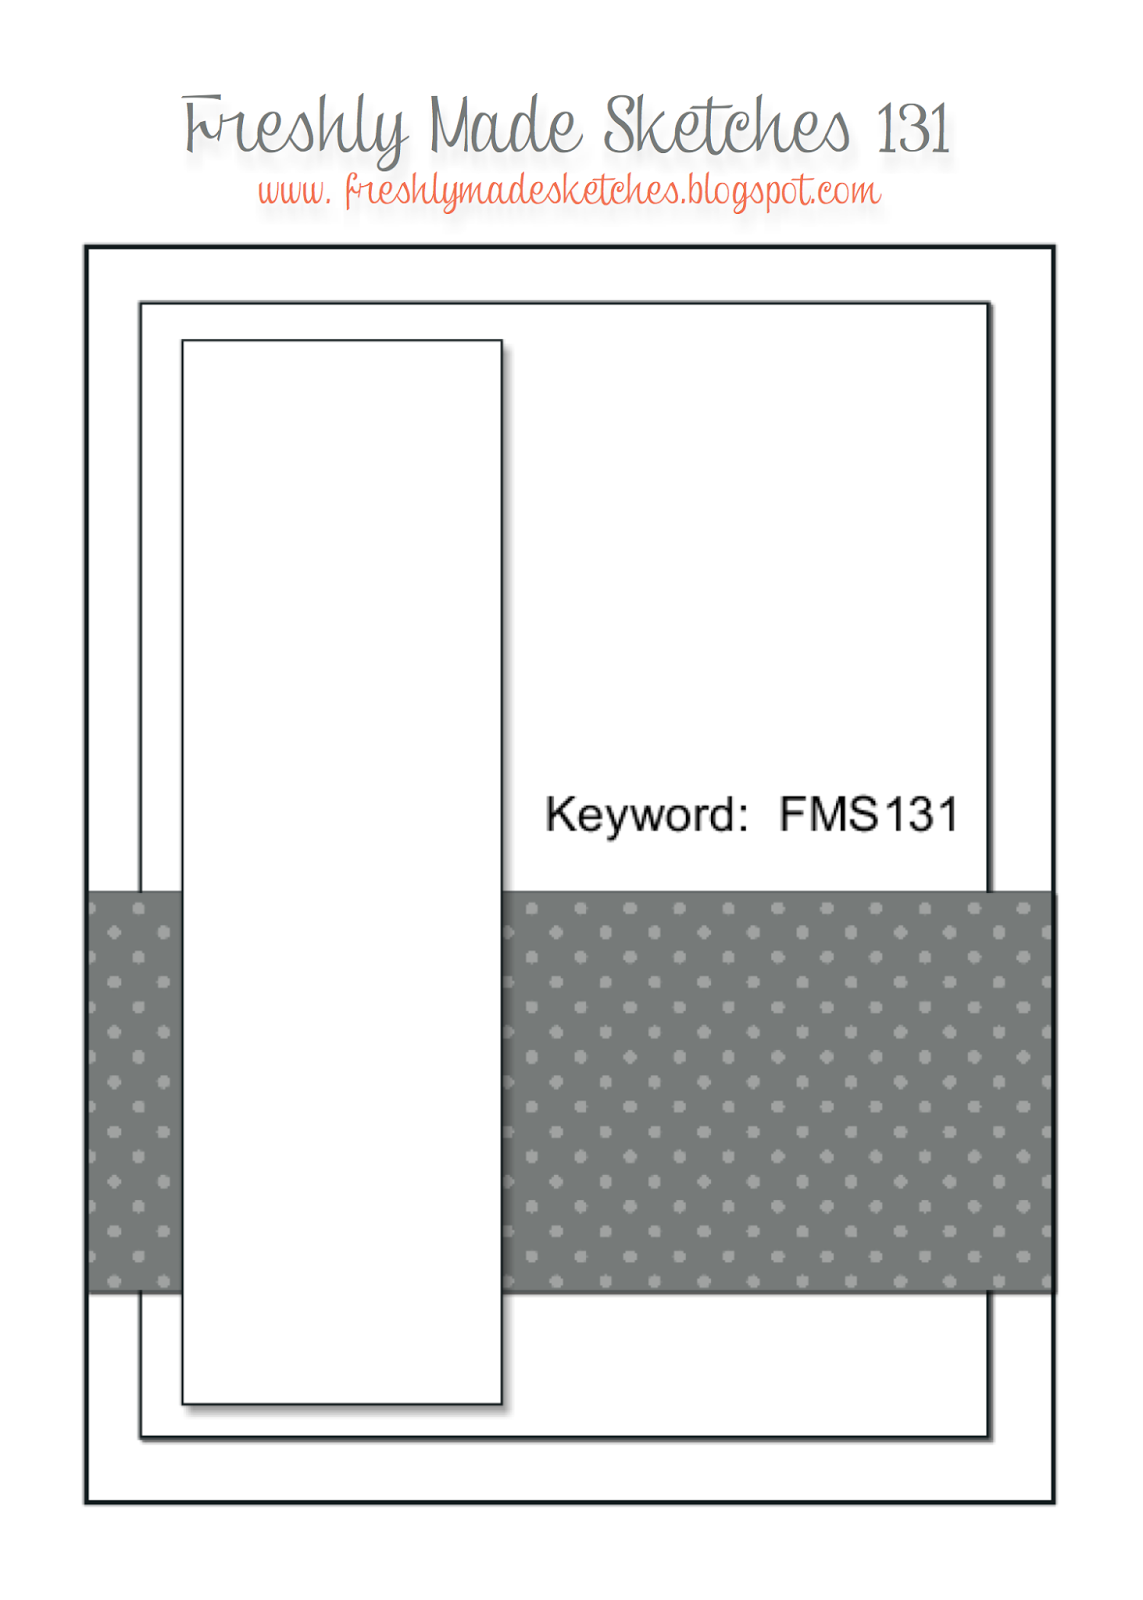
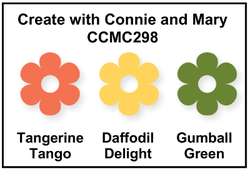
by Joanne James13. April 2014 22:33Today I'm sharing a card I made using the poppy in the Happy Watercolour set. I used the sketch over at Freshly Made Sketches for my simple layout and was inspired by the colours over at Create with Connie and Mary this week:
I decided to go with quite a simple design - here's my card:
I used a Daffodil Delight card base and stamped my poppy stem only in Versamark and stamped it onto my base card and heat embossed in gold, then did the same again with the flowerhead on a separate piece of cardstock, coloured it with Daffodil Delight and my aquapainter and cut it out, then popped it onto my card on a dimensional. I know poppies are traditionally red, but they come in all kinds of different colours, including yellow - which also give the card a bright feel.
Here's a close up of the flowerhead:
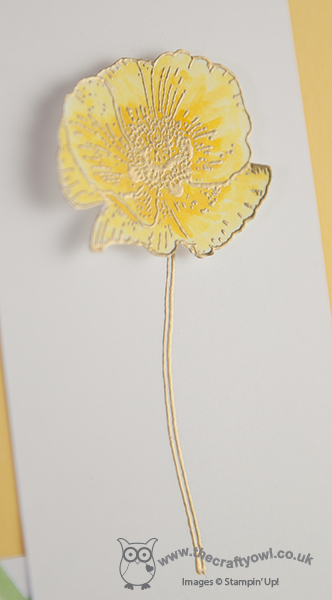
For my horizontal cross-section panel beneath the poppy, I used a piece of Watercolour Wonder DSP that features all of the challenge colours above. This is the only place where the green and orange features on my card, yet the colour works really well in breaking up what would otherwise be a rather monochromatic card. I added a few gold sequins to finish, and done.
If you'd like more ideas on how to use these colours, check out the design team inspiration - lots of great work on show, as always.
I'm off to take my juniors tenpin bowling with some friends today and then go and purchase some paint tester pots for Ben's bedroom redecoration - I love the Easter holidays!
Back tomorrow with another project; until then, happy stampin'!
Stampin' Up! Supplies Used:
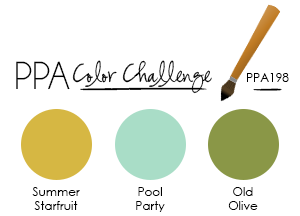
by Joanne James7. April 2014 19:53Good evening blog readers! I managed to get a little time in my craft room today (a reward to myself for finishing the housework :-) ) so thought I would make a quick card for this week's Pals Paper Arts challenge, where they are having their first colour challenge of Spring 2014 and would like us to work with the following colours:
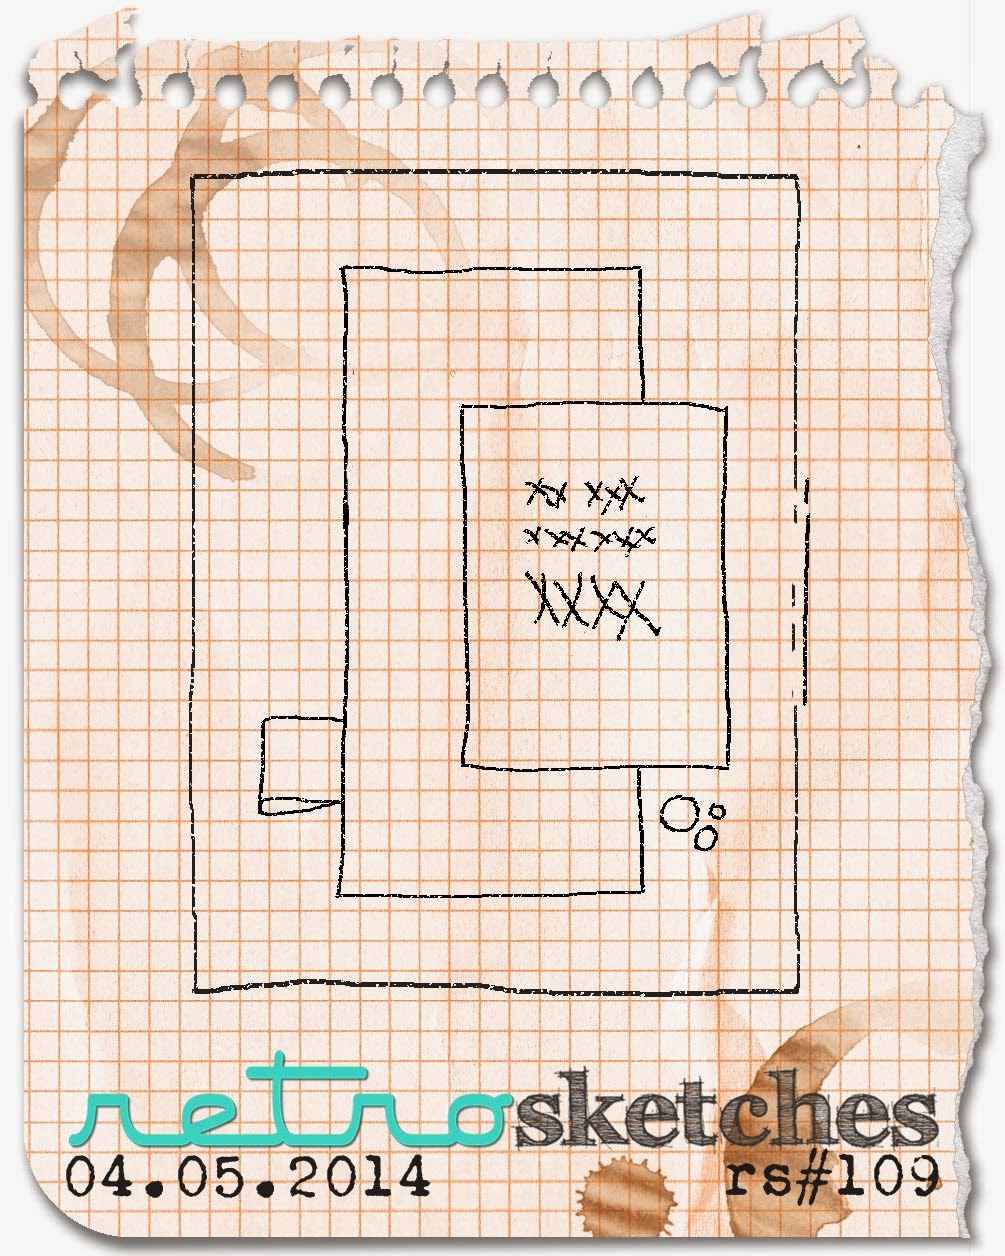
This is not a colour combination I would choose independently, but I really like it - I think the three colours work really well together. I decided to use one of the flowers from the Simple Stems stamp set and this week's sketch over at Retrosketches, and this is what I eventually came up with:
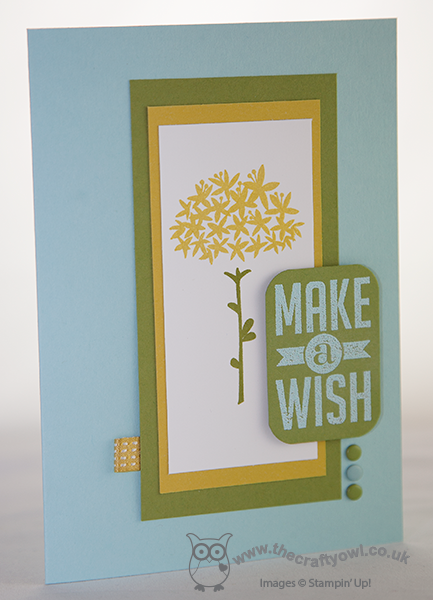
I say eventually, because this didn't turn out to be a quick card at all - it was one of those where the idea in your head doesn't fall onto the paper quite as easily as you hoped it would; I had about four aborted attempts before this one! That said, I love this flower for the Simple Stems set; it reminds me of a dandelion clock, which was the reason for pairing it with the 'Make a Wish' sentiment from the Perfect Pennants set. I stamped my sentiment in Versamark and heat embossed in Pool Party embossing powder to give it some texture and make it stand out against the Old Olive background. A small loop of ribbon and a trio of candy dots complete my card.
Back tomorrow with another project; until them, happy stampin'!
Stampin' Up! Supplies Used:
by Joanne James6. April 2014 19:00Good evening lovely blog readers! Today I'm sharing a card (well, actually two!) that I made a little while ago but that I didn't share with you at the time. I made this card using an old Freshly Made Sketches layout - here is my card:
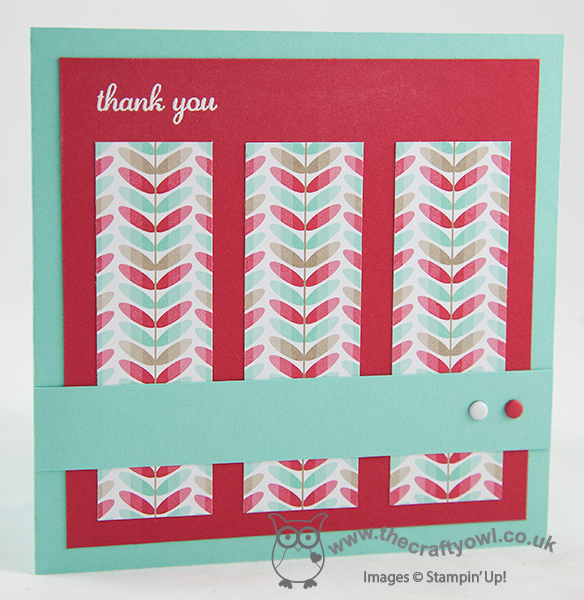
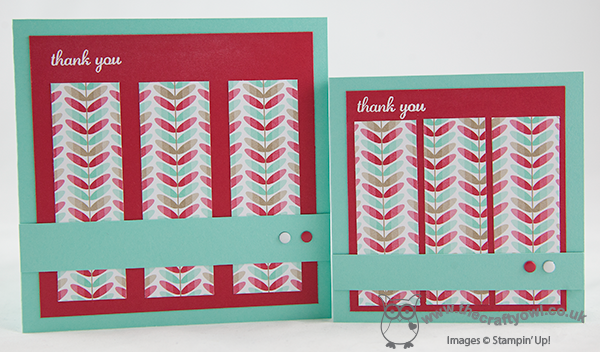
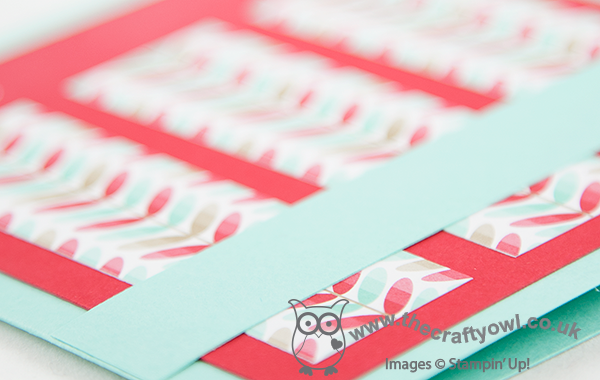
My card uses the Fresh Prints DSP stack - this paper stack is great value and perfect for cards and the pattern I've used on this card is one of my favourites: an Orla Kiely-inspired design I think and one that also appeared in last year's Sycamore Street Sale-A-Bration DSP pack, but this time updated with some fresh colours for the new season. I cut three panels, having centralised the pattern, and matted it on Real Red and a Pool Party base, with a Pool Party banner finished with two co-ordinating candy dots. The original sketch had only two dots and I wrestled with myself to not use three (I think things looks better in threes!) but I decided that the two dots balanced the sentiment on the top left-hand side of the card, so left alone! I stamped my sentiment in Versamark and heat-embossed with Whisper White embossing powder, because whilst I didn't want it to dominate my card, I didn't want it to get lost either. This was the card I was happy with, but I promised two cards today and thought I would show you the first one I made; it was slightly smaller in size but to the same layout, but instead of centralising the pattern on each individual strip, I simply cut a piece of paper equally into three. It gives quite a different effect - see what I mean:
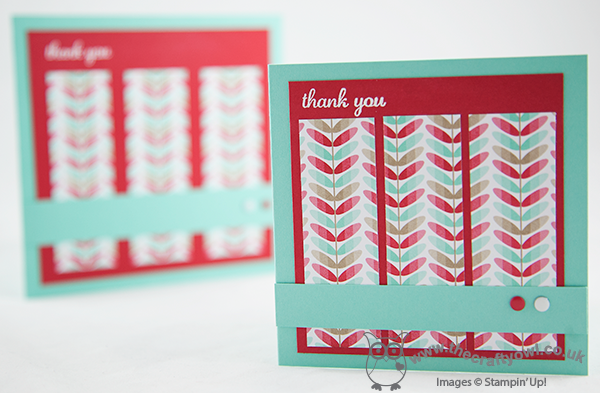
This cut really didn't work for me, as I felt such a clean card need the symmetry in the pattern - hence the second version. Here are both cards in focus side by side - which one do you prefer?
Who would have thought that such a simple card took so much thought? But for me, that's the difference between a good card and a great card! Lesson over for today; I'm off to listen to the next instalment of Harry Potter, our current bedtime reading book.
Back tomorrow with another project; until then, happy stampin'!
Stampin' Up! Supplies Used:
by Joanne James5. April 2014 20:27Another tulip card for you today - no apologies, I love this stamp! This card was inspired by the flecked pink tulips I received from my James juniors for Mother's Day last week. This card features this stamp used in another different way, this time to create an outlined background panel:
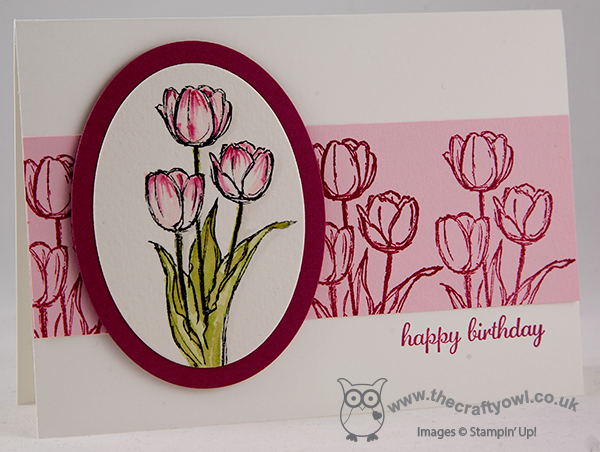
In splitting the tulips away from the sentiment on the original stamp, this makes it really easy to use the tulips for non-Easter cards, as I've done here. I used a Whisper White base, then stamped the tulips in Rose Red on a strip of Pink Pirouette cardstock. I then stamped the tulips again, this time in Black Stazon on watercolour paper and coloured with inks and my Aquapainter and cut out using my oval framelits and mounted on a second oval in Rose Red.
That's all for today; tomorrow's card may well have to be a 'get well soon' card as this afternoon my young son appears to have succumbed to the chicken pox - his THIRD dose in just 6 years!!! I didn't think this was even possible, but his itchy spots tell me otherwise. On the upside, at least it's the Easter holidays, so he should be over it by the time the new term starts :-)
Back tomorrow with another card; until then, happy stampin'!
Stampin' Up! Supplies Used:
bfde84b6-2625-4011-97c6-e19f66f05874|1|5.0|96d5b379-7e1d-4dac-a6ba-1e50db561b04
Tags: Blessed Easter, Express Yourself, Big Shot, Ovals Framelits, Shop online, Stamp-a-ma-jig, Stampin' Up, Stampin' Up Card, Stampin' Up Card ideas, Stampin' Up Supplies, Watercolouring
Cards | Stamping
by Joanne James4. April 2014 20:55Today I'm sharing another card from this week's classes - this time one of the scallop tag-closure cards that are all the rage at the moment in a lovely, deep purple. Here is my card:

The card is a standard A6 size (10.5cm x 14.9cm), but instead of being scored down the centre of the cardstock, I scored at 8.5cm and 19cm, marked the centre point and having guided the cardstock over the punch guides, I punched using the Scalloped Tag Topper Punch and trimmed away the excess on either side of the punched section. I love this punch - it really is so useful for tags, bookmarks, boxes, fancy cards and everything in between!
I also used my Aquapainter to colour this card, but instead of using watercolour paper I actually used Whisper White cardstock - I wanted to show my class attendees the differences in effect when you use different paper types. The sentiment was also stamped separately and punched out, which worked better on the narrower section. We split our sentiment away from the tulips at the start to allow for more flexibility when stamping, so this was really easy with no masking required.
That's all from me today; I'm entertaining family this weekend and off to play tooth fairy to my eldest this evening, who lost another of her baby teeth today - just need to make sure she's asleep first :-)
Back tomorrow with another card; until then, happy stampin'!
Stampin' Up! Supplies Used: