Important Stampin' Up! News: Stampin' Trimmer Discontinuation and DieCutting and Embossing Changes

by Joanne James9. April 2019 20:00

Today saw two very important announcements from Stampin' Up! that I need to make you aware of. The first of these is in relation to the Stampin' Trimmer:


Stampin’ Up! has decided to retire the Stampin’ Trimmer as of 3 June 2019, including all accessories—replacement cutting blades, scoring blades, and cutting mats. They have experienced challenges with the supplier and are taking the opportunity to research and explore a replacement option for this product, which will not be the same as the current Stampin’ Trimmer. 

While the replacement cutting blades will also retire with the trimmer and will not be featured in the annual catalogue, Stampin' Up! has ordered what would normally be six months of inventory based on recent historical patterns to help  customers during this transition away from the current trimmer. When the retiring list goes live on 15 April, the order limit for the blades will increase from three to six (and the limit will remain at six until they’re no longer available). From now until September, Stampin' Up! will receive intermittent shipments from the supplier. But please know that this news could cause faster inventory depletion. Throughout these months, we anticipate times when the blades will not be orderable (and not offered as a backorder) - this is currently the case here in the UK. During those downtimes, you will have the option to enter an e-mail address to receive notification when the blades are available again.

Click the images below to head right over to my online store to start shopping for the Stampin’ Trimmer and the replacement consumable items:

Table built using Product Table Builder by The Crafty Owl - Independent Stampin' Up! Demonstrator.

The second Big News item of the day is that Stampin’ Up! also announced that they’ll be transitioning to a new manufacturer for their dies and embossing folders moving forward.

Stampin’ Up! is moving to a direct-to-manufacturer relationship. This means that they will work directly with the factories who manufacture their dies and folders instead of working with another company who then works with different factories. This gives them greater control and potential for increased speed to market, which can only be a good thing. 

TRANSITION TO NEW DIE-CUTTING AND EMBOSSING LINE

Here’s a look at how this transition will unfold:

Through

June 3, 2019

Die and Folder Supply: While Supplies Last and Interruptions

  • Inventory on some retiring dies may be depleted before the end of the 2019 occasions and 2018–2019 annual catalogue sales period; Stampin’ Up! will not replenish inventory on any retiring dies and folders that sell out.
  • Inventory on some dies and folders carrying over into the 2019–2020 catalogue may be depleted; if this happens, they may go on backorder or may not be available to order until they have replenished the inventory.

April 15–

June 3, 2019

Retiring List
  • The old-style die-cutting & embossing machine will be on the retiring list while supplies last. This also includes related products such as plates and platforms.
  • Dies and embossing folders included on the retiring list will not be offered in the new catalogue in any format.
  • Dies and standard embossing folders NOT included on the retiring list will be carried over into the 2019–2020 annual catalogue. Stampin’ Up! will use up their current inventory before starting to ship new-style dies, so even if you place an order in 2020, you might receive an old-style die or folder.

Beginning

June 4, 2019

2019–2020 Annual Catalogue
  • All new dies and embossing folders (denoted with a “New” icon in the catalog) will be produced by their new supplier and made in the new style with a different and high-quality product design.
  • For carryover dies and non-3D embossing folders, Stampin’ Up! will use up their current inventory before starting to ship new-style dies, so even if you place an order in 2020, you might receive an old-style die or folder.
  • All new and carryover 3D embossing folders will be produced by their new supplier and made in the new style with a different and high-quality product design.
  • Carryover 3D embossing folders (previously named Dynamic) will not be available to order beginning with the catalogue launch but they are in process on getting these ready to go and they’ll be available as soon as possible. Stampin’ Up! will let you know when they are ready.
  • No die-cutting & embossing machine will be available for purchase from Stampin’ Up! in the 2019–2020 annual catalogue.
 
One of the biggest impacts of this change is that there will be no die-cutting and embossing machine in the 2019-20 annual catalogue. The Big Shot and its associated accessories will therefore be retiring so if you have been considering a Big Shot purchase you should do it now. Now would also be a good time to stock up on consumable Big Shot accessories, such as the die brush and replacement cutting pads. Head over to my online store to purchase yours via the links below:
 
Table built using Product Table Builder by The Crafty Owl - Independent Stampin' Up! Demonstrator.
 

HIGHLIGHTS: NEW-STYLE DIES AND EMBOSSING FOLDERS

Since Stampin’ Up! is using a new supplier for their dies and embossing folders, they’ll be manufactured differently, which means the way you use them will be a little different. A few of the changes between the old-style and new-style products are listed below. In the future, Stampin’ Up! will also provide videos to show how to craft with the new-style dies and embossing folders and better showcase the features described below.

Here are some of the changes you’ll notice with our new-style dies and embossing folders:

  • The new-style open dies (those that coordinate with stamps) use a high quality metal that’s thinner than before but still as strong and durable.
  • The new-style dies have an added lip to the inside of the blades.
  • On old-style dies, when you place an open die (dies that coordinate with stamps) over a stamped image, a small border of cardstock is visible around the stamped image. With new-style dies, the die hugs the edge of the stamped image. Instead of aligning the die to the space around the stamped image, you will align it to the edges of the stamped image. When the image is cut, there will still be a cardstock border around the image.

OLD STYLE ALIGNMENT

2019_DIE_COMPARISON__1
2019_DIE_COMPARISON__3

NEW STYLE ALIGNMENT

2019_DIE_COMPARISON__2
2019_DIE_COMPARISON__4
  • They’ve improved the adhesive that secures the dies to the insert sheet in the package so that it’s not too sticky. It’s easier to remove dies from the insert sheet, and the adhesive won’t cling to the dies.  (Hurrah for this update!!)
  • They’ve standardized the size of the die inserts for easier storage. There are now only two insert sizes: 5″ x 7″ (12.7 x 17.8 cm), which coordinate in size with the stamp cases, and 6″ x 6″ (15.2 x 15.2 cm). The standard sizes will allow uniform storage in whatever system you use. The envelopes that the dies come in will be slightly larger.
  • With old-style Dynamic folders, they recommended that you spritz cardstock before embossing to soften the fibers so you got a better impression. Now, that extra step will not be necessary because the new-style folders usually create a crisp impression without spritzing. The way the new folders are manufactured also gives options for more detailed and intricate designs in the future.
  • 3D folders are thinner than the old-style Dynamic folders. Because they are thinner, you will need to use a shim, depending on the die-cutting & embossing machine you use.

I will be attending Stampin' Up!'s Onstage event here in the UK this weekend and am looking forward to getting my hands on the new dies and learning more about these changes. I will continue to share updates here and on my Facebook Page as they occur. In addition, a quick note for anyone reading this who is either an online or in-person customer of mine - please do request to join my Facebook VIP Customer Group if you're not in it already - this way you can be sure that you will receive news and updates as soon as they are happen!

Video Tutorial: How To Make Baker's Twine Looped Flowers

by Joanne James25. May 2016 20:03

Wednesday - how did we get to the middle of the week already?! I've had a busy couple of days, with today including my fortnightly coffee and card drop-in session at Bells in Kingsthorpe, Northampton followed by a get-together over lunch with one of my team members. I am busy preparing my new catalogue samples and getting my catalogues ready to go out to both my online and face to face customers. If you've purchased Stampin' Up! products from me in the last six months, a complimentary catalogue will be winging its way out to you within the next week. If you haven't purchased from me recently but would like a copy of the new catalogue, please do get in touch with me either via email [email protected] or by phone and I will arrange to send a catalogue out to you too!

Today I have a video tutorial to share with you! Do you remember this card that I made a while ago?


I used this fun flower embellishment made with the It's My Party Baker's twine to decorate my Botanical Builder Framelits Die colour-blocked card. You can read more about it on the original blog post here if you missed it or would like to refresh your memory.

I promised you a video tutorial on how to make those cute baker's twine looped flower embellishments and finally here it is: 

They really are such fun to make and can be used to dress up cards and packaging and can be made from all kinds of baker's twine and linen thread. 

I hope you enjoyed today's video and it inspires you to have a go and try something new. I'll be back tomorrow with a fun birthday card for this week's new challenge over at Create With Connie and Mary. Until then, happy stampin'!

Hot Pink Picture Perfect Hummingbird Card

by Joanne James10. May 2016 22:00

Good evening everyone! I hope your week has started well. I've had my first technique class of the month yesterday along with both a rounders and cricket match (observing not participating, and both wins!), and a second technique class and this month's Project Life Memory Keeping class today so it's been a busy couple of days. Just time to pop in this evening and share the first of the cards from this month's technique class, featuring the Hummingbird in the 'Picture Perfect' stamp set. I used this week's sketch over at As You See It for my layout:

AYSIChallenge134   SIP One Element Wonder 47 800

I'm also linking up with Stamp Ink Paper again this week, as their challenge is to feature one main element on your project and make it really stand out. The hummingbird is the most tricky stamp in the set to align, but when you get it right is so worth it in terms of the result. Here is my finished card:
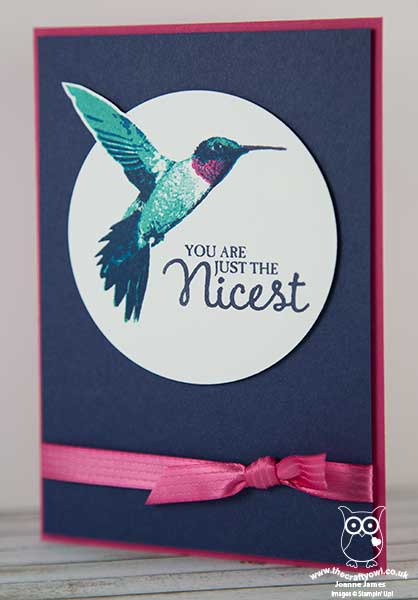
Here's the low-down on today's card:

Picture Perfect Hummingbird - 'Picture Perfect' is a multi-step image stamp set, with each of the stamps having two, three or four layers. The hummingbird comes in four pieces; for my bird I stamped my first layer in Bermuda Bay, I stamped the second stamp in Melon Mambo, the third layer in Pacific Point and the fourth and final one in Night of Navy. Whilst it sounds complicated, this set is made from photopolymer which makes lining up the images really straightforward. I find it helpful to use the eye to align the images and use a piercing mat or similar foam pad as a base for your stamping for an even image. I do prefer to stamp my bird in the order that the stamps are numbered and if all else fails, a stamp-a-ma-jig will help you to align the images perfectly.  It is definitely a stamp where positioning improves with practice and I must say my ladies today stamped with amazing results, each producing four perfectly stamped hummingbirds on the first attempt!

Partial Die Cutting using Circle Framelits - I stamped my bird onto a piece of Whisper White and having fussy cut his wing tip by hand, I then cut a partial circle up to the diagonal before adhering behind so that it aligned with my cut away circle on my card base. Circle Framelits are invaluable for this kind of partial diecutting, as you simply roll through the Big Shot to the desired point without cutting the whole way through. I've used this technique with this stamp before here; it adds an interesting detail to an otherwise clean and simple card.

Pop of Pink - Melon Mambo is one of my favourite pinks in the Stampin' Up! colour collections and whilst there is only the smallest amount featured on the throat of my bird, I picked up this colour in both my card base and satin knotted ribbon to give a real pop of colour to my otherwise blue card.

Here's today's visual summary of the key things needed to make today's card for easy reference:
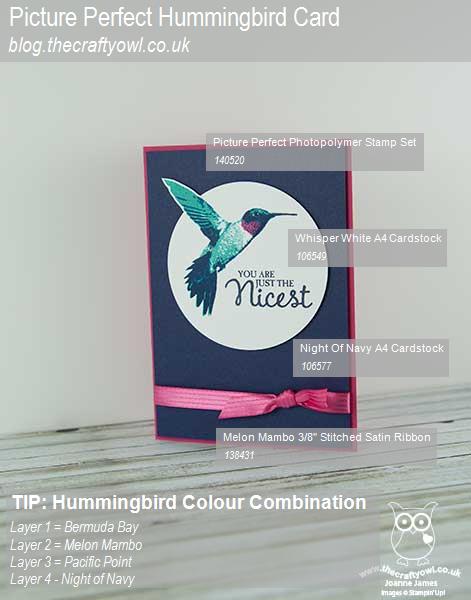
 

You can see all of my 'How To' summaries on my 'How To - Tips and Techniques' Pinterest board in case you've missed any. 

That's all from me today; I have another busy day tomorrow, with my Coffee and Card Drop In Session at Bell of Northampton in Kingsthorpe and I'll also be at the in-store Spring Open Evening at Bells too. you can find full details on the latter here

Hopefully I'll squeeze in time for a quick blog post with another of my Picture Perfect class cards. Until then, happy stampin'!


Stampin' Up! Supplies Used:

Table built using Product Table Builder by The Crafty Owl - Independent Stampin' Up! Demonstrator.

Bear Hugs - Papa Bear Gone Fishin'

by Joanne James14. April 2016 08:05

Today it's time for a new challenge over at Create With Connie and Mary and this week we have a colour combination for you:


This colour combination left me stumped for a while, until I decided that Soft Suede would be a good colour for a bear - take a look:

The low-down on today's card is as follows:

Papa Bear - I stamped my Daddy Bear from the 'Bear Hugs' stamp set in Early Espresso on Soft Suede card stock and cut him out using my Big Shot and co-ordinating Bear Hugs Framelits, curving his arms in slightly so that he could 'hold' on to his fishing pole. 

Gone' Fishin' - The 'Bear Hugs' set comes with lots of fun embellishments; I decided to go with a fish on this card that I coloured in Mint Macaron and Lost Lagoon with my Aquapainter, then painted liberally with clear Wink of Stella to give him shimmery scales. I attached my fish to a piece of white baker's twine, which I in turn knotted to my cocktail stick fishing pole. How cute?!

Geometrical Forest - I decided I needed to conjure up some forest or at least a feeling of the outdoors behind my lake, but was somewhat at a loss as to how to do this with such a limited colour palette. I perused my designer series papers and bingo - this geometrical design, whilst not including trees of any kind, works as a background. I do think those triangles are evocative of trees (ok, I know it's a stretch, but if you have a better suggestion do leave me a comment below - I'd love to hear it!) And where did I find it? In the 'It's My Party' Designer Series Paper stack of all places!

Here is the visual summary of the key products used on today's project for you to pin for easy reference:


You can see all of my 'How To' summaries on my 'How To - Tips and Techniques' Pinterest board in case you've missed any. 

Do visit the other Design Team members to see what they did with this week's colours; there's lots of inspiration over on their blogs too!

Enjoy your day and I'll be back tomorrow with another project; until then, happy stampin'!


Stampin' Up! Supplies Used:

  • Bear Hugs Clear-Mount Bundle
  • It's My Party Designer Series Paper Stack
  • Soft Suede A4 Cardstock
  • Early Espresso Classic Stampin' Pad
  • Lost Lagoon A4 Cardstock
  • Lost Lagoon Classic Stampin' Pad
  • Mint Macaron Classic Stampin' Pad
  • Ovals Collection Framelits Dies
  • Whisper White A4 Cardstock
  • Rhinestone Basic Jewels
  • Whisper White Baker's Twine
  • Clear Wink of Stella

Coffee and Card - Party Pop-Up Card

by Joanne James12. April 2016 10:00

I've had a busy day today with both my first Technique Class of the month and my monthly Project Life Memory Keeping Class. Today's card though is all about tomorrow; it's the card that we will be making at my Drop-in Coffee and Card morning at Bell of Northampton. This week we will be making a pop up card using the Party Pop-Up Thinlits - take a look:

I've featured a card front similar to this one on my blog previously (you can read the detail here) - for this one though the fun happens on the inside:

I used one of the fun Party Pop-Up Thinlits for a surprise inside greeting, cut out of Whisper White and coloured with my Stampin' Write markers to co-ordinate with the front of my card. Added gold Wink of Stella for the candle flames, of course!

Here is the visual summary of the key products used on today's project for you to pin for easy reference:


You can see all of my 'How To' summaries on my 'How To - Tips and Techniques' Pinterest board in case you've missed any.  

I would love you to join me at Bell's tomorrow between 10-12 (you can find a reminder of the full details here) - hope to see you there!

I will be back tomorrow with one of the cards from today's technique class featuring the Rose Wonder bundle and the new, final set of Weekly Deals; until then, happy stampin'!


Stampin' Up! Supplies Used:

Table built using Product Table Builder by The Crafty Owl - Independent Stampin' Up! Demonstrator.

Botanical Builder Flowers And A Happy Hello From The Paper Players

by Joanne James10. April 2016 09:00

It's Sunday and time for a new challenge over at The Paper Players! It's my turn to host our challenge this week and I have an interesting colour combination for you to play along with:


I knew when I chose my colour palette some months ago that I would do something with flowers; for my card this week I was inspired to use the Botanical Builder Framelits Dies - I just love those flowers and I knew they would be great to create the tropical flowers I had in mind with my colour scheme. I also used this week's sketch over at Mojo Monday for the layout for my card:


Here's the low-down on today's card:

Lots of Layers - I love layers and this card has lots of them! I kept them either plain or with a unified pattern of polka dots so that they wouldn't overwhelm the sentiment and flowers that are the focal point of my card.

Subtles versus Brights - Balancing my colour choices today may be considered a challenge in itself. I used my Brights largely as accent colours, although the one thing I did differently on my card was stamp my sentiment if Soft Sky, the lightest colour. This is a real departure for me as normally I would stamp it in the strongest darkest colour for impact, yet sometimes it pays to take a more subtle approach - I hope you agree :-)

The Perfect Accent - Yes I used those White Perfect Accents for my flowers again - I love them, whether left 'naked' as here today or coloured up using my Sharpies. They make such a great flower centre.

Here is the visual summary of the key products used on today's project for you to pin for easy reference:


You can see all of my 'How To' summaries on my 'How To - Tips and Techniques' Pinterest board in case you've missed any. 

Before you reach for your ink and papers, check out what our amazing team has created to inspire you this week:

The Paper Players Design Team
 
 
Here's a quick recap of our challenge rules:
 
1.  Create a new paper project
2.  Upload your creation to your blog with a link back to us and provide a direct link to the post featuring your challenge submission.
3.  Please link your card to no more than four challenges, TOTAL.
4.  Have FUN! 


I look forward to seeing what you create with this week's colours. We are off to basketball today but no hockey - one more week off for Easter until we are back on the pitch! This means cycling if the sun is shining or board games if it rains - let's see where we end up!

Back tomorrow with another project; until then, happy stampin'!


Stampin' Up! Supplies Used:

Table built using Product Table Builder by The Crafty Owl - Independent Stampin' Up! Demonstrator.

Rose Wonder Wedding Wishes For Kylie Bertucci's International Blog Highlight LOVE

by Joanne James8. April 2016 09:30


Today the lovely Kylie Bertucci, an Australian Stampin' Up! demonstrator, is hosting an international blog highlight with the theme of 'love'. I am delighted to be taking part and since I have been working with the Rose Wonder stamp set and Rose Garden Thinlits a lot lately as they feature in one of my April Stamp technique Classes, I decided to use them to create a special wedding card to share with you today:

Whilst the photograph is lovely, I can't tell you just how pretty and sparkly this card is in real life! Every part of it shines. So here's the low down on today's card:

A White Wedding - Whilst white cards can be tricky to photograph, there is nothing more stunning for a special wedding card. I used shimmery white cardstock which has a wonderful subtle sparkle and lustre and is perfect for a special card. I also kept my roses white in colour, using Dazzling Diamonds glitter in its 'raw' state to add to the purity of my card. 

Roses, Roses - My regular blog followers will know that my style generally is very clean and layered and today's card is very typical of that. I decided to create an inset panel of roses using my Rose Garden Thinlits, cutting them to fit into a frame that I'd cut out using my Big Shot and Square Framelits. As an alternative to paper-piecing the outlines and centres, I decided to try something different: I backed my frame with acetate, turned it over and painted inside the rose outlines with Crystal Effects, then sprinkled it liberally with Dazzling Diamonds glitter and left it to dry. I then flipped it over again before adhering to my card. This creates a sparkle that will even outshine glimmer paper, but has the benefit of being contained within the frame so no worries about glitter shedding from the completed card. Bonus!

A Touch of Silver - The only colour other than white that I used on my card was silver, with silver foil for my background mat layer and for my heat embossed sentiment. Just enough to frame my card and enable my sentiment to stand out - well, you can't really read white-on-white can you?!  I did toy with adding some silver satin ribbon, but decided against it as it detracted from the clean lines of my frame. 

Here is the visual summary of the key products used on today's project for you to pin for easy reference:

You can see all of my 'How To' summaries on my 'How To - Tips and Techniques' Pinterest board in case you've missed any. 

Do check out the other cards in the blog hop for inspiration; I would love it if you could pop over and vote on my card in the gallery by clicking here - the designers of the cards with the most votes will get to participate in one of Kylie's monthly international blog hops, so your votes all count!

Back tomorrow with another project; until then, happy stampin'!


Stampin' Up! Supplies Used:

Table built using Product Table Builder by The Crafty Owl - Independent Stampin' Up! Demonstrator.

Picture Perfect High Tide Starfish Card

by Joanne James2. April 2016 19:00

I've had a busy day today hence my late post - more time crafting and less time blogging, I'm afraid! Anyway, I just thought I would write a quick post to share a 'something old, something new' card that I made today using this week's Mojo Monday sketch:

My 'something new' is the 'Picture Perfect' stamp set that I had out on my desk preparing for May's technique class when we will be using that set. For today's card I paired it with some retired DSP from my hoard:

The details for today's card are as follows:

Something Old - This retired High Tide Designer Series Paper has lots of nautical and sealife patterns and I remembered this one featuring a coral starfish. The panels on this sketch lend themselves to co-ordinating DSP and I knew this card would give me the perfect opportunity to use up some of my old papers.

Something New - The starfish is the only image in the 'Picture Perfect' stamp set I've yet to use, so that was naturally my image of choice today. I stamped my starfish first in Blushing Bride, then overlaid the second image in Calypso Coral to tie it in with the coral starfish on my chosen DSP. I then cropped my image using my Circles Framelits.

Something Blue - Whilst I didn't borrow anything to make today's card, in keeping with the saying there is most definitely 'something blue': I used Pacific Point cardstock to give me a bright and solid base for my background to bring together my sentiment and patterned papers and ensure my card remained cohesive. 

Here is the visual summary of the key products used on this project for you to pin for easy reference:


Back tomorrow with another project; until then, happy stampin'!


Stampin' Up! Supplies Used:

Table built using Product Table Builder by The Crafty Owl - Independent Stampin' Up! Demonstrator.

Work of Art Easter Egg and Honeycomb Happiness Chick

by Joanne James25. March 2016 18:57

Good Friday blessings one and all! I've spent most of today outdoors making the most of the sunny weather; I met my girlfriends for a run this morning and we went on a James family bike ride this afternoon. No time to craft, but since the forecast is dreadful for the rest of the week I'm sure I'll make up for it! Today's card is for the challenge over at The Friday Mashup. I love this challenge and am sad to read that this one is their last one!

This week you can use the sketch above or create a project with an Easter theme and chicks or bunnies, or mashup and create with both. I went with the latter for this card, although I do have a mashup card planned for a few days time! Here's today's card:

I actually made this card with the ladies at my Coffee and Card session at Bell's in Northampton this week. The key elements of my fun Easter card are as follows:

An oval egg - I used my Big Shot and Ovals Framelits to create my fun Easter egg in my layer of Pink Pirouette cardstock. Now I know that technically an egg is more pointed at one end, but without an egg framelit this oval makes a pretty good alternative! Before cutting out my oval, I stamped my chick onto the card. Why? Read on below to find out!

An Easter work of art - To decorate my egg, I cut a second mat of white the same size as my pink layer and stamped the large brushstroke stamp from the 'Work of Art' stamp set in a variety of pastel colours and placed this behind the aperture. The curve of the stamped image adds to the illusion of the egg shape.

A happy chick - The little chick from the 'Honeycomb Happiness' Sale-A-Bration set has been getting lots of use this week as he is perfect for Easter cards. I stamped mine onto So Saffron cardstock, snipped him out with my paper scissors and coloured his beak with my Pumpkin Pie Stampin' Write marker. I didn't fussy cut those fiddly legs though - remember the chick I stamped on the pink layer earlier? Yes, I simply coloured the ones on this layer with my Pumpkin Pie Stampin' Write marker and then lined up my yellow chick with the stamp outline, adhering him with a couple of Stampin' Dimensionals. Clever, right? You have just 6 more days to get your hands on the 'Honeycomb Happiness' stamp set for free with a £45 order; if it's on your wish list, don't leave it too late!

An Easter sentiment courtesy of the 'Easter Lamb' stamp and a trio of Itty Bitty punched flowers completes my card. 

Here's the visual summary of the key supplies used to make today's card for you to save for easy reference:


That's all from me today; if you would like to know more about my drop-in Coffee and Card Sessions, you can read all about it here. We have a short break for Easter then the next one is scheduled for 13th April - I'd love to see you there. I'll be back tomorrow with another project. until then, happy stampin'!


Stampin' Up! Supplies Used:

Table built using Product Table Builder by The Crafty Owl - Independent Stampin' Up! Demonstrator.


Honeycomb Happiness Meets Birthday Bouquet Ice Creams!

by Joanne James23. March 2016 20:20

The middle of the week has arrived - and a short week at that! Today I have a card to share with you for this week's challenge over at TGIF Challenge that also uses the sketch layout at Fab Friday:


I got such lovely comments on my card for last week's TGIF Challenge, that when I saw the badge for this week I just knew it was the perfect opportunity to get out the ice cream patterned paper in the Birthday Blossoms DSP and play along. Here is my card:

My card is a mix of mouth-watering ice-cream in pastel colours, with a little texture and another go at no-line watercolouring. Today's highlights include:

A sweet treat stamp and paper combination - The Birthday Bouquet Designer Series Paper has some gorgeous florals, but also includes a number of great alternative patterns that are perfect for a sweet celebration. I love these soft, watercoloured ice creams and decided to stamp one using the ice-cream stamp in the 'Honeycomb Happiness' Sale-A-Bration stamp set onto watercolour paper and coloured it using inks and my aquapainter to mirror those on the paper. I needed a small sentiment that wouldn't overwhelm my cone, so I trimmed the top part away for a better fit.

A colour combination that's good enough to eat - I love the combination of pale pink and pale green, with the warm brown of soft suede - the ice-creams combine these colours perfectly and the pink and brown make the perfect base for my card. Here's this colour combination if you would like to save it to use on your projects:


Waffle-y Versatile Stylish Stripes - I used the pastels for the horizontal stripes on my card and decided to use Soft Suede to mat my watercoloured image. I don't often use texture and embossing on my cards but decided to create a little more interest with a textured layer that emulated the cone of my ice cream. The Tiny Triangles or Zig Zag Textured Embossing Folders would have been good choices, but since I don't own either of those I embossed my cardstock twice with my trusty Stylish Stripes Textured Impressions Embossing Folder, embossing once then rotating my cardstock through 90 degrees and embossing again to give a criss-cross look. It works for me!

Here is today's visual summary of the key products used for you to save for easy reference:

I hope you like today's card. As I mentioned yesterday, today is the first day of the school holidays and when I returned from my drop-in Coffee and Card session at Bell of Northampton this morning (I'll be back to share the card we made today later in the week), Rebecca decided that having played outside all morning, she wanted to do something creative this afternoon. So what do you do when two of your greatest passions in life are Lego and craft? Well, you use your Lego Mindstorms to build a robot that you can programme to decorate your Easter eggs! We made a short video to show the results and I thought I'd share here as I thought the results were rather impressive:

Who said school holidays were boring? Not when you're 10 years old and a member of the James family, for sure!

Back tomorrow with this week's card for the new challenge over at Create With Connie and Mary; until then, happy stampin'!


Stampin' Up! Supplies Used:

Table built using Product Table Builder by The Crafty Owl - Independent Stampin' Up! Demonstrator.


Mini Catalogue

BROWSE THE CATALOGUE

The mini catalogue is now live! Read and download your copy here.

Shop Online

Access my online shop 24 x 7, 365 days of the year:

Current March hostess code:

S9F2XJJW

Shop Online

Join My Team

It's always a great time to join Stampin’ Up! New team members can get £130 worth of products for only £99 + free business supplies + free shipping + all the fun being a part of Stampin’ Up! Stampin' Up! has something for everyone: join my growing team and benefit from my support to enjoy Stampin' Up! however you choose.

If you're interested, call me for a chat to understand how I can help you realise your goals. Alternatively, if you have already decided to sign up and you just can't wait, please click here for the link to the online form where you can sign up and order your starter kit right away! 

Latest Kit!

Stampin Cut and Emboss

The Rock Legend Kit has all you need to make 8 cards with coordinating envelopes. Along with the new Panda Friends Kit, both are available from January 4th for just £14 each - get yours here!

2023-24 Annual Catalogue

BROWSE THE CATALOGUE

Click on the catalogue for a full list of current SU! supplies - if you would like to order any of the items featured, please drop me a line at [email protected] or give me a call on 07773 421446 - I'd be happy to help.

New Online Exclusives

There will be new products available exclusively in the online store from 5 March - check them out here.

About Me

Hi I'm Joanne and live in Northampton and when I'm not looking after my husband and two beautiful children, am an avid crafter with a passion for all things Stampin' Up!

I must confess that I have never been a big rubber stamper - until I discovered Stampin' Up! that is. I love the fact that I can get such great results with co-ordinating stamps, inks, papers and punches - the possibilities are endless! Join me on my stamping journey as I share the things I love and be inspired to create amazing things yourself!

Follow Me

Monthly Newsletter

Box Builder

Click the button above to use Box Buster to create your custom box design using the Envelope Punch Board!

Kits Collection Now Available!

Stampin Cut and Emboss

The new Kits Collection from Stampin' Up! is now available!

Click here to see the current kits available and order yours online today.

I Design For


Stampin' Up Stuff

This is my personal blog and is not endorsed by Stampin’ Up! I hope you find it a plentiful source of ideas and personal inspiration but please don't copy my designs for contest submission or use for classes, publication or sale without express permission.