Festive and Fun Candy Cane Treat FF0149

by Joanne James8. December 2023 09:00

Today I have my card for the new challenge over at Festive Friday Card Making and Paper Crafting Challenge


In the run up to Christmas, for this challenge we are celebrating 'Christmas Festive Food'. Remember the fun thing is that at Festive Friday you do not need to actually celebrate the occasion; your goal is to simply use three or more items from the inspiration list on your project. This week I used white, brown, red and candy cane and this is what I came up with:


Here's the low-down on today's project:

A treat instead of a card today! At this time of year, quick and easy decorating ideas to add personal touches to festive treats are a great idea; I added a label and tag, featuring the cute candy cane-holding beaver from the 'Festive and Fun' stamp set to decorate a candy cane - here's a close up:


Small images that are quick to colour are perfect for the personal touch; add some festive foliage and a ribbon bow to complete the look:


How do you like to decorate your treats during the festive season? Do leave me a comment below - I'd love to hear your thoughts!

Here is the visual summary of the key products used on today's project for you to pin for easy reference:


You can see all of my 'How To' summaries on my 'How To - Tips and Techniques' Pinterest board in case you've missed any. 

How does our board inspire you? I can’t wait to see what YOU create! For more inspiration, be sure to visit the rest of the Festive Friday Card Making and Paper Crafting Challenge Design team:

Enjoy your day and I'll be back tomorrow with another project. Until then, happy stampin'!


Stampin' Up! Supplies Used:

Table built using Product Table Builder by The Crafty Owl - Independent Stampin' Up! Demonstrator.

Joy of Noel Shadow Box Christmas Card PP669

by Joanne James3. December 2023 08:00

Today it's Sunday and time for this week's new challenge over at The Paper Players! It's the turn of the fabulous Jaydee to host this week and she has a timely theme challenge for us to work with:


It's beginning to look a lot like ... Christmas! It is indeed, so Jaydee has chosen the perfect theme this week! At the start of December I like to make those 'special' cards for friends and family - those over-the-top, fancy ones that you hand deliver. I set aside my usual clean-and-layered self and throw caution to the wind, so I thought I'd share one of those cards with you today - take a look:


Here's the low-down on today's card:

A Fancy Shadow Box - Today's card is part card, part home decor. Measuring 5 3/4" square by 1/2" deep, the front of the card comprises a shadow box frame, with the main design in the centre. I've made non-festive versions of this card in a 6"x6" size that I've shared on my blog previously, but I've never made a Christmas one. This kind of card does take a little longer to make, but I think it's so worth it for a special occasion, don't you? It's also great for those who like to keep their cards and bring out year after year, as it is as much a decoration as it is a card.

Shining Brightly - I used one of the gold and vanilla patterns from the Shining Brightly specialty designer series paper to decorate the frame of my card. Now, I know this paper is now sold out in Europe, but it's been in and out of stock all season due to its popularity, so I'm hoping that for those of you who stocked up, you appreciate a project that shows it in all its glory. Given that my shadow box card has depth, I need to create a box 'envelope' to send it in and I used more of this paper for the lid. You can see my box in the photo below:

Joy of Noel - The real star of the show is the 'Joy of Noel' bundle that features in the centre of my frame. By far and away my favourite bundle from this year's mini catalogue, it really is fabulous. This bundle is still available and if you purchase it from me, you will receive a free copy of the 'Join in With Joanne & Jan' Joy of Noel tutorial that I created with my talented friend Jan Clothier. I combined gold embossed foliage and gold glitter pine needles with a gold embossed NOEL for the centrepiece - the foiling and glimmer paper add so much beautiful festive sparkle, don't you think?

A gold embossed sentiment inside completes my fancy card. What do you think? Do you like to make fancy cards for the special people in your life? Do leave me a comment below - I'd love to hear what you think.  

I'm also playing along with a few challenges: My card follows the sketch at 52 Christmas Card Throwdown (I hope they'll forgive me the sentiment placement), it's a glitter entry over at Inkspirational and finally I've been saving this one for my entry over at SUO Challenges - my favourite holiday catalogue product, actually products with the bundle and paper!!


Here is the visual summary of the key products used on today's project for you to pin for easy reference:


You can see all of my Product and 'How To' summaries on my 'How To - Tips and Techniques' Pinterest board in case you've missed any. 

Before you reach for your ink and papers, check out what our amazing team has created to inspire you this week:

Here's a quick recap of our challenge rules:
 
1.  Create a new paper project
2.  Upload your creation to your blog with a link back to us and provide a direct link to the post featuring your challenge submission.
3.  Please link your card to no more than four challenges, TOTAL.
4.  Have FUN!

Enjoy your day; I will be spending mine with more Christmas preparations and getting ready for an upcoming vacation - more about that in a future post! I'll be back tomorrow with another project. Until then, happy stampin'!


Stampin' Up! Supplies Used: 

Table built using Product Table Builder by The Crafty Owl - Independent Stampin' Up! Demonstrator.

Up to 30% Off Stampin' Up! Kits During August

by Joanne James1. August 2023 14:00

You all know what a fan I am of Stampin' Up!'s kits - they make for a perfect crafty evening in with friends, whether you are a seasoned crafter or have never crafted before and would like to try something new. Kits are fun, quick and easy and all-inclusive so there's nothing to buy and nothing to store afterwards and with so many different styles and types, there's something for everyone. During August you can save up to 30% on all kits - what could be better?! You don't need a code - all kits have already been discounted in the online store - links to each of those currently available are below; I'll be sharing details on some of my favourites on social media during this month, but I just want to draw your attention to some recent new additions, including the Festive Tags kit that launches today:

If you would like to start crafting handmade creations for Christmas and New Year, the Festive Tags Kit has everything you need to create 15 festive gift tags in less than an hour - no stamping required! There are several other Christmas card and tag kits in the online store too, so definitely worth a look.

Another recently launched stamping kit is the Boho Beach kit:

This all-inclusive kit comes with everything you need to make eight beautiful beach-inspired cards. Send a friendly note to the people you love and don’t miss the acrylic-poured paint art style used in this kit for a dazzling marbled colour effect! It’s time to take a well-deserved break, sit back, and take friends and family to the beach from the comfort of your home!

Finally the Blossom Wishes Kit:

Celebrate your friends with special slimline cards from the Blossom Wishes Kit! With vellum blossoms and foiled details, you can quickly put together a fun paper craft! This kit also comes with pre-cut sentiments in Dutch, English, French, and German, so you can send a card and say hello to friends near and far.

Kits make great gifts too - you can make up the projects and then give them away for someone else to use or give them an unopened kit to bring them crafting pleasure of their own and there are some great kits for children, including the fun Love This Memory Notebook - this could be a fun way to record and document vacation activities:

To get your hands on a discounted kit, you can either get in touch to place your order or alternatively visit my online store. Or if you would like to arrange a 'kit together' event with friends for a fun evening out, then do get in touch!

As with all kits, they are available whilst stocks last; the online store will show a full range of what is currently available; to purchase, simply click on the links below. Happy shopping!


Table built using Product Table Builder by The Crafty Owl - Independent Stampin' Up! Demonstrator.

New Wreath of Blooms Home Decor Kit Now Available

by Joanne James3. February 2023 13:15

Get ready for the latest addition to the Kits Collection by Stampin’ Up! The Wreath of Blooms Kit gives you everything you need to make your own home decor piece and it's now available in the online store. Roll and shape the pre-cut pieces and put your wreath on display!


This kit includes:

  • One 8" (20.3 cm) diameter chipboard wreath.
  • Pre-cut paper pieces that can be rolled and shaped into three-dimensional blossoms.
  • Multicoloured brads to keep everything together.
  • Thick twine to hang your wreath.
  • Enough adhesive* to complete the project.
  • Coordinating colours: Cajun Craze, Calypso Coral, Crumb Cake, Garden Green, Night of Navy, Pear Pizzazz, Petal Pink, So Saffron, white.

*Please note that you will need a hot glue gun for this project, which is not included in the kit.

If you would like to see this kit in more detail, please check out the video below:

This is such a beautiful kit - and would you believe, only £13 - this is an absolute bargain for a home decor kit! No excuse to not add a touch of Spring colour to your home and enjoy a little creativity in the process! 

Get yours in my online store today - just click on the link below:

Table built using Product Table Builder by The Crafty Owl - Independent Stampin' Up! Demonstrator.
 
This kit would also be a great little project for a crafty get-together with friends too; if you would like to arrange one, do get in touch!

Need A Christmas Gift? New Kits Added To The Kits Collection

by Joanne James6. December 2022 14:00


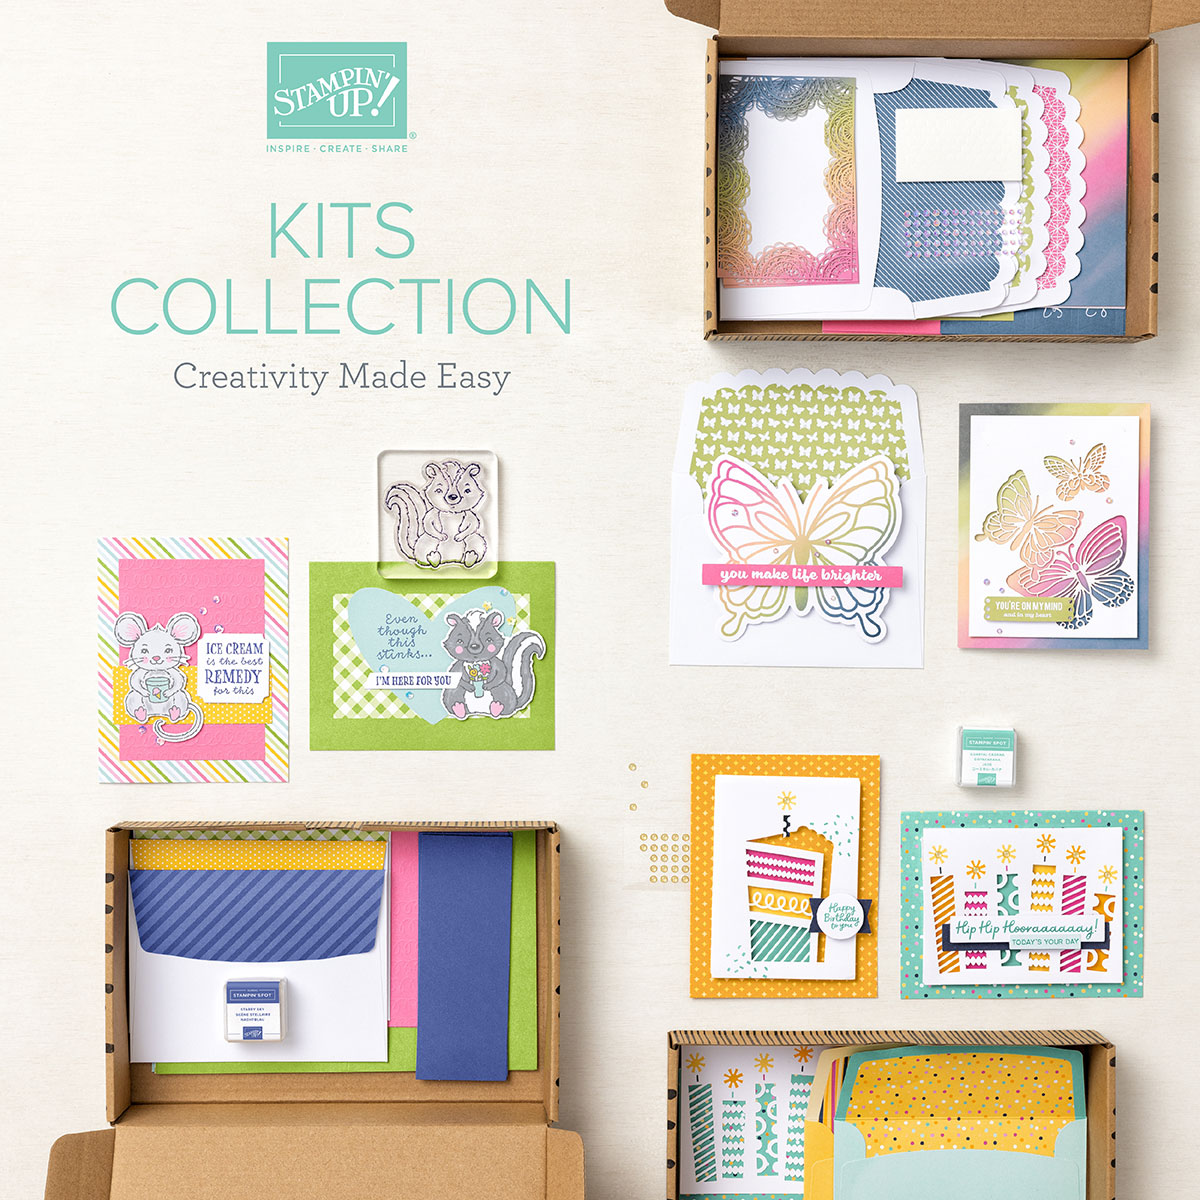
I thought today it was time to update you about the new kits have been added to Stampin' Up!'s line of all-inclusive craft kits recently and highlight a few other recent additions that may have passed you by.

For anyone not familiar with the Kits Collection, they are designed to be the perfect introduction to paper-crafting. They are great for the beginner crafter or the seasoned crafter on the go. Whatever your skill or experience, the kits are designed for you, the customer, to be in control and choose the kit experience that is most comfortable for you. Kits are all-inclusive, pre-cut, and ready to use with complete step-by-step instructions. The following kits have been added this month and are now available in the online store: 

Christmas Gifting Tags Kit

You’ll love the ease of gift gifting this year with the Christmas Gifting Kit! This tag and gift card holder kit is a simple way to enhance the Christmas gifting experience for you and your loved ones. Create gorgeous gift tags with attached gift cards holders so you can give your friends and family gift cards to the places they love while adding a handmade touch.

Cozy And Bright Christmas Card Kit

Celebrate the season with a card kit that has everything you need to make 12 festive cards. Wish those you love a merry Christmas and a joyous New Year with classic pine, cinnamon, and orange designs that will warm any heart. And the gold foil details add that special something to these seasonal designs. Don’t let the Christmas time overwhelm you–get your all-inclusive kit and make quick multiples everyone will love! 

These kits are perfect for a spot of Christmas crafting and a great way to add a personal touch to festive mail. In addition, the following non-seasonal card kits have also been added recently and are worth a look:

 The Best Remedy Card Kit

We all know that sometimes life stinks. When it does, there's a simple solution: The Best Remedy Kit! Make one of the adorable, under-the-weather animals the focal point of your card. Then customise your project with the stamp set and embellishments. The stamp set includes cute images and fun phrases that are sure to deliver a smile. When someone you love needs a pick-me-up, this kit offers the perfect remedy!

A Million Thanks Card Kit

Say “thank you” in style and dazzle with layers of dimensions with the versatile A Million Thanks Kit! This kit has everything you need to create beautiful, all-occasion cards to express your gratitude. Mix and match card bases, sentiments, pre-cut die pieces, and embellishments to create expertly crafted cards with ease. It’s never been so easy to show how seriously grateful you are!

There are also some new non-card/no stamping kits that are great for gift giving:

Birthday Card Organiser Kit

Get ready to party all year long with the Birthday Card Organizer Kit! This kit comes with everything you need to help you get organised and never miss out on a birthday celebration. It comes with the supplies to make 12 birthday cards with matching envelopes that you can easily customise. This kit is filled with pre-cut floral and background pieces to really make your crafts unique. And don’t forget the 8" x 10" (20.3 x 25.4 cm) yearly birthday organiser with sticker sentiments in multiple language options for perfect (and practical) personalisation! You can keep track of all your loved one’s birthdays, then make and save a card for them in the cardholder for each month. No matter who you are celebrating, you can give them something great!

Love This Memory Notebook Kit

LOVE THIS MEMORY NOTEBOOK KIT (ENGLISH)

Relive your favourite memories with this blast from the past! The Love This Memory Notebook Kit is the perfect way to preserve amazing moments from your life in a fun and colourful way. Gather up photos and paste them into the included notebook and decorate!

Celebrate Today Magnet Board Kit

159335159335

The Celebrate Today Magnet Board Kit includes supplies to create a magnet board designed to organise aspects of your daily life in a beautiful way. With interchangeable messages, backgrounds, and envelopes, you can decorate your magnet board to best suit your style and needs!

Kit includes:
*Pre-designed projects
*Step-by-step instructions
*Pre-cut pieces (No prep work! Get right to crafting)
* Makes 1 framed magnet board
*Enough adhesive to complete projects
* Includes 6 magnet clips
* Includes 2 image sticker sheets and 4 sentiment sticker sheets (1 each for the following languages: Dutch, English, French, and German)
* Includes 24 double-sided 4" x 3" (10.2 x 7.6 cm) cards
* Includes 2 sheets of 12" x 12" (30.5 x 30.5 cm) paper
*A 9-7/8" x 6-1/2" x 2-3/4" (25.1 x 16.5 x 7 cm) printed designer box for storage or crafting on the go
* Coordinating colors: Basic Black, Blushing Bride, Flirty Flamingo, Melon Mambo, Mint Macaron, Smoky Slate

Stampin' Up! kits offer great value for money and with Christmas on the horizon, they would make great gifts. So whether you are looking for something for a new crafter, a busy crafter or just someone who likes quick and easy projects, these kits are the perfect solution. Links to all of these and lots more available in the online store can be found below - happy shopping! 

Table built using Product Table Builder by The Crafty Owl - Independent Stampin' Up! Demonstrator.


Tree Lot Dies Christmas Home Decor And Festive Table Favour AYSI 280

by Joanne James29. July 2022 12:00

Today I'm sharing my design team card for our new challenge over at As you See It where it's time for a festive 'fill in the blank' challenge:


Today we are all about Christmas in July. I do like to get a start on Christmas cards at this time of year, but when it come to my favourite Christmas in July creation it has to be home decor and table favours; these always take longer to make than you think they will and in the busy run up to Christmas there is rarely time to devote large chunks of time to crafting, so I like to get a good headstart on these kinds of projects - it makes me feel organised! I have two projects for you today - a piece of home decor and a co-ordinating table favour. Both use the Tree Lot Dies, available free with a £90 purchase during the current Sale-A-Bration promotion - and I took the inspiration for my festive caravan and 'trees for sale' scene from the top right photo over at Hand Stamped Sentiments - what a great inspo board! First up - here's my home decoration piece:


Here's the low-down on today's projects:

I used a dome that I had in my office that I bought last year that was just waiting to be made into something, and built my little scene onto the base, having first covered the base with snowy white velvet paper (cut with a retired layering circles die). The string of lights, embellished with the pretty Festive Pearls, the trees and the 'trees for sale' sign are all one dimensional and stand with the aid of small supports behind them. The caravan is made by diecutting two of the diecut caravan pieces and adding a base (described in more detail with the table favour below) and a second curved piece of cardstock for the roof (the roof piece measures 3 1/2" x 1 1/2", scored at 1/2" on each side and 1/4" on each side respectively). I added some red ribbon to the top of my dome and red glimmer to the base of my dome for extra festive feel. Here's a close up of my little scene, with the dome removed so that you can see the detail more easily:


My finished dome measures 11cm wide by 19cm tall and that's not all - it lights up too! 


A little tricky to see since I photographed it in daylight, but a nice feature to give a cosy night time glow. In addition to my decoration, which could be used as a table centrepiece, I also created the first of a set of table favours made from the caravan die. These are quite easy to make: just cut two caravan sides, then take a piece of cardstock measuring 4 1/8" x 1 1/2", scored at 1" on each side and 1/4/" on each side respectively, to create the open box shape. They are just big enough to hold two Lindor chocolates or similar:

How cute is that?! Both of today's projects are quite easy to make, but I won't lie - there is a time-consuming element, since all of the little pieces need to be cut and glued in place. Worth it though I think - and if you start now, you will have them finished and ready to go when Christmas rolls around!

The key products used on today's project are included in the table below - no visual today. 

Here's a summary of our challenge rules:

  • Create any card, scrapbooking page, 3D project or packaging project that fits the challenge.
  • Please include the challenge graphic and link back to the challenge in your blog post. Turn off word verification so we can leave you lots of lovely comments. Make sure you link the post not the whole blog to the Linky. Use #AYSIXXX when uploading to a public gallery.
  • If you’re unsure about ‘the rules’, check the details under the Challenge Guidelines tab on the As You See It Challenge homepage.
  • In a Fill in the Blank challenge, complete the sentence in the Challenge Banner with the phrase that is true for you and create your project using the words you used. Tell us what you said in your blog or on your site.
How will you fill in the blank? What are your favourite Christmas In July projects to create? We look forward to seeing your creations in the AYSI gallery.

Enjoy your day and I'll be back tomorrow with another project. Until then, happy stampin'!


Stampin' Up! Supplies Used:

Table built using Product Table Builder by The Crafty Owl - Independent Stampin' Up! Demonstrator.

Sweet Little Rainbow Treats FF108

by Joanne James29. April 2022 09:00

Today I have my card for the new challenge over at Festive Friday. 


The challenge that we are celebrating this week is 'National Eat What You Want Day' which is on 11th May - who knew?! Remember the fun thing is that at Festive Friday you do not need to actually celebrate the occasion; your goal is to simply use three or more items from the inspiration list on your project. This week I used food, treat packaging, red, pastels and twine and this is what I came up with:


 What better for the end of the week but a Friday treat! Here's the low-down on today's treat box:

Sweet Little Boxes - OK first up is a confession: I didn't make the box from scratch! There was absolutely no need when the mini catalogue has the perfect solution - the Sweet Little Boxes! These little boxes are sweet indeed - and at 3 1/2" x 2 1/2" x 5/8", they are the perfect size for some chocolates or sweets and fit in your hand perfectly:


Playful Patterns - The boxes are flat packed, so it's super easy to customise them. I decided to use some Playful Patterns host reward striped paper for mine and simply used the box as a template, drew around it and cut out the paper and adhered it the box before putting the box together. This does mean that extra double-sided tape will be required in addition to the tape that is already on the box, but that's it - super easy. 

Brilliant Rainbows - I decorated my box with a large diecut rainbow cut using my Brilliant Rainbows Dies, pulling colours out of the paper. I added some stitched clouds courtesy of the Give It A Whirl Dies and and diecut and stamped a tag using the same bundle and tied it to my box using some (retired) Bermuda Bay and white striped baker's twine.

My box contains a packet of Skittles and has already made its way into the schoolbag of one of the James Juniors for a special break time surprise (don't worry, the other one has one too!)

Here is the visual summary of the key products used on today's project for you to pin for easy reference:


You can see all of my 'How To' summaries on my 'How To - Tips and Techniques' Pinterest board in case you've missed any. 

How does our board inspire you? I can’t wait to see what YOU create! For more inspiration, be sure to visit the rest of the  Festive Friday Challenge Design team:

Ann Schach
Beth McCullough
Sharon Hashimoto Burkert
Melanie Hungerford
Helen Jennings
Stephanie Lanzalotto
Melva Peters
Jaydee
Diane Evans
Joanne James - that's me!

Enjoy your day - today is a two-post day so be sure to check today's other project too. Until then, happy stampin'!


Stampin' Up! Supplies Used:

Table built using Product Table Builder by The Crafty Owl - Independent Stampin' Up! Demonstrator.

A New Stampin' Up! Mini Catalogue AND A Second Sale-A-Bration!

by Joanne James3. August 2021 09:00

So many reasons to celebrate today - or should I say, Sale-A-Brate?!

First up, we have a new mini catalogue, with everything you need for your seasonal and festive crafting, to take you from autumn, through to Halloween, Christmas and beyond! Here is the new mini catalogue, in all its festive glory:

Just click on the image above or in the sidebar on the right to browse the catalogue online, or contact me on 07773 421446 if you would like a paper copy posted out to you and you don't already have a demonstrator; paper copies have been sent to my regular customers. If you are as excited as me and just can't wait, here's the link to my online store - everything is available to purchase from today!

And as if that wasn't enough, we get a second bite of the Sale-A-Bration cherry this year too, with our second 2 month long Sale-A-Bration promotion! Starting from today 3rd August until 30th September, you can once again get more bang for your buck when you shop, host or join. You can click on the catalogue on the right hand side of my blog page or below to access the Sale-A-Bration leaflet to download a copy or click on the icon above or on the right to go directly to my online shopto place an order - we are LIVE!


So a reminder of how Sale-A-Bration works: for anyone who hasn't come across it before, it's Stampin' Up!'s annual promotion that is loaded with offers whether you shop, join or host. You can earn a free Sale-A-Bration product for every £45 you spend between 3 August and 30 September. There is also the opportunity to earn even bigger rewards with a £90 purchase. It's the perfect time to purchase those products you've had on your wish list and earn more products for free! Here's a link to a video from the nice people at the Home Office that lets you see each of those free products up close in more detail:

I hope that was useful and rest assured I will be sharing plenty of additional projects on my blog in the next few weeks that show these items in more detail. 


It’s also one of the best times of the year to join Stampin’ Up! There is a fabulous joining option during this year's Sale-A-Bration promotion: as usual, you can become a demonstrator for just £99 and choose £130 of FREE products for your Starter Kit. In addition to an extra £31 worth of product in your starter kit, you can select an additional one of 12 bundles FOR FREE. Here are the bundles that you are able to choose from:

There couldn’t be a better time to join the Stampin’ Up! family. Plus, the whole kit ships for free! There is plenty of choice and flexibility, whether you want to be a hobby demonstrator and just use your discount to enable you to purchase craft supplies more cheaply, or alternatively would like to build a flourishing direct sales business and sell supplies to others - it's entirely up to you. 

Hosting is also even more rewarding during Sale-A-Bration. When you host a party and reach a certain amount in sales (see the Stampin’ Rewards chart in the Sale-A-Bration brochure for more information), you can earn a free stamp set - this time the 'In Your Words' stamp set shown above. Even if your order reaches the qualifying amount on your own outside of a party, you can earn the same free stamp set too, both in person and when shopping in my online store. What's more, you can even apply your Stampin' Rewards to a Starter Kit and become a demonstrator yourself - I would love to welcome you to my team!

If you would like to host a virtual party, please do get in touch. Equally if you've ever thought about becoming an SU! demonstrator, now is a great time to do so - I would love to have a no-obligation chat with you about joining my team and the benefits.

If you would like more information on any of the above, please don't hesitate to get in touch! 

Thanks so much for popping by - it's always nice to share good news! Back soon with lots of projects showcasing products from the new catalogue and today's clean and simple post for our new challenge over at CAS Colours & Sketches. Until then, happy shopping!

Heartwarming Hugs Suite - From CAS Card to Hot Chocolate Gift Carrier!

by Joanne James2. November 2020 18:30

Happy Monday everyone! My week has started at full speed as usual but I'm here today with two projects that are both quite different that feature projects from the Heartwarming Hugs Suite. First up is a clean and simple card using the colours over at Just Add Ink this week (thank you ladies for selecting my candle card as a winner for the 'Just Add Two' challenge last week!) and this week's sketch layout over at CAS Colours and Sketches where they have a great sketch requiring a small, repeating image of some kind:


I decided to go with the coffee cup in the Warm Hugs stamp set and paired it with a sentiment from the same set that I've been wanting to use for a while - take a look:


 The sentiment is quite long so I turned my card to make use of a wider card front, and having stamped my mugs in alternating colours, I added a sentiment across the central row that I heat-embossed in silver on vellum so that it didn't totally obscure the mugs. I also added small rhinestones to the top and bottom row of mugs for a little added silver sparkle:


Finally some stamping to decorate the envelope and inside my card to finish:


Here is the visual summary of the key products used on this project for you to pin for easy reference:


You can see all of my 'How To' summaries on my 'How To - Tips and Techniques' Pinterest board in case you've missed any.

The 'Warm Hugs' stamp set is part of the Heartwarming Hugs Suite which includes lots of fun items and packaging ideas, including mini coffee cups and carriers. I made a few hot chocolate sets to share with some of my lovely customers as gifts recently using the items in the suite and decorated the cups and carriers with some of the papers in the Heartwarming Hugs designer paper pack, with a hot chocolate-filled cup and a bag of marshmallows to go with them and this seemed like a good opportunity to share a project that shows how easy it is to create a heartfelt yet relatively inexpensive gift to share with someone. Here's a close up of my completed carrier:


And here's a photo showing the detail on my decorated hot-chocolate themed cup:


I love the traditional colours that feature in this suite - isn't the dressed mug just adorable?! The textured coffee collar and sentiment added to the cup adds a nice personal touch I think. I'm linking this project up over at Color Throwdown where they are featuring the exact palette of kraft, reds and greens that feature on my decorated cup and gingham carrier.

 Here is the visual summary of the key products used on this project for you to pin for easy reference:


You can see all of my 'How To' summaries on my 'How To - Tips and Techniques' Pinterest board in case you've missed any.

Everyone that I've given one of these to so far has loved them - I'm thinking of making them for my UPS delivery driver and postman too, for them to take home for a warming drink after their rounds! Who would you give one to?

Enjoy your evening and I'll be back tomorrow with another project and news of two fabulous new launches: the new Paper Pumpkin kit and the Curvy Celebrations bundle! Until then, happy stampin'!


Stampin' Up! Supplies Used:

Table built using Product Table Builder by The Crafty Owl - Independent Stampin' Up! Demonstrator.


Gift Wrapped Meets Trimming The Town Sneak Peek

by Joanne James26. July 2020 15:00

There are lots of Christmas In July challenges about at the moment so I thought I would combine a couple and squeeze in an extra post today and share a couple of sneak peeks from the upcoming Autumn-Winter Catalogue with you in the process:


The team over at The Spot are looking for any kind of Christmas card creation and The Card Concept has a great inspiration photo that lead me to take my inspiration from one of the presents under the tree (front row, second from the right) to create a card and a matching gift card holder using some fun new products - take a look:


Here's the low-down on today's card firstly:

Trimming The Town - The designer series paper that covers the front of my card is from a new pack called 'Trimming The Town' - a pack full of contemporary designs featuring cosy villages and winter scenes. Some are really large and some really small and detailed, like the fun design I used to mimic wrapping paper on my gift parcel card.

Gift Wrapped Bow (And A Trick) - My bow comes from a new stamp set called 'Gift Wrapped' and is stamped in Real Red on Whisper White cardstock and punched out with the new co-ordinating Gift Bow Builder Punch. I added a handcut tag and some 'ribbon' too - and therein lies the trick! I actually used a current DSP for the ribbon strips that co-ordinate with my bow; can you tell which one? It's actually the reverse of one of the patterns in the Playful Pets DSP pack - isn't that a great shortcut? I added a little more stamping on the inside of my card too:


Gift Card Holder - I thought my gift-inspired card would be great to go with a co-ordinating gift-card holder too - I always need a few of these at Christmas time:

I can't take the credit for the design; it's based on one designed by the talented Erica Cerwin of Pink Buckaroo Designs (you can see the measurements for her original project on her blog here). It's a great little make, where the lid pulls out of a sleeve and you can add a message and your chosen gift card:

I think these make a cute pair of projects and are a great start to my Christmas crafting. I'm slowly but surely increasing my Christmas crafting - it always seems harder to do when the sun is shining outside though!

Here is the visual summary of the key products used on today's project for you to pin for easy reference:


You can see all of my 'How To' summaries on my 'How To - Tips and Techniques' Pinterest board in case you've missed any. 

Enjoy your day and I'll be back tomorrow with another project. Until then, happy stampin'!


Stampin' Up! Supplies Used:

To be updated 4th August.

Mini Catalogue

BROWSE THE CATALOGUE

The mini catalogue is now live! Read and download your copy here.

Shop Online

Access my online shop 24 x 7, 365 days of the year:

Current March hostess code:

S9F2XJJW

Shop Online

Join My Team

It's always a great time to join Stampin’ Up! New team members can get £130 worth of products for only £99 + free business supplies + free shipping + all the fun being a part of Stampin’ Up! Stampin' Up! has something for everyone: join my growing team and benefit from my support to enjoy Stampin' Up! however you choose.

If you're interested, call me for a chat to understand how I can help you realise your goals. Alternatively, if you have already decided to sign up and you just can't wait, please click here for the link to the online form where you can sign up and order your starter kit right away! 

Latest Kit!

Stampin Cut and Emboss

The Rock Legend Kit has all you need to make 8 cards with coordinating envelopes. Along with the new Panda Friends Kit, both are available from January 4th for just £14 each - get yours here!

2023-24 Annual Catalogue

BROWSE THE CATALOGUE

Click on the catalogue for a full list of current SU! supplies - if you would like to order any of the items featured, please drop me a line at [email protected] or give me a call on 07773 421446 - I'd be happy to help.

New Online Exclusives

There will be new products available exclusively in the online store from 5 March - check them out here.

About Me

Hi I'm Joanne and live in Northampton and when I'm not looking after my husband and two beautiful children, am an avid crafter with a passion for all things Stampin' Up!

I must confess that I have never been a big rubber stamper - until I discovered Stampin' Up! that is. I love the fact that I can get such great results with co-ordinating stamps, inks, papers and punches - the possibilities are endless! Join me on my stamping journey as I share the things I love and be inspired to create amazing things yourself!

Follow Me

Monthly Newsletter

Box Builder

Click the button above to use Box Buster to create your custom box design using the Envelope Punch Board!

Kits Collection Now Available!

Stampin Cut and Emboss

The new Kits Collection from Stampin' Up! is now available!

Click here to see the current kits available and order yours online today.

I Design For


Stampin' Up Stuff

This is my personal blog and is not endorsed by Stampin’ Up! I hope you find it a plentiful source of ideas and personal inspiration but please don't copy my designs for contest submission or use for classes, publication or sale without express permission.