by Joanne James4. March 2015 20:05Finally time for today's creative post! I was fortunate enough to be selected as the 'Top Pick' over at the As You See It Challenge last week - thank you ladies! - for this card here. Today I'm entering a card for this week's challenge which is another sketch-based one - you know how I love a good sketch:

I was keen to interpret the ring in the sketch as a wreath in some way and since I had some leftover burlap on my desk from another project that I am currently working on, I knew which direction I wanted to go. My thoughts are definitely on Spring this week - here is my interpretation of the sketch:
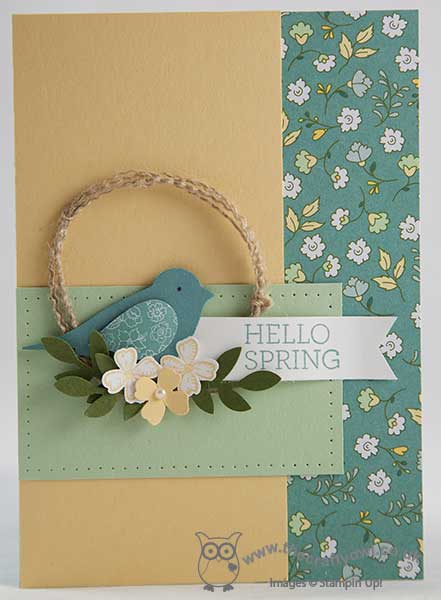
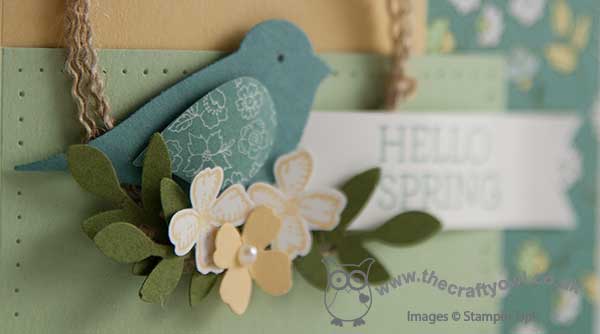
I started with a base of Lost Lagoon then added a piece of All Abloom DSP down the side. I overlapped this with a piece of So Saffron and added a Pistachio Pudding panel across the horizontal, that I pierced around the edge to add interest. To create my spring wreath, I used a few strands of burlap that I stripped from a length and tied it together at three points around the edge to hold everything together. To decorate, I added a few springs of leaves in Mossy Meadow punched from my bird punch, then punched my bird itself in Lost Lagoon. I added an eye with a Basic Grey marker and I punched his wing out of a snippet of All Abloom paper in a different stack design. I added a sentiment banner that I stamped using the Crazy About You' stamp set and to finish a trio of flowers, one in So Saffron with a pearl centre, and two that I stamped in So Saffron on Whisper White with the flower stamp from the 'Something to Say' stamp set and punched out with the co-ordinating Itty Bitty Accents punch.
I love the look and feel of this card - it's so fresh and says that Spring is on the way. I haven't used my bird punch in ages but this little fella looks quite at home sat on his burlap wreath. This would also make a nice Easter or Birthday card, with a change of sentiment.
Back tomorrow with another double-post day and some exciting news too! Until then, happy stampin'!
Stampin' Up! Supplies Used:
d85e6154-0322-4e9a-80ce-64ebefb6d975|1|5.0|96d5b379-7e1d-4dac-a6ba-1e50db561b04
Tags: 2-step bird punch, All Abloom, Itty Bitty Accents Punch Pack, Crazy About You, Shop online, Something To Say, Stampin' Up, Stampin' Up Card, Stampin' Up Card ideas, Stampin' Up Supplies, Paper Piercing
Cards | Punch Art | Stamping
by Joanne James4. March 2015 08:57It's Wednesday so that means a new collection of Wednesday Weekly Deals! This week's deals are included below - they will be available for one week only, before a new collection of deals is announced.
As always, if you want to take advantage of any of the deals on offer, you can support my business by placing your order online by clicking here or using the link to my store on the right hand side of my blog page where it says 'Shop Online' or with me in person. Don't forget to add the Hostess Code for March (you can find this under the 'Shop Online' section on the right) and be sure to make sure that you don't check the 'no contact' box if you'd like to be kept updated with the progress of you order and receive a little thank you in the post from me.
Here's a summary of this week's one-week only Wednesday deals - click on each item to go to the online store to purchase:
This week we have a gift box kit - perfect for packaging small gifts in a hurry - and the Label Love stamp set and co-ordinating punch, a great opportunity to pick up this bundle for a bargain price. In addition, gold vellum, baker's twine and Epic Day washi tape, fringe scissors - perfect for grass on all those spring projects! - and the 'Lucky You' MDS download, which will make light work of decorations for any St Patrick's Day celebrations you might be planning.
Lots to choose from this week; I'll be back later with today's creative project, but until then happy shopping!
2621bb79-dc71-4369-ac51-f4f2581e50ee|0|.0|96d5b379-7e1d-4dac-a6ba-1e50db561b04
Tags: Artisan Label Punch, Label Love, Fringe Scissors, Washi Tape, Wednesday Weekly Deals, Promotions, Shop online, Stampin' Up, Stampin' Up Card, Stampin' Up Card ideas, Stampin' Up Supplies
Promotions | Shop Online
by Joanne James3. March 2015 15:00Today I have something a little different for you! The current challenge over at SUO Challenges is 'Cards For Teens', sometimes a tricky group to create for. Most of the children's cards I create are for the under-10s so I wouldn't consider my self experienced in this field at all although having purchased an e-cutter recently and looking through My Digital Studio for inspiration, I discovered a stamp that is perfect for a birthday card for male teens that ultimately led me to make a few cards. Here's the first one:
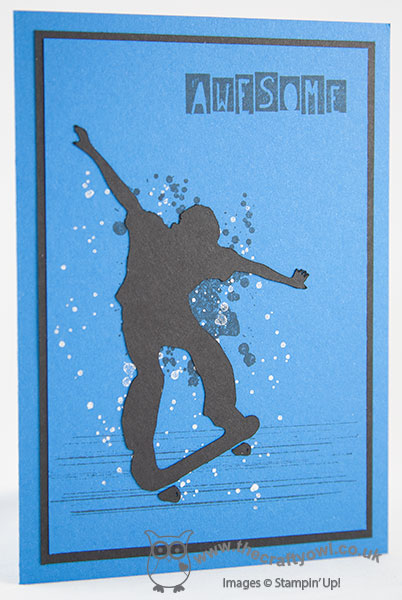
Using Pacific Point as my base colour, I used the 'Extreme Skateboard' stamp image and converted it to a cut file which I then cut out of Basic Black cardstock using my e-cutter. Before adhering to my cardbase, I added some spatter and stripes in Memento Black ink and Encore Silver Metallic to create a grungy background. I also added a retired 'Awesome' stamp from the 'Cool Kid' set to this card.
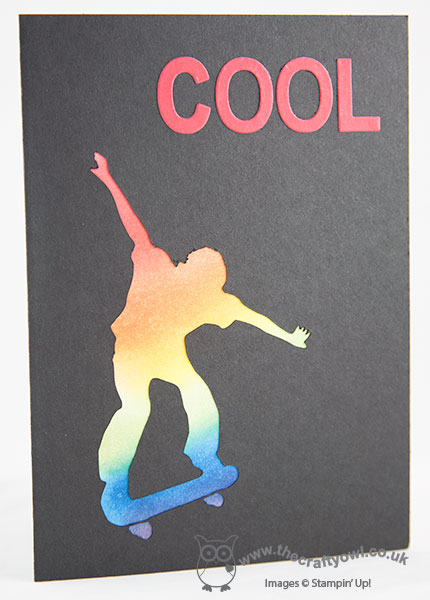
For my second card, I used the negative space of the skateboarder to create a black card with a graduated rainbow sponged skateboarder behind and added some letters cut with my Little Letters thinlits to spell 'Cool' - something all teens think applies to them I think:
Finally, I used the cut skateboarder and adhered him to a sponged rainbow starburst background - I also stamped some black stars on top of this to add to the effect:
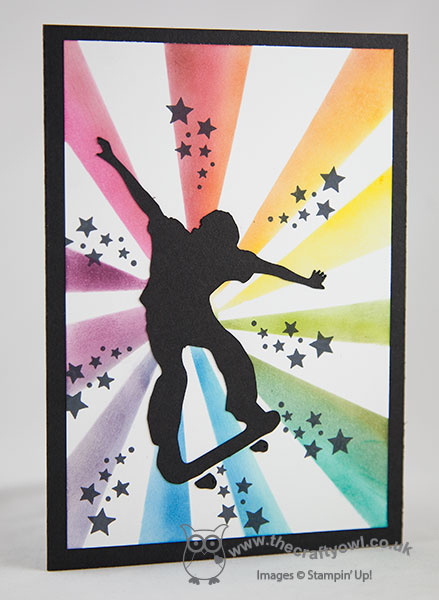
I love all of these cards, bit I think the bottom one is my favourite. It has an almost psychodelic feel. This is one of the projects that I submitted for the Convention Design Challenge in Brussels last November, although haven't shared until now. I gave the first card to my skateboard-mad 13 year old neighbour for his birthday and he pronounced it 'sick' - as I looked puzzled and slightly disappointed, he rushed to explain this was a good thing - apparently in teen-speak this is high praise! Clearly, what do I know!!!
If you struggle with teenage cards too, do check out the DT samples and the SUO gallery, where there's lots of teen inspiration.
Back tomorrow with a new set of Wednesday Weekly Deals and another project. Until then, happy stampin!
Stampin' Up! Supplies Used:
1b3c52a5-d688-4d75-a60a-c808e9f202c4|0|.0|96d5b379-7e1d-4dac-a6ba-1e50db561b04
Tags: MDS, masculine cards, My Digital Studio, Shop online, Stampin' Up, Stampin' Up Card, Stampin' Up Card ideas, Stampin' Up Supplies, Extreme Skateboard, Gorgeous Grunge, Cool Kid
Cards | E-Cutter | My Digital Studio
by Joanne James2. March 2015 08:50Happy Monday everyone! I am here to start the week with a clean and simple card that I made with a few challenges in mind:
I love the pinks in the Color Throwdown palette this week and having seen many of my blog friends create the cutest 'mini' cards for CASology this week, I just couldn't resist having a go at my own. It is also my card for the 'Less is More' challenge this week, where the theme is 'This makes me happy'. Take a look at my card and I'll explain why:
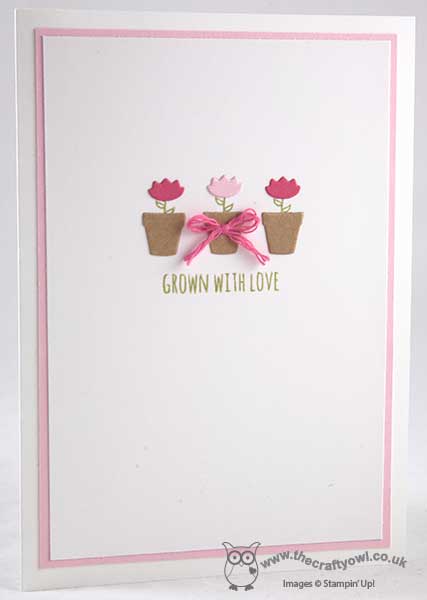
Aren't that trio of mini flowerpots just the cutest? I used the 'Handpicked From the Garden' framelits that I used on yesterday's card and cut a trio of flowerpots out of kraft cardstock, along with a trio of flower heads, two in Strawberry Slush and one in Pink Pirouette. Before adhering these to the card, I partially inked the vine leaves in Pear Pizzazz and stamped these onto my white base first to give my flowers stems and leaves, before adhering the diecuts over the top. I finished with a simple stamped sentiment of 'Grown With Love' also stamped in Pear Pizzazz and a little bow on my central pot, made from some separated strands of Strawberry Slush thick baker's twine. Here's a little close up of the detail:
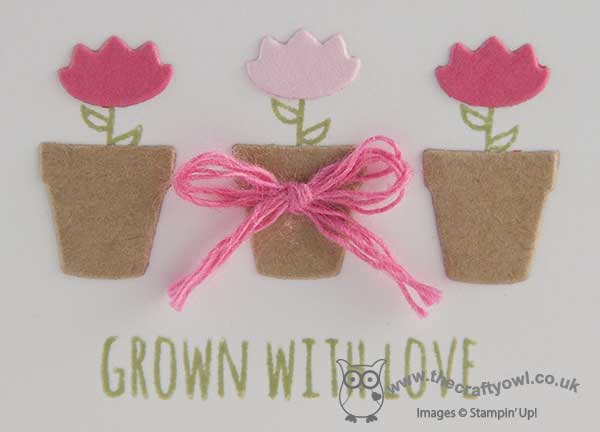
I'm not usually one to go for these teeny-tiny diecuts and I bought this set primarily for the plant tag framelits, which as a keen gardener I knew I would get lots of use for, but I'm loving these little diecuts - the set also includes a tiny trowel and a bow, perfect for adding finishing touches to gardening projects. With spring on the way, I am looking forward to be getting out into the garden more. My husband and children are keen vegetable gardeners and don't have much time for flowers, but I love nothing more than pottering around, planting tubs and hanging baskets to decorate the patio through the summer months. These little flowerpots remind me of this and it makes me happy to know that spring is on the way!
I would love to know what makes you happy - please feel free to leave me a comment below to share your thoughts and do pop on over to the LIM gallery to see what's putting everyone else in a good mood this week. Back tomorrow with another project; until then, happy stampin'!
Stampin' Up! Supplies Used:
by Joanne James1. March 2015 11:00This is my second post for today - scroll down or click here for my earlier creative post featuring today's card for our new challenge over at The Paper Players. I just wanted to share the exciting news that in addition to the 6 stamp sets, two paper packs, accessory pack and Project Life cards, oh and the Blendabilites range, from today Stampin' Up! are offering four additional products that you can earn for free with each £45 spend during the month of March only. There will be a link to the leaflet in the side bar on the right for the rest of the month - you can also click here or on the image below for the details of each of the products in all their glory:
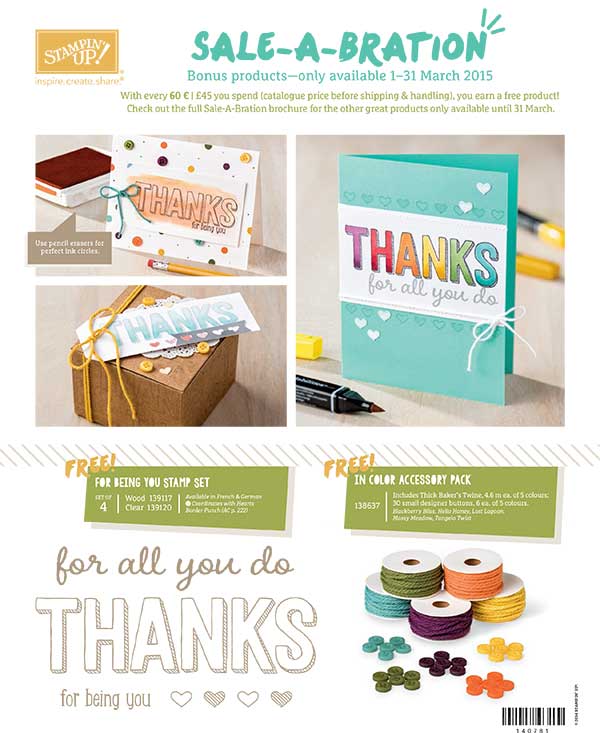
Two great stamps sets to colour, some beautiful printed vellum and an in-colour accessory pack. A great way to make the most of the last month of this year's Sale-A-Bration promotion.
Don't forget if you're ordering online to include the hostess code for March - 4AHTZQVW - and to ensure that your contact settings on the page tab headed up 'My Demonstrator' are set to 'YES', so that I can keep you informed on the progress of your order and send you a little thank you in the post.
That's all from me today; back tomorrow with another card for spring. Until then, happy shopping!
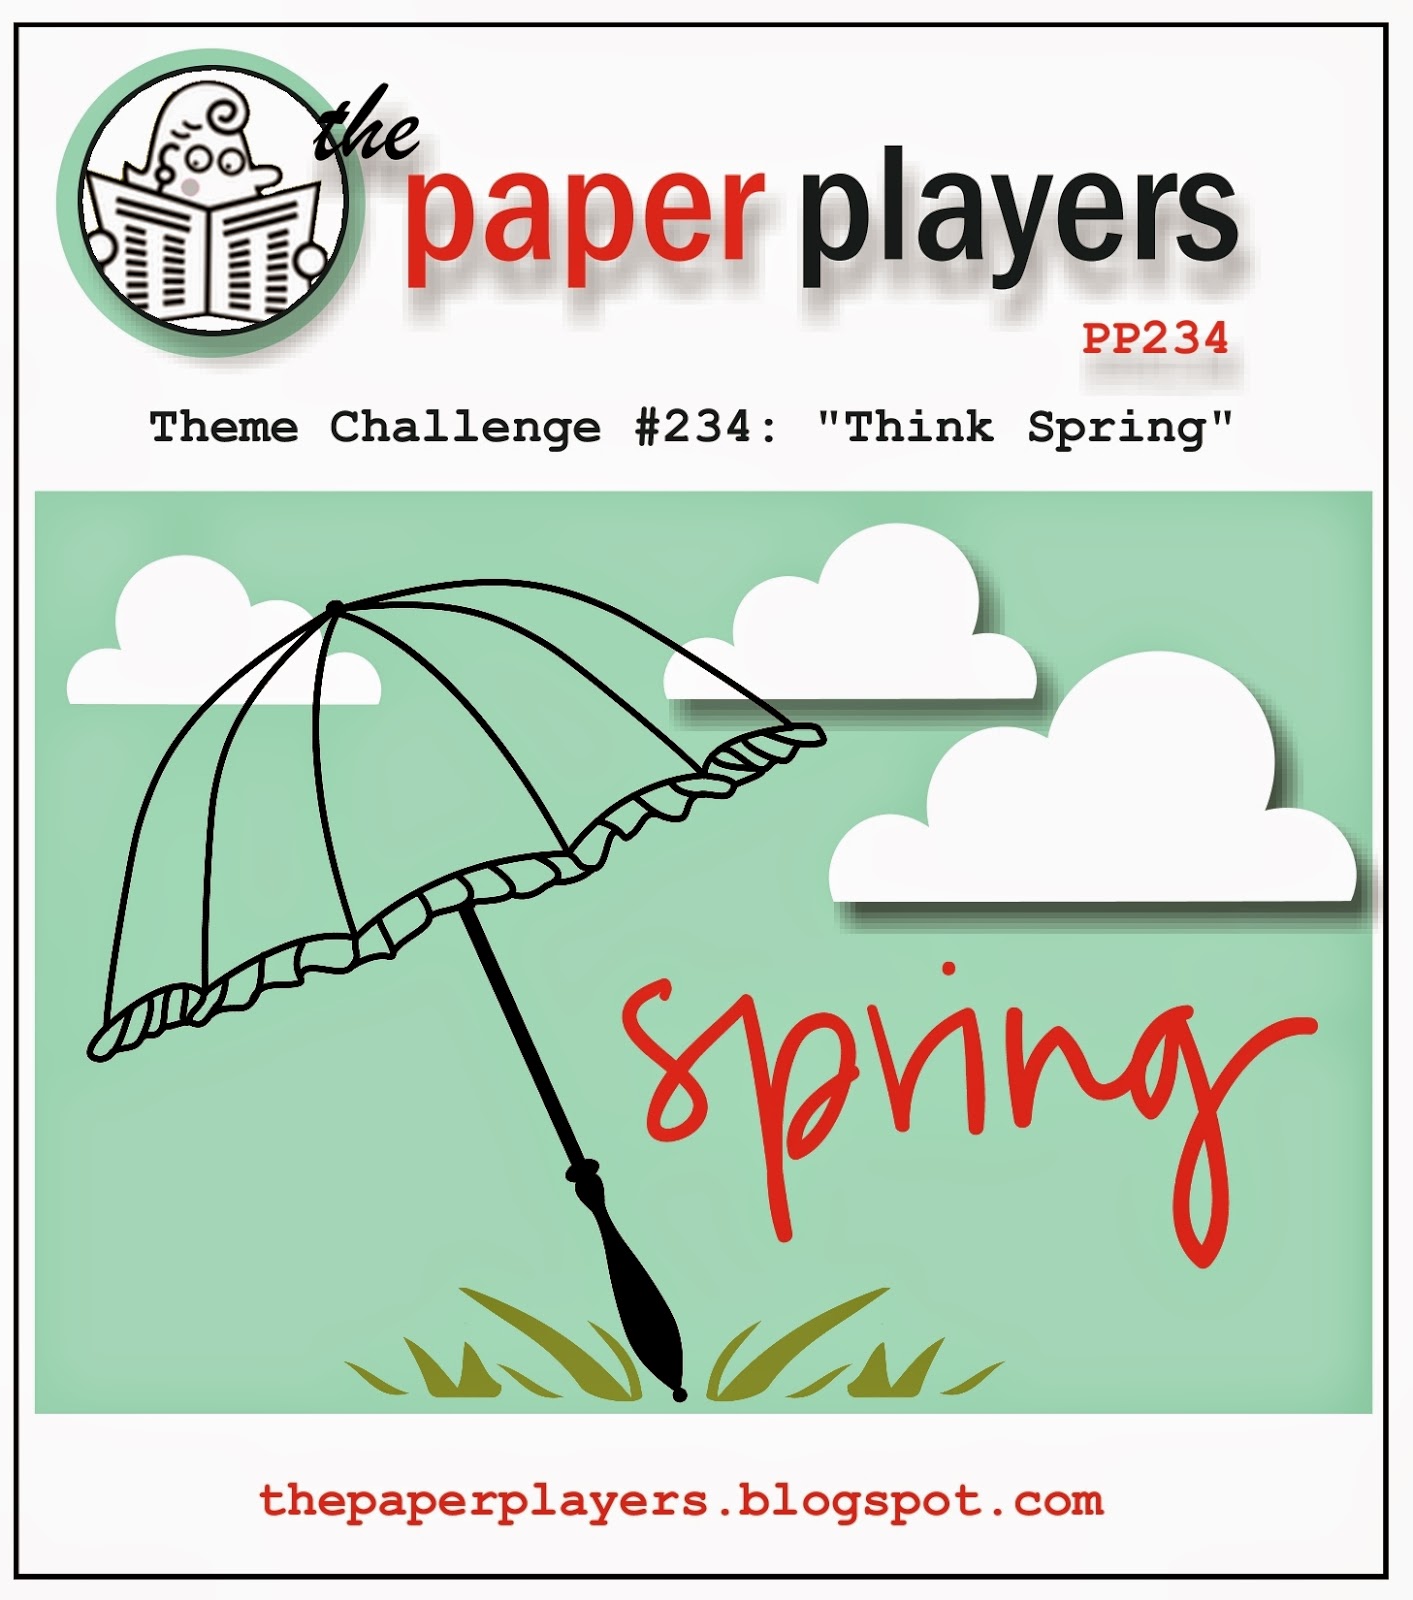
by Joanne James1. March 2015 10:00It's Sunday and you know what that means - a new challenge over at The Paper Players. This week the lovely Laurie has a fun theme to help us shake off our Winter blues:
When I 'think Spring' I immediately think of spring pastels and flowers in bloom, so the obvious choice for my card today was one of my favourite pieces of DSP from the All Abloom DSP stack:
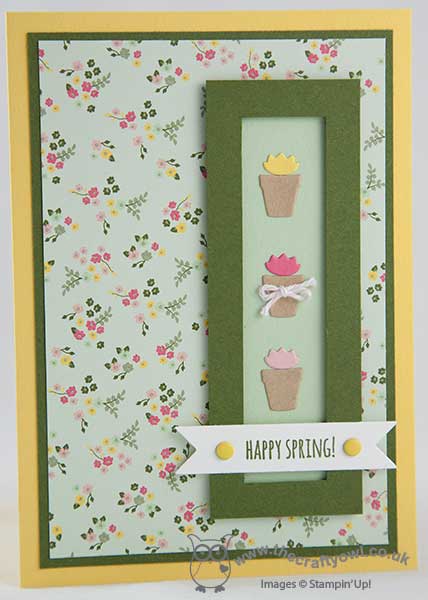
I love the pretty little flowers on this particular paper and wanted to showcase as much of the paper as possible. I decided it would make a great background layer for a shaker-style open window featuring some cute little die cut flowerpots that I cut from kraft and co-ordinating coloured cardstock using my Handpicked Framelit Dies. I finished one of the flowerpots with a tiny Blushing Bride baker's twine bow and used one of the Bitty Banner framelits to cut out the sentiment stamped from the 'From The Garden' stamp set and accented this with a couple of Daffodil Delight candy dots.
Before you reach for your ink pads, do visit the other design team members to see what interesting ideas they've had this week:
The Paper Players Design Team
Here's a quick recap of our challenge rules:
1. Create a new paper project
2. Upload your creation to your blog with a link back to us and provide a direct link to the post featuring your challenge submission.
3. Please link your card to no more than three challenges, TOTAL.
4. Have FUN!
I look forward to seeing your visions of Springtime in our gallery this week.
Back tomorrow with another project; until then, happy stampin'!
Stampin' Up! Supplies Used:
by Joanne James28. February 2015 22:26Good evening blog readers! A busy couple of days so a later blog post today. Just time to share with you another card using the Butterfly Thinlits, this time including the largest of the trio:
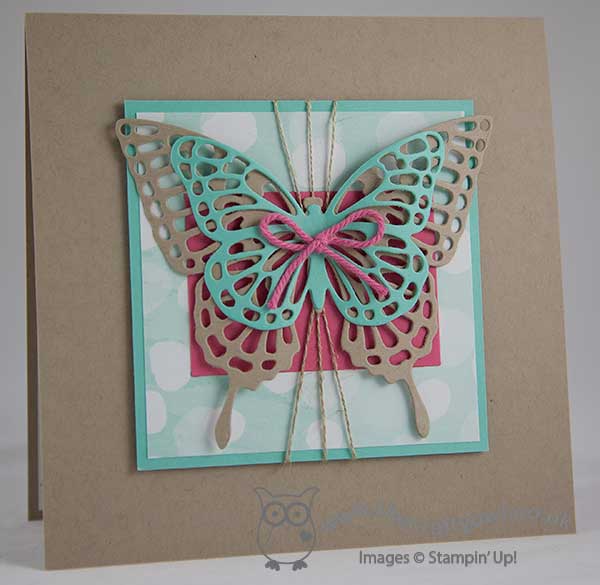
This is a larger than usual card at 6" x 6", as I wanted to allow enough cardstock to frame this rather large butterfly and set if off to true effect. The base of my card is Crumb Cake cardstock, onto which I added a raised mat panel consisting of a piece of the current Sale-A-Bration 'Best Year Ever' Designer Series Paper onto a piece of Coastal Cabana cardstock. I love this bokeh-inspired patterned paper - it saves the time of creating your own and makes for a lovely background effect. |Even better still, it can be yours free with an order of £45! I then added a piece of Strawberry Slush cardstock, and wrapped some linen thread around the panel before adhering to my card. I then added my layered butterfly - the largest butterfly cut from Crumb Cake and the smallest butterfly cut from Coastal Cabana - and finished with a bow of Strawberry Slush thick baker's twine. A no-stamping card, that really shows these delicate butterflies off to great effect.
I'm linking today's card with the sketch challenge over at Fab Friday (I turned the sketch through 90 degrees and used my linen thread in place of the flagged banner in the sketch).
Back tomorrow with my card for this week's new challenge over at The Paper Players and news of some new Sale-A-Bration goodies that you can earn during the month of March. Until then, happy stampin'!
Stampin' Up! Supplies Used:
7d0c4645-663d-45e6-9247-f22b986a2f7a|0|.0|96d5b379-7e1d-4dac-a6ba-1e50db561b04
Tags: Best year Ever, Butterfly Thinlits Dies, Big Shot, Sale-A-Bration 2015, Promotions, Shop online, Stampin' Up, Stampin' Up Card, Stampin' Up Card ideas, Stampin' Up Supplies, Bokeh
Cards | Punch Art
by Joanne James26. February 2015 20:35Thank you for all the lovely comments I've received on my 'Guy Greetings' cards these past couple of days - I'm so glad you are enjoying them. I have more of these to share, some of which I made with my lovely stamp-a-stack ladies at our class earlier today, but instead I'm having a break to share one of the cards I designed for my recent technique class featuring the Butterfly Basics stamp set and co-ordinating framelits:
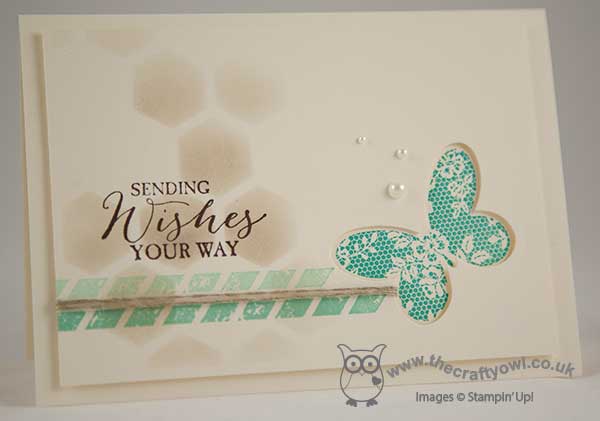
I stamped the lacy butterfly onto my Very Vanilla base in Bermuda Bay ink, then used the co-ordinating framelit to cut the shape out of the top mat layer. I then added some Crumb Cake, sponged through a stencil made with my Hexagon Hive thinlit, the border stamp, a simple sentiment and some linen thread and a scattering of pearls as a final simple embellishment. I love the versatility of thinlits and how they can be used in so many ways; using the negative space gives a different look to simply using the thinlit to cut out the butterfly and attach on top.
I'm linking today's card up with this week's challenge over at Less Is More where the theme is 'wings', which suits my butterfly perfectly.
Back tomorrow with another project; until then, happy stampin'!
Stampin' Up! Supplies Used:
by Joanne James25. February 2015 09:00I have another monochromatic masculine card for you today - I still had the papers and stamp set out on my desk from yesterday's card and couldn't resist creating another sample using this week's sketch over at As You See It:
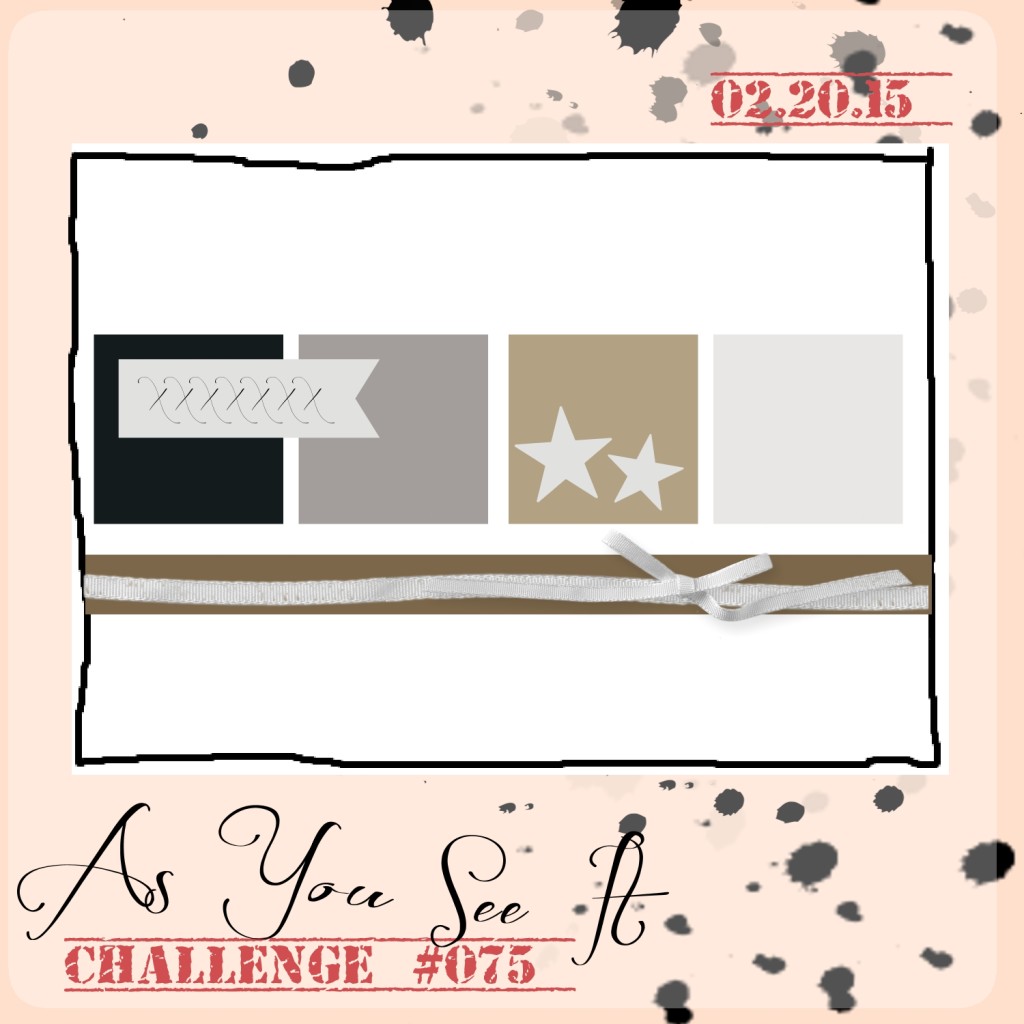
This is a great sketch for combining patterns or images and I had a few ideas as to how I was going to use it so don't be surprised if you see me use it again. For today though, it's all about the shoes - take a look at my card and you'll see what I mean:
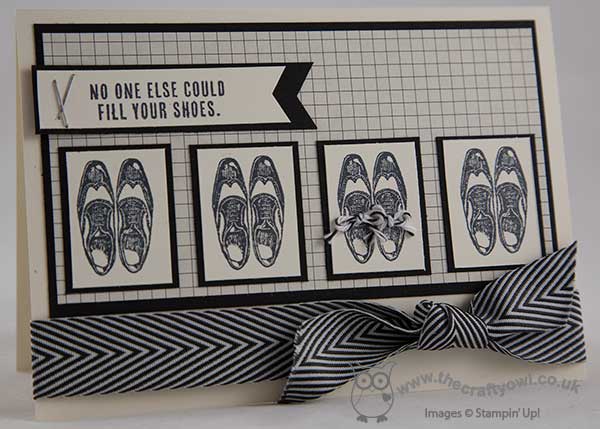
I used Very Vanilla as my base and this time a piece of checked Typeset paper on black for my panels, then I narrowed the four square elements of the sketch so that I could fit in four pairs of shoes - you can never have too many pairs of shoes, right?! A stapled banner sentiment, some wide chevron ribbon and some funky shoe laces to highlight one of the pairs of shoes and done!
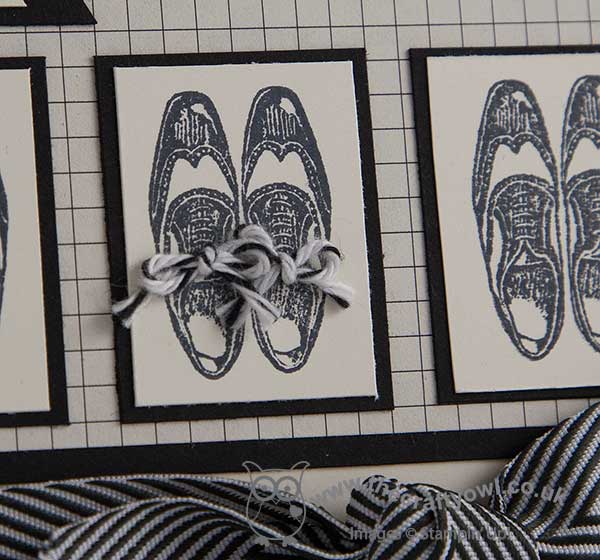
Making this card reminded me of the Robert Redford/Michelle Pfeiffer movie "Up Close & Personal" - such a great movie, but the scene where she sees his shoes with the red laces at the end ... if you haven't seen it, I won't spoil it for you, but if you're an old-fashioned romantic I can highly recommend it - just don't forget the tissues!
Back tomorrow with another project; until then, happy stampin'!
Stampin' Up! Supplies Used:
by Joanne James25. February 2015 08:18It's Wednesday so that means a new collection of Wednesday Weekly Deals! This week's deals are included below - they will be available for one week only, before a new collection of deals is announced.
As always, if you want to take advantage of any of the deals on offer, you can support my business by placing your order online by clicking here or using the link to my store on the right hand side of my blog page where it says 'Shop Online' or with me in person. Don't forget to add the Hostess Code for February (you can find this under the 'Shop Online' section on the right) and be sure to make sure that you don't check the 'no contact' box if you'd like to be kept updated with the progress of you order and receive a little thank you in the post from me.
Here's a summary of this week's one-week only Wednesday deals - click on each item to go to the online store to purchase:
This is the week to stock up on ribbon and twine, with 5 different offerings to tempt you. There are also sequins for a little sparkle, and a banner refill kit and themed MDS download if you are thinking about your Easter home decor.
Back shortly with today's creative post; until then, happy shopping!