Zany Zebras Meets Playing With Patterns Birthday Cards For Boys PP539

by Joanne James2. May 2021 09:00

Today it's Sunday and time for this week's new challenge over at The Paper Players! It's my turn to host this week and I have a fun theme challenge for you to work with:


Are you familiar with the nursery rhyme: 'What are little boys made of?' It inspired my theme this week and the fabulous badge that our teamie Nance made illustrates it perfectly. So whether you choose to feature snails, puppy dogs, superheroes, or anything else that works for you, my theme this week is cards for boys. I'm making the most of the last couple of days of retiring favourites before the new annual catalogue arrives, so I chose to go with a zany zebra (or two!) for my card, using Julee's current Mojo Monday sketch layout which was great for some simple layering of retiring papers too - take a look:


Here's the low-down on today's card:

I used a mix of Playing With Patterns DSP for my layers as I think these colours have a fun masculine feel and stamped one of the zebras from the 'Zany Zebras' stamp set in Night of Navy, adding some Wink of Stella to his mane, then fussy cut it before adding to my card. A sprinkle of resin dots finished my card front:

I added another of the zebras, this time with a party hat, to decorate the inside of my card:


I love these cute zebras and think they make fun a fun birthday card for a young boy. If you're a fan too, you have until tomorrow to get your hands on a set before they are gone forever! I will have another card for boys using them later this week - they might be retiring, but I'm not ready to part with mine just yet!

Here is the visual summary of the key products used on today's project for you to pin for easy reference:


You can see all of my Product and 'How To' summaries on my 'How To - Tips and Techniques' Pinterest board in case you've missed any. 

I actually made a second card for our challenge this week that was altogether more clean and simple. It is based on last week's Freshly Made Sketches sketch and uses another of my favourite retiring sets, Silhouette Scenes:


I masked off a column and created an ombre blended strip of sky using Balmy Blue, Pacific Point and Night of Navy inks and my blending brushes, and added the little boy with a toy aeroplane and a sentiment from the same set in Night of Navy, then added a simple 'Happy Birthday' sentiment to the inside using a stamp from 'Itty Bitty Greetings'. I love the simplicity of this card, and the way that the silhouette image overlays the ombre blended panel:


Here is the visual summary of the key products used on today's project for you to pin for easy reference:


You can see all of my Product and 'How To' summaries on my 'How To - Tips and Techniques' Pinterest board in case you've missed any. 

I love this card - so full of nostalgia! I'm linking this one up over at The Spot where the challenge is ink blending and TGIF Challenges where they are looking for ombre this week.


Before you reach for your ink and papers, check out what our amazing team has created to inspire you this week:

Here's a quick recap of our challenge rules:
 
1.  Create a new paper project
2.  Upload your creation to your blog with a link back to us and provide a direct link to the post featuring your challenge submission.
3.  Please link your card to no more than four challenges, TOTAL.
4.  Have FUN!

You can see all of my 'How To' summaries on my 'How To - Tips and Techniques' Pinterest board in case you've missed any. 

Enjoy your day; we have a long weekend here in the UK this weekend so are planning on making the most of it by taking things easy, especially since Rebecca starts her final round of GCSE exam assessments this week. I'll be back tomorrow with another project. Until then, happy stampin'!


Stampin' Up! Supplies Used: 

Table built using Product Table Builder by The Crafty Owl - Independent Stampin' Up! Demonstrator.


Table built using Product Table Builder by The Crafty Owl - Independent Stampin' Up! Demonstrator.

Party Puffins Trio Birthday Card PP537

by Joanne James18. April 2021 09:00

Today it's Sunday and time for this week's new challenge over at The Paper Players! It's the turn of the fabulous Laurie to host this week and she has a fun clean and simple challenge for us to work with:


I finally received my first pre-order from the new annual catalogue on Friday so couldn't wait to have a play! I decided to take the current Fusion sketch layout and this week's colours over at Just Us Girls to test drive one of my new stamp sets - take a look:


Here's the low-down on today's card:

Party Puffins - Today's card features a trio of Party Puffins from the new stamp set of the same name. This is such a cute new set; for my card today I stamped and fussy cut two puffins and a birthday cake for the front of my card and popped them up on dimensionals. The third puffin? He was hiding out on the inside of my card:


Black and White ... - This week's theme is 'clean and simple', so a focus on white space, limited layers and little/no embellishments. With this in mind the Fusion sketch was perfect for constraining my design to no more than half of my card front. I used a strip of black-on-white geometric patterned paper from the True Love DSP pack to ground my design and tie in with the black and white of my puffins:

... And A Trio of Colour - I grounded each of my stamped elements on a stitched square in one of the JUGS challenge colours and used the same trio of Blends combos to add colour to my cake and the legs, beaks and party hat of my puffins:


Are these cheeky little chappies not the cutest?! I just love them! Not to long to go until they go on general sale; the new 2021-22 Stampin' Up! annual catalogue will be live on 4th May. I will be packaging mine this week to send out to those customers who have purchased from me in the last 6 months; if you are reading this and you're not on my mailing list and don't already have a Stampin' Up! demonstrator and would like a copy of the new catalogue, then do get in touch with your contact details and I will arrange to get one out to you too.

Here is the visual summary of the key products used on today's project for you to pin for easy reference:


You can see all of my Product and 'How To' summaries on my 'How To - Tips and Techniques' Pinterest board in case you've missed any. 

Before you reach for your ink and papers, check out what our amazing team has created to inspire you this week:

Here's a quick recap of our challenge rules:
 
1.  Create a new paper project
2.  Upload your creation to your blog with a link back to us and provide a direct link to the post featuring your challenge submission.
3.  Please link your card to no more than four challenges, TOTAL.
4.  Have FUN!

You can see all of my 'How To' summaries on my 'How To - Tips and Techniques' Pinterest board in case you've missed any. 

The weather has been much brighter here in the UK the last couple of days so I am hoping to get out on my bike today with the rest of the James family. No other fixed plans; whatever you are doing, I hope you are enjoying some nice weather and fresh air too! I'll be back tomorrow with another project. Until then, happy stampin'!


Stampin' Up! Supplies Used:

Table built using Product Table Builder by The Crafty Owl - Independent Stampin' Up! Demonstrator.

Bloom And Grow Yellow Floral Thank You CCS 414

by Joanne James6. April 2021 13:00

It's Tuesday and time for a new challenge over at CAS Colours & Sketches. Wei is hosting this month and our first challenge of the month is a colour challenge: 


For my card today I used the sketch layout over at Fusion along with our colours this week for some pretty florals and start the process of saying goodbye to one of my favourite floral sets in the annual catalogue - take a look:


Here's the low-down on today's card:

Bloom And Grow - I love the floral boughs in the 'Bloom and Grow' stamp set that a perfect for a spot of colouring and chose a simple floral that allowed for all three challenge colours to be featured then die cut with the co-ordinating Budding Blooms Dies. 

In Stitches - There are also a few stitched elements to my card today: I placed my sentiment on a Stitched Shapes circle and added a stitched scalloped border from the 'Stitched Me Mine' Dies to my white panel. Both of these die sets are also retiring at the end of the month - so if you don't have them, grab them whilst you still can.

Balancing Black - Having considered stamping my sentiment black-on-white straight onto my panel, I eventually opted for the reverse and heat embossed my sentiment on black. It provided better contrast and really compliments the Bumblebee yellow I think, whilst not encroaching overly on my 'white space':

So what do you think? I'd love you to leave me a comment below with your thoughts! Here is the visual summary of the key products used on today's project for you to pin for easy reference:


You can see all of my 'How To' summaries on my 'How To - Tips and Techniques' Pinterest board in case you've missed any. 

As a reminder, for our colour challenges, you must use all of the stated challenge colours. You may also use neutral colours; however, the challenge colours should be the most noticeable ones featured on your card. We use Stampin' Up! color names for reference, but you are welcome to use any other companies' products as long as you match the challenge colours as closely as possible.

Enjoy your day and I'll be back tomorrow with another project. Until then, happy stampin'!


Stampin' Up! Supplies Used:

Table built using Product Table Builder by The Crafty Owl - Independent Stampin' Up! Demonstrator.

Shades of Purple Ornate Borders Thank You Card CCS412

by Joanne James23. March 2021 12:00

It's Tuesday and time for a new challenge over at CAS Colours & Sketches. Can you believe it was exactly one year ago today that the UK went into lockdown; my how times have changed in the last year - thank heavens for crafting! This week's challenge is a sketch challenge and YoonYoung has asked that we create something with three vertical elements and a central sentiment as our focal point:


Feel free to flip or rotate the sketch when making your card. For my card today I decided to use a floral border die in shades of purple for my vertical elements - here's my card:


Here's the low-down on today's card:

Ornate Borders - Whilst designed for use along the edge of a card as the name suggests, I thought that the simplest of the floral borders would also work when layered into my design to create the three vertical lines of interest in the sketch. I measure them carefully so that they were placed an equal distance apart; I like the way that the flowers show through the colour beneath to add further interest to each diecut. 

Shades of Purple - Purples are a favourite of mine and were perfect for today's card, where I decided I needed three complimentary shades of one colour, to maintain something of a CAS feel; I used the soon-to-be retiring Purple Posy, Highland Heather and Gorgeous Grape. I am also playing along with a new-to-me challenge, The Flower Challenge, introduced to me by my blogging friend, the lovely Michele Ferguson of I Card Everyone who has just joined their team of designers, where they are looking for flowers in shades of purple too. Mine are diecut as opposed to stamped (I think that's still allowed!) and if you are a purple-lover too, you should check out their gallery - there are some fabulous purple stamped creations to peruse!


Inside Detail - I chose a super simple 'thanks' from the co-ordinating 'Ornate Thanks' stamp set in a stitched oval for the front of my card, in an effort to increase my proportion of 'white space' and maintain a clean and simple feel, and finished it on the inside of my card, adding a flower made up from the pieces leftover from the diecuts on the front:

So what do you think? Is purple friend or foe in your cardmaking and how will you interpret those verticals on our sketch this week? I'm looking forward to finding out!

Here is the visual summary of the key products used on today's project for you to pin for easy reference:


You can see all of my 'How To' summaries on my 'How To - Tips and Techniques' Pinterest board in case you've missed any. 

As a reminder, for our colour challenges, you must use all of the stated challenge colours. You may also use neutral colours; however, the challenge colours should be the most noticeable ones featured on your card. We use Stampin' Up! color names for reference, but you are welcome to use any other companies' products as long as you match the challenge colours as closely as possible.

Enjoy your day and I'll be back tomorrow with another project. Until then, happy stampin'!


Stampin' Up! Supplies Used:

Table built using Product Table Builder by The Crafty Owl - Independent Stampin' Up! Demonstrator.

A Forever Greenery Hello in Just Jade and Soft Sea Foam

by Joanne James22. March 2021 18:40

As promised, I had a little extra crafty time at the weekend so I have another card to share today, this time using the current Fab Friday sketch and this week's colour palette over at The Color Throwdown:


As I was pondering two shades of green with gold and white, I was drawn to a suite from the annual catalogue that I've had for some time but barely used - take a look:


Here's the low-down on today's card:

Forever Greenery - Today's card features lots of elements from the Forever Greenery Suite. The Forever Greenery paper was the starting point for today's card. These papers have some beautiful patterns featuring lush greenery and I chose one of the simpler designs, a washed Just Jade paper with a single repeating Soft Sea Foam leaf stem. 

Forever Fern - I stamped a similar piece of leaf foliage from the Forever Fern stamp set in Just Jade onto Soft Sea Foam cardstock and diecut it with the corresponding Forever Flourishing Dies. The detail on these stamps is amazing - they are another of the Distinktive range that appear almost 3-dimensional when stamped. So pretty! 

Forever Gold - I paired my stamped stem with a couple of decorative stems from the Forever Gold laser-cut paper that is also part of the suite. I used one outline and one solid leaf stem for contrast. Along with a sprinkling of gilded gems, I think they really lift the detail in this corner of the card:

A simple 'hello' sentiment and a piece of Just Jade ribbon finish my card. I love greens and must confess that having made this card I wondered to myself why I hadn't used it more. Not that you need to restrict yourself to greens with this set; my dear friend Jan Clothier in New Zealand has made many a fabulous card with the Forever Fern stamp set and many of them in colours other than green; you can check out her Thinking Stamping blog here if you'd like to see some of her Forever Fern creations. That said, I hope you've enjoyed my greens today, as I've another card featuring this suite to share with you later this week!

Here is the visual summary of the key products used on today's project for you to pin for easy reference:


You can see all of my 'How To' summaries on my 'How To - Tips and Techniques' Pinterest board in case you've missed any. 

this is me done for today; enjoy your evening and I'll be back tomorrow with another project for our new challenge over at CAS Colours and Sketches. Until then, happy stampin'!


Stampin' Up! Supplies Used:

Table built using Product Table Builder by The Crafty Owl - Independent Stampin' Up! Demonstrator.

Sweet Strawberry Thank You Card

by Joanne James22. March 2021 14:30

I've had a busy start to my week, with a run and a class featuring the beautiful 'Friends are like Seashells' bundle. Today I have a couple of blog posts, the first one using the sketch over at Hand Stamped Sentiments:


Such a great sketch! I decided to switch out the square for a circle to soften the edges and feature some yummy-looking strawberries and the Sweet Strawberry bundle - take a look:


Here's the low-down on today's card:

I cut up some of my Sale-A-Bration Berry Delightful DSP for my focal cluster of strawberries and blossoms, punching out the shapes with my Strawberry Builder Punch - I just love the easy watercoloured look of these papers, and added some tone-on-tone stamping of additional blossom and leaves from the Sweet Strawberry stamp set in Granny Apple Green onto my Soft Sea Foam base and blended in some extra Soft Sea Foam ink with my blending brush, before running through my Subtle Embossing Folder for some added light texture. I embossed my sentiment in white onto a contrasting Real Red banner, adding some twine and pearls to finish.


Here is the visual summary of the key products used on today's project for you to pin for easy reference:


You can see all of my 'How To' summaries on my 'How To - Tips and Techniques' Pinterest board in case you've missed any. 

I'm also liking today's card up over at SUO Challenges where they have the theme of 'sweet things - food and drink'. These strawberries definitely look good enough to eat, which will have to do for a few months yet until the real thing comes into season here in the UK in mid June.

Enjoy your day; I'm off on the school run but I'll be back later with another card from my crafty weekend endeavours! Until then, happy stampin'!


Stampin' Up! Supplies Used:

Table built using Product Table Builder by The Crafty Owl - Independent Stampin' Up! Demonstrator.

Springtime Joy Easter Lamb AYSI 246

by Joanne James19. March 2021 13:00

Today has not quite gone according to plan so I'm a little late sharing my design team card for our new challenge over at As you See It - and it's my choice of theme this week too! For our new challenge we have a seasonal theme challenge:


Easter! Whether you are looking forward to potentially gathering face-to-face with friends or your congregation for the first time in a while, or simply enjoying hot cross buns and the prospect of a chocolate egg or two, Easter is I am going for a less traditional take on Easter today and instead, somewhat inspired by the chocolate bunny in our challenge photo, I'm going with a cute spring lamb to decorate my Easter card today - take a look:


 Here's the low-down on today's card:

My little lamb decorated with flowers is from the new 'Springtime Joy' stamp set, a set full of cute animals along with some lovely sentiments. I actually coloured two and made a couple of cards, paired with some retired All Ablooms designer paper that is covered in spring flowers (these papers feature the retired in-colours Strawberry Slush and Pistachio Pudding - remember those?) that I thought would work perfectly with my sweet lambkins. Here's the second one, using a different paper from the same pack:


I added some extra DSP to my envelope flap and a liner too (great ways to dress up your card further and use up paper if you have lots of it going spare!) From the outside, my card could potentially be for any occasion - I added my favourite sentiment from the stamp set to the inside of my card:


Because Easter is the perfect reminder of new beginnings, I think.

Here is the visual summary of the key products used on today's project for you to pin for easy reference (details for current products only):


You can see all of my 'How To' summaries on my 'How To - Tips and Techniques' Pinterest board in case you've missed any. 

I'm also linking today's card up over at The Paper Craft Crew where they are all about cards featuring our favourite critters this week - I think my sweet lamb qualifies. We have a farm near where we live and as it's currently lambing season, Rebecca takes any and every opportunity to head over on foot or bicycle so that she can visit the newborn lambs in the field or take a peek into the lambing shed. I must confess, they are adorable! 

Here's a summary of our challenge rules:

  • Create any card, scrapbooking page, 3D project or packaging project that fits the challenge.
  • Please include the challenge graphic and link back to the challenge in your blog post. Turn off word verification so we can leave you lots of lovely comments. Make sure you link the post not the whole blog to the Linky. Use #AYSIXXX when uploading to a public gallery.
  • If you’re unsure about ‘the rules’, check the details under the Challenge Guidelines tab on the As You See It Challenge homepage.
We look forward to seeing your creations in the AYSI gallery.

Enjoy your evening and I'll be back tomorrow with another project. Until then, happy stampin'!


Stampin' Up! Supplies Used:

Table built using Product Table Builder by The Crafty Owl - Independent Stampin' Up! Demonstrator.
 

Spring Jar of Flowers Card

by Joanne James11. March 2021 14:51

Today I've another quick post to share a card using the glorious colours over at TGIF Challenges this week and the sketch at Fusion (rotated through 90 degrees):


I loved these bright colours and thought they would be perfect for a bunch of spring tulips - take a look:


Here's the low-down on today's card:

Jar Of Flowers - My card uses the spring florals from 'Jar of Flowers' - but as per the title of my blog post, without the jar! I made a bunch of flowers and tied them with some paper and twine to cover the join between the florals and stems. I coloured the blooms with my Stampin' Blends, adding in another purple alcohol marker to give me the Gorgeous Grape colour, as we don't have Blends in this colour unfortunately.  I think these colours are so lovely together:


Purple Passion - Given that the Fusion inspo photo was all about green, you may well have thought I would use this for the base of my card today. Truth is, I love purple and I think Gorgeous Grape is one of my favourites, so I made it the main colour on my card today and used it for my card base, designer paper panel and the oval that backs my flowers. Too much? I think you can never have too much purple!

The Joys of Spring - I decided to use a sentiment from the new 'Springtime Joy' stamp set which compliments my florals perfectly. This set has some lovely sentiments for this time of year - here's another on the inside:

Here is the visual summary of the key products used on today's project for you to pin for easy reference:


You can see all of my 'How To' summaries on my 'How To - Tips and Techniques' Pinterest board in case you've missed any. 

Enjoy your day and I'll be back later with this week's post for our new challenge over at TicTacToe. Until then, happy stampin'!


Stampin' Up! Supplies Used:

Table built using Product Table Builder by The Crafty Owl - Independent Stampin' Up! Demonstrator.

Flowers For Every Season - Spring Butterfly Panel Card

by Joanne James7. March 2021 09:00

Today it's Sunday and time for this week's new challenge over at The Paper Players! It's the turn of the amazing Claire to host this week and she has a seasonal theme challenge for you to work with:
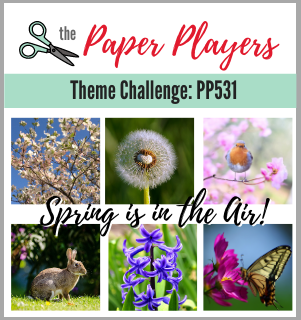
    

Whilst it has been a little chillier again here in the UK this week, there are still so many wonderful signs that spring is in the air. The daffodils are starting to open, the first lambs have been born on a neighbouring farm so today's card is full of spring colour - take a look:
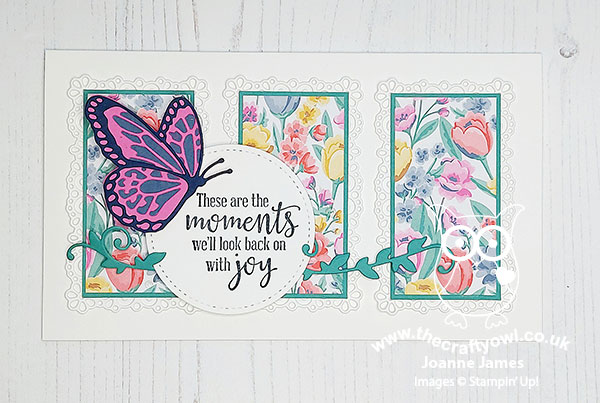
 

Here's the low-down on today's card:

Flowers For Every Season - I decided that for today's card I wanted to see an injection of spring colour, so reached for the Flowers For Every Season designer paper pack. This pack contains some very bold, bright florals and the one I chose, with its tulips amongst other flowers, is just perfect for spring. I used the three panel layout over at Paper Craft Crew so that the pattern didn't become too overwhelming, and backed each one with a thin border of Just Jade and a fancy frame diecut with the Ornate Layers Dies in Whisper White.

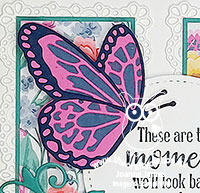
Butterfly Beauty - I chose a sentiment that I thought reflects the optimism that comes with the spring season, and embellished it with a layered butterfly cut using the Butterfly Beauty dies (I snipped this one away from the larger die):
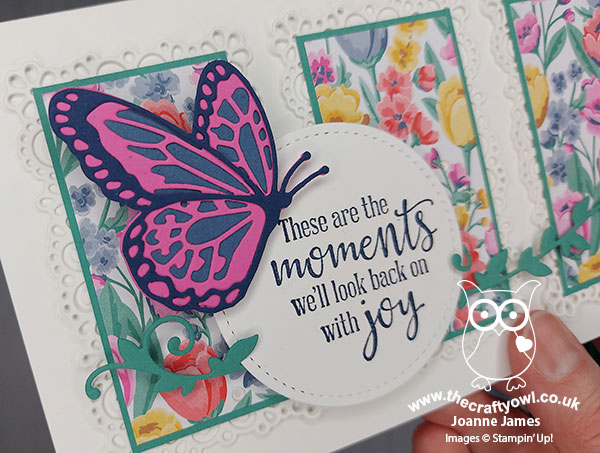
 

I also used another of the dies in the same set to create my horizontal pieces of greenery. 

Elongated Envelope - In order to comfortably accommodate my three panels, I made my card slightly longer than a standard card front (it measures 18cm instead of 14.9cm). The photo below shows the difference in sizes:
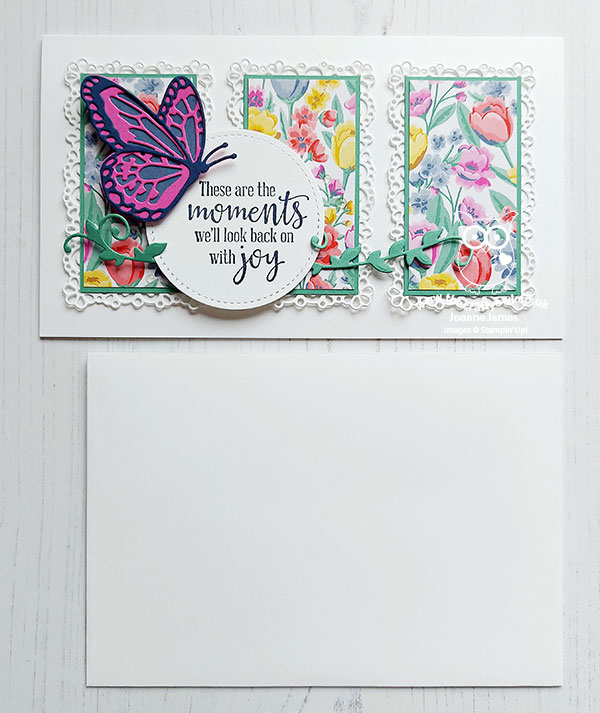
 

This meant I needed to create a custom envelope. Rather than start from scratch though, I thought I'd share with you a quick trick that you can use to convert a standard envelope to fit a larger card. All you need to do is glue the envelope closed, then slice off the end on the short side and add some some designer paper to create a new closure:
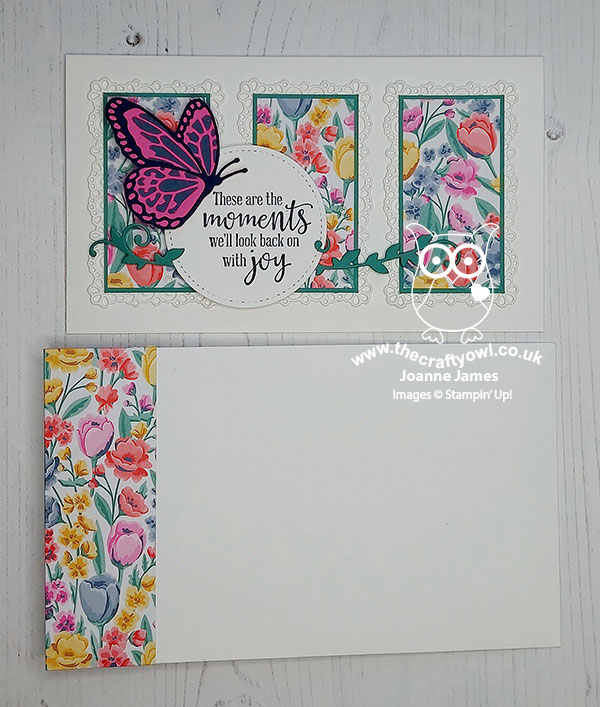
It's really straightforward: Take two strips of coordinating DSP, one measuring 4cm x 30.5cm (1 1/2" x 6") and one 4cm x 10.5cm and attach the longer one to the cut edge of the front of the envelope, with an even overhang top and bottom. Measure 18cm from the end of the envelope and score a line along your DSP, cut away the corners to create your flap then flip your envelope over to the reverse. Fold over the overhangs and glue those in place then align the shorter piece across the back of the envelope and glue to the base. Add tear and tape to the envelope flap and you're done. Here's a photo of the reverse of the envelope extension which hopefully makes some sense of my instructions above:
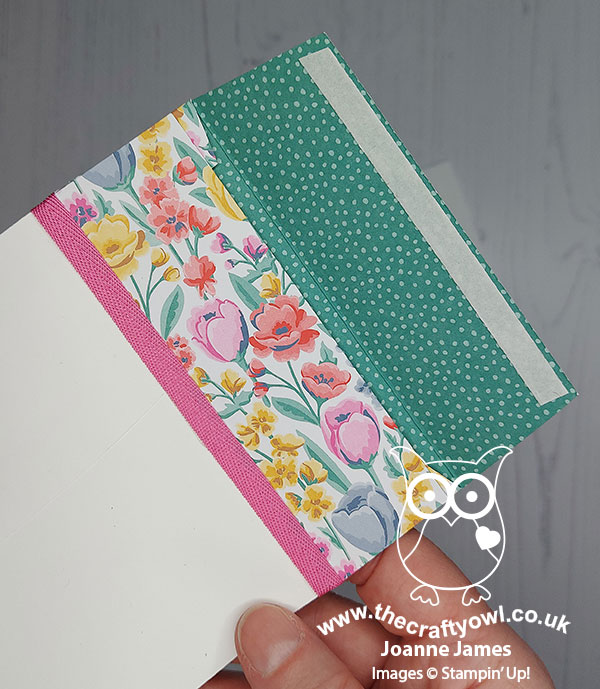
 

 I also added some Magenta Madness ribbon to cover my seam as my card will be hand delvered rather than posted - you can always leave this off if you need to be able to post your card.
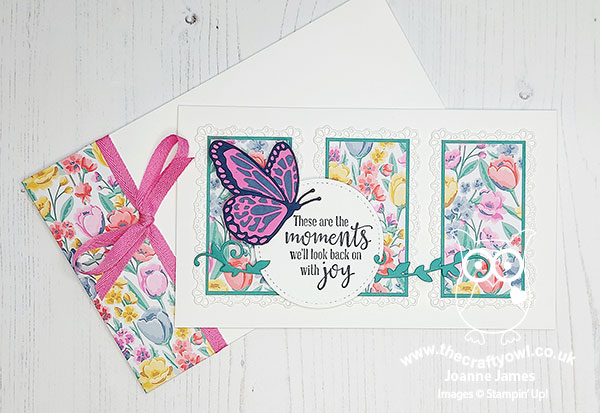
 

What do you think? I hope you found the envelope instructions useful and you like my card full of spring colour and flowers. I'm also linking up today over at SUO Challenges, where the theme is 'things that fly' - I think my butterfly qualifies on that front!

Here is the visual summary of the key products used on today's project for you to pin for easy reference:
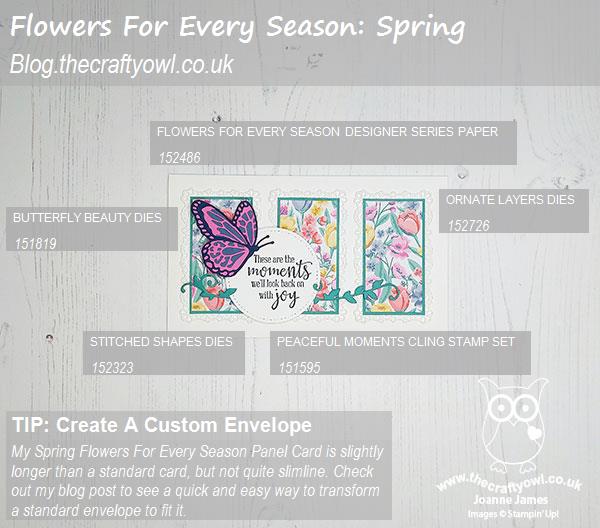
 

You can see all of my Product and 'How To' summaries on my 'How To - Tips and Techniques' Pinterest board in case you've missed any. 

Before you reach for your ink and papers, check out what our amazing team has created to inspire you this week:

Here's a quick recap of our challenge rules:
 
1.  Create a new paper project
2.  Upload your creation to your blog with a link back to us and provide a direct link to the post featuring your challenge submission.
3.  Please link your card to no more than four challenges, TOTAL.
4.  Have FUN!

You can see all of my 'How To' summaries on my 'How To - Tips and Techniques' Pinterest board in case you've missed any. 

Enjoy your day; I am hoping to spend some time in the garden today and will be making the most of my last day at home with the James Juniors before they head back to school next week on Monday and Tuesday respectively. I'll be back tomorrow with another project. Until then, happy stampin'!


Stampin' Up! Supplies Used: 

Table built using Product Table Builder by The Crafty Owl - Independent Stampin' Up! Demonstrator.

Kick Up Your Heels With Darling Donkeys CCS 407

by Joanne James16. February 2021 13:00

It's Tuesday and time for a new challenge over at CAS Colours & Sketches. Julie is hosting this month and this week we have a colour challenge: 


The colour palette gave me the perfect reason to break out 'Darling Donkeys' again, which is also perfect to link up with the challenge over at Global Design Project #GDP279 where their theme this week is 'animal' - and mine is ready to party! Take a look:


Here's the low-down on today's card:

Darling Donkeys - I couldn't resist these sweet little donkeys again for my card, today featuring the frolicking donkey on the front of my card, rather than the sweet seated one that I've used on all my previous cards, although I did add one of those to the inside:


Kick Up Your Heels - I thought this donkey would be perfect for a birthday card, and his happy demeanour reminded me of the zebras in the 'Zaony Zebras' stamp set. So I borrowed a sentiment that seemed equally appropriate for a party-going donkey as a fun-loving zebra, along with a party hat, and got my donkey ready to celebrate!

Circles, Circles - I was really pleased with how I met the 'clean and simple' brief this week - lots of white space, minimal layers and patterns and one main focal point. I did use a circle shape to tie my design together: the stitched circle background for my donkey, the circular pattern on my strips of designer paper and the polka dots on his party hat. A subtle detail but a clever way to create harmony in my CAS design:

Here is the visual summary of the key products used on today's project for you to pin for easy reference:


You can see all of my 'How To' summaries on my 'How To - Tips and Techniques' Pinterest board in case you've missed any. 

As a reminder, for our colour challenges, you must use all of the stated challenge colours. You may also use neutral colours; however, the challenge colours should be the most noticeable ones featured on your card. We use Stampin' Up! color names for reference, but you are welcome to use any other companies' products as long as you match the challenge colours as closely as possible.

The James Juniors are on half term this week so in an effot to keep them off their screens and give them a proper break from home schooling, I am being a very hands-on parent this week. So not much crafting from me, unless they are in tow! Enjoy your day and I'll be back tomorrow with another project. Until then, happy stampin'!


Stampin' Up! Supplies Used:

Table built using Product Table Builder by The Crafty Owl - Independent Stampin' Up! Demonstrator.

Mini Catalogue

BROWSE THE CATALOGUE

The mini catalogue is now live! Read and download your copy here.

Shop Online

Access my online shop 24 x 7, 365 days of the year:

Current April hostess code:

VDKNV7BH

Shop Online

Join My Team

It's always a great time to join Stampin’ Up! New team members can get £130 worth of products for only £99 + free business supplies + free shipping + all the fun being a part of Stampin’ Up! Stampin' Up! has something for everyone: join my growing team and benefit from my support to enjoy Stampin' Up! however you choose.

If you're interested, call me for a chat to understand how I can help you realise your goals. Alternatively, if you have already decided to sign up and you just can't wait, please click here for the link to the online form where you can sign up and order your starter kit right away! 

Latest Kit!

Stampin Cut and Emboss

The Rock Legend Kit has all you need to make 8 cards with coordinating envelopes. Along with the new Panda Friends Kit, both are available from January 4th for just £14 each - get yours here!

2023-24 Annual Catalogue

BROWSE THE CATALOGUE

Click on the catalogue for a full list of current SU! supplies - if you would like to order any of the items featured, please drop me a line at [email protected] or give me a call on 07773 421446 - I'd be happy to help.

New Online Exclusives

There are new products available exclusively in the online store from 5 March - check them out here.

About Me

Hi I'm Joanne and live in Northampton and when I'm not looking after my husband and two beautiful children, am an avid crafter with a passion for all things Stampin' Up!

I must confess that I have never been a big rubber stamper - until I discovered Stampin' Up! that is. I love the fact that I can get such great results with co-ordinating stamps, inks, papers and punches - the possibilities are endless! Join me on my stamping journey as I share the things I love and be inspired to create amazing things yourself!

Follow Me

Monthly Newsletter

Box Builder

Click the button above to use Box Buster to create your custom box design using the Envelope Punch Board!

Kits Collection Now Available!

Stampin Cut and Emboss

The new Kits Collection from Stampin' Up! is now available!

Click here to see the current kits available and order yours online today.

I Design For


Stampin' Up Stuff

This is my personal blog and is not endorsed by Stampin’ Up! I hope you find it a plentiful source of ideas and personal inspiration but please don't copy my designs for contest submission or use for classes, publication or sale without express permission.