Forever and Always With Oh So Ombre

by Joanne James30. January 2021 20:40

I hope you are all enjoying your weekend so far! I'm popping by with a quick post with my card for this week's Freshly Made Sketches challenge:

Jen B's sketch was perfect for me to dig out my Forever & Always bundle again and try out an idea that I had using the free Sale-A-Bration Oh So Ombre paper - take a look:


Here's the low-down on today's card:

I had seen this card by Mary Deatherage on Pinterest and wanted to explore the idea of diecutting the centre from a piece of Oh So Ombre DSP and flipping it and this sketch provided the perfect opportunity. I decided to use the Forever & Always bundle for my design; the key to getting a good result is to use the Stamparatus, as you need to have both flowers in an exactly opposing position and then the die needs to be placed absolutely centrally, before cutting. You then flip the central panel and add the sentiment.

I stamped a couple of flowers, then masked them to add in some leaves. I cut out my central panel using my scalloped stitched rectangle Stitched So Sweetly Dies before adding a diecut and stamped sentiment, with a few enamel dots to finish. Popping the central panel up on dimensionals also adds a shadow from the black mat below:


Doesn't it create such an interesting effect? Unable to stop there, I also applied the same technique on a Bermuda Bay background using the Friends Are Like Seashells set:


This time I stamped my shells, again with some masking, and sentiment and added some pearls to finish:


I used the free Sale-A-Bration Oh So Ombre papers as my background, but you could equally create your own ombre background with a sponge brayer or blender brushes. These cards are quite addictive - I think the idea could be used for lots of sets! Here's a shot of both cards together - do you have a favourite?


Here is the visual summary of the key products used on today's projects for you to pin for easy reference:


And my second card:


You can see all of my 'How To' summaries on my 'How To - Tips and Techniques' Pinterest board in case you've missed any. 

Enjoy your evening and I'll be back tomorrow with another project for this week's new challenge over at The Paper Players. Until then, happy stampin'!


Stampin' Up! Supplies Used:

Table built using Product Table Builder by The Crafty Owl - Independent Stampin' Up! Demonstrator.

Curvy Christmas Buffalo Check Christmas Card

by Joanne James24. November 2020 21:57

Today I'm sharing a card using the current sketch over at Paper Craft Crew in a card that was inspired by the fabulous photo over at The Card Concept to create my clean and layered card:

 Vertical Sketch Challenge   

I was inspired by the red and black buffalo check pillow, green ribbon-tied foliage and the white of the rocking chair of the Card Concept photo; this is what I came up with:


Here's the low-down on today's card:

I used the foliage stamps in the 'Curvy Christmas' set to create my tied foliage and stamped this on a stitched scallop square; no curves on the front of the card, but I did use one of the curved stamps to decorate my envelope and the inside of my card:


I paired this with a panel of Real Red cardstock stamped in black with the Buffalo Check background, a banner of green gingham ribbon and some rhinestones and pearls to decorate, along with a sentiment snipped from one of the stamps in the 'Itty Bitty Christmas' stamp set.

Here is the visual summary of the key products used on today's project for you to pin for easy reference:


You can see all of my 'How To' summaries on my 'How To - Tips and Techniques' Pinterest board in case you've missed any. 

I absolutely love that inspiration photo and combined with the sketch am really pleased with how this card turned out.

Enjoy your evening and I'll be back tomorrow with another project. Until then, happy stampin'!

Stampin' Up! Supplies Used:

Table built using Product Table Builder by The Crafty Owl - Independent Stampin' Up! Demonstrator.

Snowflake Splendor Sparkling Snowflake Wishes TTT90

by Joanne James12. November 2020 17:00

A busy couple of days but it's Thursday and time for a new challenge over at TicTacToe! It's the turn of Team X to host this week and the lovely Ashwini is our featured designer this week. This is the fun board that we are playing along with: 


I decided to go down the centre column with blue, holiday and sparkle/shine and am sharing a clean and layered snowflake card with you today - take a look:


Here's the low-down on today's card:

True Blue - The main blue that I chose to feature on my card today is Pacific Point - one of the first three ink pads I ever purchased when I started stamping (along with Real Red and Old Olive, in case you're interested!) and whilst, like my other initial purchases, this is a colour that is still going strong, it's also one I don't use as frequently in my general crafting. So you can imagine how pleased I was when I saw it feature as one of the colours in the Snowflake Splendor patterned paper - I knew it would be the perfect opportunity to give it some love!

Snowflake Splendor - There are so many beautiful patterns in the Snowflake Splendor papers it's difficult to choose just two, but choose I did! I went with a couple of complimentary patterns, both of which feature Pacific Point, to bring out the bold blue colour. I used white mats on my project, which is something I don't often do but is a great way to showcase a stronger colour such as Pacific Point. 

Glimmer and Sparkle - Pacific Point is not the only blue that I showcase on today's card though; the Balmy Blue glimmer paper is so full of sparkle I couldn't resist adding some to my festive snowflake showcase and I think it compliments the other elements beautifully. I also added a sprinkling of sequins for a little more shimmer; along with my sparkle-filled sentiment I think this card is perfect for the current Time Out challenge too, where the challenge word is 'festivals' with the option of added shimmer/glitter - yes please!

Here is the visual summary of the key products used on today's project for you to pin for easy reference:


You can see all of my Product and 'How To' summaries on my 'How To - Tips and Techniques' Pinterest board in case you've missed any. 

A tictactoe board offers so many creative possibilities - how does this week's board inspire you? Why not have a go? We would love to see you in the gallery and who knows - you might be selected for Designer's Choice and be eligible to be a guest designer on a future challenge. 

Enjoy your day; I'll be back tomorrow with another project. Until then, happy stampin'!


Stampin' Up! Supplies Used: 

Table built using Product Table Builder by The Crafty Owl - Independent Stampin' Up! Demonstrator.

Let Faith Be Your Biggest Fear Meets Artistry Blooms

by Joanne James12. October 2020 07:00

It's Monday and to start the week I have a short post to share a couple of cards I made with this week's Freshly Made Sketches layout:


They are both encouragement cards, this time with the optional addition of pink, perfect for the current Time Out challenge. One of my cards also features an ombre background which is the trend over at Just Us Girls this week. Here's the first one:


And here's the second one, featuring another of the papers in the Artistry Blooms paper pack: 


Both cards feature a wonderful encouraging sentiment from the 'Ridiculously Awesome' stamp set, that is rather appropriate today as I am headed off for shoulder surgery. I am putting all my faith on my surgeon, that's for sure!

So which one is your favourite? I love them both and will be making a few more with these papers this month whilst they are on offer in the DSP sale :-)

Here is the visual summary of the key products used on today's project for you to pin for easy reference:


You can see all of my 'How To' summaries on my 'How To - Tips and Techniques' Pinterest board in case you've missed any. 

Enjoy your day and I'll be back tomorrow with another project. Until then, happy stampin'!


Stampin' Up! Supplies Used:

Table built using Product Table Builder by The Crafty Owl - Independent Stampin' Up! Demonstrator.

Pampered Pets CAS Birthday Card PP509

by Joanne James20. September 2020 09:00

Today it's Sunday and time for this week's new challenge over at The Paper Players! It's the turn of the fabulous LeAnne to host this week and she has a timely Clean and Simple challenge for you to work with:


I used this week's sketch over at The Paper Craft Crew which was perfect for a clean and simple card, grabbed my Playful Pets designer paper and set to work - take a look:


Here's the low-down on today's card:

Pampered Pets - I pulled out my Playful Pets designer paper and after adding a strip, I diecut one of the dogs from the set and layered it with a scalloped rectangle and a sentiment banner. The only stamping on the front of my card is the sentiment and some sponged pawprints. 

Inside Action - I added a sentiment and a stamped outline of the same puppy from the Pampered Pets stamp set on the inside of my card:

Clean and Simple - A reminder that this week is clean and simple week, so in addition to the theme of 'pets', your cards should meet the following criteria:

  • Minimal layers and embellishments
  • Plenty of open space, aka "white" space
  • Simple and uncluttered

I think the fact that it's taken me longer to write this post than make my card is probably a good indicator that I ticked the 'clean and simple' box, but the distraction of the comedy I'm watching on TV might also have something to with that! Here is the visual summary of the key products used on today's project for you to pin for easy reference:


You can see all of my Product and 'How To' summaries on my 'How To - Tips and Techniques' Pinterest board in case you've missed any. 

Before you reach for your ink and papers, check out what our amazing team has created to inspire you this week:

Here's a quick recap of our challenge rules:
 
1.  Create a new paper project
2.  Upload your creation to your blog with a link back to us and provide a direct link to the post featuring your challenge submission.
3.  Please link your card to no more than four challenges, TOTAL.
4.  Have FUN!

You can see all of my 'How To' summaries on my 'How To - Tips and Techniques' Pinterest board in case you've missed any. 

Enjoy your day; I'll be back tomorrow with another project. Until then, happy stampin'!


Stampin' Up! Supplies Used: 

Table built using Product Table Builder by The Crafty Owl - Independent Stampin' Up! Demonstrator.

Gilded Autumn Patterned Paper Trio of Thank You Cards for PP505

by Joanne James23. August 2020 09:00

Today it's Sunday and time for this week's new challenge over at The Paper Players! It's the turn of the amazingly talented LeAnne to host this week and she has my favourite, a sketch challenge for you to work with:
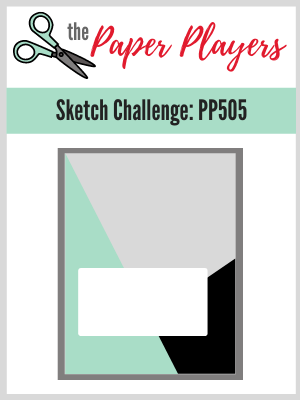
    

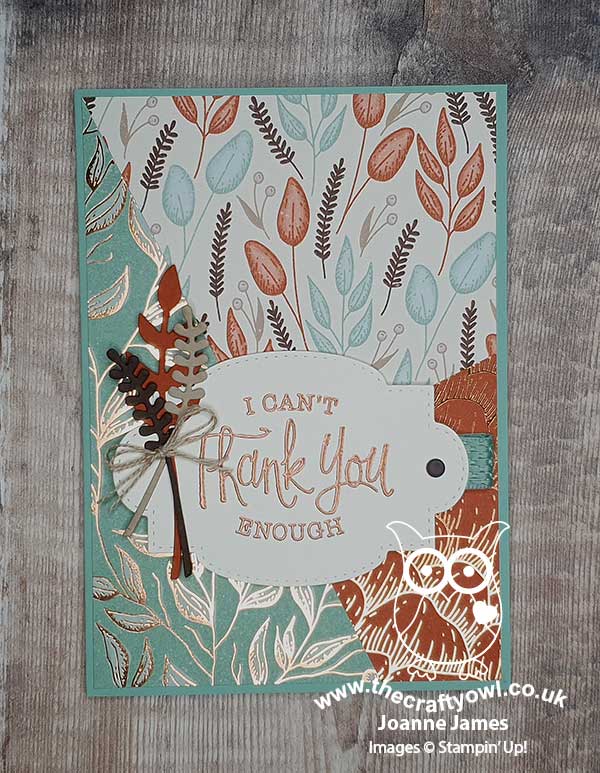
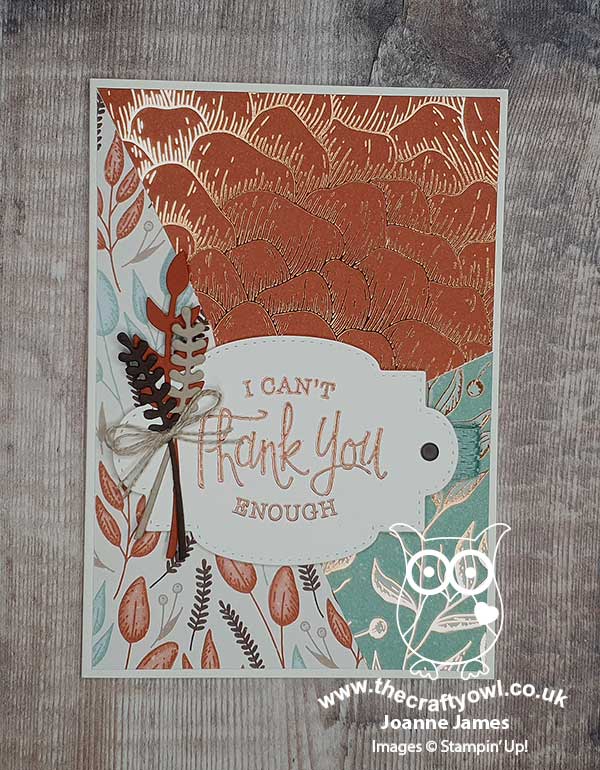
LeAnne's sketch is perfect to showcase some designer series papers and I couldn't resist another card using the Gilded Autumn speciality designer series papers - take a look:
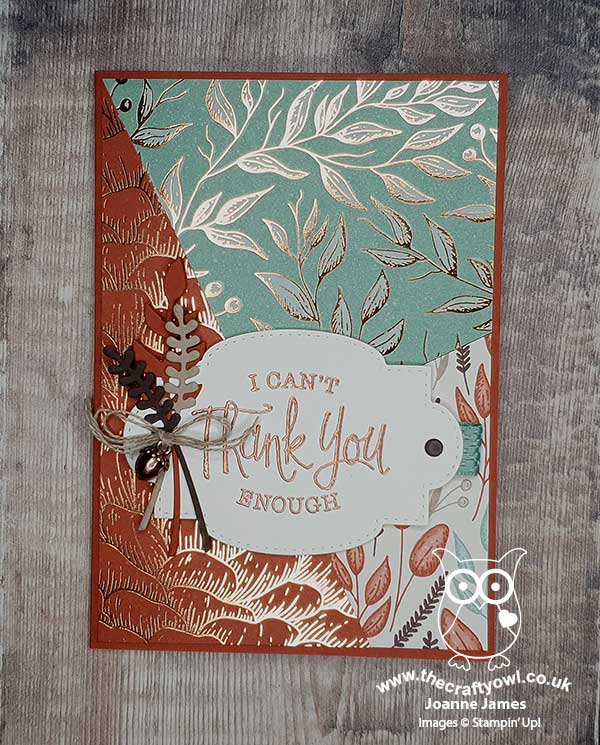
 

Here's the low-down on today's card:

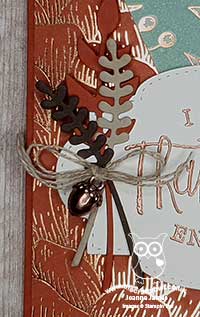
Gilded Autumn Goodness - The Gilded Autumn papers are beautiful, with some fabulous foil detailing. I paired my chosen patterns with a sentiment and label from the 'So Sentimental' bundle and added some of the ribbon from the suite to my label too.

A Copper Acorn - I used some retired dies for my diecut leaves (from the Beautiful Bouquet die set) as they had a shape that works well with the patterns on the paper and added a double linen thread bow. I stopped there on my two additional cards as I wanted them to be post-friendly, however I couldn't resist adding one of the lovely copper acorn trinkets from the suite to one of my cards - these are just so pretty:
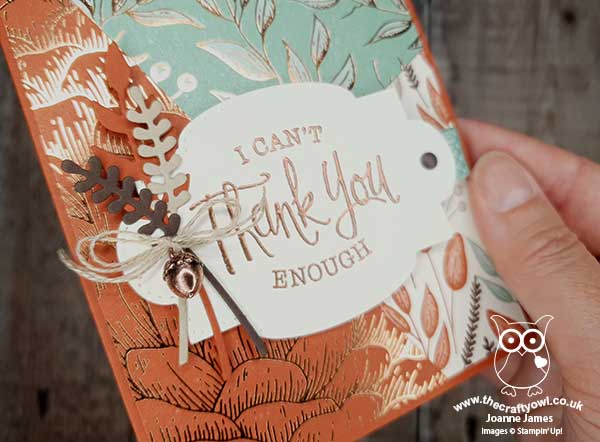
 

I'm going to link this card up over at Hand Stamped Sentiments too - I just love their inspiration photo this week, it's so perfect for the season!

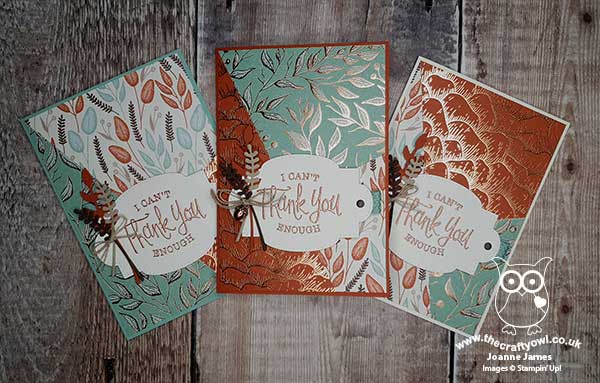
And Two Makes Three - As I mentioned above, having cut 3 rectangular pieces of DSP, and then cut all three together at the same angle on my guillotine, I made another two cards to use up all of the pieces. Here's my second card:
 

And my third card:
 

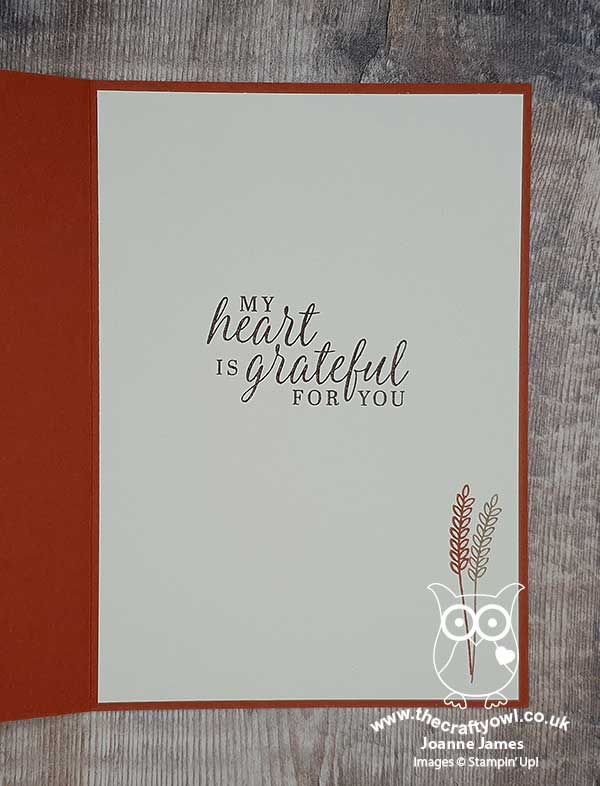
A little simple stamping using the 'Beautiful Autumn' set inside finished each card:
 

Here's all three of my cards together - do you have a favourite? Leave me a comment, I would love to hear your thoughts.
 

Here is the visual summary of the key products used on today's project for you to pin for easy reference:
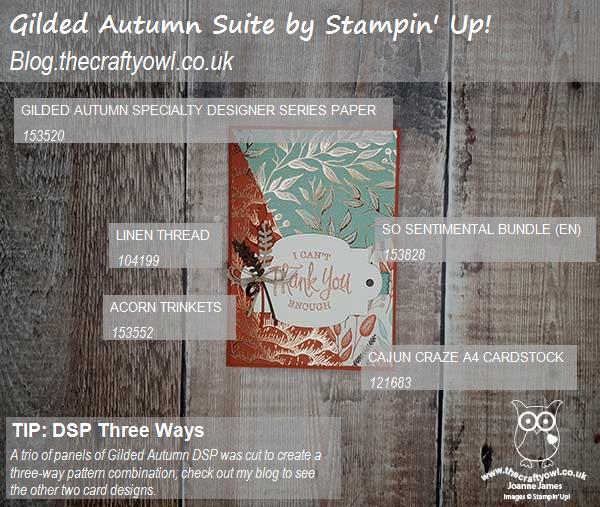
 

You can see all of my Product and 'How To' summaries on my 'How To - Tips and Techniques' Pinterest board in case you've missed any. 

Before you reach for your ink and papers, check out what our amazing team has created to inspire you this week:

Here's a quick recap of our challenge rules:
 
1.  Create a new paper project
2.  Upload your creation to your blog with a link back to us and provide a direct link to the post featuring your challenge submission.
3.  Please link your card to no more than four challenges, TOTAL.
4.  Have FUN!

You can see all of my 'How To' summaries on my 'How To - Tips and Techniques' Pinterest board in case you've missed any. 

Enjoy your day; I'll be back tomorrow with another project. Until then, happy stampin'!


Stampin' Up! Supplies Used: 

Table built using Product Table Builder by The Crafty Owl - Independent Stampin' Up! Demonstrator.

Have a Hoot Owl Family Christmas Card Sneak Peek

by Joanne James18. July 2020 18:00

A late post from me today as we've been busy cycling and enjoying a dinner of homemade pizzas in our new pizza oven! I'm sharing a card using this gorgeous colour palette over at Colour Inkspiration and the current Paper Craft Crew sketch:

No photo description available.   Vertical sketch with horizontal scallop rectangle placed in bottom left corner with banner behind.

Whilst that lovely colour palette would work really well for an autumnal card, following my Autumn-Winter pre-order unboxing live session online this week, I couldn't resist making my first Christmas card with my new supplies - take a look:


Here's the low-down on today's card:

Have A Hoot - The cute little owls on today's card are courtesy of a new stamp set called 'Have A Hoot' - aren't they just the cutest?! I heat embossed them in white onto Crumb Cake to highlight the little snowflakes and coloured the owls with my Blends. Check out the punny sentiment too!

So Many Snowflakes - I stamped some background snowflakes tone-on-tone onto my Real Red card base and added a diecut snowflake in (retired) white glimmer paper and cut with my new So Many Snowflakes dies as an accent. I also added a sprinkle of snowflake sequins for a little sparkle.

Stitched So Sweetly - My stitched scalloped panel is courtesy of the Stitched So Sweetly dies; I added a couple of strips of Cinnamon Cider cardstock and DSP behind just to highlight the colour and anchor the panel - here's a close up: 


Here is the visual summary of the key products used on today's project for you to pin for easy reference:


You can see all of my 'How To' summaries on my 'How To - Tips and Techniques' Pinterest board in case you've missed any. 

Enjoy your evening and I'll be back tomorrow with another project. Until then, happy stampin'!


Stampin' Up! Supplies Used:

Table built using Product Table Builder by The Crafty Owl - Independent Stampin' Up! Demonstrator.

Flowers For Every Season Floral Birthday Card

by Joanne James22. June 2020 11:25

Happy Monday everyone! Today is a special day - not one, but two, yes both of the James Juniors are back to school! There was much excitement in the James household this morning and whilst it's only for a couple of weeks, and for one it's only for a couple of days each week, the excitement at seeing friends and teachers face to face again was palpable! The house is now eerily silent, but it does mean that I am racing through my jobs today and am getting my blog post in early too! Today I'm sharing a card that I made inspired by the lovely Amy's sketch over at Freshly Made Sketches:

A super versatile sketch I'm sure you'll agree and I decided to get snipping for my floral creation today - take a look:


Here's the low-down on today's card:

Flowers For Every Season - Whilst flowers are by no means mandatory for this sketch, I initially reached for my Flowers For Every Season Memories and More cards as I wanted to incorporate the adhesive sentiments into my card. I couldn't find any flowers that worked for me though, so I reached for my co-ordinating papers and decided to get fussy cutting! I wanted to create some layering with my flowers, with some behind and some in front of my label, so separated the flowers to make this work. 

A Sweet Label - My sentiment label is from the Stitched So Sweetly Die set - such a great set for labels with a good variety of shapes and sizes. 

Textile Texture - I added some texture to the top layer of my Misty Moonlight cardstock using the new Textile Texture embossing folder which is lovely for a little extra detail.

This card was simple to put together once the fussy cutting was completed. I used another leftover edge piece of DSP to decorate the inside of my card too:


Waste not, want not and all that!

Here is the visual summary of the key products used on today's project for you to pin for easy reference:


You can see all of my 'How To' summaries on my 'How To - Tips and Techniques' Pinterest board in case you've missed any. 

Enjoy your day. I'm racing through my jobs before early school pick up. I'll be back tomorrow with another project. Until then, happy stampin'!


Stampin' Up! Supplies Used:

Table built using Product Table Builder by The Crafty Owl - Independent Stampin' Up! Demonstrator.

Ornate Border Dies Inlaid Diecut Thank You Card

by Joanne James17. April 2020 20:18

Yay it's Friday! I feel more than ever the need to start my post with the day of the week just to remind myself - is it me or do they all seem to blur into one these days?! Today I'm sharing a card that I made using this week's Color Throwdown colours: 


I wanted to have a play with my new Ornate Border Dies having seen a lovely stencilled card that my friend LeAnne created with hers. When I saw these colours and the quilt in the photo though I thought they would be nice for a little inlaid diecutting - take a look:


Here's the low-down on today's card:

Ornate Border Dies - The new Ornate Border Dies are part of the early release Ornate Garden Release. I knew I would love these dies as soon as I saw them! I did have a few erroneous cuts before I realised which side the die was cutting the outer edge on, but once I'd worked this out I was fine. I cut the die three times: once in Basic Black for my mat, then again in Smoky Slate and Real Red, and used these latter two to inlay the flowers and leaves into my black panel. 

Take Your Pick - You might think that inlaid diecutting is a tricky business and whilst it does take a little while, there is one tool that can make it really easy: the Take your Pick tool. That end with a little bob of blue tac is super useful for easily picking up tiny pieces and dropping them into the spaces in the die openings. I can highly recommend one - adding adhesive sheets to the back of your cardstock before diecutting helps from a gluing perspective too.

So Sentimental - For my panel I used a piece of retired gingham DSP from Sale-A-Bration last year and I finished my card with a thank you sentiment from the 'So Sentimental' set and cut it out with one of the co-ordinating Stitched So Sweetly Dies. I added a scrap of red ribbon and my card was done!

Here is the visual summary of the key products used on today's project for you to pin for easy reference:


You can see all of my 'How To' summaries on my 'How To - Tips and Techniques' Pinterest board in case you've missed any. 

We took part in a family online quiz yesterday, hosted (virtually, of course!) by some friends of ours with lots of other friends online which was great fun. Determined to continue in a similar vein and do something different again today, I joined an online 'pilates for runners' class, run by the physio that has been treating me for my frozen shoulder rehabilitation. I'm keen to get back to running but am nowhere near fit enough at the moment, plus it's more fun to cycle with the Juniors whilst they are at home. It was tough but I thoroughly enjoyed it - I'm sure my glutes will feel be feeling the effects tomorrow though! What are you doing to make each day a little different to the one that went before? Enjoy your evening and I'll be back tomorrow with another project. Until then, happy stampin'!


Stampin' Up! Supplies Used:

Table built using Product Table Builder by The Crafty Owl - Independent Stampin' Up! Demonstrator.

On To Adventure Holidaymaker for PP481

by Joanne James8. March 2020 10:00

Today it's Sunday and time for this week's new challenge over at The Paper Players! It's the turn of the fabulous Laurie to host this week and she has a vibrant colour challenge for you to work with:


I spent much of this week undertaking last-minute preparations for my weekend craft retreat, so was short on time to create and lacking my creative mojo. Anyway, I had to keep it quick and this is what I came up with - take a look:


I stamped my lady from the 'On to Adventure' stamp set and coloured her with my Stampin' Blends, then mounted her on a layered circle and stamped my sentiment onto a Coastal Cabana scalloped rectangle. A sprinkling of champagne rhinestones finish my card.

Super simple this week!

Here is the visual summary of the key products used on today's project for you to pin for easy reference:


You can see all of my Product and 'How To' summaries on my 'How To - Tips and Techniques' Pinterest board in case you've missed any. 

Before you reach for your ink and papers, check out what our amazing team has created to inspire you this week:

Here's a quick recap of our challenge rules:
 
1.  Create a new paper project
2.  Upload your creation to your blog with a link back to us and provide a direct link to the post featuring your challenge submission.
3.  Please link your card to no more than four challenges, TOTAL.
4.  Have FUN!

Enjoy your day; I will be on day two of my weekend craft retreat. Yesterday we had a ball, so I'm sure today will be just as much fun! More about that later in the week. I'll be back in a couple of days with another project. Until then, happy stampin'!


Stampin' Up! Supplies Used: 

Table built using Product Table Builder by The Crafty Owl - Independent Stampin' Up! Demonstrator.

Mini Catalogue

BROWSE THE CATALOGUE

The mini catalogue is now live! Read and download your copy here.

Shop Online

Access my online shop 24 x 7, 365 days of the year:

Current March hostess code:

S9F2XJJW

Shop Online

Join My Team

It's always a great time to join Stampin’ Up! New team members can get £130 worth of products for only £99 + free business supplies + free shipping + all the fun being a part of Stampin’ Up! Stampin' Up! has something for everyone: join my growing team and benefit from my support to enjoy Stampin' Up! however you choose.

If you're interested, call me for a chat to understand how I can help you realise your goals. Alternatively, if you have already decided to sign up and you just can't wait, please click here for the link to the online form where you can sign up and order your starter kit right away! 

Latest Kit!

Stampin Cut and Emboss

The Rock Legend Kit has all you need to make 8 cards with coordinating envelopes. Along with the new Panda Friends Kit, both are available from January 4th for just £14 each - get yours here!

2023-24 Annual Catalogue

BROWSE THE CATALOGUE

Click on the catalogue for a full list of current SU! supplies - if you would like to order any of the items featured, please drop me a line at [email protected] or give me a call on 07773 421446 - I'd be happy to help.

New Online Exclusives

There will be new products available exclusively in the online store from 5 March - check them out here.

About Me

Hi I'm Joanne and live in Northampton and when I'm not looking after my husband and two beautiful children, am an avid crafter with a passion for all things Stampin' Up!

I must confess that I have never been a big rubber stamper - until I discovered Stampin' Up! that is. I love the fact that I can get such great results with co-ordinating stamps, inks, papers and punches - the possibilities are endless! Join me on my stamping journey as I share the things I love and be inspired to create amazing things yourself!

Follow Me

Monthly Newsletter

Box Builder

Click the button above to use Box Buster to create your custom box design using the Envelope Punch Board!

Kits Collection Now Available!

Stampin Cut and Emboss

The new Kits Collection from Stampin' Up! is now available!

Click here to see the current kits available and order yours online today.

I Design For


Stampin' Up Stuff

This is my personal blog and is not endorsed by Stampin’ Up! I hope you find it a plentiful source of ideas and personal inspiration but please don't copy my designs for contest submission or use for classes, publication or sale without express permission.