Start Your Christmas Shopping Early - Great Offers with Wednesday Weekly Deals!

by Joanne James10. September 2014 09:35

It's Wednesday so that means a new collection of Wednesday Weekly Deals! This week's deals are included below - they will be available for one week only, before a new collection of deals is announced.

As always, if you want to take advantage of any of the deals on offer, you can support my business by placing your order online by clicking here or using the link to my store on the right hand side of my blog page where it says 'Shop Online' or with me in person. Don't forget to add the Hostess Code for September (you can find this under the 'Shop Online' section on the right). 

Here's a summary of this week's one-week only Wednesday deals - click on each item to go to the online store to purchase:


This weeks deals:

Table built using Product Table Builder by The Crafty Owl - Independent Stampin' Up! Demonstrator.

More great offers this week: the Modern Mosaic TIEF and Mosaic Punch are both great prices and just over £16 if you purchase both. At £8.63 the Banner Punch is a bargain; what's more if you combine it with one of the co-ordinating stamp sets from the annual catalogue, such as Banner Banter (134060 clear, £12.95) this would make a great gift for a crafty friend for just over £20 - a good opportunity to get started with some Christmas shopping perhaps! Plus framelits, ribbon, cardstock and MDS - so much to choose from!

Back shortly with today's creative project; until then, happy shopping!

Tags: , , , , , , ,

Promotions | Shop Online | Stamping

Today's Wednesday Weekly Deals

by Joanne James2. July 2014 07:00

As if there wasn't enough Stampin' Up! goodness to tempt us all this week, today is Wednesday so that means a new collection of Wednesday Weekly Deals too! This week's deals are included below - they will be available for one week only, before a new collection of deals is announced.

As always, if you want to take advantage of any of the deals on offer, you can support my business by placing your order online by clicking here or using the link to my store on the right hand side of my blog page where it says 'Shop Online' or with me in person. Don't forget to add the Hostess Code for July (you can find this under the 'Shop Online' section on the right). 

Here's a summary of this week's one-week only Wednesday deals - click on each item to go to the online store to purchase:

Table built using Product Table Builder by The Crafty Owl - Independent Stampin' Up! Demonstrator.

 Sequins, buttons and best of all punches included this week - race you to the shop! Back later with today's creative post; until then, happy shopping!

Mosaic Bauble Thinlit Card and Punch Tip Video

by Joanne James26. October 2013 22:16

We have had a lovely day today; we've stayed indoors out of the howling winds and had some family over for Sunday lunch. It's been lovely to spend time with my brother- and sister-in-law, nephew and niece, as we don't do it nearly often enough with the busy lives we all lead.

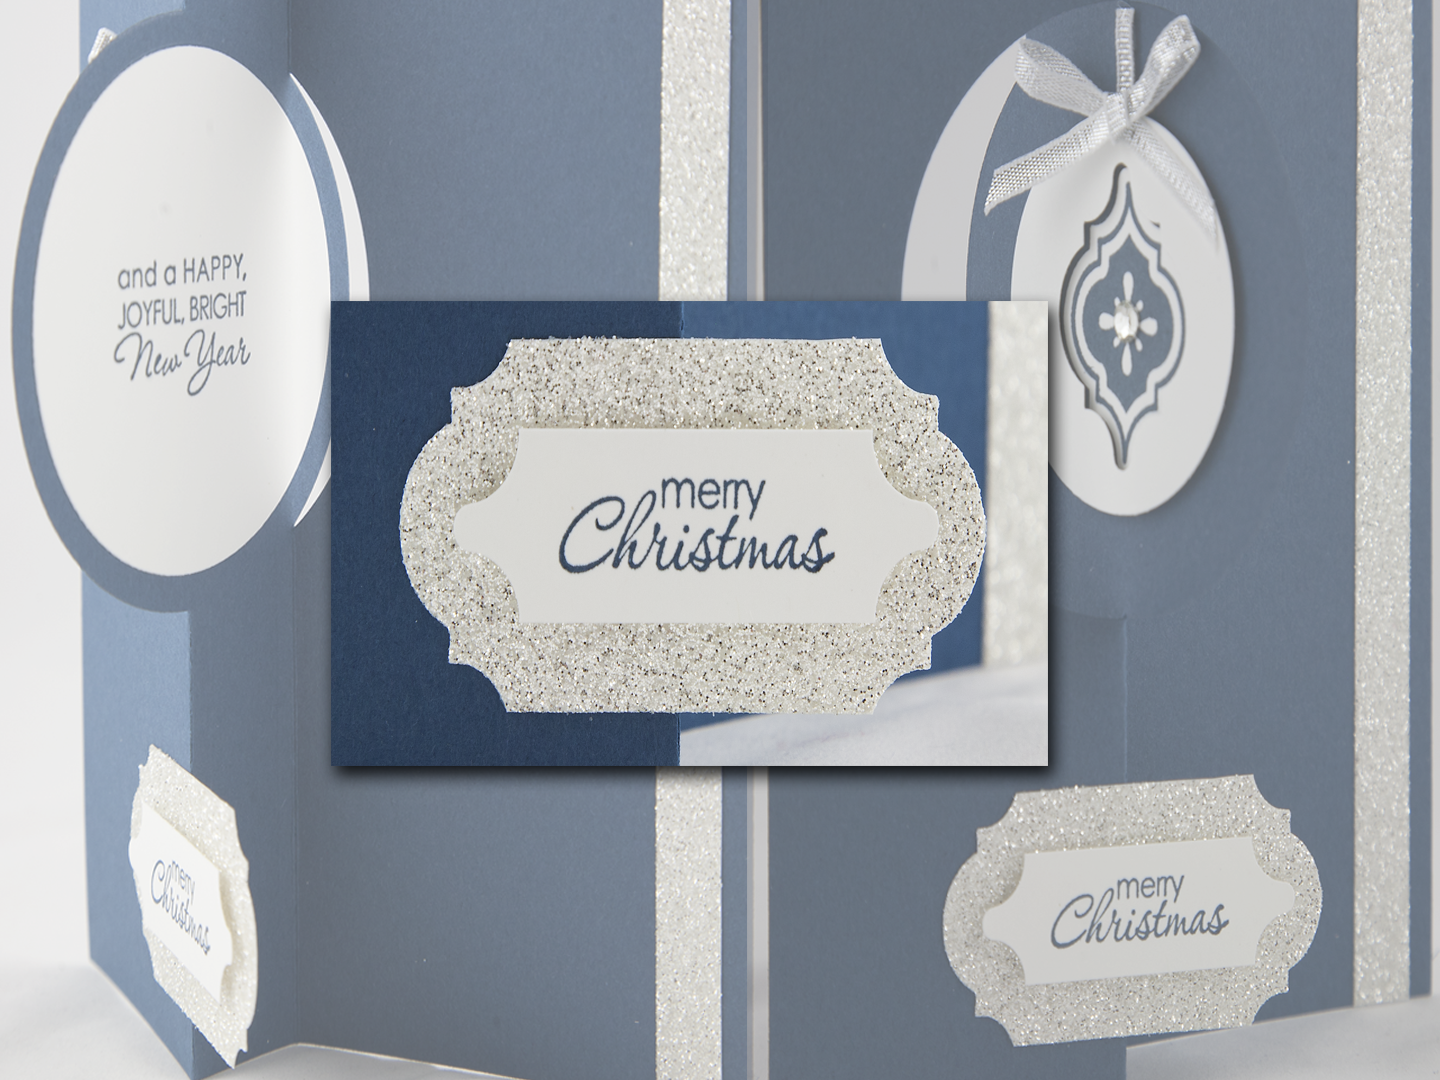
As promised, I have another Thinlit card for you today, this time with a Mosaic Madness bauble design - take a look:
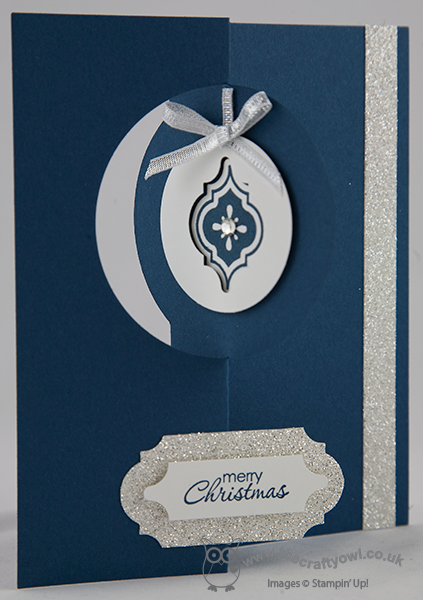
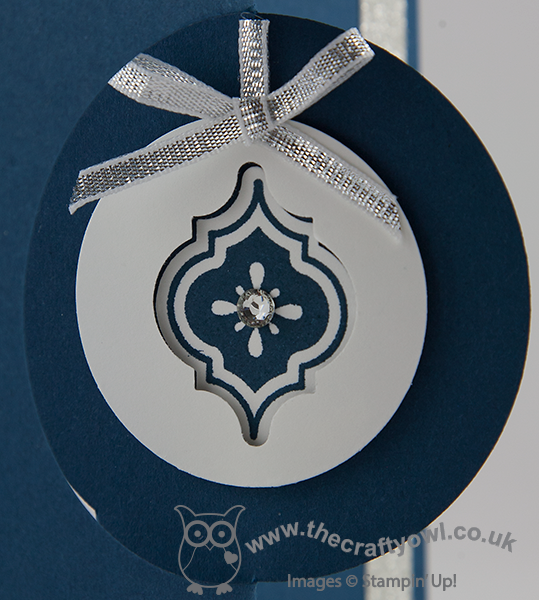
I created a simple 'layered' bauble using a circle punch and the mosaic punch, then layering by raising the outer circle on dimensionals and creating a ribbon hanger. Here's a close-up of my bauble:
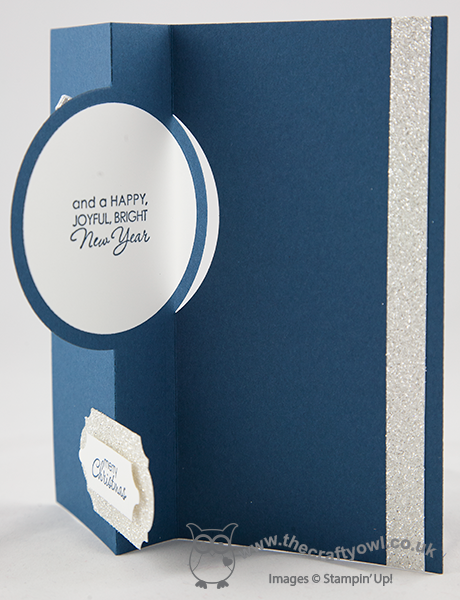
For a greeting on this card, I used a pair of sentiments from the 'Petite Pairs' stamp set, stamping one half on a layered label on the front of the card and the other half on the reverse of the flipped circle:
Lastly, are you wondering what punches I used for my raised sentiment label on the front of my card? Here's a closer look:
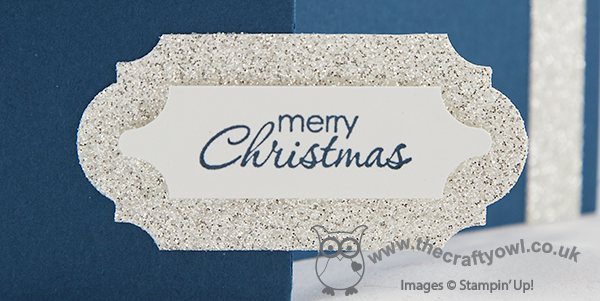
No, it's not a new label punch or two, I actually used my Mosaic Punch to create them! I'm all for making your tools work harder for you and this punch is great for creating labels as well as straight forward mosaic shapes. I shot a short video to show you how to make these labels; I actually made it a while ago, but didn't make a card to go with it, so haven't shared it until now. This also explains why the stamped pieces I used in the video are not the actual ones you see on today's card. If you're feeling confused, just watch the video - it will all make sense! Here's the link:

Just to recap on the measurements in the video: I recommend the narrow label is a maximum of 1.5cm in width, and the wider label 3.0cm in width. Either label can be of any length. I hope you found the video tutorial useful.

Lastly, don't forget, you have only until 11pm tomorrow night to order any of the 25 stamp sets that are 25% off - for details on the stamps on offer, click here.

Back tomorrow with another project; until then, happy stampin'!
 

Stampin' Up! Supplies Used:

Quatrefancy Mosaic

by Joanne James16. September 2013 22:32

This is a short post I'm afraid - I've already typed this once and lost it, so am furiously retyping (I'm blaming the computer rather than the operator though - bloggers prerogative!) Today I'm sharing another of the mosaic cards from last week's class, this time showcasing the Quatrefancy Speciality Designer Series Paper:

This is a CASe of a Janine Tinklenberg card that I saw on Pinterest. I love the bold colours of the designer paper and the stamped punched images really make it 'pop'. There really is so much you can do with this product suite; this card is simple in design, yet so effective.

Did you notice that all the cards in this month's class also featured the Banner Greetings stamp set? This is an exclusive hostess set that you can purchase with hostess credits earned on a qualifying party or individual order (£150 or more). There has never been a better time to host a party, with so many lovely new hostess sets in both the annual catalogue and Autumn-Winter seasonal catalogue to choose from. So what are you waiting for? Treat yourself to an early Christmas present of free crafting goodies and book a party with me today - get in touch to discuss available slots, there are still times available before Christmas.

Back tomorrow with another project; until then, happy stampin'!


Stampin' Up! Supplies Used:

 Modern Mosaic Textured Impressions Embossing FolderMosaic MadnessMosaic PunchQuatrefancy Specialty Designer Series Paper

Punch Pack - by Stampin' Up!Basic Rhinestones Jewel Accents - by Stampin' Up!Banner Greetings

Mosaic Madness Christmas Card

by Joanne James1. August 2013 21:00

I know, I know - 145 days until Christmas, but as a crafter it pays to be prepared! I have been busy this week preparing for an all day Christmas workshop this weekend when we will be making a headstart on our 3D projects and gifts for the festive season.

As such, today seems like a good day to share another of our quarterly team training projects designed by Monica Gale: this time a Christmas card using the Mosaic Madness stamp set. I love this set and still have so many more projects to make with it. It is great for all kinds of cards, and the main mosaic shape does have something ornamental about it, so it works really well for a Christmas card. So here is the finished card:

 The hanging ornament is made by scoring four punched pieces vertically then adhering together around the bakers twine and is then suspended in the negative space of a punched circle. The nice thing about this card is that although it's very multi-dimensional, it still folds flat for posting. Also, if you're wondering where that piece of crumb cake DSP with the chevrons came from, you might be looking for some time as it's actually a strip cut from a Tag a Bag - these just have so many uses!

So the first of many Christmas cards and projects to come; I will share our weekend workshop projects next week, guaranteed to really get you in the festive spirit! This is also a good time to mention that Mosaic Madness is the stamp set that I'll be featuring in my September card classes. If you would like more information about my classes or to book a place, please get in touch to find out more.

Back tomorrow with another project; until then, happy stampin'!


Stampin' Up Supplies:

Stamps: Mosaic Madness, Greetings of the Season

Cardstock: Crumb Cake, Whisper White, Cherry Cobbler

Ink/Stampin' Write Markers: Coastal Cabana, Crumb Cake, Cherry Cobbler

Tools: Mosaic Punch, 1 3/4" Circle Punch, Scallop Trim Border Punch

Finishing Touches: Baker's Twine (Tag A Bag Accessory Kit), Tag A Bag

Mosaic Trellis

by Joanne James18. July 2013 21:09

I'm back after another busy card class last night, which was great fun but I was home too late to post so am back on track this evening. We were using the 'Best of Flowers' set at yesterday's class and everyone made some great cards - I 'll share these another time. Today I have another Mosaic Madness card for you; something a little different:

To create this card, I used the mosaic stamp set along with the co-ordinating embossing folder and punch, but this time created a 'trellis' from the embossed sheet using the punch, and then stamping a two-tone pattern on the trellis so that it would really 'pop' against the Coastal Cabana ink and cardstock duo. I've been playing around with this idea in my head for a few days and having finally committed it to paper I'm really pleased with how it's turned out.

This set really is so versatile; I hope you're not tired of it yet, as there's lots more where this came from! I'll be featuring this stamp set in September's card class, so if you live in Northampton and would like to experience a little Mosaic Madness for yourself, then do get in touch for further details - whether an experienced crafter or first-time card maker, you will be more than welcome. We are not having a monthly card class in August due to the summer holidays, although on Saturday 3rd August I am holding an-all day Christmas Crafts Workshop, where we will be getting a headstart on our Christmas preparations - it pays to be organised, especially if you're a crafter!

Back tomorrow with another project; until then, happy stampin'!


Stampin' Up Supplies:

Stamps: Mosaic Madness, Really Good Greetings

Cardstock: Coastal Cabana, Whisper White

Ink/Stampin' Write Markers: Coastal Cabana, Strawberry Slush, Crisp Cantaloupe

Tools: Mosaic Punch, Mosaic Embossing Folder, Stamp-a-ma-jig

Finishing Touches: Basics Rhinestones

Mosaic In-Colour Card Swaps

by Joanne James15. July 2013 21:52

Today I'm sharing my team training swaps that I promised you on Saturday, but after a fun day at training yesterday was too tired to post. I completed one basic design, featuring the Mosaic Madness stamp set, but in five different colourways, each showcasing one of the new in colours. So here is the first one, with the base colour of Strawberry Slush:

The feature colours on this card are Crisp Cantaloupe and Coastal Cabana. Here is the second card, with a Crisp Cantaloupe base and feature colours of Coastal Cabana and Pistachio Pudding:

Here is the third card, with a Baked Brown Sugar base and feature colours of Crisp Cantaloupe and Bermuda Bay:

Here is the fourth card, with a Coastal Cabana base and feature colours of Calypso Coral and Smoky Slate:

Here is the fifth and last card, with a Pistachio Pudding base and feature colours of Strawberry Slush and Smoky Slate:

The design is intentionally simple - it needs to be when there are so many to make! I liked taking the opportunity to play around with new colour combinations and also I like the stamping of the same colour ink on cardstock that I used for the main card; this isn't something I do much of, usually but I like the effect and think I'll be doing it more often. So which colour combination is your favourite? Do you have a new 'number one' in-colour? Leave me a comment below or on my Facebook page - I'd love to know what you think. It's still neck-and-neck Strawberry Slush and Coastal Cabana for me; too close to call!

Back tomorrow with another card; until then, happy stampin'!

Stampin' Up Supplies:

Stamps: Mosaic Madness, Happy Day

Cardstock: 2013-15 In Colours

Ink/Stampin' Write Markers: As detailed above

Tools: Mosaic Punch, Itty Bitty Punch

Finishing Touches: Basics Rhinestones


Tags: , , , , , , , ,

Cards | Stamping | Swaps

Mosaics ... And It's All Really Good!

by Joanne James3. July 2013 20:00

After all the excitement of yesterday's catalogue launch, today I'm sharing another mosaic card. This is a simple white card and features a small flag of the co-ordinating Quatrefancy Specialty paper:

This card was really easy to pull together and just goes to show you can get a nice card design without the need for a stamp-a-ma-jig to line up all the various mosaic tiles. The sentiment comes from a new greetings stamp set called 'Really Good Greetings' and is one of those general stamps that will suit lots of occasions.

Back tomorrow with another project; until then, happy stamping!


Stampin' Up Supplies:

Stamps: Mosaic Madness, Really Good Greetings

Cardstock: Strawberry Crush, Whisper White, Quatrefancy Specialty Designer Series Paper

Ink/Stampin' Write Markers: Pool Party, Island Indigo, Pumpkin Pie, Strawberry Crush

Tools: Mosaic Punch, Itty Bitty Punch

Finishing Touches: Basics Rhinestones, Island Indigo Bakers Twine

Mosaic Madness and Two New Colours

by Joanne James28. June 2013 21:24

All is well in the James household today, so it has been a day of catch-up crafting with the opportunity to tick a few things off my 'to do' list and also have another play with some new goodies! One of the best things about being a Stampin' Up! demonstrator is that we get the opportunity to purchase items before the new catalogue goes live and in some instances even receive new product free.

For today's 'sneak peak, I've made a card that showcases some fabulous new mosaic products - take a look:

The word 'mosaic' means 'to create images with a collection of small pieces of glass, stone or other materials' and the products I've used in today's card are great for paper ones. There is a patterned embossing folder, a stamp set and a co-ordinating punch that makes it so easy to create these mosaic shapes in super-quick time. For my card, I embossed the background and then stamped and punched a variety of patterned mosaic shapes, interspersing these with one of the smaller images from the stamp set stamped straight onto the background. I cut away the outer edge to show the profile of these tile pieces and anchored the banner with a final mosaic piece on dimensionals and finished with a coloured rhinestone. Here's a close up of the detail:

I also took the opportunity to play with two new colours: the card base is one of the new in colours, Coastal Cabana, and the yellow I used is the returning Regals colour Crushed Curry. I love this colour combo. I hope you like this card as I think the set is called 'Mosaic Madness' for a reason - I am brimming with ideas on how to use it, so there will be lots more where this came from. There is a co-ordinating set of designer series paper too - a blog post for another time though!

Back tomorrow with another project; until then, happy stampin'!


Stampin' Up Supplies:

Stamps: Mosaic Madness, Happy Day

Cardstock: Coastal Cabana, Night of Navy, Whisper White

Ink/Stampin' Write Markers: Coastal Cabana, Crushed Curry, Night of Navy

Tools: Mosaic Embossing Folder, Mosaic Punch

Finishing Touches: Basics Rhinestones


Tags: , , , , , , , ,

Cards | Stamping

Mini Catalogue

BROWSE THE CATALOGUE

The mini catalogue is now live! Read and download your copy here.

Shop Online

Access my online shop 24 x 7, 365 days of the year:

Current March hostess code:

S9F2XJJW

Shop Online

Join My Team

It's always a great time to join Stampin’ Up! New team members can get £130 worth of products for only £99 + free business supplies + free shipping + all the fun being a part of Stampin’ Up! Stampin' Up! has something for everyone: join my growing team and benefit from my support to enjoy Stampin' Up! however you choose.

If you're interested, call me for a chat to understand how I can help you realise your goals. Alternatively, if you have already decided to sign up and you just can't wait, please click here for the link to the online form where you can sign up and order your starter kit right away! 

Latest Kit!

Stampin Cut and Emboss

The Rock Legend Kit has all you need to make 8 cards with coordinating envelopes. Along with the new Panda Friends Kit, both are available from January 4th for just £14 each - get yours here!

2023-24 Annual Catalogue

BROWSE THE CATALOGUE

Click on the catalogue for a full list of current SU! supplies - if you would like to order any of the items featured, please drop me a line at [email protected] or give me a call on 07773 421446 - I'd be happy to help.

New Online Exclusives

There will be new products available exclusively in the online store from 5 March - check them out here.

About Me

Hi I'm Joanne and live in Northampton and when I'm not looking after my husband and two beautiful children, am an avid crafter with a passion for all things Stampin' Up!

I must confess that I have never been a big rubber stamper - until I discovered Stampin' Up! that is. I love the fact that I can get such great results with co-ordinating stamps, inks, papers and punches - the possibilities are endless! Join me on my stamping journey as I share the things I love and be inspired to create amazing things yourself!

Follow Me

Monthly Newsletter

Box Builder

Click the button above to use Box Buster to create your custom box design using the Envelope Punch Board!

Kits Collection Now Available!

Stampin Cut and Emboss

The new Kits Collection from Stampin' Up! is now available!

Click here to see the current kits available and order yours online today.

I Design For


Stampin' Up Stuff

This is my personal blog and is not endorsed by Stampin’ Up! I hope you find it a plentiful source of ideas and personal inspiration but please don't copy my designs for contest submission or use for classes, publication or sale without express permission.