New Wednesday Weekly Deals Are Here!

by Joanne James1. April 2015 11:50

It's Wednesday so that means a new collection of Wednesday Weekly Deals! This week's deals are included below - they will be available for one week only, before a new collection of deals is announced. 

As always, if you want to take advantage of any of the deals on offer, you can support my business by placing your order online by clicking here or using the link to my store on the right hand side of my blog page where it says 'Shop Online' or with me in person. Don't forget to add the Hostess Code for April DBJFM4DG and be sure to make sure that you don't check the 'no contact' box if you'd like to be kept updated with the progress of you order and receive a little thank you in the post from me. 

Here's a summary of this week's one-week only Wednesday deals - click on each item to go to the online store to purchase:

Table built using Product Table Builder by The Crafty Owl - Independent Stampin' Up! Demonstrator.

You may be disappointed that Sale-A-Bration has ended, but today's weeky deals have something of a silver lining for sure: framelit offers abound this week, along  with the gift box punch board and the fabulous extra large gift boxes and some Blushing Bride ribbon to tie them up in! This week's framelit offers include some of my most used framelits - come back later to see today's creative post, where I used the Square Framelits to create today's fun card.

Until then, happy shopping!

Masculine Love CCMC286

by Joanne James21. January 2014 20:39

Good evening blog readers! I had lots of jobs to do today, but after a morning of paperwork I decided the housework could wait and I spent the afternoon cardmaking instead (oops!!) Today I'm sharing another Valentine's card, this time with a more masculine feel. I used the colours from this week's challenge over at Create with Connie and Mary as my starting point:

I decided to use my 'Hearts A Flutter' stamp set, as although this is one of my favourite sets and one I use a lot all year round, I haven't used it on any of my Valentine's cards yet this year. Here is my card:

I stamped my hearts somewhat randomly across the lower half of my card, either side of my focal point. I mounted the top layer of cardstock on dimensionals for two reasons: firstly, to make the ribbon easier to attach and secondly so that the heart that I cut out (I used my hearts framelits for this) would have some depth and my die cut 'love' would have more impact. I deliberately chose to use Smoky Slate for my middle layer, as I wanted the heart to have a more masculine appeal, especially as I used ribbon on my card too; Island Indigo Chevron Ribbon isn't too girly, but adds a luxurious feel to the card. A few candy dots to finish just to add balance and done.

Whilst I designed this card with a man in mind, I think it would work equally well for a woman, especially if you're not the kind of person who is into all things pink and red.

Back tomorrow with another Valentine's themed card; until then, happy stampin'!

Stampin' Up! Supplies Used:

Table built using Stampin' Up! Product Table Builder from The Crafty Owl.


DIY Wedding Stationery - It's Easier Than You Think!

by Joanne James12. January 2014 19:56

Good evening lovely blog readers - I hope you have all enjoyed a lovely weekend. Mine seems to have revolved around cooking for a change, with more time in the kitchen trying out new things. I blame Gordon Ramsey - I caught the last few episodes of his recent home cooking series on Channel 4 and just had to buy the accompanying book. The whole family pored over it yesterday morning and are now in a race to work our way through the delicious recipes within! Coupled with the fact that I seem to have passed my recent ailments to my daughter, such that she couldn't manage her swim squad training today as usual, it has felt like a less frantic weekend than is usually the case in the James household.

Anyway, today I thought I would share something different with you: wedding stationery. I recently wrote an article for the Winter Edition of a local wedding magazine called 'Local Wedding Connections' on just how easy it is to create the wedding stationery of your dreams, at a fraction of the cost of purchasing ready-made. You can read my article in full here, but I wanted to share more of the samples I created for this shoot in my post today. So here is the entire collection: 

Creating your own wedding stationery can be not only cost-effective, but also means you can produce something that is unique and personal to you. I created the above range using the 'Hearts-A-Flutter' stamp set and matching framelits - here are some additional images that show some of the close-up design detail:

Wedding favour 'crackers' made using the Envelope Punch Board:

A dinner menu for the Reception dinner, where you can see the subtle layering of the design:

A place card, to denote the bride's place setting:

The inside of one of the 'Save The Date' cards:

You can go to my own website, www.thecraftyowl.co.uk for more information on the services I provide. As customers of mine that have made their own stationery will attest, if you choose a simple yet elegant design it is easier to produce large volumes of perfectly co-ordinating stationery than you might think. Best of all, Stampin' Up!'s extensive range of co-ordinating inks, papers, ribbons, embellishments and cardstock, alongside an extensive range of stamp designs, mean that pretty much anything is possible. That said, if making your own wedding stationery really isn't for you, I also offer a bespoke 'make to order' service - just contact me to discuss your requirements.

Christmas time is popular for engagements and many people will be making wedding plans at this time of year, so if you know someone who fits the bill do share my details with them - I can make a huge chunk of their wedding preparations easier! In addition, point them in the direction of the Local Wedding Connections website at www.localweddingconnections.co.uk; it contains lots of useful information, supplier details and general useful bits and pieces for anyone in the market for a wedding.

Back tomorrow with another project; until then, happy stampin'!


Stampin' Up! Supplies Used:

Table built using Stampin' Up! Product Table Builder from The Crafty Owl.


Tags: , , , , , , , ,

Cards | Stamping | Weddings

Christmas Banner Card PCCCS #66

by Joanne James12. November 2013 16:01

An earlier post than usual from me today, as I am out at school this evening to discuss 'wins and learns' from the weekend's bonfire and fireworks evening, which was a huge success. As promised, today's creative post is a very festive Christmas card created using the current Paper Craft Crew Challenge sketch as my inspiration. Here is the challenge sketch:

I haven't made a banner card for a while, so thought I would take the opportunity to create a festive one. Here's my card:

I chose Real Red, Whisper White and Gumball Green for my festive creation and whilst I followed the layered style of the sketch, I chose to change the shape of my card and create a long, slim card (for which I created a bespoke envelope with my new envelope punch board!). I also incorporated my sentiment into my banner, rather than across the bottom of my card - I haven't used the Occasions Alphabet before, but it seemed perfect for a flagged banner here. My Hearts a Flutter stamps and framelit set enabled this card to come together easily.

Hop on over to the PCC Challenge page here to see what the Design team and other participants did with the sketch - there are some great creative inspirations to enjoy.

Back tomorrow with another project; until then, happy stampin'!


Stampin' Up Supplies Used:


Tags: , , , , , , , ,

Cards | Stamping

An Apple for the Teacher

by Joanne James12. July 2013 20:45

That's it for another year - school is officially out! Where does the time go? Today I'm sharing some of my teacher thank you gifts with you. I love to create handmade gifts and as some of my readers know, one of my other hobbies is biscuit making. So for my end of year teacher gifts, I decided to make apple-shaped chocolate iced biscuits, presented in the fab new Tag a Bag Gift Boxes and finished with a decorated tag from the co-ordinating accessory kit:

I often make mini-cookies and present in glass jars, but on this occasion these gift boxes were the perfect size and shape to hold ten of my apple biscuits. These boxes are great value at £6.25 for eight boxes and as they're food safe they are perfect for biscuits, cupcakes or other edible as well as non-edible gifts. I also made use of my accessory kit to seal and label the boxes. Here's a close up of one of the tags:

Wondering how I made the apples? I used the heart from my Hearts a Flutter framelits and then removed the bottom point with my Petite Curly Label Punch, added a leaf and stalk and done. A quick stamped and cut Bitty Banner 'thank you' and some Gumball Green ribbon added the finishing touch. One more photo for you with one of the biscuits out of the box so that you can see exactly what they look like:

Hoping to be back tomorrow with another project; have a busy day making tomorrow, as I have swaps to prepare for quarterly team training on Sunday and I haven't even started yet - oops! Until then, happy stampin'!


Stampin' Up Supplies:

Stamps: Bitty Banners

Cardstock: Whisper White, Real Red, Gumball Green, Chocolate Chip

Ink/Stampin' Write Markers: Real Red

Tools: Hearts a Flutter Framelits, Bitty Banners Framelits, 3/4" Circle Punch

Finishing Touches: Tag a Bag Gift Boxes, Tag a Bag Accessory Kit, White Baker's Twine

Hearts of Gold

by Joanne James11. June 2013 22:48

Very late post from me today, but having had a day out on a geography field trip, one of the children's classmates round for tea and a Parents' Association fete planning meeting, this feels like the first time I've sat down since breakfast! I've the second of my Golden Wedding Anniversary cards to share today, this one using the Hearts A Flutter stamps and framelits:

For this card I used a white card base with a raised brushed gold and white layered panel, with two gold embossed hearts. I have used the Hearts A Flutter stamps and framelits in many ways and love the versatility of this set. I used more gold embossing for the sentiment across the bottom of the card. So, quite different to yesterday's card but this is also on it's way to another couple celebrating 50 years of marriage - some achievement, for sure.

Back tomorrow with the last of the golden anniversary cards; until then, happy stampin'!


Stampin' Up Supplies:

Stamps: Hearts A Flutter, Memorable Moments

Cardstock: Whisper White, Brushed Gold

Ink/Stampin' Write Markers: Versamark

Tools: Hearts a Flutter Framelits, Stamp-a-ma-jig

Finishing Touches:  Gold Embossing Powder, Whisper White 5/8" Organza Ribbon

Tags: , , , , , , , , ,

Cards | Stamping

Easter Egg Treat Holder

by Joanne James25. March 2013 22:07

Today I have a lovely treat holder for you, the perfect size for a Creme Egg or something similar as a great way to 'dress up' your egg into something a little bit special. I made something similar when experimenting with wedding favour boxes a few weeks ago (I will photograph these and share another time!) and modified my original design slightly to accommodate a small Easter egg:


They were so easy: an open box base, sandwiched between two of the bookmark-style tags from the Two Tags Die set. A small hole punched for a handle, tied with some co-ordinating ribbon and a little tag made with one of the Hearts A Flutter framelits and decorated with the basket of Easter eggs stamp from the Spring Sampler set. The photo below just shows the eggs inside so you can see in more detail:

I'd like to say the eggs were still around, but ... well it is nearly Easter, right??! Might need to buy a couple more before I gift these to anyone!

Back tomorrow with another Easter project; until then, happy stampin'!


Stampin' Up Supplies:

Stamps: Spring Sampler, Bitty Banners

Cardstock: Calypso Coral, Pool Party

Ink/Stampin' Write Markers: Island Indigo, Calypso Coral, Lucky Limeade, Wisteria Wonder, Pool Party

Tools: Hearts A Flutter Framelits, Bitty Banners

Finishing Touches: Pool Party and Calypso Coral Ruffled Ribbon, Bakers Twine


Tags: , , , , , ,

3D Projects | Boxes | Stamping

Love Story Anniversary Card

by Joanne James26. February 2013 20:18

I know Valentine's Day is done and dusted, but this month I also celebrated my wedding anniversary, so forgive the hearts but I've another romantic card to share with you today.

The design of this card is cased from Brian King; you can see his original card here. I loved this card the first time I saw it and knew that I was going to have to re-create it. As I don't have the Hearts Framelits, my method was slightly different; I used a large heart punch to make the negative heart shape on the central panel, with the pink heart cut out using one of the Hearts a Flutter framelits and the white heart in the centre using the small heart punch. The winning element for me is the sentiment though - it summed up my thoughts perfectly and seems as appropriate after 14 years of marriage as it would on a wedding day. The colour combination also ticks my box; I find myself using lots of Grey and Melon Mambo lately.

Hope you like it; I'll be back with something different tomorrow. Until then, happy stampin'!


Stampin' Up Supplies:

Cardstock: Melon Mambo, Basic Grey, Whisper White

Stamps: One in a Million

Ink: Melon Mambo

Tools: Large Heart Punch, Hearts a Flutter Framelits, Small Heart Punch, Big Shot


Tags: , , , , , , , ,

Cards | Stamping

When is a Heart not a Heart? When it's a Flower!

by Joanne James3. February 2013 21:34

Back today as promised with a 3D project for you. I've seen a number of versions of similar pictures to these in cyberspace and am not sure who gets the credit for the original version - possibly the Australian company Mondo Cherry (you can check out their website here). Anyway, I've always wanted to have a go at creating one of these hearts, so inspired by my absolutely favourite new designer paper, More Amore, and hearts in a variety of shapes and sizes, this is what I came up with:

I kept things simple and just finished off with a few pearls to add interest. I love the way you get to see both sides of the paper in the design too - often one side is sacrificed for the other.


I think this would make such a lovely piece of wall art and would look beautiful in a little girl's bedroom. That's where this particular version is headed; my daughter loved it the moment she set eyes on it and has been desperate for me to take its picture and blog it so that it can be hung in its final destination! I love the effect that this kind of design creates; I may have a go with brighter colours and a more random pattern some other time - watch this space!

That's all for today - until next time, happy stampin'!


Stampin' Up Supplies:

Paper: Whisper White, More Amore (DSP)

Tools: Full Heart Punch, Small Heart Punch, Hearts a Flutter Framelits, Simply Scored, Bone Folder

Finishing Touches: Pearl Basic Jewels


Tags: , , , , , , , ,

3D Projects

Love Letters Straight From The Heart

by Joanne James1. February 2013 10:10

We are back to the LOVE theme today, with a cute set of four notelets with a coordinating box. I have designed them with Valentine's Day in mind, but these little 3" notelets are perfect for tucking into a lunchbox or loved one's pocket for a surprise love note.

I've used a selection of stamp sets to create this set:
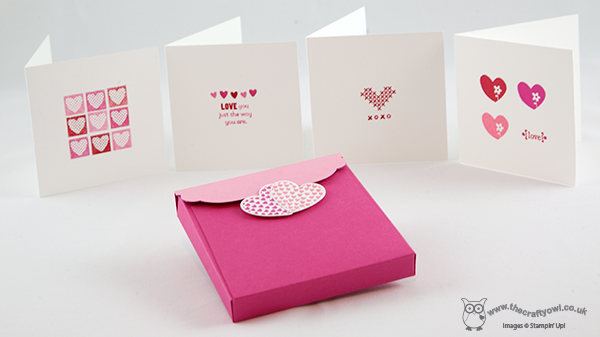
 

From the left, do you recognise the stamp used on the first card? I created the patchwork heart design by using my marker pens to colour the central section of the 'recover rapidly' Band-Aid stamp from the Sale-A-Bration Patterned Occasions stamp set, aligning each one with my trusty stamp-a-ma-jig to align them into a neat patchwork pattern. The second stamp is from a now retired set called 'Sprinkled Expressions' and the third uses the cross stitch heart from the Hoop La La set in the main catalogue. Lastly, the heart/flower stamp is one of 24 available in the set 'Spring Sampler' available in the new Spring Summer seasonal catalogue that goes live TODAY! There are lots and lots of lovely new items, some of which I've already featured and many of which you will see on my blog during the coming weeks and months. There is a link to the catalogue on the right hand side of my page; if you would like your own copy of the catalogue or would like to place an order, do get in touch with me at joanne@thecraftyowl and I will be happy to help.

I also whipped up a lovely two-tone box to keep them all in out of melon mambo cardstock with a co-ordinating regal rose flap shaped using one of the small Labels Collection framelits. To finish off, I stamped and cut a pair of hearts using the Hearts a Flutter set to tuck the box flap into and hold it in place.

My little girl has had her eye on these ever since she saw me putting them together, so I'm thinking I might slip the first one of mine into her school bag for a little surprise. The second might go into my husband's lunch box - assuming I stop crafting for long enough to make him a sandwich of course! I hope you are inspired to have a go and make something similar - do leave me a comment and let me know who you are sending yours to. Off to create now - until next time, happy stampin'!

Stampin' Up Supplies:

Stamps: Patterned Occasions, Sprinkled Expressions (retired), Hearts A Flutter, Hoop La La, Spring Sampler, Tiny Tags, Hearts a Flutter

Paper: Whisper White, Melon Mambo, Regal Rose

Stampin' Write Markers: Real Red, Melon Mambo, Regal Rose

Tools: Stamp-a-ma-jig, Hearts a Flutter Framelits, Labels Collection Framelits, Simply Scored

Current Promotions

Stampin Cut and Emboss

Save up to 30% off on all your favourite kits from 1 to 31 October! 

Click here to see the current kits available and order yours online today.

Join My Team

It's always a great time to join Stampin’ Up! During October you can get even more in your starter kit! New team members can get £160 worth of products for only £99 + free business supplies + free shipping + all the fun being a part of Stampin’ Up! Stampin' Up! has something for everyone: join my growing team and benefit from my support to enjoy Stampin' Up! however you choose.

If you're interested, call me for a chat to understand how I can help you realise your goals. Alternatively, if you have already decided to sign up and you just can't wait, please click here for the link to the online form where you can sign up and order your starter kit right away! 

Shop Online

Access my online shop 24 x 7, 365 days of the year:

Current October hostess code:

4XPEYCB9

Shop Online

Scrapbooking

Stampin' Up! has introduced a new range of 12x12" scrapbooking product and kit - the full range is now available to purchase online. To download a copy of the new digital Scrapbooking Catalogue click here.

Mini Catalogue

BROWSE THE CATALOGUE

'Tis The Season - the new Stampin' Up! Mini Catalogue is here! For more details and to download your copy click here

2024-25 Annual Catalogue

BROWSE THE CATALOGUE

Click on the image to download your copy of the 2024-25 annual catalogue. For a full list of current SU! supplies, go to my online store. If you would like any help or advice, please drop me a line at joanne@thecraftyowl.co.uk or give me a call on 07773 421446 - I'd be happy to help.

Latest Kits!

Stampin Cut and Emboss

The Christmas Ornaments Kit and Card Keeper Kit are the latest kits in the online store - get yours here!

New Online Exclusives

There are new products available exclusively in the online store from 5 November - check them out here.

About Me

Hi I'm Joanne and live in Northampton and when I'm not looking after my husband and two beautiful children, am an avid crafter with a passion for all things Stampin' Up!

I must confess that I have never been a big rubber stamper - until I discovered Stampin' Up! that is. I love the fact that I can get such great results with co-ordinating stamps, inks, papers and punches - the possibilities are endless! Join me on my stamping journey as I share the things I love and be inspired to create amazing things yourself!

Follow Me

Monthly Newsletter

Box Builder

Click the button above to use Box Buster to create your custom box design using the Envelope Punch Board!

Kits Collection Now Available!

Stampin Cut and Emboss

The new Kits Collection from Stampin' Up! is now available!

Click here to see the current kits available and order yours online today.

I Design For


Stampin' Up Stuff

This is my personal blog and is not endorsed by Stampin’ Up! I hope you find it a plentiful source of ideas and personal inspiration but please don't copy my designs for contest submission or use for classes, publication or sale without express permission.