by Joanne James7. October 2014 08:00Today I'm back with a Christmas card (haven't had one of those for a few days!!) I saw this week's sketch over at Create With Connie and Mary this week and immediately had an idea - always great when that happens! Here is the sketch that inspired my card:
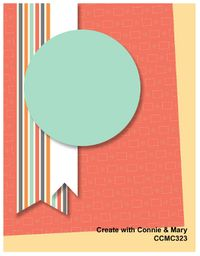
This is a great sketch with many possibilities; I wanted to use the 'Mingle All The Way' stamp from the stamp set of the same name and this is the card I came up with:
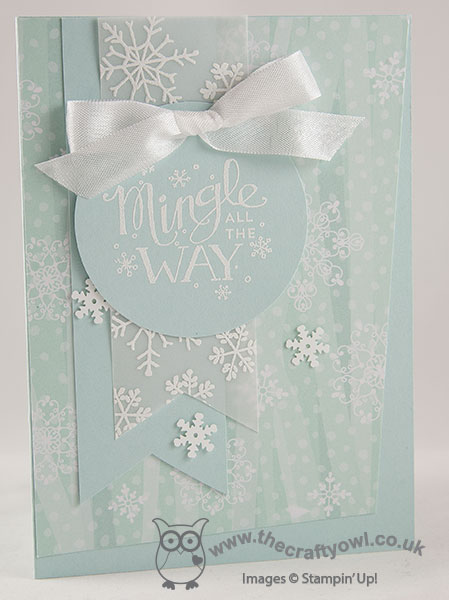
I used Soft Sky for my card base and a piece of the swirly snowflake paper from the 'All is Calm' speciality DSP pack for my offset layer. I then used a plain piece of Soft Sky for my bottom banner flag and overlaid this with a vellum banner that I stamped in Versamark with snowflakes from the Endless Wishes stamp set and then heat embossed in White. For the circle, I stamped the sentiment again in Versamark and heat embossed in white, then punched it out using my 2 1/2" circle punch. To finish, I added a few snowflake sequins and a bow in white seam binding ribbon.
Without trying, I made a monochromatic card, something I usually find quite tricky. I love the calm, serene feeling of this card.
Back tomorrow with this week's Design Team card for Colour Me...! and a new set of Wednesday Weekly Deals. Until then, happy stampin'!
Stampin' Up! Supplies Used:
by Joanne James2. October 2014 21:02A quick post from me today with one of the cards we made at my card class earlier this week. This month's class featured the Festival of Trees stamp set and co-ordinating punch - without further ado, here's today's card:
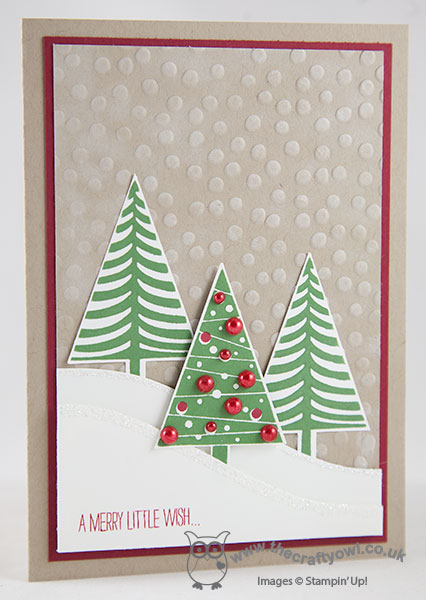
I started with a base of Crumb Cake with a mat of Cherry Cobbler, then an additional mat of Crumb Cake which was embossed with the Decorative Dots embossing folder and lightly sponged with white kraft ink to look like snow. I added two Whisper White snow drifts, edged with Dazzling Diamonds, and then stamped and punched three trees in Garden Green on Whisper White and interspersed them between the snow drifts. The tree at the front is also over-stamped with the bauble stamp in Cherry Cobbler and a few pearls coloured with Cherry Cobbler Blendabilities added to give extra dimension. A sentiment added inside and out, and finished!
All of the cards in this month's class were quite different as I was aiming to show my ladies just how versatile this stamp set and punch can be. If you live local to me in Northampton and would like to join me for a future class, do get in touch - newcomes, whether experienced or novice papercrafters, are always welcome!
That's all from me today; back tomorrow with another project. Until then, happy stampin'!
Stampin' Up! Supplies Used:
by Joanne James27. September 2014 21:27Hello lovely blog readers! I hope you're having a good weekend. I've spent my day preparing for my cardmaking class on Monday (more on that later in the week). I had a lovely day yesterday, the highlight of which was spending the morning at a fundraiser coffee morning held by my sister-in-law; wonderful cakes and tea in vintage china and a balloon release in memory of those we have known and loved who passed away as a result of cancer. We raised £323 in total which will go towards the charity MacMillan Cancer Support, to fund nurses to support those suffering this terrible disease, so a fantastic effort for a worthwhile cause.
Today I'm sharing my entry for this week's Merry Monday challenge, where Kathy is hosting a fun game of Christmas Bingo:
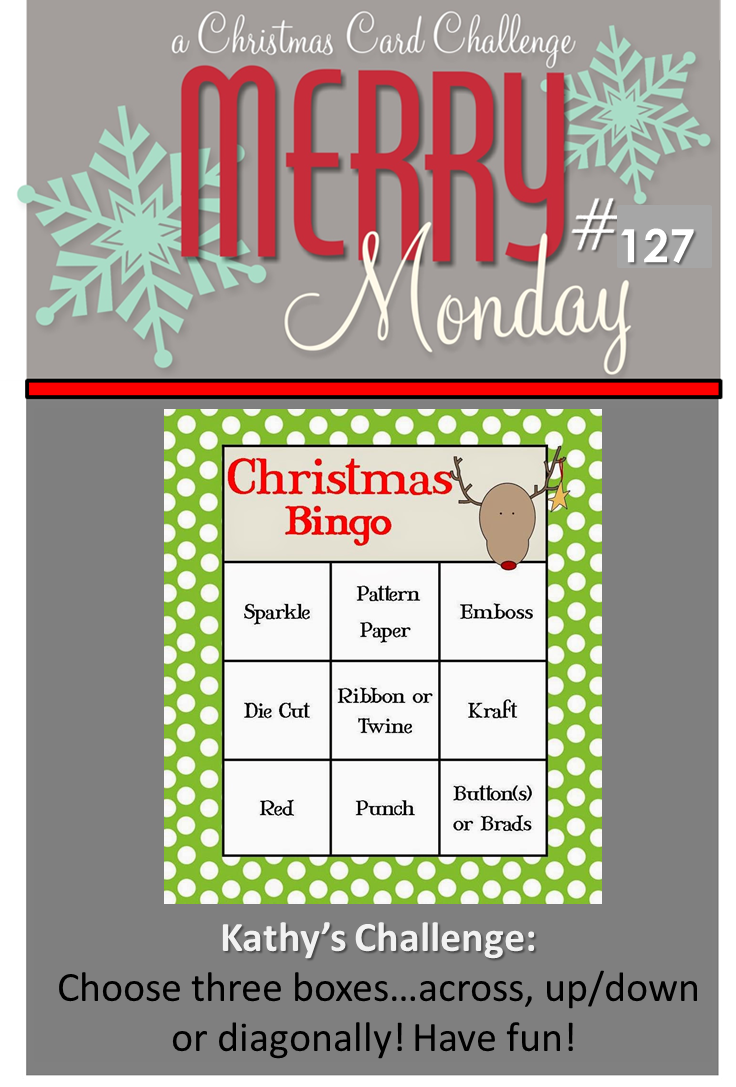
I decided to use the diagonal - red, ribbon or twine and emboss - for my card, which you can see below:
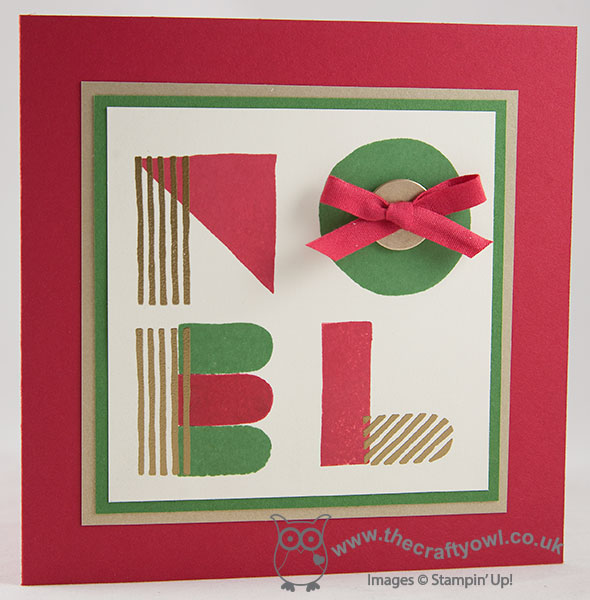
I decided to make a square card and wanted to try another sentiment-based card using the 'What's Your Type?' stamp set, this time using the word 'Noel' and more traditional Christmas colours of Real Red, Garden Green and gold. I stamped my sentiment onto Very Vanilla, with the lined elements of each letter stamped in Versamark and heat embossed in gold. I finished the 'O' with gold button threaded with Real Red 1/4" cotton ribbon and tied in a bow.
These cards are quite fun and not at all tricky when you get the hang of aligning the various stamps to make the letters. That's all from me today; back tomorrow with my Design Team card for The Paper Players - and a bonus card!
Until then, happy stampin'!

Stampin' Up! Supplies Used:
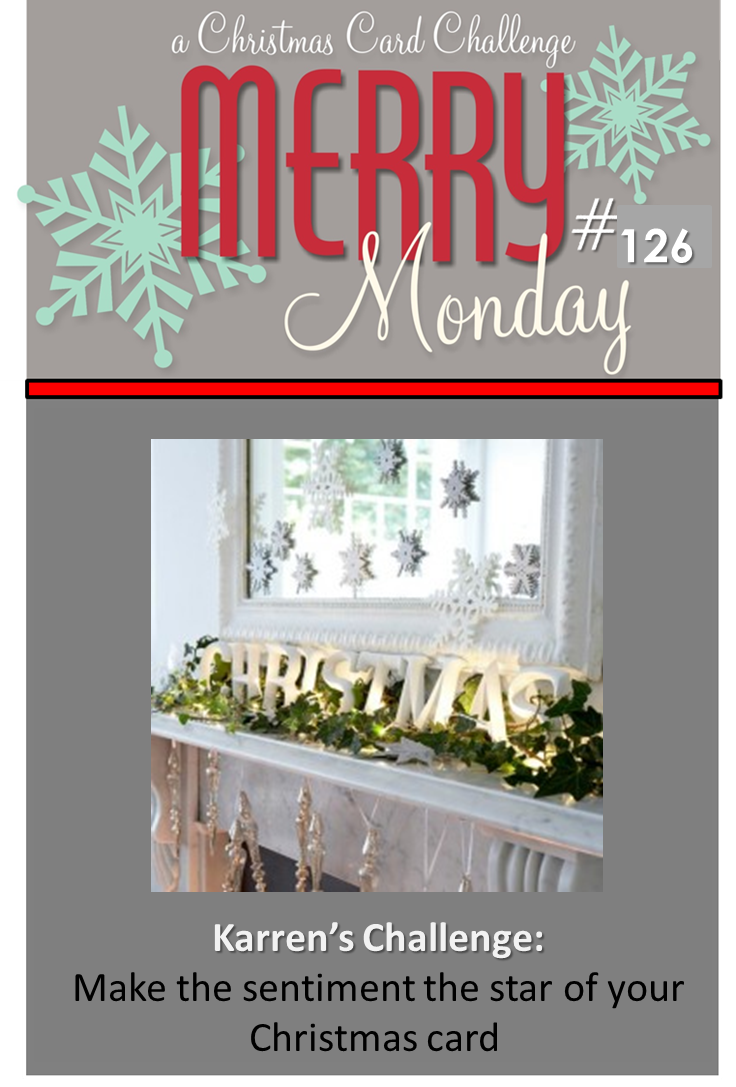
by Joanne James20. September 2014 21:51Here at last with today's post! A busy day today - homework, grocery shopping, we had friends round to make cake pops this afternoon (always fun!) and then a swimming gala this evening - so finally I'm sitting down for long enough to share today's card with you! Today's card is for this week's Merry Monday Christmas Challenge, where the theme from Karren this week is to let your sentiment take centre stage:
I was tempted to go with a few obvious choices for my card using some of the fabulous new sentiments in the current seasonal catalogue, but decided to take the opportunity to try something different that I've had in mind for a while. I made a sentiment all of my very own - take a look:
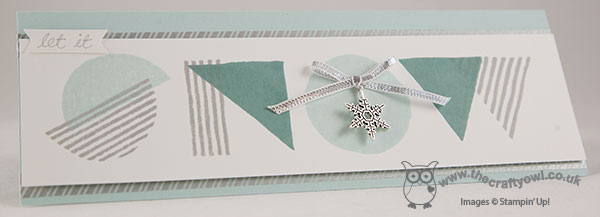
I decided to make a long, thin card and used the 'What's Your Type?' stamp set to stamp the word 'snow' using the various patterns and shapes in the set. I love this unusual graphic style type and it is great for making the sentiment the feature of your card. I stamped the various letters in a combination of Smoky Slate, Soft Sky and Lost Lagoon and finished the 'O' with one of the new snowflake embellishments and some silver ribbon. I mounted this section with dimensionals on a base of Soft Sky with a couple of strips of silver washi tape running along it. To complete my sentiment, I used my Smoky Slate Stampin' Write Marker to write 'let it' in my own handwriting on a little handcut banner and adhered to the top of the sentiment panel. A rather modern take on 'let it snow', granted, but I think it works and it's very different.
That's all from me; back tomorrow with this week's Design Team card for The Paper Players. Until then, happy stampin'!
Stampin' Up! Supplies Used:
by Joanne James19. September 2014 18:54Yay - it's Friday! I've had a productive craft day today, even if no housework managed to get done (ah well, there's always tomorrow for that!) and am finally finding time to write today's blog post. I used this week's sketch over at Retrosketches to make today's Christmas card and broke out my Festival of Trees stamp set for the first time. Here's the sketch I based my card on:
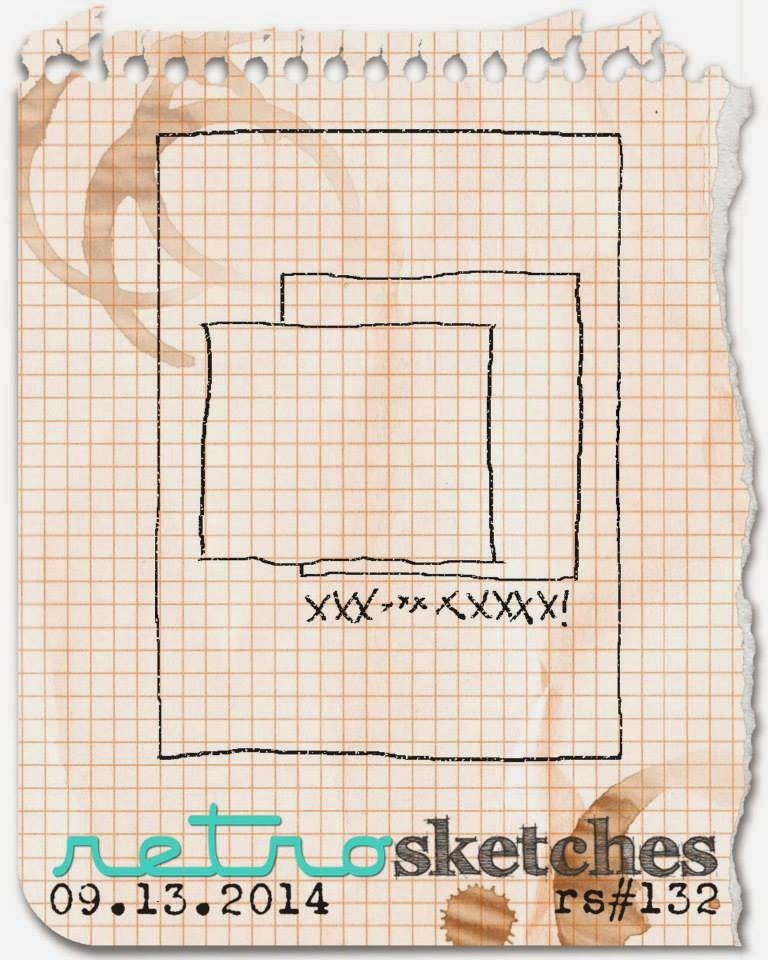
A great layered layout - and here's what I did with it:
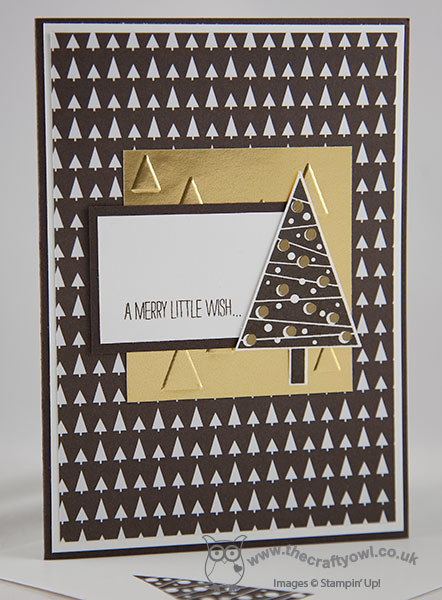
I based my card around the graphic Christmas tree design paper from the Trim The Tree DSP stack - these are so great for making cards! - and having layered this piece onto my Early Espresso card base and a mat of Whisper White, I embossed a piece of gold foil with the On Point embossing folder, which looks like little Christmas tree shapes, then followed this with a smaller piece of Whisper White mounted on Early Espresso and stamped with the first part of the sentiment that comes with the Festival of Trees stamp set. I then added my Christmas tree, which I stamped in Early Espresso on Whisper White, then stamped the baubles in Versamark and heat embossed them in gold - in real life they are really shiny and contrast beautiful with the dark brown of the tree. Oh and did I mention how easy it was to punch out with my co-ordinating tree punch? No? Well, it's a doddle!
An unconventional colour scheme for a Christmas card maybe, but I like it! Before I forget - I'm also joining up with the lovely Darnell's NBUS challenge - pretty much everything other than ink and solid colour cardstock that I used today was officially 'Never Before Used Stuff!'

Right - I'm off to catch up on some of the jobs that I should have been doing at home today. Back tomorrow with another Christmas card in an altogether more conventional colour scheme -until then, happy stampin'!
Stampin' Up! Supplies Used:
by Joanne James18. September 2014 10:37Well we're on the back end of the week already - yay! Thank you to all the new visitors to my blog yesterday who came to see my guest stamper card for The Color Throwdown and to those of you who left lovely comments on my blog - it's always nice to hear from my readers! I look forward to you becoming regular visitors.
Today's card is for this week's challenge over at 'Less is More' where the theme this week is 'beverages' and it's a one layer challenge. I pulled out one of my favourite Christmas retired sets, Scentsational Season, to make today's card; I thought a winter-warming hot chocolate should be the order of the day for my card, even if not outdoors as we are still enjoying a mild September (and long may it continue!). Here's my card:
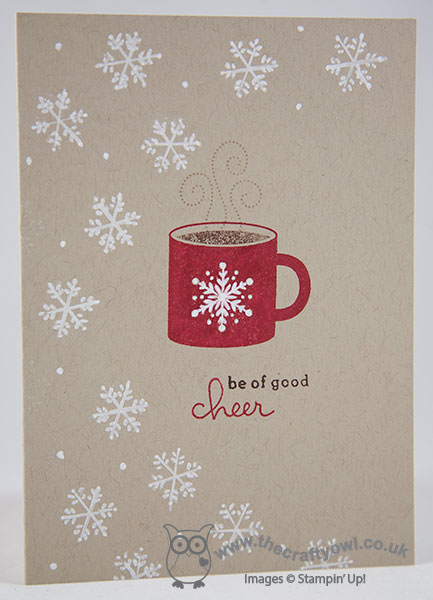
I used a Crumb Cake base and stamped my mug in Real Red, colouring the hot chocolate section of the mug separately with my Chocolate Chip Stampin' Write marker. I added my two-tone sentiment from the 'Endless Wishes' set, then using my Chalk Marker, I carefully coloured in the snowflake on the mug and randomly doodled a flurry of snowflakes around the edge of my card. I'm a tea drinker myself (in large quantities, usually about 10 cups a day!) but there's something really appealing about hot chocolate in the Winter time - I think it's the smell of cocoa and sugar which just cuts through cold air like nothing else!
Check out the gallery for more beverage inspiration - there are lots of fun cards there this week, and a whole range of beverages are featured including some altogether more alcoholic tipples too!
Back tomorrow with another project; until then, happy stampin'!
Stampin' Up! Supplies Used:
by Joanne James16. September 2014 08:45Apologies firstly for anyone who saw a partial post within the last 10 hours - my blog appears to have published one version of tomorrow's post whilst also saving a draft; not sure what's happened there, but as it wasn't complete anyway it won't have made much sense. Come back tomorrow to see the completed post, with card! I think the moral of the story is don't spend too much time late at night preparing blog posts.
Anyway - today I'm sharing a Christmas card that I made for this week's challenge over at Create with Connie and Mary, where we have been challenged to use the following colour palette:
Whilst today's card took less than 10 minutes to make, I could have made six in the time it took me to decide upon my final design! I started out with my 'All Is Calm' Christmas Designer Series Paper as I knew it featured these colours, but then was overwhelmed by all of the possibilities and options and couldn't decide where to start. Here's my finished card:
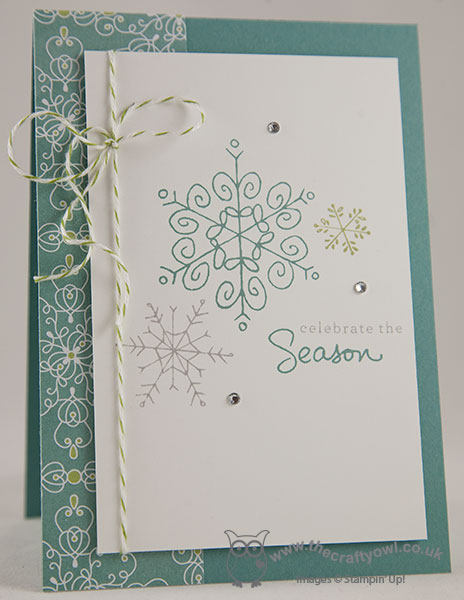
I eventually decided to use the paper you can see on the edge of this card; I had been unsure how I was going to use this pattern as I don't have any of the stamp sets that obviously co-ordinate with it and it's quite a bold pattern. Eventually I thought it would make the perfect background for my Endless Wishes stamp set - SOOO glad SU! put this in the catalogue this year for us Europeans to enjoy too! - so I bordered my Lost Lagoon base card with it, then adhered my stamped top panel using dimensionals after tying a loop of Old Olive baker's twine around it. I know this is a bit of a cheat to the colour palette, but there's so little of it in the twine it could be mistaken for Pear Pizzazz at a distance (or at least that's my story and I'm sticking to it!)
I love the simplicity of this card and think I will actually make a few more of these to add to my stock of Christmas cards. Back tomorrow with a double post for you: my usual Design Team card for Colour Me...! and a special post as the Guest Star Stamper over at The Color Throwdown as I was their Featured Stamper with this card last week! Oh, and not forgetting the new Wednesday Weekly Deals! Until then, happy stampin'!
Stampin' Up! Supplies Used:
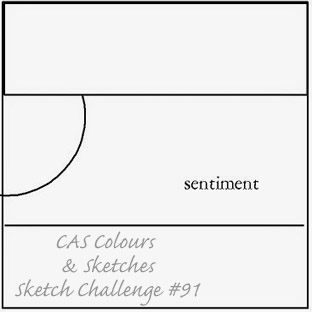
by Joanne James13. September 2014 20:40Back to my blog today after a couple of days absence; I've had a lot on these past few days and it's taken me until today to get back with it! At least now it's the weekend and today has seemed altogether more peaceful. I managed to make a card today with this week's challenge over at Merry Monday in mind; I also used the sketch over at CAS Colours and Sketches for my layout:
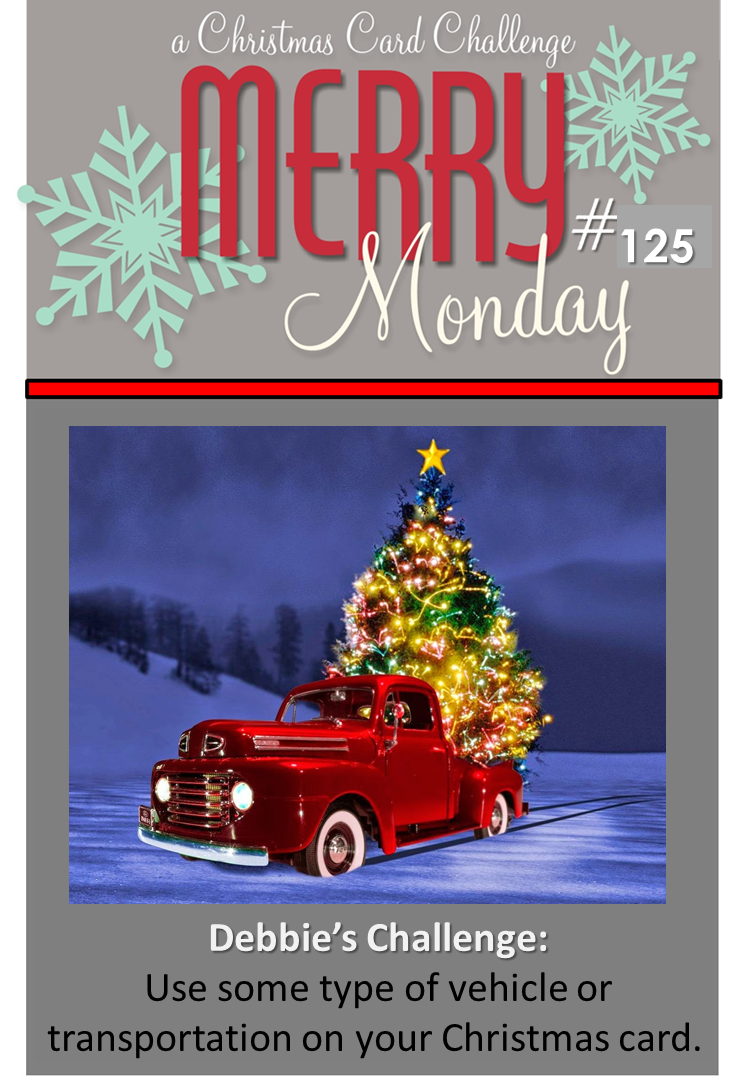
I was so inspired by the gallery cards over at Merry Monday this week - love all those cars and trucks transporting Christmas trees - that I wanted to have a go. Only problem is - I don't have a single car stamp. So I decided to think laterally and decided to use the santa sleigh and reindeer stamp from the 'Holiday Home' set - here is my card:
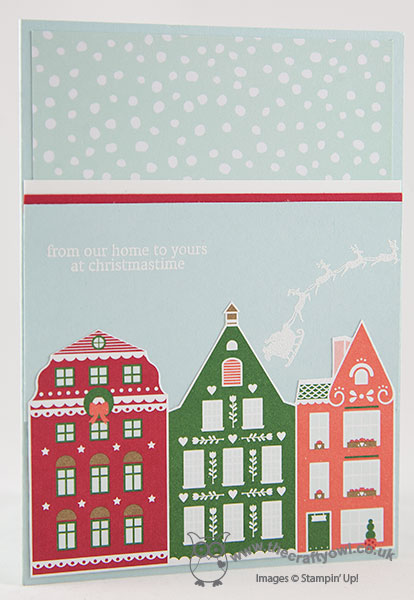
I actually turned the sketch upside down, so that I could use the reindeer and sleigh as the arched element of the design - the 'Holiday Home' stamp set is photopolymer so it's really easy to curve the stamp to look as if it was flying across the roof of the last house. I stamped the sleigh and sentiment in Versamark and heat embossed in Whisper White so that it would really stand out against the Soft Sky central panel. I edged the top of this with two thin stripes of Real Red and Whisper White respectively to add definition then used a piece of the snow pattern from the All is Calm DSP for the top section. For the bottom section, I fussy cut a row of houses from the Nordic Noel DSP - I love the bright colours in this paper and the little houses have such pretty designs.
I hope you like today's card; back tomorrow with my Design Team card for The Paper Players.
Until then, happy stampin'!
Stampin' Up! Supplies Used:
by Joanne James2. September 2014 21:12Another busy day today - getting ready for the return to school tomorrow of my beloved James Juniors, including an early visit to meet Ben's new teacher, as it has changed over the vacation to the one he was expecting prior to the end of last term. I love having them at home during holiday time and we have had lots of fun, but I think we will all benefit from a little more routine in our lives (although this time next week I might disagree!)
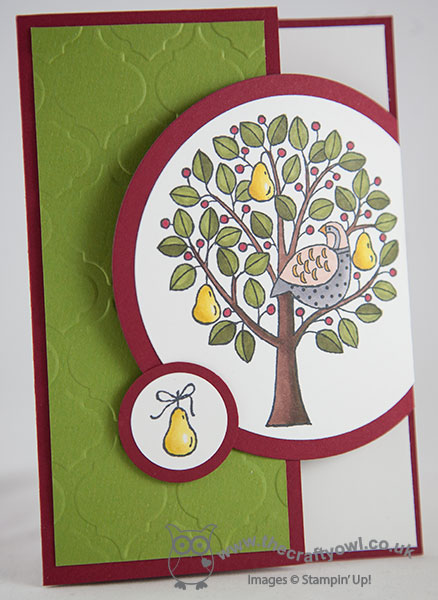
So today a quick share of another card I made with the 'Partridge & Pears' stamp, this time in reds and browns and stamping onto Sahara Sand as my base, rather than Whisper White. It give a totally different look and feel - take a look and see what you think:

I used Early Espresso as my card base, with a layer of the lovely Cherry Cobbler plaid patterned paper from the Trim The Tree DSP paper stack, the stamped my main image in Early Espresso on Sahara Sand. I coloured the image with my standard Stampin' Write markers and only used my Blendabilities on the pears (Old Olive) and the partridge's breast (skin tones). You have to be really careful when using Blendabilties on coloured cardstock, as they bleed into the paper much more quickly than with Whisper White. I added some colour to the leaves with my chalk marker. I finished my card with a sentiment from the 'Watercolor Winter Too' set stamped in Cherry Cobbler on Sahara Sand and cut it out with my Big Shot and Project Life framelits, then matted it onto a piece of Early Espresso which I just snipped the corners away from with a circle punch to echo the shape of the framelit.
I really like the more muted colours of this card - it's just a little bit different. Back tomorrow with my Design team post for the Colour Me...! challenge, so do pop by to see what our theme is this week, along with a new set of Wednesday Weekly Deals.
Until then, happy stampin'!
Stampin' Up! Supplies Used:
by Joanne James1. September 2014 19:59Happy Monday everyone! Mine has been a fun one; I had the first of my classes this month this afternoon and made Christmas cards for the first time - yay! This month's class featured the new 'Partridge & Pears' set from the seasonal autumn-winter catalogue as we also used it as an opportunity to get more practise using Stampin' Up! Blendabilities alcohol marker pens, following on for last month's class where we used them for the first time.
Today I'm sharing one of the cards I designed for the class, using a gatefold-type closure - here is the card:
The tree is stamped in Momento Black ink on Whisper White and coloured with a combination of Old Olive, Daffodil Delight, Cherry Cobbler, Smoky Slate, Pumpkin Pie and Skin Tones Blendabilites then cut out with the Big Shot and Circle Framelits. It is mounted on a Cherry Cobbler circle cut with the next size framelit up and the completed circle is scored and folded and adhered between the base and liner layer. The other front section is covered with a piece of Old Olive that has been embossed with the Mosaic embossing folder. The closure for the fold is made by stamping the pear from the same set onto Whisper White and punching out with the 1" circle punch, which is matted on a piece of Cherry Cobbler cut with the 1 1/4" circle punch, and attaching with to the front of the card with a Stampin' dimensional, so that the main circle can 'hook' underneath it as in the picture above.
When the card is open, it looks like this:
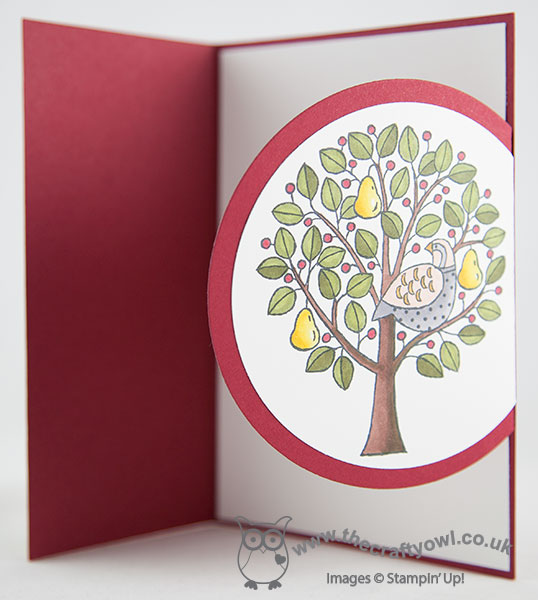
Lastly, a quick peek at the inside - there's still room for a sentiment over to the left, as it's hidden beneath the main front panel:

I hope you liked today's card; it's a little different and a fun way to ring the changes with a stamp like this. I'll share one or two more cards from my class later in the week. If you live in Northampton or the surrounding areas and would like to attend any of my classes, do drop me a line - all ages and abilities are welcome.
Back tomorrow with another project; until then, happy stampin'!
Stampin' Up! Supplies Used:
608748ef-6317-467c-92ba-b62f5bae9f25|0|.0|96d5b379-7e1d-4dac-a6ba-1e50db561b04
Tags: Christmas, Circles Framelits, circle punch, Mosaic Embossing Folder, Partridge & Pears, Classes, Shop online, Stampin' Up, Stampin' Up Card, Stampin' Up Card ideas, Stampin' Up Supplies
Cards | Stamping