Hometown Greetings Snowy Day Diecut CAS Card

by Joanne James21. January 2019 08:00

Another Monday, another week! As promised, I'm back today with another card that meets the criteria for this week's challenge over at The Paper Players - this one uses the current challenge colour palette over at CAS Colours and Sketches:


Today's card has a similar layout to yesterday's with a clean and simple style - and no stamping at all on the front of my card! So here it is: 


Again I used my Hometown Greetings Edgelits Dies, with a simple uncluttered design and minimal layers and embellishments. I used the challenge colours in blocks: the Crumb Cake for my card base, a panel of Balmy Blue for the sky and a pop of Real Red for the snowman's scarf which I cut by hand and adhered to his body with a little Tombo glue. For the snow on today's card, I used my retired Blizzard Thinlits die and used lots of the tiny circular diecut elements that nestle in between the larger snowflakes and stuck each of them on individually to create my falling snow. A rather painstaking exercise, but not too tricky with my handy Pick Up Tool and worth it for the overall effect.

Whilst there's no stamping on the front of my card, I did stamp a greeting on the inside, along with another pop of red (the heart is from the new Meant To Be stamp set):


Here is the visual summary of the key products used on today's projects for you to pin for easy reference:


You can see all of my Product and 'How To' summaries on my 'How To - Tips and Techniques' Pinterest board in case you've missed any. 

Enjoy your day; I am hoping mine is going to be a productive office day - if I get all of my admin tasks completed, i may even manage a little stamping time! I'll be back tomorrow with another project. Until then, happy stampin'!


Stampin' Up! Supplies Used: 

Table built using Product Table Builder by The Crafty Owl - Independent Stampin' Up! Demonstrator.

Textured Beautiful Blizzard Christmas Card

by Joanne James6. December 2018 22:00

Well it's taken me a few days as I've had a couple of classes and am knee-deep in all that comes with the preparations for the festive season, but today I'm here and sharing the last of the three cards that I designed for a recent technique class using the Beautiful Blizzard bundle - take a look:


Here's the low-down on today's card:

A Swirly Snowflake Blizzard - This card has the simplest of stamped backgrounds. I used a variety of the swirls and snowflake stamps in the set in both blues to create a stamped swirly snowflake blizzard. This is one of those very forgiving, easy stamped projects, perfect for a beginner and would work on a single layer card too.

Shimmery White Textured Snowflakes - The real 'wow' on this card is very difficult to see on the above photo: I made a mask using the Blizzard Thinlits and added a layer of textured snowflakes using shimmery white embossing paste. This looks so sparkly in real life and adds real texture and interest to the card design. I finished with some diecut snowflakes and a simple heat embossed sentiment.

A Sweet Sentiment - The sentiment on the inside of my card is one that just makes me go all warm and fuzzy inside:

Isn't that just so sweet?!

Here is the visual summary of the key products used on today's project for you to pin for easy reference:


You can see all of my 'How To' summaries on my 'How To - Tips and Techniques' Pinterest board in case you've missed any. 

Enjoy your evening and I'll be back soon with another project. Until then, happy stampin'!


Stampin' Up! Supplies Used: 

Table built using Product Table Builder by The Crafty Owl - Independent Stampin' Up! Demonstrator.

A Z-Fold Blizzard of Snowflakes for PP421

by Joanne James2. December 2018 09:00

Today it's Sunday and time for this week's new challenge over at The Paper Players - yay! It's the turn of the queen of florals, the lovely Jaydee,  to host this week and she has a festive theme challenge for you to work with:


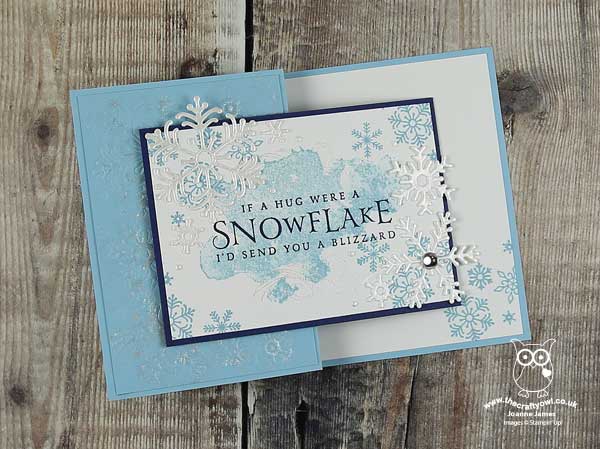
Jaydee has been kind to us with a broad theme this week - pretty much anything festive goes! I decided that I would take my inspiration from the snow in our badge picture this week and share a card that I made at a recent technique class using the Beautiful Blizzard bundle - take a look:


Here's the low-down on today's card:

An Embossed Blizzard - On this card I used the Blizzard Thinlits Die to create an embossed (as opposed to a diecut) panel to add interest to the fold behind my sentiment panel. I then sponged this liberally with Frost White Shimmer Paint for a subtle snowy sparkle. I love that the Big Shot Embossing Mats make this really easy and make our dies go further, opening up a whole new range of creative possibilities.

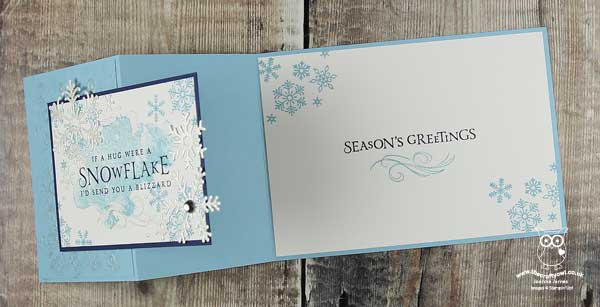
A Fancy Fold - This card uses a fancy fold that is quite simple to recreate - a z-fold - it's a great way to allow for overhanging diecuts without having to increase the overall size of the card and shows just a hint of the decoration inside too. Here's a picture of my card opened out so that you can see the inside fully:


A Drop of Frost - The stamping on my card is a random combination of the stamps in this set, with a few of the snowflakes left over from this card added for dimension. I finished one of these with a frosted droplet - these make perfect centres for a wintery snowflake.

I'm a little pressed for time with all that is going on in the James household during the holiday season, so no the visual summary of the key products used on today's project today although the table at the bottom of this post will of course take you directly to my online store if you would like to purchase any of the items featured on today's card. 

Before you reach for your ink and papers, check out what our amazing team has created to inspire you this week:

Here's a quick recap of our challenge rules:
 
1.  Create a new paper project
2.  Upload your creation to your blog with a link back to us and provide a direct link to the post featuring your challenge submission.
3.  Please link your card to no more than four challenges, TOTAL.
4.  Have FUN!

You can see all of my 'How To' summaries on my 'How To - Tips and Techniques' Pinterest board in case you've missed any. 

Enjoy your day - I shall be recovering from my first Christmas party yesterday and tacking a mountain of ironing today but I'll be back tomorrow with another project. Until then, happy stampin'!


Stampin' Up! Supplies Used: 

Table built using Product Table Builder by The Crafty Owl - Independent Stampin' Up! Demonstrator.

Beautiful Blizzard Panel Card

by Joanne James1. December 2018 16:00

Today I'm sharing the first of three cards that I designed for a recent technique class using the Beautiful Blizzard bundle - take a look:


Here's the low-down on today's card:

A Snowflake Blizzard - On this card I used the Blizzard Thinlits Die to cut a full panel of snowflakes. I used a piece of Whisper White cardstock that I first covered with an adhesive sheet on the reverse, then sponged the whole of the front liberally with Frost White Shimmer Paint for a subtle snowy sparkle. The use of a multi-purpose adhesive sheet is key for making this an easy project, as it means that the snowflakes and the surround can be used by simply peeling them off the backing paper. No fiddling around trying to add liquid adhesives to the narrow snowflake stems! This card features the 'negative' of the diecut; I'll be sharing the other two cards that use the rest of the snowflakes tomorrow and later in the week.

A Stitched Label - The label that features the sentiment on the front of my card is from the Stitched Labels Framelits; so pretty and perfect for the first part of my sentiment, along with a few stamped snowflakes too. 

A Sweet Sentiment - I love the sentiment on this card, which carries over from the front of the card to complete on the inside:

Without the 'season's greetings', this sentiment would be lovely for someone celebrating a winter birthday too. 

I'm a little pressed for time with all that is going on in the James household during the holiday season, so no the visual summary of the key products used on today's project today although the table at the bottom of this post will of course take you directly to my online store if you would like to purchase any of the items featured on today's card. 

Enjoy your evening - I am out at my first Christmas party this evening but I'll be back tomorrow with my card for this week's Paper Players challenge which will also feature snowflakes! Until then, happy stampin'!


Stampin' Up! Supplies Used: 

Table built using Product Table Builder by The Crafty Owl - Independent Stampin' Up! Demonstrator.

Beautiful Blizzard Christmas Card

by Joanne James7. November 2018 07:00

Today I'm sharing a card using last week's sketch over at the Paper Craft Crew:

I have a technique class featuring the Beautiful Blizzard Bundle next week and having designed the cards for my class I wanted to create another card in a similar colourway to demonstrate the versatility of this set and this sketch was perfect - take a look:


 Here's the low-down on today's card:

Beautiful Blizzard - This is such a pretty stamp set; the splodges, spots and wisps make it easy to create lots of texture in detail with minimal layering. I stamped the background behind my sentiment oval in a combination of Balmy Blue and Night of Navy, stamping some of the images full strength and stamping some off first to create depth. I also added a little touch of snow to the inside too:


Frosted Shimmer Snowflakes - I used a couple of the snowflakes cut with my Blizzard Thinlits Die to embellish my sentiment oval, liberally sponging each with Frosted White Shimmer Paint for a wonderful soft shimmery finish.

A Snowflake Trinket - To finish my card, I added one of the new snowflake trinkets too - because you can never have too many snowflakes!

Here is the visual summary of the key products used on today's project for you to pin for easy reference:


You can see all of my 'How To' summaries on my 'How To - Tips and Techniques' Pinterest board in case you've missed any. 

Enjoy your day; I've a busy day in my craft room today catching up following a busy day yesterday. One big thing achieved though - finally got the last bits in the kitchen finished so I'm all set to decorate the week after next then I'll be able to share some pictures! I'll be back tomorrow with another project. Until then, happy stampin'!


Stampin' Up! Supplies Used:

Table built using Product Table Builder by The Crafty Owl - Independent Stampin' Up! Demonstrator.

Mini Catalogue

BROWSE THE CATALOGUE

The mini catalogue is now live! Read and download your copy here.

Shop Online

Access my online shop 24 x 7, 365 days of the year:

Current April hostess code:

VDKNV7BH

Shop Online

Join My Team

It's always a great time to join Stampin’ Up! New team members can get £130 worth of products for only £99 + free business supplies + free shipping + all the fun being a part of Stampin’ Up! Stampin' Up! has something for everyone: join my growing team and benefit from my support to enjoy Stampin' Up! however you choose.

If you're interested, call me for a chat to understand how I can help you realise your goals. Alternatively, if you have already decided to sign up and you just can't wait, please click here for the link to the online form where you can sign up and order your starter kit right away! 

Latest Kit!

Stampin Cut and Emboss

The Rock Legend Kit has all you need to make 8 cards with coordinating envelopes. Along with the new Panda Friends Kit, both are available from January 4th for just £14 each - get yours here!

2023-24 Annual Catalogue

BROWSE THE CATALOGUE

Click on the catalogue for a full list of current SU! supplies - if you would like to order any of the items featured, please drop me a line at [email protected] or give me a call on 07773 421446 - I'd be happy to help.

New Online Exclusives

There are new products available exclusively in the online store from 5 March - check them out here.

About Me

Hi I'm Joanne and live in Northampton and when I'm not looking after my husband and two beautiful children, am an avid crafter with a passion for all things Stampin' Up!

I must confess that I have never been a big rubber stamper - until I discovered Stampin' Up! that is. I love the fact that I can get such great results with co-ordinating stamps, inks, papers and punches - the possibilities are endless! Join me on my stamping journey as I share the things I love and be inspired to create amazing things yourself!

Follow Me

Monthly Newsletter

Box Builder

Click the button above to use Box Buster to create your custom box design using the Envelope Punch Board!

Kits Collection Now Available!

Stampin Cut and Emboss

The new Kits Collection from Stampin' Up! is now available!

Click here to see the current kits available and order yours online today.

I Design For


Stampin' Up Stuff

This is my personal blog and is not endorsed by Stampin’ Up! I hope you find it a plentiful source of ideas and personal inspiration but please don't copy my designs for contest submission or use for classes, publication or sale without express permission.