Today it's Sunday and time for this week's new challenge over at The Paper Players! It's the fifth week of the month and the turn of the amazing Anne Marie to host with a fun TicTaToe challenge board for you to work with:
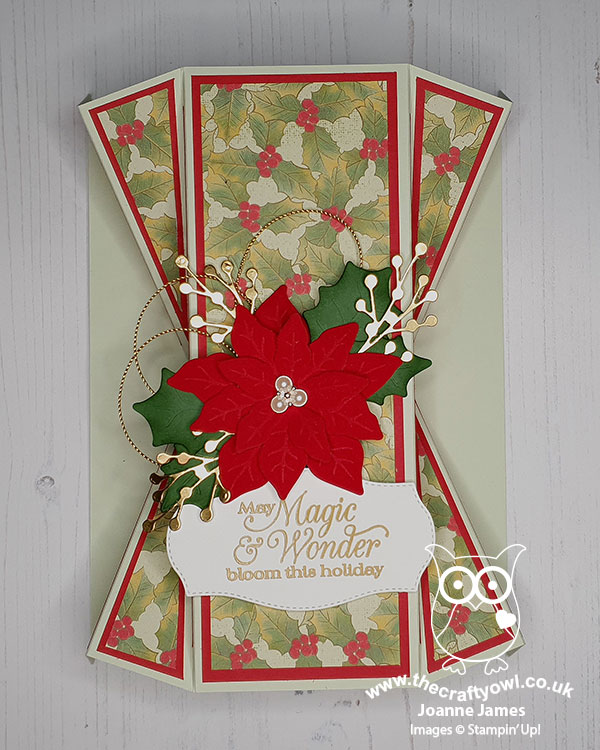
I decided to go all-out with a fancy fold card today and originally was aiming for the central column of the board with diecut - fancy fold - embellishment; by the time I'd finished my card, I had inadvertently covered every square except 'colouring tool'! This card (almost!) has it all - take a look:
Here's the low-down on today's card:
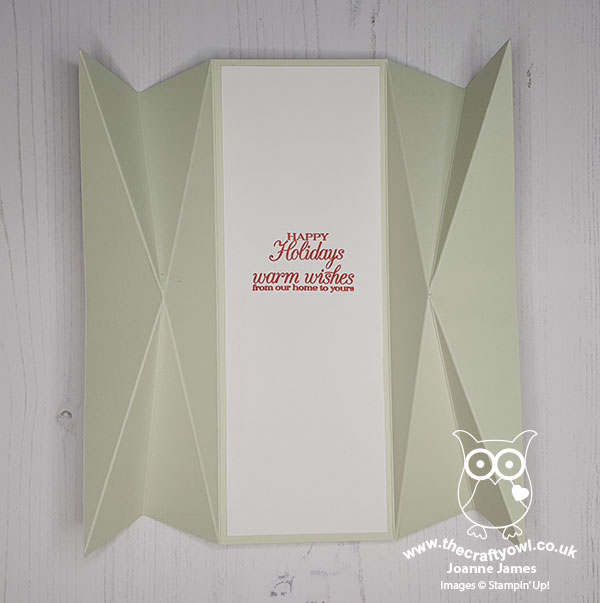
Double Fan Fancy Fold - I chose to make a double fan fancy fold card today as I've seen lots of these doing the rounds this season and for a fancy fold, they really aren't that tricky. I did a little bit of internet searching for a template, but in the end decided to make my own. My card measures 8 1/4" x 9", scored on the vertical at 1 1/2", 3", 6" and 7 1/2" and then scored on the diagonal as shown below. The basic outline is really straightforward - cutting the mats and layers to decorate was a little more time consuming, but worth it as they look lovely when finished. The card then has space on the reverse for the panel that would otherwise have been on the inside:
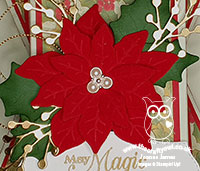
Poinsettia Showcase - I chose my favourite holly paper from the Poinsettia Place pack for my panels and chose to create a single layered poinsettia for my centrepiece. I cut a three layered flower from red velvet paper for my poinsettia using the poinsettia dies and added some holly leaves and gold berry sprigs. The red velvet paper is gorgeous and perfect for a showcase flower such as this - I wish you could feel the texture of it; it embosses beautifully too, as you can see on the close up below:
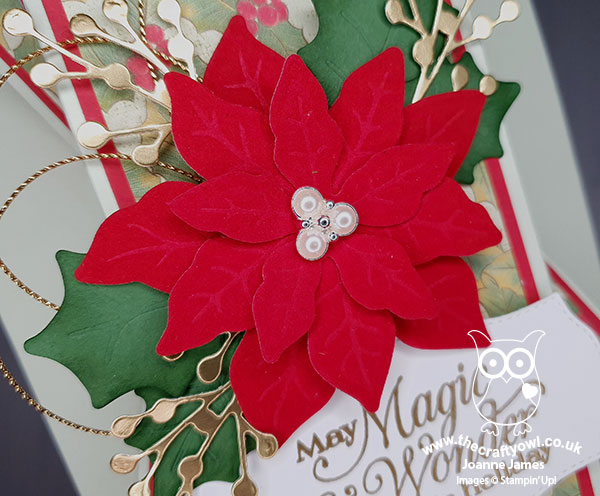
Pearls and Shine - I added a beaded pearl embellishment to the centre of my flower for the perfect finishing touch. Combined with the velvet paper, touches of gold foil and twine and gold embossed sentiment, this makes for quite a special Christmas card.
I'm linking my card up over at TGIF Challenges where the theme is 'Have a magical Christmas' (my sentiment was the perfect choice!) and over at SUO Challenges where the theme is also Christmas.
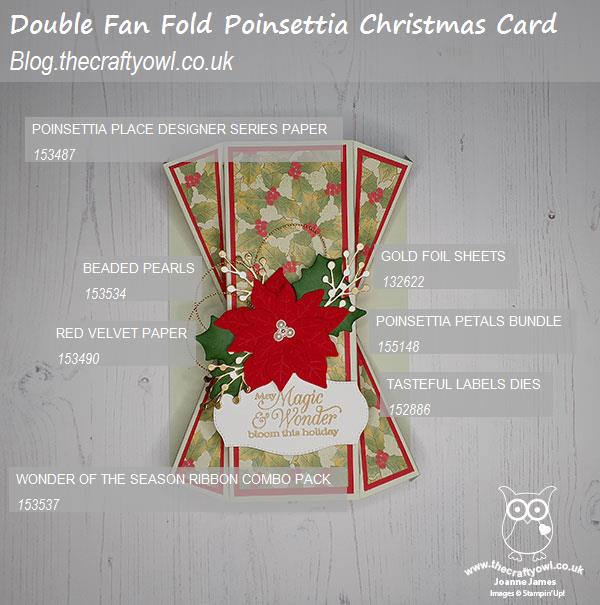
Here is the visual summary of the key products used on today's project for you to pin for easy reference:
You can see all of my Product and 'How To' summaries on my 'How To - Tips and Techniques' Pinterest board in case you've missed any.
Before you reach for your ink and papers, check out what our amazing team has created to inspire you this week:
The Paper Players Design Team
Here's a quick recap of our challenge rules:
1. Create a new paper project
2. Upload your creation to your blog with a link back to us and provide a direct link to the post featuring your challenge submission.
3. Please link your card to no more than four challenges, TOTAL.
4. Have FUN!
You can see all of my 'How To' summaries on my 'How To - Tips and Techniques' Pinterest board in case you've missed any.
Enjoy your day; for the first time ever whilst still in November, I think we are decorating the house for Christmas this afternoon. The James Juniors have been pestering me all week and to be honest I think we could all use a little festive cheer, so decorations it is! I'll be back tomorrow with another project. Until then, happy stampin'!
Stampin' Up! Supplies Used: