by Joanne James23. June 2026 12:00
It's Tuesday and time for a new challenge over at CAS Colours & Sketches. Suzy is hosting this challenge and we have a colour challenge for you:


These colours made me think Autumn/Winter, and I am so not ready to go there yet! But then I saw those beautiful florals over at Just Us Girls, with the striking dark purple bloom to the right of the centre of the mood board, and I decided to settle for simple florals and revisiting a fun technique - take a look:

Here's the low-down on today's card:
I thought the tiny floral stems from the Forever Florals bundle, along with a lovely swirly sentiment, would make a sweet clean and simple card and the flower heads themselves lend themselves nicely to the rock and roll technique: I inked my flower head stamp in Gorgeous Grape, then prior to stamping rolled the edges into my Blackberry Bliss ink pad. The result? Some pretty two-tone blossoms that really stand out against the white background:

I added a narrow strip of torn vellum to ground my stems and give my sentiment somewhere to 'sit' then added a simple twine bow to finish. I'm a lover of all things purple. so I particularly like the finished result on this card.
Here is the visual summary of the key products used on today's project for you to pin for easy reference:

You can see all of my 'How To' summaries on my 'How To - Tips and Techniques' Pinterest board in case you've missed any.
As a reminder, for our colour challenges, you must use all of the stated challenge colours. You may also use neutral colours; however, the challenge colours should be the most noticeable ones featured on your card. We use Stampin' Up! colour names for reference, but you are welcome to use any other companies' products as long as you match the challenge colours as closely as possible.
Enjoy your day; I am still ploughing through a mountain of post holiday washing and ironing, but it comes with the territory so I'm not complaining! and I'll be back soon with another project. Until then, happy stampin'!
Stampin' Up! Supplies Used:

by Joanne James21. June 2026 08:00
Today it's Sunday and time for this week's new challenge over at The Paper Players! It's the turn of the fabulous Jan to host this week and she has a fun clean and simple challenge for us to work with:

I am all about the sunshine so I wanted to reflect that in my card today - take a look:

Here's the low-down on today's card:
I created my rays by stamping the sunray stamp from the Joyful Squares stamp set twice and added my sentiment from Splash & Relax in Azure Afternoon to a diecut circle, embellished with a pair of cool sunnies for good measure:

And that's it - super simple, super fun! If you haven't given Joyful Squares a second look, you can still pick it up for a song on the last chance section of the online store - such a great stamp for scrapbooking and cardmaking alike.
Here is the visual summary of the key products used on today's project for you to pin for easy reference:

You can see all of my Product and 'How To' summaries on my 'How To - Tips and Techniques' Pinterest board in case you've missed any.
Before you reach for your ink and papers, check out what our amazing team has created to inspire you this week:
The Paper Players Design Team
Anne Marie Hile - on leave
Here's a quick recap of our challenge rules:
1. Create a new paper project
2. Upload your creation to your blog with a link back to us and provide a direct link to the post featuring your challenge submission.
3. Please link your card to no more than four challenges, TOTAL.
4. Have FUN!
Enjoy your day; I am arriving back from a two week vacation in the USA today and hoping to bring the sunshine with me! I'll be back later in the week with another project. Until then, happy stampin'!
Stampin' Up! Supplies Used:

8e9e7c70-381c-413a-9b89-83315ce34b9a|0|.0|96d5b379-7e1d-4dac-a6ba-1e50db561b04
Tags: Shop Stampin' Up! Online, Stamping Shop Stampin' Up online, Shop online, Stampin' Up, Stampin' Up Card ideas, Stampin' Up Supplies, Stampin' Up Card, The Paper Players, Clean and Simple, Stylish Shapes Dies, Splash and Relax, Joyful Squares
Cards | Shop Online | Shop Stampin' Up! Online | Stamping
by Joanne James19. June 2026 13:00
Today I'm sharing my design team card for our new challenge over at As you See It where it's time for a colour challenge, chosen by me:

.jpeg)

The challenge graphic might be bright flowers, but I decided to go with another summer card with a pool/beach vibe - perfect for another entry over at Time Out Challenges with summer and water as my chosen words. Take a look:

Here's the low-down on today's card:
I went with a tone-on-tone stencilled watery background (I am officially in love with the Water Decorative Mask!), then added an inflatable rubber ring and beach ball for some pool fun and some sunnies and a visor to keep the sun at bay whilst at play, all from the Splash & Relax bundle. I created another custom sentiment by using my Mini Alphabet Dies to accentuate the word ‘splash’:

Some sparkly enamel dots from my stash to give the illusion of sunlight bouncing off the water surface completes my card.
Here is the visual summary of the key products used on today's project for you to pin for easy reference:

You can see all of my 'How To' summaries on my 'How To - Tips and Techniques' Pinterest board in case you've missed any.
Here's a summary of our challenge rules:
- Create any card, scrapbooking page, 3D or packaging project that fits the challenge.
- For a Colour Challenge use all of the given colours and only those colours with these exceptions:
- White and Very Vanilla are free colours.
- In addition, you may use of ONE of these neutrals: Basic Black, Basic Gray, Crumb Cake, Basic Beige.
- Please include the challenge graphic and link back to the challenge in your post.
- Make sure you link the specific post and not the whole blog to the Linky. Use AYSI#(insert challenge number) when uploading to a public gallery
- Please turn off word verification so that we can send you lots of feedback.
- You can combine our challenge with up to 3 other compatible challenges.
- We do reserve the right to delete, or not consider for Top Pick and Featured Artist, entries that do not comply with these guidelines.
We look forward to seeing your creations in the AYSI gallery.
Enjoy your day and I'll be back tomorrow with another project. Until then, happy stampin'!
Stampin' Up! Supplies Used:

c46da9b7-c773-4ca5-b0cd-a480aa50758c|0|.0|96d5b379-7e1d-4dac-a6ba-1e50db561b04
Tags: Stampin' Up, Stampin' Up Card, Stampin' Up Card ideas, Stampin' Up Supplies, Shop online, Shop Stampin' Up online, Shop Stampin' Up! Online, As You See It Challenge, Mini Alphabet Dies, Splash and Relax, Water and Dotted Lines Decorative Masks
Cards | Shop Online | Shop Stampin' Up! Online | Stamping
by Administrator14. June 2026 08:00
Today it's Sunday and time for this week's new challenge over at The Paper Players! It's the turn of the fabulous Christy to host this week and she has a bright colour challenge for us to work with:


I thought these colours were perfect for summer and the Just Us Girls Challenge this week, and I’m also linking up over at Time Out Challenges with ‘summer’ and ‘water’ as my chosen words - take a look at what I came up with:

Here's the low-down on today's card:
I decided to use my Party Alphabet Dies to create a punny sentiment as the focal point of my card. I added some water stencilling to the letters before adding some diecut foam from the Rolling Waves bundle (I did both of these steps before I diecut the letters) then layered some fun leaves, shells and umbrellas using the other dies in the Rolling Waves bundle to add a little extra summery feel:

I thought this was a fun way to create a ‘sea card with a difference’ - what do you think? Here is the visual summary of the key products used on today's project for you to pin for easy reference:

You can see all of my Product and 'How To' summaries on my 'How To - Tips and Techniques' Pinterest board in case you've missed any.
Before you reach for your ink and papers, check out what our amazing team has created to inspire you this week:
The Paper Players Design Team
Anne Marie Hile - on leave
Here's a quick recap of our challenge rules:
1. Create a new paper project
2. Upload your creation to your blog with a link back to us and provide a direct link to the post featuring your challenge submission.
3. Please link your card to no more than four challenges, TOTAL.
4. Have FUN!
Enjoy your day; I'll be back later in the week with another project. Until then, happy stampin'!
Stampin' Up! Supplies Used:


38d7041f-c16f-46e9-bcc7-33d6b074ef94|0|.0|96d5b379-7e1d-4dac-a6ba-1e50db561b04
Tags: Shop Stampin' Up! Online, Stamping Shop Stampin' Up online, Shop online, Stampin' Up, Stampin' Up Card ideas, Stampin' Up Supplies, Stampin' Up Card, The Paper Players, Party Alphabet Dies, Rolling Waves, Cutest Crew
Cards | Shop Online | Shop Stampin' Up! Online | Stamping
by Joanne James9. June 2026 12:00
It's Tuesday and time for a new challenge over at CAS Colours & Sketches. The lovely Rachel is hosting this month and our first challenge is a sketch challenge:


She has asked that we use a simple tag shape with an overlaid sentiment on a square card base. Feel free to flip or rotate the sketch when making your card.
For my card today I'm also playing along over at Addicted to CAS where the code word is 'critter' and I'm featuring a pair of them on today's card:

Here's the low-down on today's card:
I added this cute little bug from the Cute As A Bug designer series paper to my tag, grounding her with a little shading and added a sweet bee delivering a flower to her directly to my cardbase:

A simple sentiment from 'Meant To Bee' completes my card - cute as can bee, right?
Here is the visual summary of the key products used on today's project for you to pin for easy reference:

You can see all of my 'How To' summaries on my 'How To - Tips and Techniques' Pinterest board in case you've missed any.
As a reminder, for our colour challenges, you must use all of the stated challenge colours. You may also use neutral colours; however, the challenge colours should be the most noticeable ones featured on your card. We use Stampin' Up! colour names for reference, but you are welcome to use any other companies' products as long as you match the challenge colours as closely as possible.
Enjoy your day and I'll be back tomorrow with another project. Until then, happy stampin'!

9134cc26-37ed-4eca-a47e-493a147c8cd0|0|.0|96d5b379-7e1d-4dac-a6ba-1e50db561b04
Tags: Stampin' Up, Stampin' Up Card, Stampin' Up Card ideas, Stampin' Up Supplies, Shop online, Shop Stampin' Up online, Shop Stampin' Up! Online, CAS Colours and Sketches, Cute As A Bug, Tailor Made Tags Dies, Meant To Bee.
Cards | Shop Online | Shop Stampin' Up! Online | Stamping
by Joanne James8. June 2026 08:00 
Today I've a quick post to share a card for the current challenges over at Color Hues and AAA Cards:


I thought the previous AAA Cards layout would be perfect for a collection of summery bits (I went with the options summer/sun/beach) and pieces from the Splash & Relax bundle and those colours were the perfect way to showcase them - take a look:

Here's the low-down on today's card:
I went with a combination of inflatable rubber ring, a drinks container and some cool pink shades, all with a watery stencilled background to add to the summer pool vibe:

A suitable sentiment from the same set completes my clean and simple card - fun in the sun anyone?
Here is the visual summary of the key products used on today's project for you to pin for easy reference:

You can see all of my 'How To' summaries on my 'How To - Tips and Techniques' Pinterest board in case you've missed any.
Enjoy your day and I'll be back tomorrow with another project. Until then, happy stampin'!
Stampin' Up! Supplies Used:

c0098902-dbf5-4d22-9784-1039048b8ae0|0|.0|96d5b379-7e1d-4dac-a6ba-1e50db561b04
Tags: Shop Stampin' Up! Online, Stamping Shop Stampin' Up online, Shop online, Stampin' Up, Stampin' Up Card ideas, Stampin' Up Supplies, Stampin' Up Card, Impressions Abloom, In Bloom, Splash and Relax, Water and Dotted Lines Decorative Masks, Clean and Simple
Cards | Shop Online | Shop Stampin' Up! Online | Stamping
by Joanne James7. June 2026 08:00
Today it's Sunday and time for this week's new challenge over at The Paper Players! It's the turn of the fabulous Stef to host this week and she has a theme challenge for us to work with:

It's Father's Day here in the UK in a few weeks time, so Stef's challenge provided the perfect opportunity for me to get my cards ready. I had a few to make, but thought I'd share the funniest one with you! Take a look at my card:

Here's the low-down on today's card:
This card was a labour of love - in more ways than one! The James Junior had seen something similar on one of his socials (I'm afraid I was unable to trace it to give credit - but thank you, whoever you are!) and promptly screenshot it and asked me to make one for the hubs for Father's Day in a couple of week's time. It features a bunch of retired stamp sets: Skinny Mini Alphabet, Make A Difference and others and pretty much speaks for itself! I stamped the question first, followed by the house and present, then painstakingly created the phrases in between.

It was a bit of a squeeze (in truth, I wish I'd stamped the question a little higher to leave more of a gap in between, but there we are). Otherwise, I'm pretty happy with how it turned out and the fact that my son laughed like a drain when he saw it means that lining up all those alphabet stamps was indeed worthwhile! Good job his Dad has a sense of humour, that's all I can say!
Before you reach for your ink and papers, check out what our amazing team has created to inspire you this week:
The Paper Players Design Team
Anne Marie Hile - on leave
Here's a quick recap of our challenge rules:
1. Create a new paper project
2. Upload your creation to your blog with a link back to us and provide a direct link to the post featuring your challenge submission.
3. Please link your card to no more than four challenges, TOTAL.
4. Have FUN!
Enjoy your day; I'll be back soon with another project. Until then, happy stampin'!
7197926a-156a-4a1e-b6a5-7cc0aa2a7c10|0|.0|96d5b379-7e1d-4dac-a6ba-1e50db561b04
Tags: Shop Stampin' Up! Online, Stamping Shop Stampin' Up online, Shop online, Stampin' Up, Stampin' Up Card ideas, Stampin' Up Supplies, Stampin' Up Card, The Paper Players, Father's Day, Skinny Mini Alphabet, Make A Difference
Cards | Shop Online | Shop Stampin' Up! Online | Stamping
by Joanne James5. June 2026 18:11
Today I've another super quick post to share a card for the current challenge over at SUO Challenges:
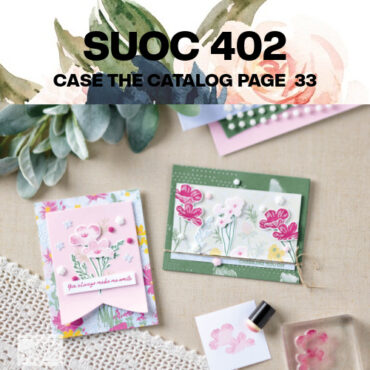
The challenge is to case one of the cards on page 33 of the current Stampin' Up! catalogue so I went with the one featuring a pink banner on the left - take a look:

Here's the low-down on today's card:
I used the retired Impressions Abloom bundle and In Bloom designer series paper, along with a few retired floral embellishments too:

This card makes a change for me, as I don't often use DSP for a card base with a stamped banner detail on top, but I quite like the finished effect. This card came together quite quickly, so much so that I actually made two of these cards at the same time.
Enjoy your day and I'll be back tomorrow with another project. Until then, happy stampin'!

by Joanne James5. June 2026 13:00
Today I'm sharing my design team card for our new challenge over at As you See It where it's time for my favourite, a sketch challenge, designed by Jan:

As soon as I looked at Jan's sketch layout, I imagined a balloon for that large circle - and then I couldn't unsee it, so I just went with it! Take a look at what I came up wtih:

Here's the low-down on today's card:
I used some retired Bright & Beautiful designer series paper to give the background to my card a fun party feel and pulled the colours out to use for my balloon and sentiment. Full disclosure: the new Balloon Festoon Dies were what got me thinking about large balloons but I don't own them (yet!) I realised I had a retired oval framelit that was the same size, so I used it to make my own balloon, tied with a twine string. I added a layered sentiment using the Words of Beauty bundle that fits with the birthday theme:

A couple of Berry Burst enamel dots complete my card. Balloons are perfect for birthdays - what would you do with that circle in the sketch?
Here is the visual summary of the key products used on today's project for you to pin for easy reference:

You can see all of my 'How To' summaries on my 'How To - Tips and Techniques' Pinterest board in case you've missed any.
Here's a summary of our challenge rules:
- Create any card, scrapbooking page, 3D or packaging project that fits the challenge.
- Please include the challenge graphic and link back to the challenge in your post.
- Make sure you link the specific post and not the whole blog to the Linky. Use AYSI#(insert challenge number) when uploading to a public gallery
- Please turn off word verification so that we can send you lots of feedback.
- You can combine our challenge with up to 3 other compatible challenges.
- We do reserve the right to delete, or not consider for Top Pick and Featured Artist, entries that do not comply with these guidelines.
We look forward to seeing your creations in the AYSI gallery.
Enjoy your day and I'll be back tomorrow with another project. Until then, happy stampin'!
Stampin' Up! Supplies Used:

766b6dcc-f03a-436e-b5ec-60b9e9fa21a0|0|.0|96d5b379-7e1d-4dac-a6ba-1e50db561b04
Tags: Stampin' Up, Stampin' Up Card, Stampin' Up Card ideas, Stampin' Up Supplies, Shop online, Shop Stampin' Up online, Shop Stampin' Up! Online, As You See It Challenge, Ovals Framelits, Words of Beauty, Bright and Beautiful
Cards | Shop Online | Shop Stampin' Up! Online | Stamping
by Administrator31. May 2026 08:00
Today it's Sunday and time for this week's new challenge over at The Paper Players! It's my turn to host this week and as it's the fifth Sunday of the month we have a bonus TicTacToe challenge board to work with:


I've chosen a board full of my favourite things so I'm looking forward to seeing which row or column you tackle. I went down the middle column with flowers/free/patterned paper for my card, but there are also some diecuts, yellow and layers in there too! I used the sketch over at Atlantic Hearts Sketch Challenge for my layout - take a look at what I came up with:

Here's the low-down on today's card:
I decided I wanted to make a yellow card, so went hunting for some yellow papers - the retired Floral Delight pack was perfect. I already had a couple of flowers fussy cut that worked perfectly with the layout, so all I had to do was choose some other papers in the pack for the strips and border, add in some additional sprigs of greenery courtesy of my trusty retired sprig punch, and add a diecut sentiment from my favourite Words of Beauty sentiment set:

A few enamel dots and a linen bow complete my card. There's something so cheerful about a yellow card - I love the bright gingham border on this one too.
Here is the visual summary of the key products used on today's project for you to pin for easy reference:

You can see all of my Product and 'How To' summaries on my 'How To - Tips and Techniques' Pinterest board in case you've missed any.
Before you reach for your ink and papers, check out what our amazing team has created to inspire you this week:
The Paper Players Design Team
Anne Marie Hile - on leave
Here's a quick recap of our challenge rules:
1. Create a new paper project
2. Upload your creation to your blog with a link back to us and provide a direct link to the post featuring your challenge submission.
3. Please link your card to no more than four challenges, TOTAL.
4. Have FUN!
Enjoy your day; I spent yesterday afternoon watching the James Junior playing cricket in the soaring heat; no amount of ice lollies between runs seemed to cool anyone down! Today I am going to get up early and tackle my mountain of ironing (a necessary evil of having the boy home - but I wouldn't have it any other way!) before the heat of the day whilst the hubs is out on his paddleboard giving someone a lesson, then hopefully spend a relaxing afternoon pottering in the shade. I'll be back tomorrow with another project. Until then, happy stampin'!
Stampin' Up! Supplies Used:

a4991a80-3f26-4ca3-b311-b3c8eaf9dee6|0|.0|96d5b379-7e1d-4dac-a6ba-1e50db561b04
Tags: Shop Stampin' Up! Online, Stamping Shop Stampin' Up online, Shop online, Stampin' Up, Stampin' Up Card ideas, Stampin' Up Supplies, Stampin' Up Card, The Paper Players, Words of Beauty, Floral Delight, Scalloped Contours Dies
Cards | Shop Online | Shop Stampin' Up! Online | Stamping