Swirly Snowflakes Thinlits Square Easel Christmas Card

by Joanne James8. December 2017 12:00

It's Friday and finally I've managed to squeeze in a blog post to share with you - hurrah! Today I'm sharing another card using the Snowflake Sentiments bundle - and just like my card for The Paper Players on the Sunday before last (you can see that card here if you missed it), it uses the thinlits in a rather unusual way. I'm also linking up with the team over at Stamp Ink Paper who are looking for snow-themed creations this week:

I decided to make an easel card  - this is what it looks like closed:


This is what it looks like open:


And finally here's another shot from above, that shows the detail of the front edge and my sentiment, which I stamped in Versamark and heat embossed onto a label punched with the Everyday Label Punch:


I wanted to make a special card that really showcased the versatility of the Swirly Snowflakes Thinlits Dies, so I used the edge thinlits to create two layered squares and finished it with a stitched square, onto which I stamped a snowflake from the co-ordinating Snowflake Sentiments set in Versamark and heat embossed it in gold. I finished with one of the super-sparkly faceted gems to create a focal centrepiece. Creating a card like this is not for the faint-hearted - it took a fair amount of partial die cutting and snipping of the gold piece to remove excess pieces in order to have a symmetrical design, but it was so worth it - the finished card has a real 'wow' factor, I love it!

I'm pleased to see that the Snowflake Sentiments stamp set and Swirly Snowflakes Thinlits Dies are on carryover and will remain available beyond the end of the Autumn-Winter catalogue - this means lots more opportunities to create with this set! They won't be available as a bundle though, so if you want the 10% saving, be sure to snap them up before January 2nd - just click on the link in the supplies list at the bottom of today's post.

Here is the visual summary of the key products used on today's project for you to pin for easy reference:


You can see all of my 'How To' summaries on my 'How To - Tips and Techniques' Pinterest board in case you've missed any. 

Enjoy your day and I'll be back around lunchtime tomorrow with a special post as I'm the guest designer over at Inspired By All The Little Things this week. My project contains a Spring-Summer sneak-peek too so be sure to come back and take a look. Until then, happy stampin'!


Stampin' Up! Supplies Used:

Table built using Product Table Builder by The Crafty Owl - Independent Stampin' Up! Demonstrator.

Snowflake Sentiments For The Paper Players PP372

by Joanne James26. November 2017 09:00

It's Sunday and time for this week's new challenge over at The Paper Players! It's my turn to host this week and I have my favourite kind of challenge, a sketch, for you all to work with:


My card today is all about the snowflakes and uses the Snowflake Sentiments bundle - take a look:


Here's the low-down on today's card:

Snowflake Inspiration - I used the piece of snowflake patterned paper from the Christmas Round The World DSP pack as the starting point for my card today; the dark grey reminds me of a snowy sky and is the perfect backdrop for those pale blue and white snowflakes.

Swirly Snowflake Border - The paper pairs beautifully with the stamps and thinlits in the Snowflake Sentiments bundle. I used the Swirly Snowflake thinlits to create my layered border and snowflake embellishment. The detail on these delicate cuts makes for some really pretty pieces, especially when cut from Dazzling Diamonds glimmer paper - the snowflakes are so sparkly against the Pool Party layer and the grey of the background paper. The thinlits are designed to cut with a straight edge to one side of the border, but I wanted them to be a mirror image so I snipped away the excess from the snowflakes and cut the background piece in the same way.

Open To Interpretation - I added a ribbon and bow to my sketch as I don't often add bows to the front of my card, yet when I came to make my card, I chose not to add a bow as I didn't want to obscure the detail of those pretty snowflakes, although I did add a strip of ribbon between the border layers. I also moved up the position of my snowflake embellishment to provide a better balance with the positioning of my sentiment. These changes don't make my card 'wrong' - they are just one way to interpret the sketch. I can't wait to see how it inspires you!

Here is the visual summary of the key products used on today's project for you to pin for easy reference:


You can see all of my Product and 'How To' summaries on my 'How To - Tips and Techniques' Pinterest board in case you've missed any. 

Before you reach for your ink and papers, check out what our amazing team has created to inspire you this week:

The Paper Players Design Team
 
 
Here's a quick recap of our challenge rules:
 
1.  Create a new paper project
2.  Upload your creation to your blog with a link back to us and provide a direct link to the post featuring your challenge submission.
3.  Please link your card to no more than four challenges, TOTAL.
4.  Have FUN! 


I look forward to seeing your interpretations of my sketch in the gallery this week. Enjoy the rest of your weekend as it will be over all too quickly; we are ice-skating later with the swimming squad - our first Christmas party of the season! I'll be back tomorrow with another project; until then, happy stampin'!


Stampin' Up! Supplies Used: 

Table built using Product Table Builder by The Crafty Owl - Independent Stampin' Up! Demonstrator.

Label Me Pretty 2017-19 In-Colour Thank You Card

by Joanne James21. November 2017 21:30

I'm finally back with a post today! With my American friends celebrating Thanksgiving tomorrow, I thought today a card that expresses gratitude was in order. Today's card also fits for a few challenges that are happening at the moment too (click on the badges to go to the respective blogs):


My card uses an incredibly useful bundle from the annual catalogue - take a look:


Here's the low-down on today's card:

Be Thankful - I am thankful for many things and I love that the Label Me Pretty set has this wonderful sentiment that is perfect for giving thanks and showing appreciation to others - finished with a teeny, tiny heart - adorable! This is such a great set for layering, with so many options. I created a crib sheet for my open house ages ago which I've been sharing with my face-to-face customers in classes; it has been so well received I thought I would share it here so that you could all save it too:


Details, Details - In addition to my layered label, my card has some other neat details: the tiny scalloped edge on the left is courtesy of the Decorative Ribbon Border Punch and the scalloped edge was cut with the scallop thinlit in the Seasonal Layers Thinlits set; the curved flower detail from the 'Label Me Pretty' stamp set fits it perfectly, how convenient! 

Don't Forget The Pretty - My card has a very feminine feel to it, with the Powder Pink and Fresh Fig in-colours balancing beautifully against the white, along with the tiny florals and pretty detailing, all finished off with a tied Powder Pink ribbon. Not my usual style, yet nice to ring the changes once in a while.

Here is the visual summary of the key products used on today's project for you to pin for easy reference:


You can see all of my 'How To' summaries on my 'How To - Tips and Techniques' Pinterest board in case you've missed any. 

I'll be back tomorrow with another project. Until then, happy stampin'!


Stampin' Up! Supplies Used:

Table built using Product Table Builder by The Crafty Owl - Independent Stampin' Up! Demonstrator.

Warm and Cozy Clean And Simple Christmas Sweater PP371 GDP113

by Joanne James19. November 2017 09:00

It's Sunday and time for this week's new challenge over at The Paper Players! It's the turn of the super-talented Sandy, to host this week and she has a fun clean and simple challenge for us to work with:


I'm a little late with my post today - I am still struggling to keep up with everything as I am so very busy at the moment - but I couldn't miss the opportunity to join in with Sandy's clean and simple 'warm and cozy' challenge in this week's Global Design Project challenge colours - take a look:


Here's the low-down on today's card:

Warm and Cozy - When I think of cold winter days, I think of mittens, gingerbread latte and woolly jumpers; so what better than a Christmas jumper to fit with the 'warm and cozy' theme? There are some fun sweaters in the 'Christmas Sweaters' stamp set; I decided to go with the simple striped one with a snowflake centrepiece for my clean and simple card. With a nod to the lovely Sandy who is such an expert colourer, I decided to get out my new Stampin' Blends to colour my sweater. I'm not sure I'm as good as Sandy when it comes to colouring, but it sure is fun and allowed me a peaceful 10 minutes in my otherwise hectic day!

Deck The Halls - I knew I wanted to use a few simple embellishments and I didn't want to add too many layers to my clean and simple card, so I decided to create a little patterned background with my sentiment to sit behind my sweater. I used my stamp-a-ma-jig to line up my sentiment and just stamped it repeatedly in Cherry Cobbler ink. Keeping this detail to one area of the card allows me to preserve the 'white space' that is a key feature of a clean and simple card.

All Good Things Come In Threes - Along with the trio of festive colours that feature on my sweater, I have also used a trio of embellishments: a (retired) wooden snowflake, a Pool party twine bow and some Pool Party enamel shapes for some added fun detail. I tried to keep my embellishments to a minimum given this week's theme but couldn't resist these additional touches to complete my warm and cozy card.

Here is the visual summary of the key products used on today's project for you to pin for easy reference:


You can see all of my Product and 'How To' summaries on my 'How To - Tips and Techniques' Pinterest board in case you've missed any. 

Before you reach for your ink and papers, check out what our amazing team has created to inspire you this week:

The Paper Players Design Team
 
 
Here's a quick recap of our challenge rules:
 
1.  Create a new paper project
2.  Upload your creation to your blog with a link back to us and provide a direct link to the post featuring your challenge submission.
3.  Please link your card to no more than four challenges, TOTAL.
4.  Have FUN!

Don't forget the theme is clean and simple this week - so minimal layers and embellishments and lots of white space. I can't wait to see what you create and look forward to visiting your blogs this week! Enjoy the rest of your weekend as it will be over all too quickly; I'll be back later with news of a fantastic week of promotions that will be starting tomorrow and hope to resume something like normal blogging service this week. Until then, happy stampin'!


Stampin' Up! Supplies Used: 

Table built using Product Table Builder by The Crafty Owl - Independent Stampin' Up! Demonstrator.

Painted Harvest Triple Fold Card

by Joanne James15. November 2017 22:00

Today I'm just popping by with a quick blog post to share a quick card with you - the last of my cards from my technique class featuring the Painted Harvest bundle earlier this month. Our final card is a real showcase of the fabulous Painted Autumn designer series papers in the form of a triple fold card - take a look:


Continuing with our 'thankful' theme, the triple fold design of this card showcases the gorgeous Painted Autumn papers, with five different panels of paper on the main Very Vanilla folded section and a sixth on the belly band that holds it closed. There is a hidden circle on the inside of the back panel on which to write your greeting and the belly band is decorated with another of those lovely sunflowers and another of the sentiments in the Painted Harvest set. I can't find my photo of the card when open, showing the inside - if I manage to track it down in my backed up projects I'll come back and update this post. In the meantime, I'm sure you get the idea!

Here is the visual summary of the key products used on today's project for you to pin for easy reference:


You can see all of my 'How To' summaries on my 'How To - Tips and Techniques' Pinterest board in case you've missed any. 

If you've enjoyed the outputs of this class, I have a similar one featuring the Delightful Daisy Suite on Monday 4th December with a couple of spaces left - you can see the full details here. Contact me for more information or to book your place - I would love you to join us!

Don't forget 9PM tomorrow is the first opportunity you will have to go online and reserve the new Stamparatus stamp positioning tool - you can read all about it here. I'll be back tomorrow with another reminder and hopefully a creative project too. Until then, happy stampin'!


Stampin' Up! Supplies Used:

Table built using Product Table Builder by The Crafty Owl - Independent Stampin' Up! Demonstrator.

Painted Autumn Suite Collage Card

by Joanne James7. November 2017 06:00


I'm back with another of the cards made at yesterday's technique class featuring the Painted Autumn Suite, which also uses the current sketch over at The Paper Craft Crew:

 Play along with the Paper Craft Crew for Square Sketch Challenge 266. The challenge starts November 1st and ends November 7, 2017 at 1 PM EST. Visit the blog at www.papercraftcrew.com to check out the design team samples and to submit your project. #papercraftcrew #papercrafting #sketchchallenge #color #playalong #imakecards #cardmaker #diy #sendacard #craft #stampinup #cardchallenge #papercraft #bigshot #rainydayfun #designteam #becreative #artsandcrafts #hobby #snailmail #createeveryday #crafttherapy #creativelifehappylife #pcc2017

I love the fact that the sketch had lots of bits and pieces which allowed me to use lots of the items in the Painted Autumn Suite:


Here's the low-down on today's card:

Painted Autumn Patterns - I decided to use the panel to feature a piece of the gorgeous Painted Autumn DSP that I hadn't used previously. I hope you, like me, stocked up on this paper when it was part of the 'buy 3, get 1 free' offer -  the designs really are beautiful. I took my inspiration from the swirly leaves and branches of the paper and using the sketch built my design from there.

All About Texture - This card is full of elements that add texture: ribbon, burlap, enamel dots, punched leaves, touches of nature elements, punched border - all of which add to the loose, collage feel. 

Realistic Planks - The background panel is embossed with the Pinewood Planks Textured Impressions Embossing Folder. This 3D, dynamic folder creates deep and realistic dimensional embossed impressions that look just like the grain of pinewood planks - the perfect way to add interest to my background without detracting from the other elements.

I'm also linking up with the gals over at SUO Challenges today where they currently have a 'thankful' theme going on. 

Here is the visual summary of the key products used on today's project for you to pin for easy reference:


You can see all of my 'How To' summaries on my 'How To - Tips and Techniques' Pinterest board in case you've missed any. 

I am managing an early post today as I have an all-day Christmas stamp-a-stack and then I'm out talking to a local women's group about festive packaging this evening. I hope you have a great day; I'll be back tomorrow with another project. Until then, happy stampin'!


Stampin' Up! Supplies Used:

Table built using Product Table Builder by The Crafty Owl - Independent Stampin' Up! Demonstrator.

Painted Harvest Eclipse Thank You Card

by Joanne James6. November 2017 21:30

It's Monday and the start of another week - only 7 weeks to go until Christmas! I'm not counting down today though; Today I'm sharing a card that I made with the ladies in the second of my technique classes this month that also fits a new(ish) challenge that has appeared in blog land - the TicTacToe Challenge:


I went across the top row for my Painted Harvest thank you card - take a look:


Here's the low-down on today's card:

Large Letter Eclipse - Eclipse cards that use a word raised out of a background are everywhere right now and so on-trend, i thought it was about time I shared one with you. What a great opportunity to use those Large Letter Framelits again - these framelits really are so worth the investment! I went with a wide, thinner card than usual that is just right to fit my 'thanks'.

Painted Harvest - I created my sunflower background using a repeating pattern of bright sunflowers; my chosen colours are Crushed Curry and Peekaboo Peach and I think the latter most certainly adds a vibrancy to this card - the letters really 'pop' against those sunflowers.

A Split Sentiment - I decided to use a split sentiment to really tie my raised letters into the theme of my card: on my small cut oval I partially stamped one of the sentiments from the Painted Harvest set that says 'gather together & give thanks', omitting the 'thanks' and selectively inking the remaining portion, so that my raised letters complete the sentiment. 

Here is the visual summary of the key products used on today's project for you to pin for easy reference:


You can see all of my 'How To' summaries on my 'How To - Tips and Techniques' Pinterest board in case you've missed any. 

I hope your day was a productive one; the ladies in today's class all produced some fabulous creations! My next class in December is using the Delightful Daisy bundle - for more details check out the event on my Facebook page here and get in touch to book your place. I'll be back tomorrow with another project using the Painted Harvest stamp set. Until then, happy stampin'!


Stampin' Up! Supplies Used:

Table built using Product Table Builder by The Crafty Owl - Independent Stampin' Up! Demonstrator.

Holiday Pines Hug In A Mug For PP369

by Joanne James5. November 2017 09:00

It's Sunday and time for this week's new challenge over at The Paper Players! My good friend LeAnne is the hostess this week and she has a seasonal theme for us to work with:


I was rather pressed for time this week and had been wanting to play along with the team over at Merry Monday with that fun inspiration photo so took the opportunity to use some of my hoarded retired Adventure Bound DSP along with my new 'Hug In A Mug' Stamp Set and combined the two to come up with this card - take a look:


My pines were in-situ and ready to go so I simply heat-embossed my sentiment in white, having already created a shadow in Early Espresso, to enable it to stand out against the wood effect DSP, fussing cut my little mug and added some puffy frosting to my hot chocolate having added white embossing powder to Tombo glue and heated it to create the puffy effect - I made a video tutorial on this technique previously that you can see here. I added a stamped striped candy cane and that was my card done - so easy to recreate.

Here is the visual summary of the key products used on today's project for you to pin for easy reference:


You can see all of my Product and 'How To' summaries on my 'How To - Tips and Techniques' Pinterest board in case you've missed any. 

This card is destined for a good friend of mine who recently emigrated to the USA; I miss our chats over coffee so I know this is one piece of happy mail that will surely brighten her day. 

Before you reach for your ink and papers, check out what our amazing team has created to inspire you this week:

The Paper Players Design Team
 
 
Here's a quick recap of our challenge rules:
 
1.  Create a new paper project
2.  Upload your creation to your blog with a link back to us and provide a direct link to the post featuring your challenge submission.
3.  Please link your card to no more than four challenges, TOTAL.
4.  Have FUN! 


I look forward to seeing what you create with this week's theme. Enjoy the rest of your weekend as it will be over all too quickly; I'll be back tomorrow with another project; until then, happy stampin'!


Stampin' Up! Supplies Used: 

Table built using Product Table Builder by The Crafty Owl - Independent Stampin' Up! Demonstrator.

Around The World Christmas Card

by Joanne James30. October 2017 05:00

Today I'm sharing a card for this week's challenge over at Freshly Made Sketches:

I decided to do something different with the Around The World designer series papers again - take a look:


Here's the low-down on today's card:

A Trio Of Papers - I've used designer series paper from two packs on today's cardboth of which are available in the 'Buy 3, Get 1 Free' designer series paper promotion. There are two more days for you to stock up on the papers on offer, so don't delay! There are three different patterns of designer series paper on today's card: the first is the red and white diagonal stripe from the Be Merry collection, and the second is one of two from the Around The World pack. The first of the Around the World papers is the Pool Party snowfall background; can you spot the second one? 

Look Who's Talking - The second of the Around The World papers on my card is the speech bubble - this is fussy cut directly from one of the sheets in the pack. The sheet in question features 29 sayings in a variety of languages - what fun! Perfect for a no-stamping card too. I backed my speech bubble with a piece of Basic Grey cardstock for additional stability and snipped it allowing a thin border all the way around to add more definition and help it standout on my card.

A Seasonal Colour Combo - I took the colours for my card today directly from the speech bubble - a festive combination of cool Pool Party Blue with warm Cherry Cobbler red, along with Whisper White and Basic Grey as neutrals. Here is my colour combination should you wish to save it for your creative inspiration:


Here is the visual summary of the key products used on today's project for you to pin for easy reference:


You can see all of my 'How To' summaries on my 'How To - Tips and Techniques' Pinterest board in case you've missed any. 

Enjoy your day and I'll be back tomorrow with another project. Until then, happy stampin'!


Stampin' Up! Supplies Used:

Table built using Product Table Builder by The Crafty Owl - Independent Stampin' Up! Demonstrator.

Leaf Punch Christmas Wreath PP368

by Joanne James29. October 2017 09:00

It's Sunday and time for this week's new challenge over at The Paper Players! The clocks went back last night here in the UK so whilst this heralds the official arrival of winter, it also means an extra hour in bed - bliss! It's the fifth week of the month and the turn of the lovely Jaydee to host this week. She has a tic-tac-toe board to challenge our creative juices:


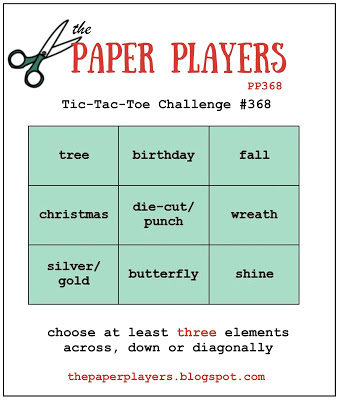
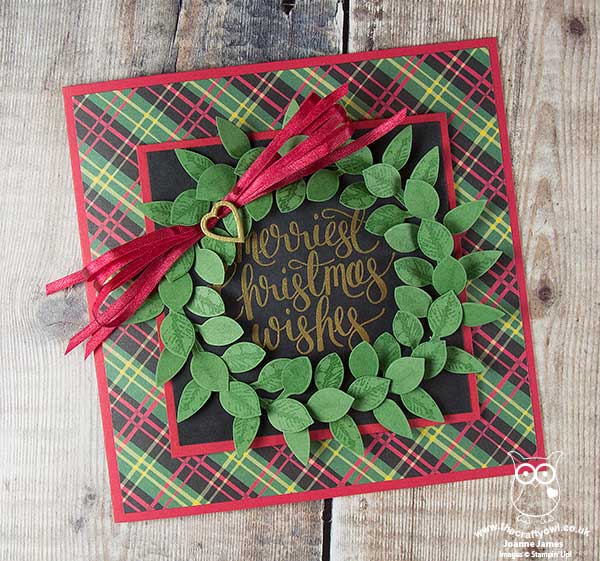
Tic-tac-toe week is always fun as the gallery is full of so many different creations as each of us work with a different combination of squares. For once I knew exactly where I was going with this one: straight across the middle. I took the opportunity to make another Christmas card, this time a larger 6" x 6" square card - take a look:


Here's the low-down on today's card:

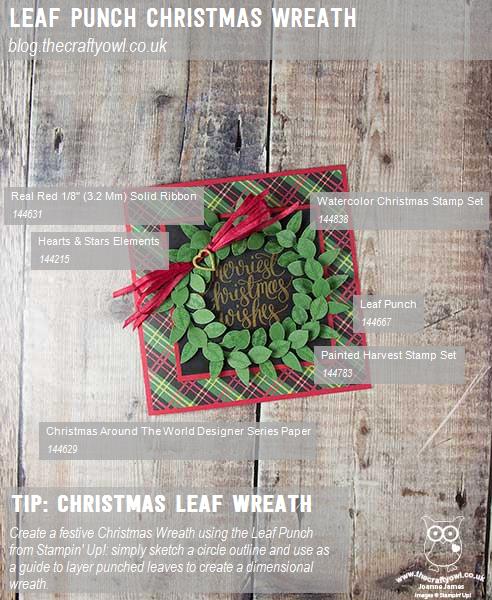
Leaf Punch Wreath - I used my leaf punch to create the oversize Christmas wreath on my card today. I stamped a whole bunch of leaves using each of the stamps in the 'Painted Harvest' stamp set in Garden Green onto Garden Green cardstock, then punched them out and layered them around my heat-embossed sentiment. Whilst this punch is part of the Painted Autumn Suite in the seasonal catalogue, today's card proves it will stretch beyond autumn into spring, summer and winter seasons too. 

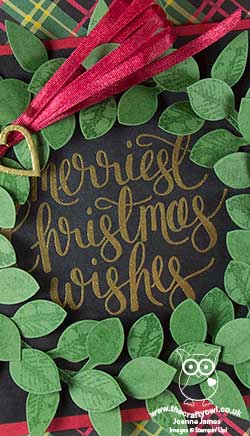
Watercolor Christmas - The sentiment on my card is from the 'Watercolor Christmas' stamp set, that co-ordinates with the Christmas card kit of the same name. I love the big, bold scripted sentiments in this set! I know this set will be a 'keeper' for me, long after this catalogue is gone. I decided to heat emboss my sentiment in gold onto Basic Black cardstock, to tone in with the rich colours of my designer series paper border.

Grab Some Tartan -  The tartan border on my card uses one of my favourite patterns in the Around the World Designer Series Paper pack. This is one of the packs of paper that is included in the 'Buy 3, Get 1 Free' designer series paper promotional offer. This offer runs until the end of October so you have three more days to take advantage of this offer - why not stock up today? Just click on the links in the table below to go straight to my online store.

Here is the visual summary of the key products used on today's project for you to pin for easy reference:


You can see all of my Product and 'How To' summaries on my 'How To - Tips and Techniques' Pinterest board in case you've missed any. 

This card really isn't post-friendly because of the depth and fragile nature of the wreath and bow, however will be perfect to hand-deliver to someone special - it really is very pretty in real life and makes a great statement card.

Before you reach for your ink and papers, check out what our amazing team has created to inspire you this week:

The Paper Players Design Team
 
 
Here's a quick recap of our challenge rules:
 
1.  Create a new paper project
2.  Upload your creation to your blog with a link back to us and provide a direct link to the post featuring your challenge submission.
3.  Please link your card to no more than four challenges, TOTAL.
4.  Have FUN! 


I look forward to seeing what you create with our board this week. Enjoy the rest of your weekend as it will be over all too quickly; I'll be back tomorrow with another project; until then, happy stampin'!


Stampin' Up! Supplies Used:

Table built using Product Table Builder by The Crafty Owl - Independent Stampin' Up! Demonstrator.

Mini Catalogue

BROWSE THE CATALOGUE

The mini catalogue is now live! Read and download your copy here.

Shop Online

Access my online shop 24 x 7, 365 days of the year:

Current April hostess code:

VDKNV7BH

Shop Online

Join My Team

It's always a great time to join Stampin’ Up! New team members can get £130 worth of products for only £99 + free business supplies + free shipping + all the fun being a part of Stampin’ Up! Stampin' Up! has something for everyone: join my growing team and benefit from my support to enjoy Stampin' Up! however you choose.

If you're interested, call me for a chat to understand how I can help you realise your goals. Alternatively, if you have already decided to sign up and you just can't wait, please click here for the link to the online form where you can sign up and order your starter kit right away! 

Latest Kit!

Stampin Cut and Emboss

The Rock Legend Kit has all you need to make 8 cards with coordinating envelopes. Along with the new Panda Friends Kit, both are available from January 4th for just £14 each - get yours here!

2023-24 Annual Catalogue

BROWSE THE CATALOGUE

Click on the catalogue for a full list of current SU! supplies - if you would like to order any of the items featured, please drop me a line at [email protected] or give me a call on 07773 421446 - I'd be happy to help.

New Online Exclusives

There are new products available exclusively in the online store from 5 March - check them out here.

About Me

Hi I'm Joanne and live in Northampton and when I'm not looking after my husband and two beautiful children, am an avid crafter with a passion for all things Stampin' Up!

I must confess that I have never been a big rubber stamper - until I discovered Stampin' Up! that is. I love the fact that I can get such great results with co-ordinating stamps, inks, papers and punches - the possibilities are endless! Join me on my stamping journey as I share the things I love and be inspired to create amazing things yourself!

Follow Me

Monthly Newsletter

Box Builder

Click the button above to use Box Buster to create your custom box design using the Envelope Punch Board!

Kits Collection Now Available!

Stampin Cut and Emboss

The new Kits Collection from Stampin' Up! is now available!

Click here to see the current kits available and order yours online today.

I Design For


Stampin' Up Stuff

This is my personal blog and is not endorsed by Stampin’ Up! I hope you find it a plentiful source of ideas and personal inspiration but please don't copy my designs for contest submission or use for classes, publication or sale without express permission.