by Joanne James30. October 2017 05:00
Today I'm sharing a card for this week's challenge over at Freshly Made Sketches:

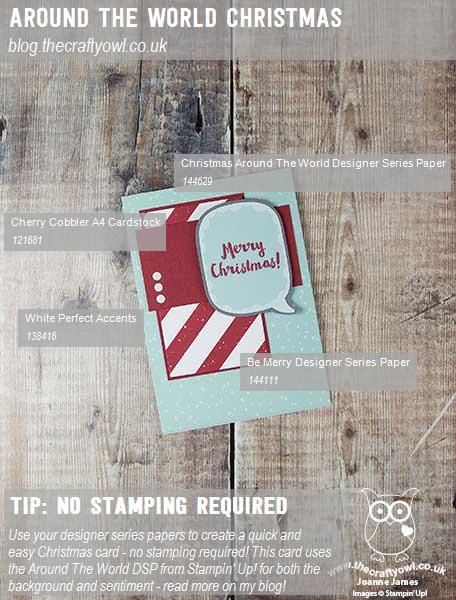
I decided to do something different with the Around The World designer series papers again - take a look:

Here's the low-down on today's card:
A Trio Of Papers - I've used designer series paper from two packs on today's card, both of which are available in the 'Buy 3, Get 1 Free' designer series paper promotion. There are two more days for you to stock up on the papers on offer, so don't delay! There are three different patterns of designer series paper on today's card: the first is the red and white diagonal stripe from the Be Merry collection, and the second is one of two from the Around The World pack. The first of the Around the World papers is the Pool Party snowfall background; can you spot the second one?
Look Who's Talking - The second of the Around The World papers on my card is the speech bubble - this is fussy cut directly from one of the sheets in the pack. The sheet in question features 29 sayings in a variety of languages - what fun! Perfect for a no-stamping card too. I backed my speech bubble with a piece of Basic Grey cardstock for additional stability and snipped it allowing a thin border all the way around to add more definition and help it standout on my card.
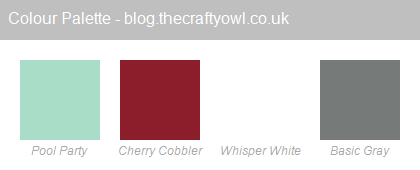
A Seasonal Colour Combo - I took the colours for my card today directly from the speech bubble - a festive combination of cool Pool Party Blue with warm Cherry Cobbler red, along with Whisper White and Basic Grey as neutrals. Here is my colour combination should you wish to save it for your creative inspiration:
Here is the visual summary of the key products used on today's project for you to pin for easy reference:
You can see all of my 'How To' summaries on my 'How To - Tips and Techniques' Pinterest board in case you've missed any.
Enjoy your day and I'll be back tomorrow with another project. Until then, happy stampin'!
Stampin' Up! Supplies Used:
by Joanne James16. October 2017 10:00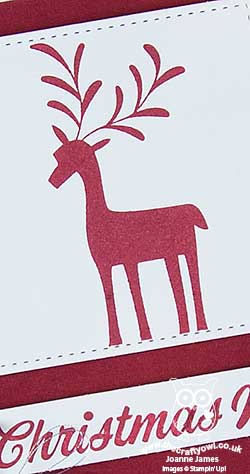
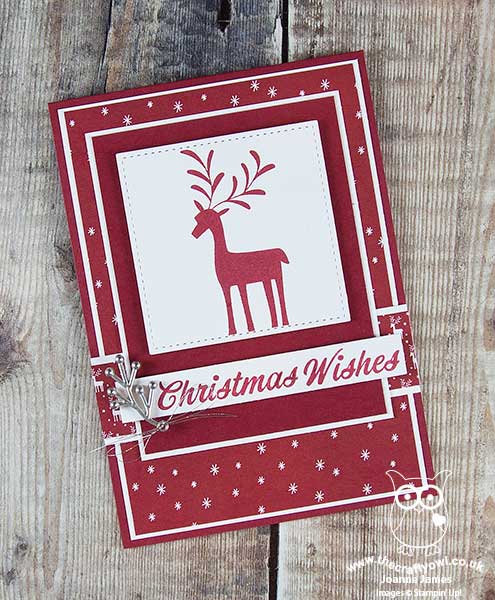
It's Monday again - doesn't a new week roll around quickly? Today I'm sharing a Christmas card that I made using this week's sketch over at Freshly Made Sketches:

I decided to go monochromatic with this one using a bunch of co-ordinating products from the Be Merry Suite - take a look:
Here's the low-down on today's card:
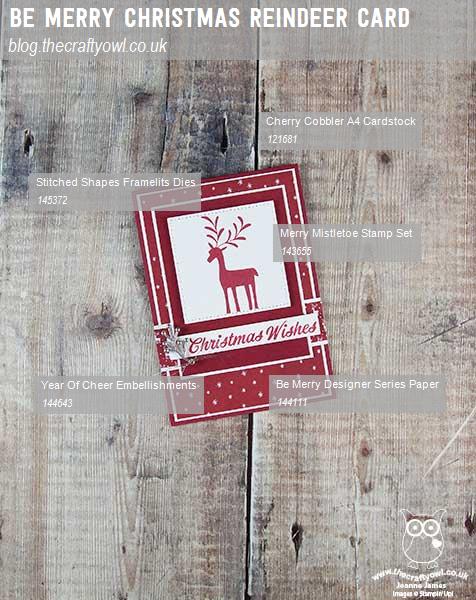
Be Merry - I decided to feature the charming reindeer from the 'Merry Mistletoe' stamp set front and centre on my card today. This was one of the sets that was available at a discount during the World Card Making Day promotions, so I'm sure lots of you will have snapped it up! I am also featuring this set, along with the Be Merry designer series papers - still available until the end of the month as part of the current 'Buy 3, get one free' promotion on designer series paper - at my November Christmas Stamp-A-Stack Event on Tuesday 7th November. This is an all-day event that will enable you to make 40, yes 40 Christmas cards and envelopes in one go! you can see more details on my Facebook Events page here - if you live in or around Northampton do get in touch if you'd like to join me in person for this event. This class can also be provided as a 'class to go' in the mail, so if you're further afield and this is something that interests you, do get in touch to order yours.
Mask It - The observant amongst you will notice that the sentiment I used on my card today is also from the 'Merry Mistletoe' stamp set, but not as designed. On the stamp the words are one on top of the other, but I wanted them to run one after the other to fit across the banner on my card. I am not one to cut up my stamps (absolute sacrilege in my book!); luckily there was no need for such drastic measures. I simply used some low-tack tape to mask off the bottom word before inking my stamp, removed the tape and stamped 'Christmas' then did the same in reverse and used my Stamp-a-ma-jig to add 'Wishes' alongside it.
Is It A Sprig? - I needed an embellishment to finish my card and immediately reached for the metal pieces in the Year of Cheer embellishments pot. The little stars speak for themselves, but the other design, the one that I used on my card today I'm not really sure what it is supposed to be - is it a foliage sprig perhaps? I think they look a little like a reindeer antler - hence my choosing it for my card today. What do you think - I'd love to hear your thoughts!
Here is the visual summary of the key products used on today's project for you to pin for easy reference:
You can see all of my 'How To' summaries on my 'How To - Tips and Techniques' Pinterest board in case you've missed any.
Enjoy your day and I'll be back tomorrow with another project. Until then, happy stampin'!
Stampin' Up! Supplies Used:
359d7501-ea6a-4e16-b086-18ab925bb10f|0|.0|96d5b379-7e1d-4dac-a6ba-1e50db561b04
Tags: Be Merry, Christmas, Merry Mistletoe, Classes, Shop online, Shop Stampin' Up online, Shop Stampin' Up! Online, Stampin' Up, Stampin' Up Card, Stampin' Up Card ideas, Stampin' Up Supplies
Cards | Classes | Shop Online | Shop Stampin' Up! Online | Stamping
by Joanne James14. October 2017 19:45
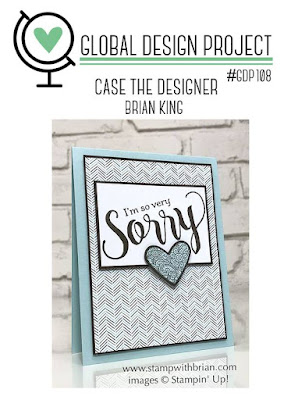
Today I'm sharing a card for this week's challenge over at Global Design Project where this week the challenge is to CASE The Designer and the man in question is one of my all-time favourites - the lovely Brian King. Here is the challenge badge showing the card of Brian's that we are to CASE:
And here's my festive-themed CASE of Brian's card:

Here's the low-down on today's card:
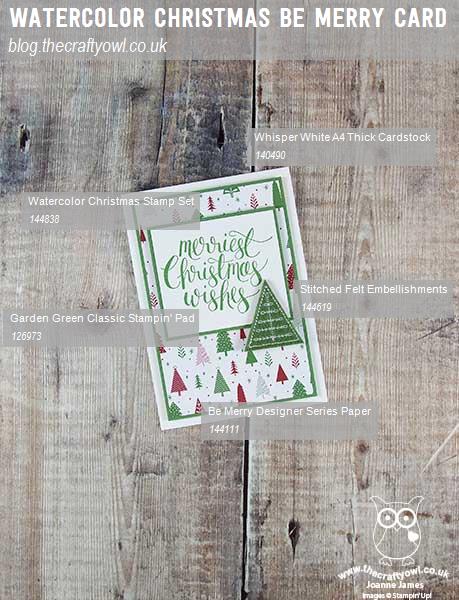
CASE = Copy And Selectively Edit - I am a big fan of Brian's clean, layered style and so CASEing his work was not difficult for me! I was inspired by the layout of Brian's card, the sentiment style and use of designer series paper, although chose to add to my Christmas card stash with an alternative festive theme and colour scheme.
Watercolour Christmas - I needed a big, bold sentiment for my card and wanted to mimic not only the size but also the swirling script style of Brian's card so I settled on the largest of the sentiments in the Watercolor Christmas set. This set is designed to work with the Watercolor Christmas project kit, yet the gorgeous scripted sentiments, along with the trio of trees, is useful for so much more than the kit cards alone - it's a definite keeper. The angle of the letters meant I needed to add my embellishment after the sentiment rather than slightly more centrally, but the basic layout that inspired my card can still be seen.
Going Green - One of the things I liked about Brian's original card was the definition that the Early Espresso borders gives to the individual layers and elements. Having decided to use the Be Merry Designer Series Paper for my main panel, I chose to use Garden Green for my borders and sentiment. I carried on the colour with my Garden Green Stitched Felt Embellishment, which also serves as a nod to the Christmas tree pattern on my DSP.
This is a great card that uses relatively few supplies - thanks Brian for the inspiration!
Here is the visual summary of the key products used on today's project for you to pin for easy reference:
You can see all of my 'How To' summaries on my 'How To - Tips and Techniques' Pinterest board in case you've missed any.
I'll be back tomorrow with another project - or two! - for our new challenge over at The Paper Players. Until then, happy stampin'!
Stampin' Up! Supplies Used:
51c38ea2-520e-48ee-bc08-cac56301f47c|0|.0|96d5b379-7e1d-4dac-a6ba-1e50db561b04
Tags: Christmas, Stitched Felt Embellishments, Watercolor Christmas, Kits, Be Merry, Shop Stampin' Up! Online, Shop Stampin' Up online, Shop online, Stampin' Up, Stampin' Up Card, Stampin' Up Card ideas, Stampin' Up Supplies
Cards | Shop Online | Shop Stampin' Up! Online | Stamping