For An A Teacher Thank You Card

by Joanne James28. August 2021 20:52

Today I'm sharing a quick card that uses the sketch layout at Paper Craft Crew (I substituted the square with a circle) and this week's colours over at Colour Throwdown:


I love those bright primary colours and I couldn't resist the adorable inspiration photo! I decided to use some retired product and dug out my Harvest Hellos stamp set and Apple Builder Punch to create a teacher card for my stash - take a look:


A super simple design, I created a base of floating lines in blue and green and added my apple behind my heat-embossed sentiment:


No supplies list as the key items featured are retired, but if you have any specific queries, then pop a comment below and I will happily answer them.

Enjoy your evening and I'll be back tomorrow with another project. Until then, happy stampin'!


Greatest GOAT Way To Goat Card

by Joanne James24. June 2020 20:04

A quick post from me this evening - it's too hot to be at the PC! I'm sharing a card for this week's CAS(E) This Sketch challenge where they have this great layout:

I decided instead of a floral that I would decorate my label with a goat. Yes, you did read that correctly - take a look:


Here's the low-down on today's card:

I am in the process of finishing up my teacher thank you cards, and whilst a little unconventional, I thought this goat and sentiment from the new 'Way To Goat' stamp set would be perfect for a teacher with a sense of humour! I coloured him with my Grey Granite Stampin' Blends and used a label from the Wild Rose Dies. I kept my cardbase simple with a textured panel and used Shaded Spruce as a nod to the school colour. Simple and guaranteed to raise a smile from the recipient! 

Here is the visual summary of the key products used on today's project for you to pin for easy reference:


You can see all of my 'How To' summaries on my 'How To - Tips and Techniques' Pinterest board in case you've missed any. 

Enjoy your evening and I'll be back tomorrow with another project. Until then, happy stampin'!


Stampin' Up! Supplies Used:

Table built using Product Table Builder by The Crafty Owl - Independent Stampin' Up! Demonstrator.

An Apple For The Teacher Thank You Card And Gift PP495

by Joanne James14. June 2020 09:00


Today it's Sunday and time for this week's new challenge over at The Paper Players! It's the turn of the lovely Laurie to host this week and she has an interesting colour challenge for you to work with:


First up, I have a confession to make: I couldn't find my Tranquil Tide ink pad so substituted with Garden Green. I have a few projects for you today; armed with Narelle's sketch over at Freshly Made Sketches I decided to use some retired designer series papers in the challenge colours and my 'Harvest Hellos' stamp set to make a couple of teacher thank you cards and some cute gift packaging.  Here's the first of my cards:


Some simple layering of my DSP and a stamped and punched apple, along with a 'thanks' diecut courtesy of the Well Written Dies, completed my card. I actually made two - on the second one, I reversed the layering of the papers and had the letter paper in front as opposed to the numbers:


 I added some simple stamping to the inside of my card from the same set:

 Here are the two cards together - which one do you prefer?

I had picked up a couple of cute apple notepads that I thought would be perfect for some extra small teacher gifts so took the opportunity to create some co-ordinating boxes for my cards, complete with tags:


And here's another view:


And that cute apple notepad that is in the box? Here it is:


The apple folds flat but when clipped open it forms an apple shape, so I just had to create a lidded box that could present it whole for full effect - here are both projects together:


Here is the visual summary of the key products used on today's project for you to pin for easy reference:


You can see all of my Product and 'How To' summaries on my 'How To - Tips and Techniques' Pinterest board in case you've missed any. 

Before you reach for your ink and papers, check out what our amazing team has created to inspire you this week:

Here's a quick recap of our challenge rules:
 
1.  Create a new paper project
2.  Upload your creation to your blog with a link back to us and provide a direct link to the post featuring your challenge submission.
3.  Please link your card to no more than four challenges, TOTAL.
4.  Have FUN!

You can see all of my 'How To' summaries on my 'How To - Tips and Techniques' Pinterest board in case you've missed any. 

Enjoy your day; the weather was glorious here in the UK yesterday so I'm hoping that will continue today and I can spend some time in the garden. I'll be back tomorrow with another project. Until then, happy stampin'!


Stampin' Up! Supplies Used: 

Table built using Product Table Builder by The Crafty Owl - Independent Stampin' Up! Demonstrator.

An Apple For An APlus Teacher Thank You Card

by Joanne James11. May 2020 19:00


Another Monday, the start of a new week! I had an online demonstration this morning and something of an admin afternoon, so I've just time for a quick post to share another card for the current Fusion challenge, this time using both the sketch and inspiration layout:


The sketch and inspo photo combined to make the perfect teacher thank you card - take a look:


My bright red apple is courtesy of the 'Harvest Hellos' stamp set and the Apple Builder punch, two of my favourite items for creating teacher thank you cards and on carryover to the new catalogue too - yay! I paired my apple with a retired stamped notepaper background on a Crumb Cake base and swirly thanks diecut, again courtesy of a retired die; the notepaper and die were perfect to replicate the biscuit in the photo though, so it had to be! I also finished the inside with some added decoration courtesy of 'Harvest Hellos': 


I made a few of these cards at the same time to add to my end of year stash; the youngest of my James Juniors is in a transition year at school so I will need a lot of teacher thank you cards come July, so I'm starting now!

Here is the visual summary of the key products used on today's project for you to pin for easy reference:


You can see all of my 'How To' summaries on my 'How To - Tips and Techniques' Pinterest board in case you've missed any. 

Enjoy your evening and I'll be back tomorrow with another project. Until then, happy stampin'!


Stampin' Up! Supplies Used:

Table built using Product Table Builder by The Crafty Owl - Independent Stampin' Up! Demonstrator.

An Apple For A Teacher Thank You Card

by Joanne James11. May 2020 19:00


Another Monday, the start of a new week! I had an online demonstration this morning and something of an admin afternoon, so I've just time for a quick post to share another card for the current Fusion challenge, this time using both the sketch and inspiration layout:


The sketch and inspo photo combined to make the perfect teacher thank you card - take a look:


My bright red apple is courtesy of the 'Harvest Hellos' stamp set and the Apple Builder punch, two of my favourite items for creating teacher thank you cards and on carryover to the new catalogue too - yay! I paired my apple with a retired stamped notepaper background on a Crumb Cake base and swirly thanks diecut, again courtesy of a retired die; the notepaper and die were perfect to replicate the biscuit in the photo though, so it had to be! I also finished the inside with some added decoration courtesy of 'Harvest Hellos': 


I made a few of these cards at the same time to add to my end of year stash; the youngest of my James Juniors is in a transition year at school so I will need a lot of teacher thank you cards come July, so I'm starting now!

Here is the visual summary of the key products used on today's project for you to pin for easy reference:


You can see all of my 'How To' summaries on my 'How To - Tips and Techniques' Pinterest board in case you've missed any. 

Enjoy your evening and I'll be back tomorrow with another project. Until then, happy stampin'!


Stampin' Up! Supplies Used:

Table built using Product Table Builder by The Crafty Owl - Independent Stampin' Up! Demonstrator.

Harvest Hellos Clean and Simple Teacher Thank You Card

by Joanne James15. April 2020 21:02

A quick post today and I'm sharing a card using the current sketch over at CAS(E) This Sketch:

I didn't manage to play along last week (I managed a so-so card, but wasn't thrilled with it and decided not to share!). All change this week though - as soon as I saw the sketch I knew what I was going to do with it. Here's my clean and simple creation:


Here's the low-down on today's card:

I decided to go with a teacher thank you card. I know that schools here and all around the world are closed as we try and protect each other from this dreadful virus, however whether the Juniors go back to school or not next term, I figure there will still be the need for teacher thank you cards, so I'm getting organised!

I decided to add a trio of yellow pencils (this is from a retired Project Life stamp set) in the corner and over-stamped the bottom one with my thank you sentiment. I have a confession to make - as I came to write up my post I realise there were 4 stripes of ombre on the sketch, and I've only included 3 - oops! I genuinely hadn't noticed. I like to have odd numbers though, so I think my subconscious was probably responsible for the decision. I overlaid my pencils with a red apple from the 'Harvest Hellos' stamp set, coloured with Blends and punched out using my Apple Builder Punch and with a little tag and linen thread bow to finish.

Here is the visual summary of the key products used on today's project for you to pin for easy reference:


You can see all of my 'How To' summaries on my 'How To - Tips and Techniques' Pinterest board in case you've missed any. 

The warm weather has returned today so I made the most of it, getting some washing done and the children and I went on a nice bike ride this evening after dinner. I did sneak in a little crafting time too so have lots to share with you in coming days! Enjoy your evening and I'll be back tomorrow with another project. Until then, happy stampin'!


Stampin' Up! Supplies Used:

Table built using Product Table Builder by The Crafty Owl - Independent Stampin' Up! Demonstrator.


Hand Delivered Teacher Thank You Card For PP438

by Joanne James21. April 2019 09:00


Today it's Easter Sunday and time for this week's new challenge over at The Paper Players! It's the turn of the fabulous Anne-Marie to host this week and she has a clean and simple challenge for you to work with:


Remember: this is clean and simple week. What do we mean by 'clean and simple' ? Create a card that has:

  • Minimal layers and embellishments
  • Plenty of open space, also known as 'white space'
  • Is simple and uncluttered

I struggled initially with Anne-Marie's challenge this week; I think not getting into my craft room all week hasn't helped! I had an idea for a card and then once I'd made it I really wasn't sure about it; I'll share that card tomorrow and would love you to come by and take a look and tell me what you think. Meanwhile, after a break and a change of stamp set, along with this week's CAS(E) This Sketch layout and the CAS Colours and Sketches colour palette, I created a second card and felt much happier about the whole thing! So here's that card:


Here's the low-down on today's card:

Paper Piecing - Not to be confused with 'paper piercing', paper piecing is the technique of stamping an image and then stamping either the whole or partial image again on coloured or patterned paper and fussy cutting it to piece it together on the main base image. I used it for both the skirt that my teacher is wearing (Blueberry Bushel in-colour DSP) and the pile of books she is carrying (a mix of Wood Textures DSP and solid colour cardstock). This is a fun way to add pattern to areas of your stamped image and can be used with a wide variety of stamps - those with larger areas suitable for colouring, such as those in the Hand Delivered hostess set, are particularly good. 

Primary Brights - I love this colour combination; the trio of primary colours is very bright and also seemed appropriate for a teacher thankyou card. I added further interest to my books by using a couple of different scraps of Wood Textures DSP for additional subtle detail. 

A Teacher Thank You - The sentiments in the 'Hand Delivered' stamp set suggest that the pile of books is intended to make a graduate congratulations card, yet I think they are perfect for a teacher card too. There is a thank you sentiment in this set, but I opted to use the words from the 'Picked For You' set instead, so that I could use a teacher-specific greeting on my front banner (both of the banner elements come from the Lakeside framelits set) and continued this theme with the wording on the inside too:

This card is sure to brighten someone's teacher's day! Both of the James Juniors have male form tutors this year, but Ben has plenty of female subject teachers who are worthy of a little end-of-year gift, so I think it might be heading to one of those. Both of these stamp sets are so useful for teachers cards, and both are set to retire with the current annual catalogue so if they're on your wishlist make sure you put them in your shopping basket before it's too late.

Here is the visual summary of the key products used on today's project for you to pin for easy reference:


You can see all of my Product and 'How To' summaries on my 'How To - Tips and Techniques' Pinterest board in case you've missed any. 

Before you reach for your ink and papers, check out what our amazing team has created to inspire you this week:

Here's a quick recap of our challenge rules:
 
1.  Create a new paper project
2.  Upload your creation to your blog with a link back to us and provide a direct link to the post featuring your challenge submission.
3.  Please link your card to no more than four challenges, TOTAL.
4.  Have FUN!

You can see all of my 'How To' summaries on my 'How To - Tips and Techniques' Pinterest board in case you've missed any. 

Enjoy your day; we will be having an Easter egg hunt, followed by a roast for lunch and then an afternoon in the garden making the most of the wonderfully warm weather we have been blessed with the last couple of days - we need to make the most of it as I'm sure it won't last! Wishing you a pleasant Easter bank holiday weekend however you choose to spend it. I'll be back tomorrow with another project. Until then, happy stampin'!


Stampin' Up! Supplies Used: 

Table built using Product Table Builder by The Crafty Owl - Independent Stampin' Up! Demonstrator.

Window Box Thinlits Pencil Gift Box and Back To School Card For The Paper Players PP360

by Joanne James3. September 2017 09:00

It's Sunday and time for this week's new challenge over at The Paper Players! My dear friend Claire is the hostess this week and she has a fun and timely theme for us to work with:


I know some of my readers in other countries have already seen a return to school, but for us this week Wednesday is the day, so this week's challenge is a timely one. Is it me or do all Mums especially get just a little excited at the prospect of the start of a new academic year and a return to school after the long summer break? Don't get me wrong, I love having my two Juniors at home and am thankful for the break from the sometimes relentless activities that comprise the school routine, however all good things must come to an end and so it is that we are getting ready to begin a new school year, with the excitement, opportunities and challenges that this will undoubtedly bring.

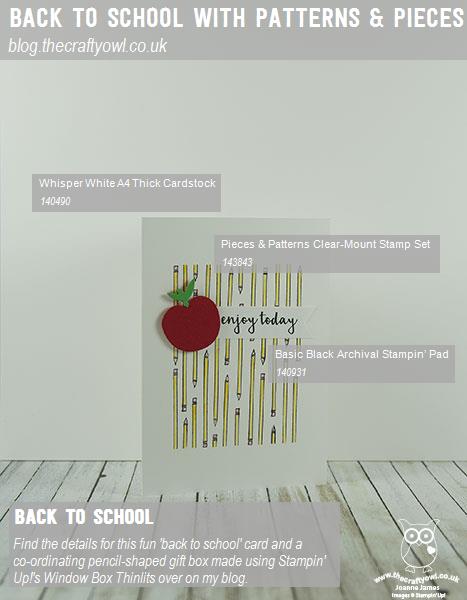
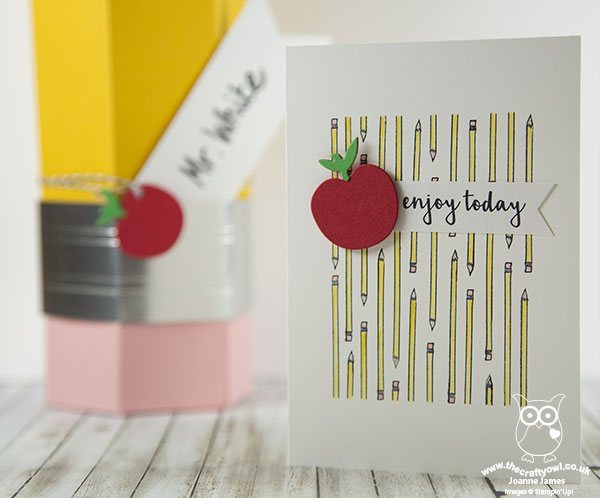
I've double projects for you today as I needed some gift packaging for a teacher gift this week, so took the opportunity to create a fun gift box and co-ordinating card - take a look:


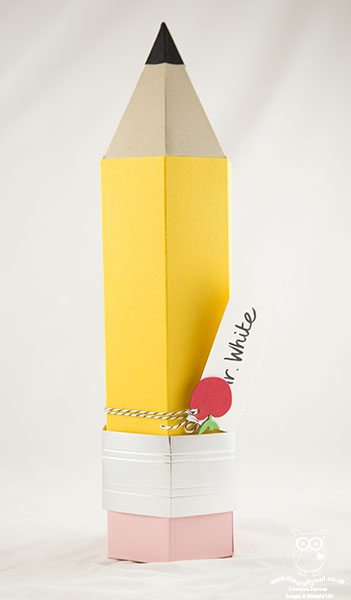
The gift box is rather large (approx. 18 inches long) so was something of a challenge to photograph but hopefully the detail below will enable you to see how I made it. Here's the low-down on today's projects:

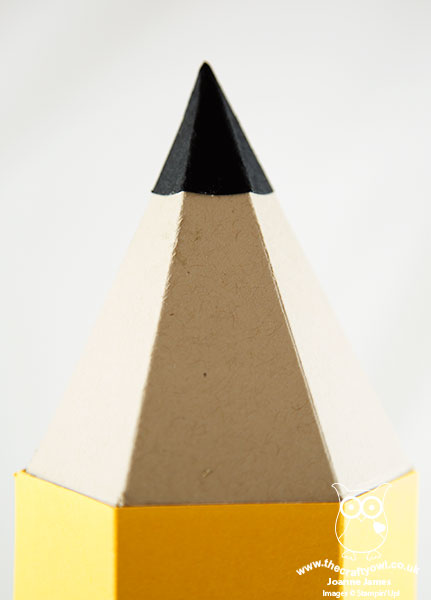
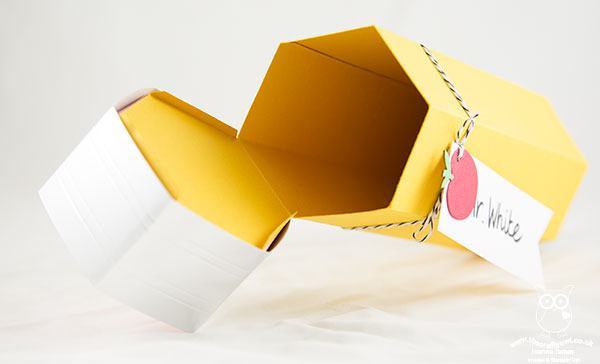
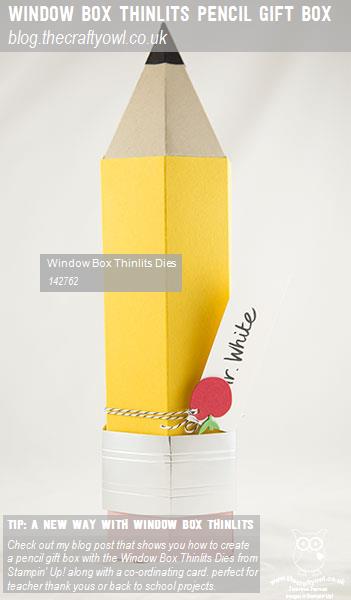
A Window Turned Pencil Box - Having made an elongated box with my Window Box previously with the ladies in one of my technique classes earlier this year, I knew that I could use the same idea to create my pencil-shaped box. I cut one piece of the window box without cutting straight through and elongated this for the length of my sheet of A4 Crushed Curry cardstock. I then cut another piece that was the same length and the width of three sides, for the opposite 3 sides of my pencil, but without a bottom/lid. Instead I used some Maths to create a template for my pencil point in Crumb Cake, and adhered this inside the end of the tube to create my pencil point:


Here's a shot showing you how the main body of the pencil box opens to accommodate the main gift:


In addition to the main box, I also made a complete box using my Window Box Thinlits in Blushing Bride for my eraser and adhered this to the top of my pencil, which also opens separately - just big enough to add a little treat or two inside to accompany my main gift:


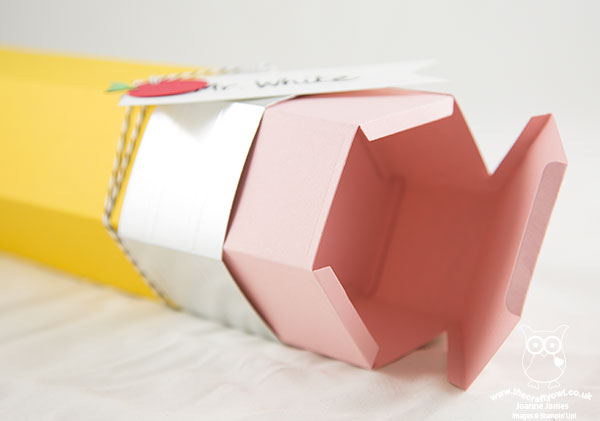
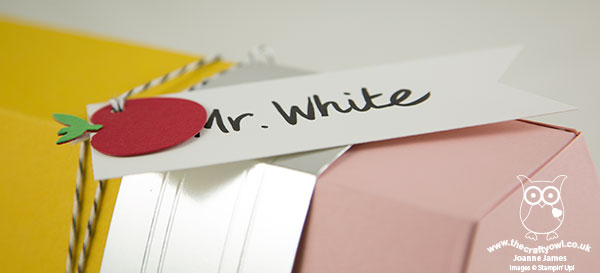
Finally I added a sleeve created from silver foil, to hold the pencil box closed securely - it just slides off to create access to the main box. A banner tag decorated with an apple - every teacher project has to have one, right? - finished my box. 

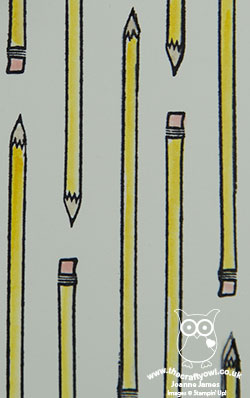
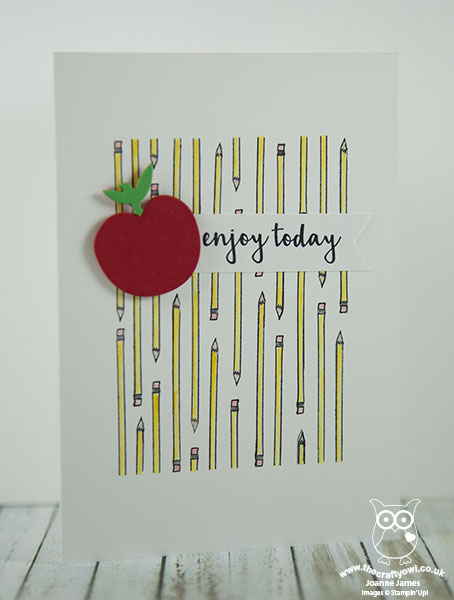
Pieces And Patterns For A Co-ordinating Card - I wanted a card to co-ordinate with my gift box, so decided to replicate the pencil design on a simple card using the pencil stamp from the Pieces and Patterns set. I masked a square and created my own repeating pattern - thank heavens for a stamp-a-ma-jig! - and then added a banner sentiment from the same set, again anchored with an apple (made using an old die I have in my stash):

Back To School Colours - My back-to-school pencil and apple colours fit perfectly with the colour palette and photo inspiration over at The Color Throwdown this week (I hope I'll be allowed my pink eraser and a few neutrals (the pencil really wouldn't be complete without it). I'm also linking my card up with the challenge over at Addicted to CAS where the code word is 'apples' and both of my projects fit the bill over at Paper Craft Crew where they have extended their 'back to school' challenge for another week:

      Play along with the Paper Craft Crew Theme Challenge 257! Visit www.papercraftcrew.com #theme #themechallenge #stampinup #sunnygirlscraps #playalong #cardmaking #papercrafting #papercraft #scrapbooking #handmade #rubberstamping #cards

Here is the visual summary of the key products used on today's project for you to pin for easy reference:


You can see all of my Product and 'How To' summaries on my 'How To - Tips and Techniques' Pinterest board in case you've missed any. 

Before you reach for your ink and papers, check out what our amazing team has created to inspire you this week:

The Paper Players Design Team
 
 
Here's a quick recap of our challenge rules:
 
1.  Create a new paper project
2.  Upload your creation to your blog with a link back to us and provide a direct link to the post featuring your challenge submission.
3.  Please link your card to no more than four challenges, TOTAL.
4.  Have FUN! 


I look forward to seeing what you create with this week's theme. Enjoy the rest of your weekend as it will be over all too quickly; I'll be back tomorrow with another project; until then, happy stampin'!


Stampin' Up! Supplies Used: 

Table built using Product Table Builder by The Crafty Owl - Independent Stampin' Up! Demonstrator.

Mini Catalogue

BROWSE THE CATALOGUE

The mini catalogue is now live! Read and download your copy here.

Shop Online

Access my online shop 24 x 7, 365 days of the year:

Current April hostess code:

VDKNV7BH

Shop Online

Join My Team

It's always a great time to join Stampin’ Up! New team members can get £130 worth of products for only £99 + free business supplies + free shipping + all the fun being a part of Stampin’ Up! Stampin' Up! has something for everyone: join my growing team and benefit from my support to enjoy Stampin' Up! however you choose.

If you're interested, call me for a chat to understand how I can help you realise your goals. Alternatively, if you have already decided to sign up and you just can't wait, please click here for the link to the online form where you can sign up and order your starter kit right away! 

Latest Kit!

Stampin Cut and Emboss

The Rock Legend Kit has all you need to make 8 cards with coordinating envelopes. Along with the new Panda Friends Kit, both are available from January 4th for just £14 each - get yours here!

2023-24 Annual Catalogue

BROWSE THE CATALOGUE

Click on the catalogue for a full list of current SU! supplies - if you would like to order any of the items featured, please drop me a line at [email protected] or give me a call on 07773 421446 - I'd be happy to help.

New Online Exclusives

There are new products available exclusively in the online store from 5 March - check them out here.

About Me

Hi I'm Joanne and live in Northampton and when I'm not looking after my husband and two beautiful children, am an avid crafter with a passion for all things Stampin' Up!

I must confess that I have never been a big rubber stamper - until I discovered Stampin' Up! that is. I love the fact that I can get such great results with co-ordinating stamps, inks, papers and punches - the possibilities are endless! Join me on my stamping journey as I share the things I love and be inspired to create amazing things yourself!

Follow Me

Monthly Newsletter

Box Builder

Click the button above to use Box Buster to create your custom box design using the Envelope Punch Board!

Kits Collection Now Available!

Stampin Cut and Emboss

The new Kits Collection from Stampin' Up! is now available!

Click here to see the current kits available and order yours online today.

I Design For


Stampin' Up Stuff

This is my personal blog and is not endorsed by Stampin’ Up! I hope you find it a plentiful source of ideas and personal inspiration but please don't copy my designs for contest submission or use for classes, publication or sale without express permission.