Joy To You And Yours CCS 526

by Joanne James21. November 2023 13:00

It's Tuesday and time for a new challenge over at CAS Colours & SketchesThis week's challenge is a sketch challenge and Nancy has asked that we include three elements overlaid with a sentiment. Feel free to flip or rotate the sketch when making your card.


For my card today I decided to embrace the interesting colour palette over at Hand Stamped Sentiments and create a simple Christmas card using my Alphabet A' La Mode Dies - take a look:


Here's the low-down on today's card:

For today's card I used a dark Pebbled Path background, and having added some tone-on-tone ink around the edge of the base to add depth, I flicked the surface with some watered-down white ink for some snow splatters. I added a trio of letters to spell the word JOY for my 3 elements and cut these from white cardstock, then overlaid these with a sentiment stamped in Berry Burst from the retired 'Peace and Joy' stamp set (there is an equivalent one in the current 'Merry & Bright' stamp set).  so that they would stand out against my Pebbled Path background:

 Some diecut holly leaves and berries and a sprinkling of rhinestones complete my clean and simple card design. I wasn't sure about this colour palette when I saw it, but I ended up liking my card so much that I made two! Here;s another photo with my inside sentiment too:


I'm also linking this card up for a second entry over at Less Is More where the theme is 'Anything CAS Goes'. 

Here is the visual summary of the key products used on today's project for you to pin for easy reference:


You can see all of my 'How To' summaries on my 'How To - Tips and Techniques' Pinterest board in case you've missed any. 

Enjoy your day and I'll be back tomorrow with another project. Until then, happy stampin'!


Stampin' Up! Supplies Used:

Table built using Product Table Builder by The Crafty Owl - Independent Stampin' Up! Demonstrator.

Peace on Earth Detailed Dove Diecut Christmas Card

by Joanne James21. December 2020 21:32

Good evening everyone! I have had a busy few days with last-minute Christmas preparations so blogging has had to wait awhile, but I've managed to squeeze in some time this evening to share a card I made a few weeks ago following my 'Dove of Hope' online class that features a fun technique. The sentiment and non-traditional colour scheme also make it perfect for the current Christmas Kickstart Challenge and the challenge over at Colour Dare too:


I used the Detailed Dove Dies to create my fabulous dove and teamed it with a sentiment from the Peace and Joy bundle, along with an inked background I created using the salt technique - take a look:


Have you ever created a background using the salt technique? It's really easy: all you need to do is take a piece of watercolour paper and give it a wash in your chosen colour(s), then whilst still wet, sprinkle with salt crystals in varying sizes, some coarse and some fine, then ideally leave your background to dry naturally. When it's dry you can brush off any excess salt and you will be left with a background where the salt has created an interesting textural pattern. I added a fine spray of Frosted White Shimmer Paint too for a little added extra sparkle, before adding my layered sentiment and diecut dove.

I adore this dove die and have a few more cards with it that I've yet to share, so I'll try and add a couple more later this week if time permits. 

Here is the visual summary of the key products used on today's project for you to pin for easy reference:


You can see all of my 'How To' summaries on my 'How To - Tips and Techniques' Pinterest board in case you've missed any. 

Enjoy your evening and I'll be back tomorrow with another project. Until then, happy stampin'!


Tags: , , , , , ,

Cards | Shop Online | Shop Stampin' Up! Online | Stamping

Heartwarming Hugs With Peace and Joy For Christmas

by Joanne James5. December 2020 22:16

Today I have a quick post with the a card for the current colour challenge over at Just Add Ink:

These colours have featured in a few of my projects as they are all in the Heartwarming Hugs designer series paper (and you all know how much I love designer series paper!) this card is one I designed for a class featuring the Peace and Joy bundle - take a look:


 Here's the low-down on today's card:

I layered a trio of banners of DSP onto a stitched rectangle, then added some Real Red sheer ribbon and sprig punch greenery behind my focal point sentiment, with a little stamping on the inside to finish:


Here is the visual summary of the key products used on today's project for you to pin for easy reference:


You can see all of my 'How To' summaries on my 'How To - Tips and Techniques' Pinterest board in case you've missed any. 

Enjoy your day and I'll be back tomorrow with another project (or two!) and a video for my weekly Paper Players post. Make sure to pop by - you won't want to miss it! Until then, happy stampin'!


Stampin' Up! Supplies Used:

Table built using Product Table Builder by The Crafty Owl - Independent Stampin' Up! Demonstrator.

Copper and Navy Merry and Bright Christmas Card FMS463

by Joanne James30. November 2020 13:48

Today I'm sharing a card that uses Amy's sketch over at Freshly Made Sketches as its starting point:

I absolutely loved Amy's sketch this week (it's a keeper - thanks Amy!) and could have made a ton of cards with it! Alas time was my enemy so I chose my favourite idea and ran with it! It uses one of my favourite festive combinations inspired by the patterns of the Brightly Gleaming designer paper I used for my rectangle background - take a look:


Here's the low-down on today's card:

I made the paper the star of the show and paired it with a stamped and diecut sentiment from the 'Peace and Joy' bundle, using vellum for the base layer to soften the panel but allow the pattern to shine through. I used a bunch of retired diecuts for the trio of background 'sticks' (they are actually cut using the candle die from the 'Doily Wishes' set!) and added a copper star in place of the dot on the 'i' in 'bright' for a little something extra - check it out below:


I added a copper bow from some leftover twine from a retired card kit to complete my card.

Here is the visual summary of the key products used on today's project for you to pin for easy reference:


You can see all of my 'How To' summaries on my 'How To - Tips and Techniques' Pinterest board in case you've missed any. 

I made another card using the 'Peace and Joy' dies for another card over the weekend which I will hopefully be back to share with you later; right now I'm against the clock so have to dash!! Enjoy the rest of your day and I'll hopefully be back later with another project. Until then, happy stampin'!


Stampin' Up! Supplies Used:

Table built using Product Table Builder by The Crafty Owl - Independent Stampin' Up! Demonstrator.

Reindeer Clip Clean And Simple Christmas Cards

by Joanne James17. November 2020 17:30

Today I'm sharing a card for the current challenge over at CASology where I haven't played in a while that also uses the sketch over at Paper Craft Crew:

    Vertical Sketch Challenge PCC401   

  I loved the sketch over at PCC this week and knew it would be perfect for me to use up some fun reindeer paper clips that I had lurking in my embellishment drawer - take a look:


Cute, right?! Here's the low-down on today's card:

I loved these little reindeer clips when they came out a few years ago and must confess to having hoarded a few containers of them when they retired. The sketch was just perfect to add one to a square of Soft Suede and embellish with some gold twine, a strip of brushed metallic cardstock and some gold gilded gems - oh and an 'All The Trimmings' red enamel dot to make my stag a Rudolf ;-) I paired it with a simple block 'MERRY' sentiment from the super-useful 'Peace and Joy' stamp set for for an additional pop of festive colour:


I added some simple stamping to the inside using other words from the same stamp set: 


And I was done! Quite simple really but I think the reindeer paper clip makes a fun focal point in and of itself.

Here is the visual summary of the key products used on today's project for you to pin for easy reference:


You can see all of my 'How To' summaries on my 'How To - Tips and Techniques' Pinterest board in case you've missed any.

When I'd finished my card, I liked it so much I made a couple more - I also used glitter enamel dots on one of them:

I'm now building my Christmas card stash at a pace - hoping to get them all in the post nice and early this year for a change, I figure we could all do with a little early festive cheer!

Enjoy the rest of your day; I'm off to watch the Great British Bake Off semi-final tonight, so looking forward to drooling over their makes and bakes, especially as it's patisserie week! I'll be back tomorrow with another project. Until then, happy stampin'!


Stampin' Up! Supplies Used:

Table built using Product Table Builder by The Crafty Owl - Independent Stampin' Up! Demonstrator.

Peace on Earth Coastal Cabana Christmas Card

by Joanne James5. November 2020 11:40

This week is getting busier by the minute so I'm just popping in with a quick card that I'm going to hopefully squeeze in to the current CAS(E) This Sketch challenge, where they have a fabulous sketch this week:


I still had the Joy Dies out on my desk from my last class and knew immediately what I wanted to do with this sketch, which is also perfect for the current Just Us Girls challenge where the focus is on word diecuts. To complete today's challenge trio I used this week's colours over at Global Design Project #GDP265 and used Bermuda Bay as my free choice. So here's my card  - take a look:


Here's the low-down on today's card:

Peace and Joy - I love this stamp and die bundle and I knew that I had to use all 3 layers of my Peace die to full effect on the front of today's card. I played around with the colours for each layer until I was happy with the effect. I really like the endless sentiment combinations you can create; here's how I finished the sentiment on the inside of today's card:


Beautiful World - There are times when stamp sets and bundles have great cross co-ordination, and I think the Beautiful World bundle in the annual catalogue is given a whole new lease of life when paired with either the Peace and Joy bundle or the Dove of Hope bundle from the current Autumn-Winter catalogue. The image of the globe seemed like a fitting stamp to create my repeating background to tie-in with my sentiment, without detracting from it. Not overly Christmassy perhaps, but I think it would make a great masculine Christmas card.

Monochromatic Peace - Having considered a bold contrast for my free choice colour, in the end plumped for Bermuda Bay as I felt the cool palette of aqua and grey against the white fitted with the peaceful theme of my card. What do you think? Would you have gone with something more contrasting - shocking pink, perhaps? Do leave me a comment below, I'd love to hear your thoughts. 

Here is the visual summary of the key products used on today's project for you to pin for easy reference:


You can see all of my 'How To' summaries on my 'How To - Tips and Techniques' Pinterest board in case you've missed any. 

Enjoy your day and I'll be back tomorrow with another project, this time for our new challenge over at As You See It which is all about colour. Until then, happy stampin'!

Stampin' Up! Supplies Used:

Table built using Product Table Builder by The Crafty Owl - Independent Stampin' Up! Demonstrator.

CASEing The Catalogue With Snowflake Splendor PP506

by Joanne James30. August 2020 09:00

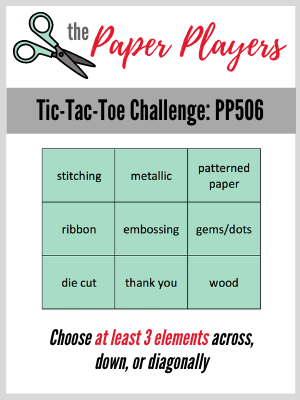
Today it's Sunday and time for this week's new challenge over at The Paper Players! It's the fifth week of the month and the turn of the amazing Ann to host this week with a fun TicTaToe challenge board for you to work with:
    

My cards today feature lots of products from the Snowflake Splendor Suite in the Autumn-Winter mini catalogue. Take a look:
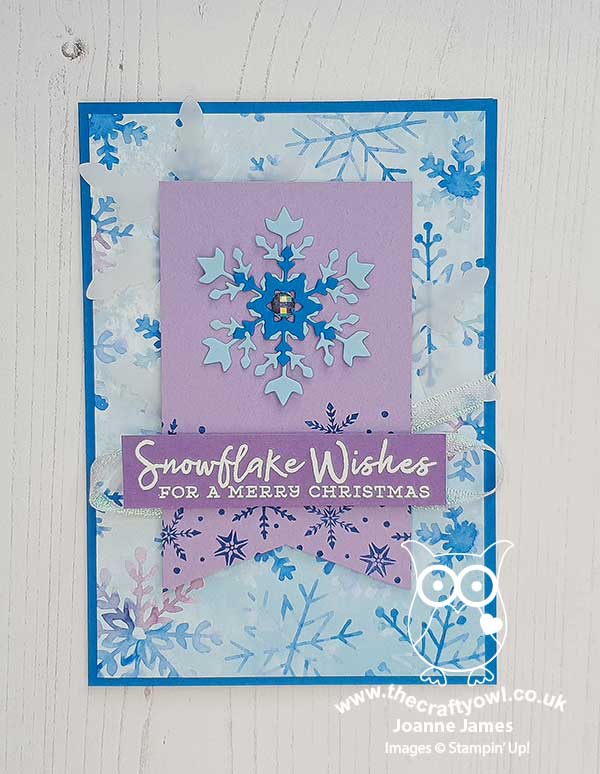
 

Here's the low-down on today's card:

TicTacToe - I love a tic tac toe board - they offer such a wealth of creative possibility and always result in an interesting gallery. I went along the diagonal bottom left to top right - diecut, embossing and patterned paper - for my card today, but realised afterwards it also works for the middle horizontal row of ribbon, embossing and gems - check out the sparkly blue faceted gem I used to centre my diecut layered snowflake:
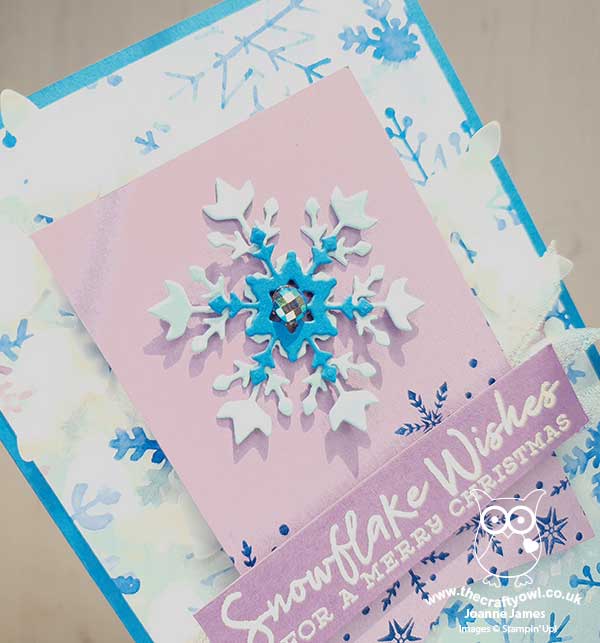
 

CASEing The Catalogue - Does the layout I chose for today's card look familiar? The team over at SUO Challenges are challenging us to CASE (Copy And Share Everything or Copy And Selectively Edit, you choose) either of the cards featuring the 'Whale Done' Suite on page 94 of the catalogue:
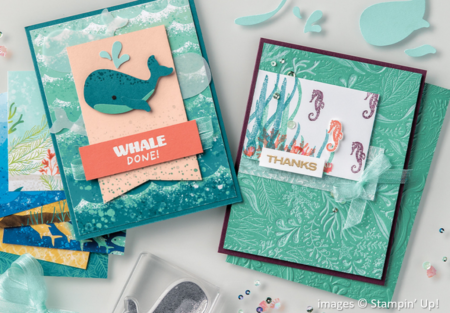
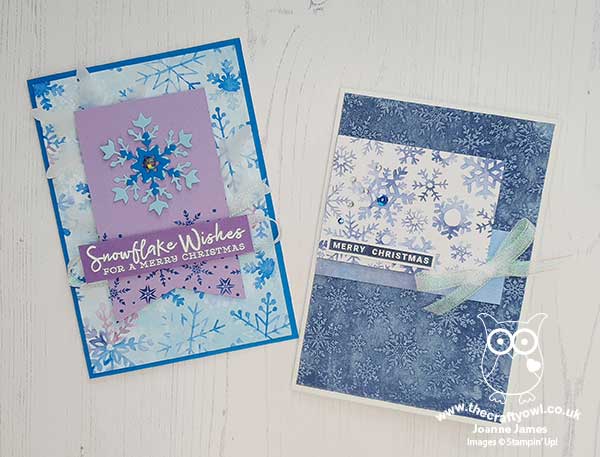
I often use my Stampin' Up! catalogue for inspiration in terms of colours or layouts and this was a fun challenge to show how you can take inspiration from the catalogue to create something fresh and new. I actually made both of the cards I'm sharing today live in a Zoom demonstration with the ladies in my Online Classes Facebook Group during last week's session, as I wanted to explain my process and encourage them not to discount pages that featured products that might not be of interest to them, but instead look to see what other inspiration they could take. My card uses the same layout as the one on page 94 and includes all of the same elements: patterned paper, a central banner with contrasting stamping, a feature diecut image, diecut vellum pieces behind the banner and an embossed sentiment backed with ribbon - yet my card looks quite different to the one on page 94 as it uses a completely different product suite.

Snowflake Splendor Times Two - Having made this card, I then went on to CASE the second card on this page, that highlights an inked embossing folder technique:
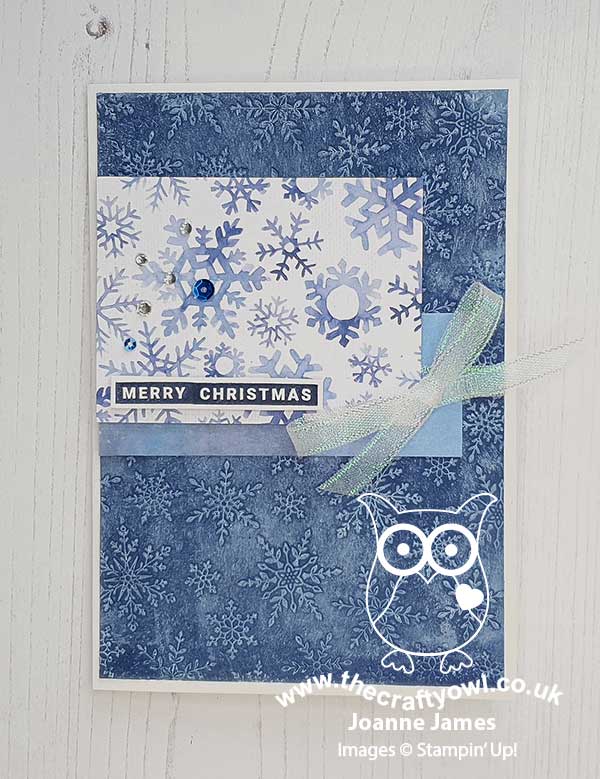
 

I used the Winter Snow embossing folder and instead of a stamped panel, used a couple of pieces of contrasting designer series paper for the feature panel, embellished with some rhinestones and Whale of a Time sequins, along with a sentiment created from stamping two of the greetings from the 'Peace And Joy' stamp set next to each other to create a single one; this one is slightly different in layout to the catalogue sample, yet the similarities in layout still make it recognisable. 

Here's both of my CASEd cards together: 
 

Here is the visual summary of the key products used on today's project for you to pin for easy reference:
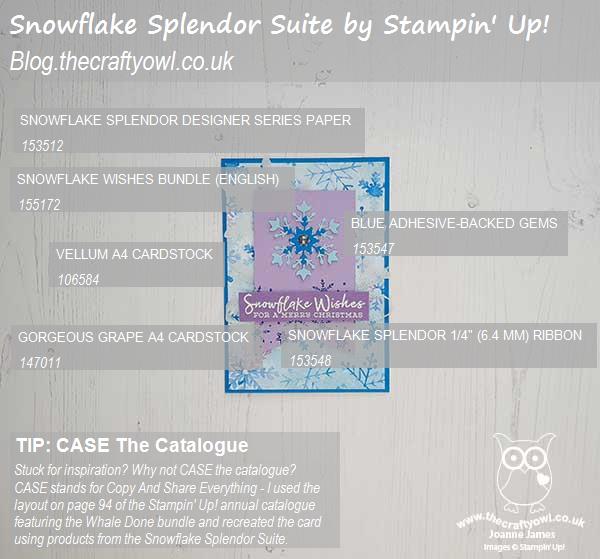
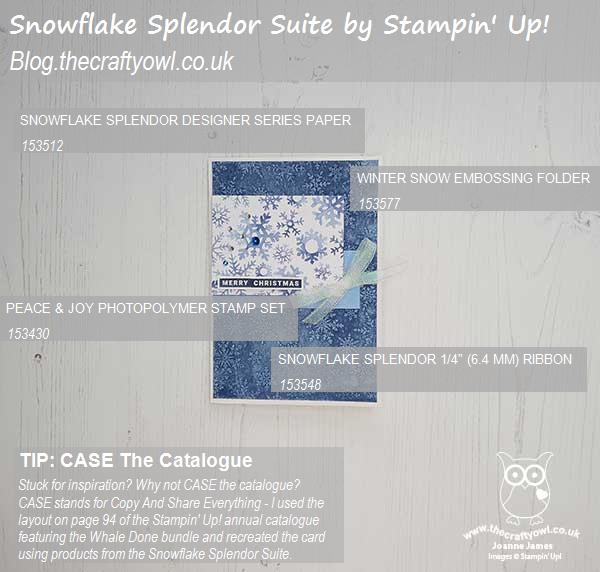


You can see all of my Product and 'How To' summaries on my 'How To - Tips and Techniques' Pinterest board in case you've missed any. Do you ever use layouts from the catalogue as a starting point for your card making? Do let me know in the comments below - I'd love to hear what inspires you to create! Equally, if you would like to watch the video of me making both of these cards, do get in touch for more details on how to join my Online Classes group - I would love to have you join me.

Before you reach for your ink and papers, check out what our amazing team has created to inspire you this week:

Here's a quick recap of our challenge rules:
 
1.  Create a new paper project
2.  Upload your creation to your blog with a link back to us and provide a direct link to the post featuring your challenge submission.
3.  Please link your card to no more than four challenges, TOTAL.
4.  Have FUN!

You can see all of my 'How To' summaries on my 'How To - Tips and Techniques' Pinterest board in case you've missed any. 

Enjoy your day; my day today will be a busy one, for a Sunday. Rebecca is back to hockey for the first time in 6 months for pre-season training so is very excited about that and I have hours of content to catch up on from Stampin' Up!'s Leader Summit this past few days, much of which I didn't do live because we were otherwise engaged as a family celebrating young Master James' finishing of prep school. Thank heavens for online recordings and catch-up - where would we be without it?! I also have a mound of raspberries to make into jams, jellies and more - the weather here these last few days has been positively autumnal so I have some very soft and squishy fruit that has been rather battered by the high winds! I'll be back tomorrow with another project. Until then, happy stampin'!


Stampin' Up! Supplies Used: 

Table built using Product Table Builder by The Crafty Owl - Independent Stampin' Up! Demonstrator.


Peace and Snowflakes Times Two

by Joanne James20. August 2020 13:00

Today's second and third cards came about following my online card class earlier this week where we were making cards using the Snowflake Wishes Suite and I had the urge to make another card featuring the gorgeous papers. I had already made a card for this week's Global Design Project #GDP254 that I will be sharing later this week, but I could resist another go with that sketch:


I decided to go full-on snowflakes and used a trio of retired snowflake trinkets to embellish my sentiment:


I also added some In-Color Misty Moonlight ribbon beneath my label for an added splash of blue.

Here is the visual summary of the key products used on today's project for you to pin for easy reference:


Having deliberated over which paper pattern to showcase on my card, I realised that the reverse of my chosen design had a fabulous watercolour effect; so I decided to create another card using this that was inspired by the sketch challenge over at TGIF Challenges this week:

I had been musing for a few days over whether or not to brave a watercolour background, but decided this paper would be the perfect cheat. So I paired it  with the fabulous Peace and Joy bundle to create another Christmas card - take a look: 


A fabulous stacked diecut on a vellum wrap and a trio of heat embossed and epoxy 'stars' complete this rather pretty card, even if I say so myself!

Here is the visual summary of the key products used on today's project for you to pin for easy reference:


You can see all of my 'How To' summaries on my 'How To - Tips and Techniques' Pinterest board in case you've missed any. 

Enjoy your day and I'll be back later with my post for this week's new TicTacToe challenge. Until then, happy stampin'!


Card 1 - Stampin' Up! Supplies Used:

Table built using Product Table Builder by The Crafty Owl - Independent Stampin' Up! Demonstrator.
 
Card 2 - Stampin' Up! Supplies Used:
Table built using Product Table Builder by The Crafty Owl - Independent Stampin' Up! Demonstrator.

Scrapbooking

Stampin' Up! has introduced a new range of 12x12" scrapbooking product and kit - the full range is now available to purchase online. To download a copy of the new digital Scrapbooking Catalogue click here.

Mini Catalogue

BROWSE THE CATALOGUE

'Tis The Season - the new Stampin' Up! Mini Catalogue is here! For more details and to download your copy click here

Shop Online

Access my online shop 24 x 7, 365 days of the year:

Current September hostess code:

JQEHTZGK

Shop Online

2024-25 Annual Catalogue

BROWSE THE CATALOGUE

Click on the image to download your copy of the 2024-25 annual catalogue. For a full list of current SU! supplies, go to my online store. If you would like any help or advice, please drop me a line at joanne@thecraftyowl.co.uk or give me a call on 07773 421446 - I'd be happy to help.

Join My Team

It's always a great time to join Stampin’ Up! New team members can get £130 worth of products for only £99 + free business supplies + free shipping + all the fun being a part of Stampin’ Up! Stampin' Up! has something for everyone: join my growing team and benefit from my support to enjoy Stampin' Up! however you choose.

If you're interested, call me for a chat to understand how I can help you realise your goals. Alternatively, if you have already decided to sign up and you just can't wait, please click here for the link to the online form where you can sign up and order your starter kit right away! 

Latest Kits!

Stampin Cut and Emboss

The Christmas Ornaments Kit and Card Keeper Kit are the latest kits that will be arriving in the online store later this month - get yours here!

New Online Exclusives

There are new products available exclusively in the online store from 3 July - check them out here.

About Me

Hi I'm Joanne and live in Northampton and when I'm not looking after my husband and two beautiful children, am an avid crafter with a passion for all things Stampin' Up!

I must confess that I have never been a big rubber stamper - until I discovered Stampin' Up! that is. I love the fact that I can get such great results with co-ordinating stamps, inks, papers and punches - the possibilities are endless! Join me on my stamping journey as I share the things I love and be inspired to create amazing things yourself!

Follow Me

Monthly Newsletter

Box Builder

Click the button above to use Box Buster to create your custom box design using the Envelope Punch Board!

Kits Collection Now Available!

Stampin Cut and Emboss

The new Kits Collection from Stampin' Up! is now available!

Click here to see the current kits available and order yours online today.

I Design For


Stampin' Up Stuff

This is my personal blog and is not endorsed by Stampin’ Up! I hope you find it a plentiful source of ideas and personal inspiration but please don't copy my designs for contest submission or use for classes, publication or sale without express permission.