Happy Forest Friends Thank You Card for AYSI296

by Joanne James7. April 2023 12:00

Today I'm sharing my design team card for our new challenge over at As you See It where it's time for my favourite, a sketch challenge, chosen by Jan:


I considered how I was going to use that large central circle as my focal point and since I'm in 'use it up' mode with my retiring product right now, I decided to create a little scene using some woodland creatures from the Happy Forest Friends designer series paper in the annual catalogue. After much fussy cutting and arranging and re-arranging, this is what I came up with:


Here's the low-down on today's card:

Several of the sheets in the Happy Forest Friends pack have printed scenes on them, so having considered how I was going to make the most of each sheet I actually fussy cut some animals, then used my largest circle Stylish Shapes Die to partially cut a circle, having firstly fussy cut the edge of the tree to sit outside of the circle border. I then added an owl, bear, bird and half a fox (good job he was peeking from behind the tree!) and layered them to create my scene. You can see the detailing a little better on the close up below:

I added a couple of panels using another of the patterns in this pack to the background, and a simple bow of Old Olive twine and a stamped and fussy cut sentiment from the 'Lovely You' stamp set that seemed to fit with my scene. The 'Lovely You' stamp set has lots of useful sentiments and is currently available at 60% off - just £9.20. What a bargain - snap one up here in my online store whilst it's still available!

Here is the visual summary of the key products used on today's project for you to pin for easy reference:


You can see all of my 'How To' summaries on my 'How To - Tips and Techniques' Pinterest board in case you've missed any. 

Here's a summary of our challenge rules:

  • Create any card, scrapbooking page, 3D project or packaging project that fits the challenge.
  • Please include the challenge graphic and link back to the challenge in your blog post. Turn off word verification so we can leave you lots of lovely comments. Make sure you link the post not the whole blog to the Linky. Use #AYSIXXX when uploading to a public gallery.
  • If you’re unsure about ‘the rules’, check the details under the Challenge Guidelines tab on the As You See It Challenge homepage.
  • In a sketch challenge, you are welcome to rotate or flip a sketch. You can replace shapes used such as substituting a circle panel for a square panel. However, we must be able to still see the basis of the original sketch in your finished product.
We look forward to seeing your creations in the AYSI gallery.

Enjoy your day and I'll be back tomorrow with another project. Until then, happy stampin'!


Stampin' Up! Supplies Used:

Table built using Product Table Builder by The Crafty Owl - Independent Stampin' Up! Demonstrator.

Clean And Simple Autumn Leaves TT182

by Joanne James6. October 2022 17:00

It's Thursday and time for a new challenge over at TicTacToe! It's the turn of Team X to host this week and the lovely Betty is our featured designer this week. This is the fun board that we are playing along with: 


Lots of seasonal delights on today's board! I went across the middle row with orange, free and autumn leaves to make a clean and simply thank you card - take a look:


Here's the low-down on today's card:

Today's card is clean and simple in style, although took a little effort to achieve. My Cajun Craze cardbase with heat embossed sentiment from 'Lovely You' was easy enough, but for the top layer I wanted to create a diecut edge detail using the oak leaf die in the Chic die set. It may look at first glance as if this card is simply a split panel with a trio of leaves adhered in a diagonal on top, but that's not the case! I created a mask using a trio of diecut leaves and some masking paper, and used this to mask the Vanilla panel and then added colours to the area below the mask where my leaf diecuts would ultimately sit. I used the Color Dare colours (bottom row, plus top left orange), then adhered my distressed gold leaf diecut leaves on top, so that my blended colour showed through. Finally I trimmed my border to the bottom outer edge of my leaf shapes. This was a little time-consuming, but I really love the effect - the leaves look so autumnal to me and the touches of gold with the distressed paper I used for the outlines and a few sequins to finish add to the richness:  


I am super happy with my clean and simple card so will also be linking up with the lovely peeps over at Addicted to CAS where the codeword is 'Autumn' - for me, synonymous with the changing colours of the leaves. I hope you like today's creation!

Here is the visual summary of the key products used on today's project for you to pin for easy reference:


You can see all of my Product and 'How To' summaries on my 'How To - Tips and Techniques' Pinterest board in case you've missed any. 

A tictactoe board offers so many creative possibilities - how does this week's board inspire you? Why not have a go? We would love to see you in the gallery and who knows - you might be selected for Designer's Choice and be eligible to be a guest designer on a future challenge. 

Enjoy the rest of your day; I'll be back tomorrow with another project. Until then, happy stampin'!


Stampin' Up! Supplies Used: 

Table built using Product Table Builder by The Crafty Owl - Independent Stampin' Up! Demonstrator.

Every Chapter Friendship Card FF112

by Joanne James24. June 2022 09:00

Today I have my card for the new challenge over at Festive Friday. 


The challenge that we are celebrating this week is 'Alice In Wonderland Day' which is on 4th July. Remember the fun thing is that at Festive Friday you do not need to actually celebrate the occasion; your goal is to simply use three or more items from the inspiration list on your project. This week I used hearts, teacup and book and this is what I came up with:


Here's the low-down on today's card:

I knew I wanted to use the 'Every Chapter' stamp set for my card today (teacup and book - check!) and decided I would CASE Krista's layout over at Global Design Project #GDP348 too, so went on the hunt for some teacup-patterned paper for my background. The patterns in the Tea Boutique papers were too uniform to look right either side of my central panel, so I opted for some retired teacup paper from my stash instead. This then led me to use a similar colour palette to Krista's card too - double inspiration! 

I did a partial stamp using only the top portion of my 'Every Chapter' stamp (masking out the words on the book spine), fussy cut it out and coloured it with my Stampin' Blends before popping onto a background made using one of the stamps from the new 'Cup Of Tea' set, where I separated each sentiment with a hand-drawn heart (hearts - check!) I added another heart to my teabag tag detail and a final sentiment from 'Lovely You' to complete my card.


Here is the visual summary of the key products used on today's project for you to pin for easy reference:


You can see all of my 'How To' summaries on my 'How To - Tips and Techniques' Pinterest board in case you've missed any. 

I'm also linking today's card up over at The Alphabet Challenge where they are on 'F is for Friendship' - this card will be headed to one of mine!

How does our board inspire you? I can’t wait to see what YOU create! For more inspiration, be sure to visit the rest of the  Festive Friday Challenge Design team:

Ann Schach
Beth McCullough
Sharon Hashimoto Burkert
Melanie Hungerford
Helen Jennings
Stephanie Lanzalotto
Melva Peters
Jaydee
Diane Evans
Joanne James

Enjoy your day; I'm back on the road and off to Nottingham and on to Newcastle tomorrow. I'll be back here on Sunday with my card for the new challenge over at The Paper Players. Until then, happy stampin'!


Stampin' Up! Supplies Used:

Table built using Product Table Builder by The Crafty Owl - Independent Stampin' Up! Demonstrator.

Ornate Borders Just Because

by Joanne James10. April 2021 20:20

This evening I've a quick post to share a card I made with this week's Color Throwdown colours and this week's Freshly Made Sketches sketch: 


 I was intrigued by Jen B's sketch this week and made a couple of cards with it (I'll share the second one on Monday). Usually I would create a channel with that sketch and focus on some DSP in that gap, but I found myself today looking at it differently. Here's what I came up with:


Here's the low-down on today's card:

I created a layered floral border to run down the centre of my card front using one of the Ornate Borders dies, accenting some of the flowers and paper-piecing others. I added some coloured pearls to the centres and then a sentiment from the 'Lovely You' set directly onto the card front to finish:


Here is the visual summary of the key products used on today's project for you to pin for easy reference:


You can see all of my 'How To' summaries on my 'How To - Tips and Techniques' Pinterest board in case you've missed any. 

Short and sweet from me today; I'll be back tomorrow with another project for our new challenge over at The paper Players. Until then, happy stampin'!


Stampin' Up! Supplies Used:

Table built using Product Table Builder by The Crafty Owl - Independent Stampin' Up! Demonstrator.

Lovely You Baby Wipe Technique Cards

by Joanne James15. July 2020 09:00

Today I'm sharing a couple of cards that I made using the sketch layout over at TGIF Challenges this week:

I thought this was the perfect layout to showcase a couple of panels I made in one of my online Zoom demonstrations yesterday morning - take a look:


Here's the low-down on today's card:

Lovely You - Further to my class featuring the 'Lovely You' stamp set last week, I have been continuing my online demonstrations showcasing additional ideas and techniques that can be used with this set. The little leaves and flowers in this stamp set are useful for so many things and particularly good for creating patterned backgrounds.

Baby Wipe Technique - I created a variegated ink pad using a trio of reinkers and a stack of baby wipes that I then used t create my multi-coloured background. If you've never tried this technique, I recommend you give it a go - it is really fun and you can achieve a unique result each time. Here are the colours I used to create my ink pad:


Delightful Tag Topper Punch - When is a tag not a tag? Well, when it's used to create an interesting design feature on a card! I love the way the sketch has this split panel - perfect for 2 tags punched with the Delightful Tag Topper punch and after heat embossing with my sentiment, I tied them both together with some soft white seam binding ribbon.

I liked the sketch so much I created two panels then mounted each separately, one onto an Old Olive base and one on to Mint Macaron. The ladies on my call were unanimous in their preference for the Old Olive base, but I thought I'd share the alternative with you too:


Lastly, here's both cards together:


Here is the visual summary of the key products used on today's project for you to pin for easy reference:


You can see all of my 'How To' summaries on my 'How To - Tips and Techniques' Pinterest board in case you've missed any. 

I am loving my online sessions with my ladies; we are having an Autumn-Winter pre-order unboxing on Thursday this week - if you would like to join us just let me know!

Enjoy your day and I'll be back tomorrow with another project. Until then, happy stampin'!


Stampin' Up! Supplies Used:

Table built using Product Table Builder by The Crafty Owl - Independent Stampin' Up! Demonstrator.

Lovely You Stitched Heart Triangle Panel Card

by Joanne James10. July 2020 20:47

Today I'm sharing a card that started out with the colour palette over at CAS Colours and Sketches and Lee Ann's sketch this week over at Freshly Made Sketches:


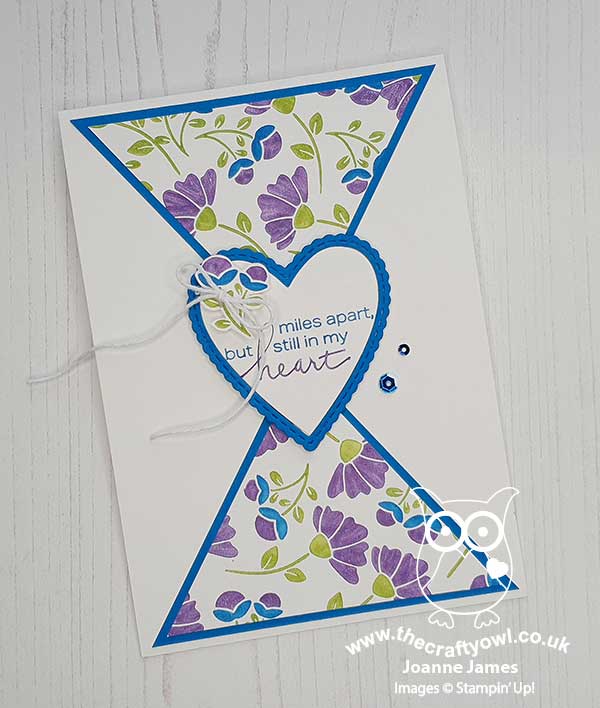
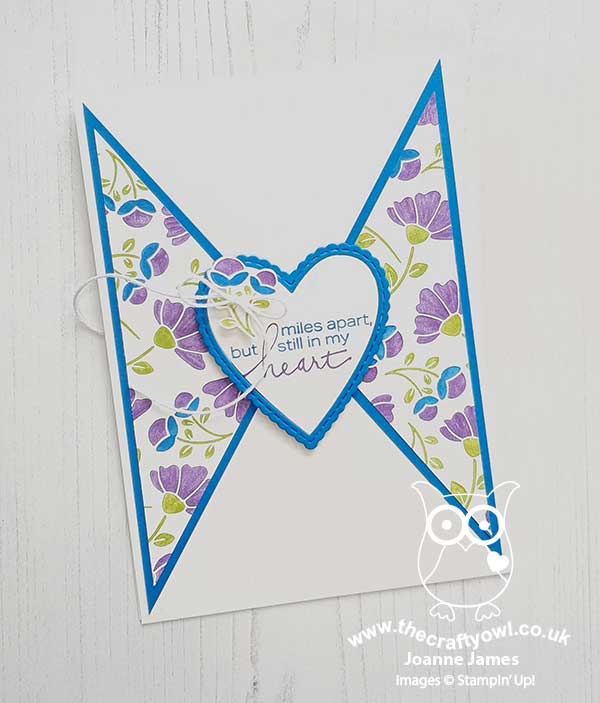
I ended up creating a sheet of my own DSP too so will also be linking up over at the new-to-me challenge The Spot too. Here's my card: 

Here's the low-down on today's card:

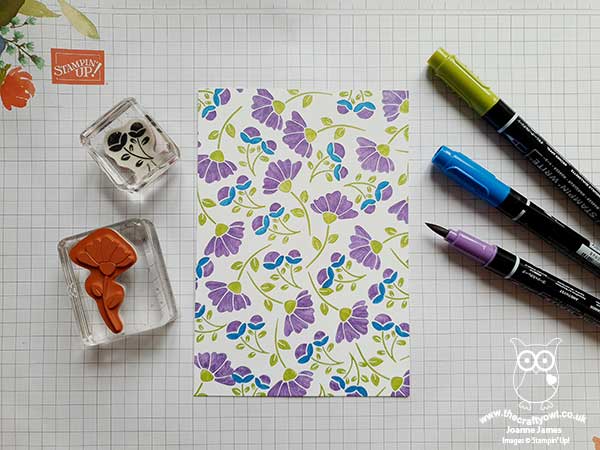
Lovely You DSP - I was immediately drawn to the CAS Colours and Sketches colour palette this week as I'm a big fan of Brights and whilst Pacific Point was one of the three ink pads that I first purchased when I was new to Stampin' Up! so many years ago, it's a colour I don't often use these days. I would never have chosen this trio of colours to work with, but I absolutely love the vibrant, bright combination and will definitely use it again. I held an online class featuring the 'Lovely you' stamp set earlier this week and as is my 'new normal' since my move to online classes, I always host a number of additional demonstration sessions in between classes for anyone to attend that use the same set and highlight other ways it can be used. In our class we created a DSP using one colour per stamp then created a one sheet wonder set of cards, by cutting our DSP in a certain way to give various panels. I wanted to show that these stamps would also be great as multi-coloured images using Stampin' Write markers to colour each of the parts of the flowers on each stamp with a different colour. I shared a sample I made earlier in the week using this technique for a single flower (if you missed it you can see that card that I posted earlier this week here) and knew that these more intense colours would work to great effect and work for the same idea of creating your own piece of patterned paper. Here's my finished paper before I cut it into sections:


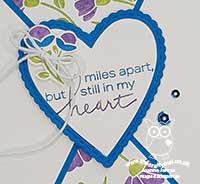
Stampin' Write Markers Two Ways - In addition to inking the individual flower elements, I also used my Stampin' Write markers to ink my sentiment easily using two different colours, highlighting the word 'heart' in Gorgeous Grape - this is so much easier to do with a marker than with ink pads.  

A Stitched Heart - I decided this sentiment would work perfectly in a heart shape, so created an outlined heart using my Stitched Be Mine dies. I need to shorten my sentiment to fit it into my heart, so inked it twice in stages and stamped it in such a way that it would both fit into the heart shape and accommodate a fussy cut flower for decoration - you can see the detail below:


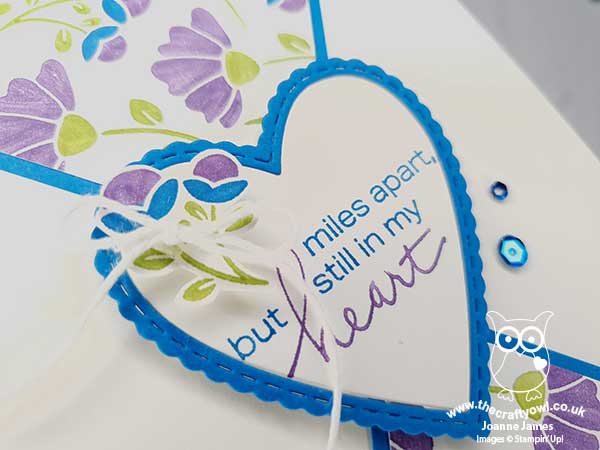
Finally I added a couple of blue sequins and a white twine bow to complete the decoration on my card. 

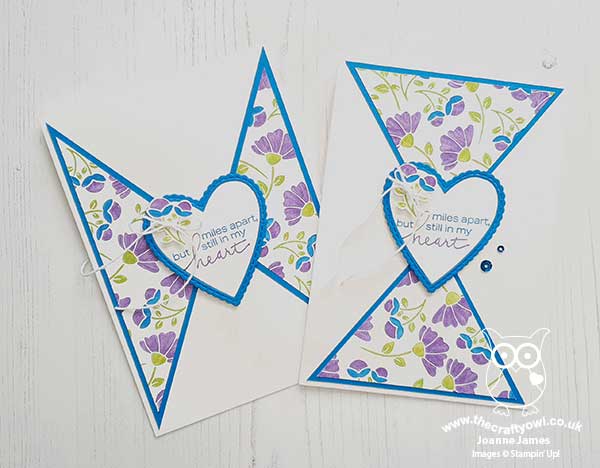
I actually made two cards, since once that rectangle was cut into triangles I had another 2 opposing triangles and didn't want to let them go to waste so made a second card too with an identical centrepiece:


Here are both cards together:


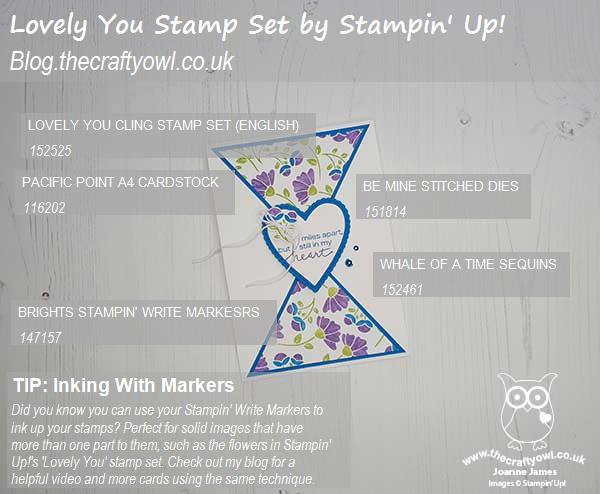
I finished these cards and love them - they are so me!! Here is the visual summary of the key products used on today's project for you to pin for easy reference:


You can see all of my 'How To' summaries on my 'How To - Tips and Techniques' Pinterest board in case you've missed any. 

Lastly, I've been experimenting with some video lately and I did make a little time lapse video (no audio - that proved a little too challenging for my technical skills!) that shows how I put my card together:

Do you find this kind of thing useful? I'd be really interested to know whether this is the kind of thing you would like to see more of. 

Enjoy your day - the sun is shining here - finally! - so I may do some gardening, combined with a little cooking later on. I'll be back tomorrow with another project. Until then, happy stampin'!


Stampin' Up! Supplies Used:

Table built using Product Table Builder by The Crafty Owl - Independent Stampin' Up! Demonstrator.

Lovely You Ornate Layers Pastels Card

by Joanne James6. July 2020 21:05

I've had a busy day today with an online class this morning so I'm late blogging and an just squeezing in a card for this week's challenge over at CAS Colours and Sketches

I usually shy away from 'the double' but I still had my 'Lovely You' stamp set on my desk from this morning's class and saw an opportunity to combine something that featured in this morning's class - making our own patterned paper - with something we are looking at in our demonstration session on Thursday later this week - using our Stampin' Write markers to colour stamps - to create a card. Here's what I came up with:


Here's the low-down on today's card:

I changed the colours to the closest current ones and used one of the Ornate Layers Dies to frame my two-colour marker inked image, and paired my randomly stamped panel with a plain green one to ground it. I added a soft white ribbon bow; in hindsight, this along with the frame makes this card a little less 'CAS' than I would usually consider a card to be, but I do like the end result.

If you would like to join me for a free 30 minute demonstration session later this week that demonstrates the techniques I used on today's card, then do leave me a comment below or send me an email and I will send you the joining details - everyone is welcome.

Here is the visual summary of the key products used on today's project for you to pin for easy reference:


You can see all of my 'How To' summaries on my 'How To - Tips and Techniques' Pinterest board in case you've missed any. 

Enjoy your evening and I'll be back tomorrow with another project. Until then, happy stampin'!


Stampin' Up! Supplies Used:

Table built using Product Table Builder by The Crafty Owl - Independent Stampin' Up! Demonstrator.


Mini Catalogue

BROWSE THE CATALOGUE

The mini catalogue is now live! Read and download your copy here.

Shop Online

Access my online shop 24 x 7, 365 days of the year:

Current March hostess code:

S9F2XJJW

Shop Online

Join My Team

It's always a great time to join Stampin’ Up! New team members can get £130 worth of products for only £99 + free business supplies + free shipping + all the fun being a part of Stampin’ Up! Stampin' Up! has something for everyone: join my growing team and benefit from my support to enjoy Stampin' Up! however you choose.

If you're interested, call me for a chat to understand how I can help you realise your goals. Alternatively, if you have already decided to sign up and you just can't wait, please click here for the link to the online form where you can sign up and order your starter kit right away! 

Latest Kit!

Stampin Cut and Emboss

The Rock Legend Kit has all you need to make 8 cards with coordinating envelopes. Along with the new Panda Friends Kit, both are available from January 4th for just £14 each - get yours here!

2023-24 Annual Catalogue

BROWSE THE CATALOGUE

Click on the catalogue for a full list of current SU! supplies - if you would like to order any of the items featured, please drop me a line at [email protected] or give me a call on 07773 421446 - I'd be happy to help.

New Online Exclusives

There will be new products available exclusively in the online store from 5 March - check them out here.

About Me

Hi I'm Joanne and live in Northampton and when I'm not looking after my husband and two beautiful children, am an avid crafter with a passion for all things Stampin' Up!

I must confess that I have never been a big rubber stamper - until I discovered Stampin' Up! that is. I love the fact that I can get such great results with co-ordinating stamps, inks, papers and punches - the possibilities are endless! Join me on my stamping journey as I share the things I love and be inspired to create amazing things yourself!

Follow Me

Monthly Newsletter

Box Builder

Click the button above to use Box Buster to create your custom box design using the Envelope Punch Board!

Kits Collection Now Available!

Stampin Cut and Emboss

The new Kits Collection from Stampin' Up! is now available!

Click here to see the current kits available and order yours online today.

I Design For


Stampin' Up Stuff

This is my personal blog and is not endorsed by Stampin’ Up! I hope you find it a plentiful source of ideas and personal inspiration but please don't copy my designs for contest submission or use for classes, publication or sale without express permission.