Nothings Better Than Cocktails JUGS 676

by Joanne James22. April 2023 05:00

Today I'm sharing my fourth card for my Guest Designer spot over at Just Us Girls. This week it's Clean and Simple week - always a favourite!


The theme is food and beverages - I couldn't resist another outing with my 'Nothing's Better Than' stamp set before it retires! I used the layout over at Try Stamping on Tuesday and the bright colour palette over at Color Throwdown to make a colourful cocktail reminiscent of summer vacations - take a look:


Here's the low-down on today's card:

I stamped my cocktail in yellow and decided to accent with a blue umbrella and slice of lime, then diecut it and backed it with a circle of vellum and carried my accent colours through to my strips of ombre glimmer paper and my two-tone sentiment: 


I stamped another glass on the front of my envelope and on the inside of my card for added colour:


If you stamp them all at the same time, it really takes very little extra time and it's a nice way of adding a little extra 'pretty'. I will miss this set soooo much when it retires - the stamps and dies have done double-duty in my craft room and then some; I love them and will never part with them! Be sure to check out what the Just Us Girls Design Team have made for Clean and Simple Week - I'm sure they will have some amazing projects to share!

Here is the visual summary of the key products used on today's project for you to pin for easy reference:


You can see all of my 'How To' summaries on my 'How To - Tips and Techniques' Pinterest board in case you've missed any. 

Enjoy your day; I'd like to tell you that my plan for today was to consume cocktails, but alas no such luck! I will be stood at the side of the hockey pitch, as usual - cocktails will have to wait for antoher day! I'll be back tomorrow with my card for our new challenge over at The Paper Players. Until then, happy stampin'!


Stampin' Up! Supplies Used:

Table built using Product Table Builder by The Crafty Owl - Independent Stampin' Up! Demonstrator.

Nothing's Better Than Cookies FF121

by Joanne James28. October 2022 08:00

Today I have my card for the new challenge over at Festive Friday. 


The challenge that we are celebrating this week is 'National Family PJ Day' which is on November 14th - who knew?! Remember the fun thing is that at Festive Friday you do not need to actually celebrate the occasion; your goal is to simply use three or more items from the inspiration list on your project. This week I used hot chocolate, cookies and circles along with the sketch over at Sunday Stamps for my layout and this is what I came up with:


Here's the low-down on today's card:

To The Rescue - I almost struggled to combine enough of the elements this week - I had most of them in one form or another, but not that could be used together. Then I remembered I had some of this retired 'Night Before Christmas' designer series paper from a few years ago in my stash and bingo - it gave me cookies and hot chocolate in one! All I needed to do was combine with the 'Nothing's Better Than' stamp set for my sentiment and the Love You More Than co-ordinating dies for my diecut circle-shaped cookies and I had a trio!

A Cookie Trio - I stamped and diecut a trio of cookies to compliment my greeting on the front of my card, which I carried over to the inside too:

This set really is so much fun - you can create all kinds of greetings and messages with it! This card will be perfect to go with a home-baked gift in the run up to the festive season and is sure to make someone smile!

A Stacked Sentiment - I diecut the word 'cookies' in my greeting and triple-stacked it to add height, using Poppy Parade to pick up the colour of the mugs on the paper - I used this for my banner topper too. 


Whilst this isn't a Christmas card, I think the red gives it a fun, festive feel. I also added some of the Early Espresso suede effect ribbon to the topper - this feels so luxurious and makes nice flat bows too.

Here is the visual summary of the key products used on today's project for you to pin for easy reference:


You can see all of my 'How To' summaries on my 'How To - Tips and Techniques' Pinterest board in case you've missed any. 

How does our board inspire you? I can’t wait to see what YOU create! For more inspiration, be sure to visit the rest of the Festive Friday Challenge Design team:

Ann Schach
Beth McCullough
Sharon Hashimoto Burkert
Melanie Hungerford
Helen Jennings
Melva Peters
Jaydee
Diane Evans
Joanne James

Like many families, the James' have a long-standing tradition of family pyjamas at Christmas time. My husband jokes that he has more Christmas PJs than ones he can wear all year around! Here's a Christmas selfie of us sporting ours from last Christmas:


These were actually quite tasteful considering some of the designs we've sported over the years - I guess that's what happens when you have discerning teenagers in the house! Enjoy your day and I'll be back tomorrow with another project. Until then, happy stampin'!


Stampin' Up! Supplies Used:

Table built using Product Table Builder by The Crafty Owl - Independent Stampin' Up! Demonstrator.

Nothing's Better Than Clean And Simple Glimmer Cocktails CCS45

by Joanne James21. June 2022 12:00

It's Tuesday and time for a new challenge over at CAS Colours & Sketches. Samantha is hosting this month and this week we have a colour challenge featuring three of the five new 2022-24 Stampin' Up! in colours: 


For my card today I made a colourful cocktail card using the 'Nothing's Better Than' stamp set - take a look: 


Here's the low-down on today's card:

Nothing's Better Than - I've used the 'Nothing's Better Than' for a colourful cocktail card previously (you can see that card here if you missed it) but this one is an altogether more clean and simple affair. 

Glimmer Shapes - I backed my stamped and die cut cocktail glass with a combination of in-colour glimmer stitched circles and backed the sentiment banner with another one in the third challenge colour - so much sparkle, yet concentrating it in a small area enables the clean and simple feel to be maintained:


I also added a trio of Tahitian Tide enamel dots to continue the circle theme.

Inside And Out - Another cocktail inside my card and a second one on the envelope completes my card - no naked envelopes or insides here!


Here is the visual summary of the key products used on today's project for you to pin for easy reference:


You can see all of my 'How To' summaries on my 'How To - Tips and Techniques' Pinterest board in case you've missed any. 

As a reminder, for our colour challenges, you must use all of the stated challenge colours. You may also use neutral colours; however, the challenge colours should be the most noticeable ones featured on your card. We use Stampin' Up! color names for reference, but you are welcome to use any other companies' products as long as you match the challenge colours as closely as possible.

Enjoy your day and I'll be back tomorrow with another project. Until then, happy stampin'!


Stampin' Up! Supplies Used:

Table built using Product Table Builder by The Crafty Owl - Independent Stampin' Up! Demonstrator.

Nothing's Better Than In-Color Glimmer Cocktails PP594

by Joanne James5. June 2022 08:00

Today it's Sunday and time for this week's new challenge over at The Paper Players! It's the turn of the fabulous Anne Marie to host this week and she has a fun theme challenge for you to work with:


I still had my Nothing's Better Than set out on my desk from Friday's cards out on my desk, so I decided to use the current Atlantic Hearts sketch layout and play along with the In-Color challenge over at Hand Stamped Sentiments and set about recreating the colourful cocktails on our challenge board this week - take a look:


Here's the low-down on today's card:

I cut a whole bunch of stitched rectangles in glimmer paper in each of the new in-colours and laid them on my card base in alternating colours, with the lighter shades at the top and the darker shades bottom. I then added my sentiment and my colourful cocktail glass. I brushed my cocktail with clear Wink of Stella - along with the glimmer paper, this makes for one sparkly card!

I finished my sentiment on the inside of my card and added another cocktail for good measure:

I also added a stamped cocktail to the front of my envelope - it's definitely happy hour for the recipient of this card!

Here is the visual summary of the key products used on today's project for you to pin for easy reference:


You can see all of my Product and 'How To' summaries on my 'How To - Tips and Techniques' Pinterest board in case you've missed any. 

Before you reach for your ink and papers, check out what our amazing team has created to inspire you this week:

Here's a quick recap of our challenge rules:
 
1.  Create a new paper project
2.  Upload your creation to your blog with a link back to us and provide a direct link to the post featuring your challenge submission.
3.  Please link your card to no more than four challenges, TOTAL.
4.  Have FUN!

Enjoy your day; I'll be back tomorrow with another project. Until then, happy stampin'!


Stampin' Up! Supplies Used: 

Table built using Product Table Builder by The Crafty Owl - Independent Stampin' Up! Demonstrator.


Nothing's Better Than Coffee And Cocktails AYSI276

by Joanne James3. June 2022 12:00

Today I'm sharing my design team card for our new challenge over at As you See It where it's time for a theme challenge:


I was tempted to do something with lemons, as I love the bright yellow of the lemons against the blue in our inspiration photo today, however I have had a rainbow-themed idea percolating in my head for a little while so decided to try that out instead. As a result, I ended up wtih not one but two cards for you today - take a look:


Here's the low-down on today's cards:

Rainbow Pastels Coffee - I started off with this card that was inspired by the pastel rainbow colours over at Fusion (you can see them on the badge at the bottom of this post). I stamped and diecut a collection of coffee cups using the Nothing's Better Than stamp set and Love You More Than co-ordinating dies, and adhered them across the centre of my slimline card. I added a simple stamped sentiment either side, with the diecut 'coffee' added on top using adhesive foam sheet:


 I carried the sentiment and coffee cup theme through to the inside (and did the same with my second card too):


 I was going for a clean and simple card with lots of white space and could have stopped there, but decided that it would be fun to add a selection of sequins from my stash that co-ordinated with my rainbow colours around the cups for a little extra sparkly detail - it's also a nod to the round plates in the Fusion photo. Check out how pretty they shine:


Rainbow Brights Cocktails - Having completed this card, I thought it would be fun to make another card with the same idea, this time using the cocktail glass in the Nothing's More Than set. I changed up my rainbow of colours from pastels to brights (I was thinking more of a day to night vibe!) for my second card:


The cocktail glasses are larger than the coffee cups, so I went for a more uniform positioning across the centre of the card and placed my stamped sentiments to either side for better balance. I wanted to preserve my white space so didn't add as many sparkles this time; I still couldn't resist a few iridescent rhinestones to add to my cocktail party feel though!


So which are you - Team Coffee of Team Cocktails? Today it's a Bank Holiday here in the UK to celebrate Her Majesty The Queen's Platinum Jubilee - 70 years on the throne, wow! I think this means I'll be doing both as the day progresses; any excuse to raise a glass, ma'am!

Here is the visual summary of the key products used on today's project for you to pin for easy reference:


You can see all of my 'How To' summaries on my 'How To - Tips and Techniques' Pinterest board in case you've missed any. 

Here's a summary of our challenge rules:

  • Create any card, scrapbooking page, 3D project or packaging project that fits the challenge.
  • Please include the challenge graphic and link back to the challenge in your blog post. Turn off word verification so we can leave you lots of lovely comments. Make sure you link the post not the whole blog to the Linky. Use #AYSIXXX when uploading to a public gallery.
  • If you’re unsure about ‘the rules’, check the details under the Challenge Guidelines tab on the As You See It Challenge homepage.
We look forward to seeing your creations in the AYSI gallery.

Enjoy your day and I'll be back tomorrow with another project. Until then, happy stampin'!


Stampin' Up! Supplies Used:

Table built using Product Table Builder by The Crafty Owl - Independent Stampin' Up! Demonstrator.


Nothing's Better Than Cookies Card FF103

by Joanne James18. February 2022 09:00

Happy Friday everyone! Today I have my card for the new challenge over at Festive Friday:


The challenge that we are celebrating this week is 'National Peanut Butter Lovers Day' which is on 24th January each year. Remember the fun thing is that at Festive Friday you do not need to actually celebrate the occasion; your goal is to simply use three or more items from the inspiration list on your project. This week I used baked goods, brown and enamel dots for my clean and simple cookie card today - check it out:


Here's the low-down on today's card:

Nothing's Better Than ... - I love the sentiment combinations in the 'Nothing's Better Than' stamp set - I mean, coffee, chocolate, cookies and cocktails!! I'm a tea drinker over coffee, but that would disrupt the 'c's, so I'm good with it! Today's card of course features cookies as my baked goods; the fun thing about the sentiments in this set is that they can be used inside and outside to make fun combinations - this is how I finished the inside of today's card:


... Cookies - I used a simple layered square for the sentiment on the front of my card, backed with a strip of (retired) pink plaid paper, and accented my sentiment with a couple of diecut cookies, complete with crumbs:


A trio of pink enamel dots complete today's card.

Here is the visual summary of the key products used on today's project for you to pin for easy reference:


You can see all of my 'How To' summaries on my 'How To - Tips and Techniques' Pinterest board in case you've missed any. 

How does our board inspire you? I can’t wait to see what YOU create! For more inspiration, be sure to visit the rest of the  Festive Friday Challenge Design team:

Ann Schach
Beth McCullough
Sharon Hashimoto Burkert
Melanie Hungerford
Helen Jennings
Stephanie Lanzalotto
Melva Peters
Jaydee
Diane Evans
Joanne James

Enjoy your day; it's the last day of half-term today however with the impending storm the James Juniors and I shall be battonning down the hatches and spending the day indoors! and I'll be back tomorrow with another project. Until then, happy stampin'!


Stampin' Up! Supplies Used:

Table built using Product Table Builder by The Crafty Owl - Independent Stampin' Up! Demonstrator.


Sweet Talk Love You TTT148

by Joanne James10. February 2022 18:00

It's Thursday and time for a new challenge over at TicTacToe! It's the turn of Team X to host this week and the lovely Felicita is our featured designer this week. This is the fun board that we are playing along with: 
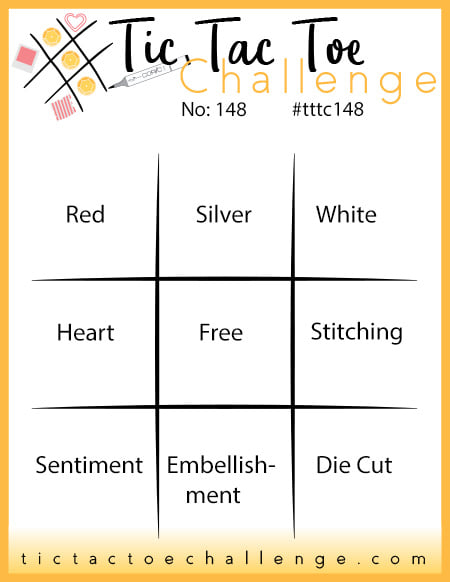
       

I went down the first column with red/heart/sentiment (my card also works for the middle row of heart/free/stitching) and I used the lovely red and pink hearts inspo over at Double D and the fabulous sketch over at Sunday Stamps (this one is a keeper ladies!) for the layout for my sweet-on-you card today - take a look:
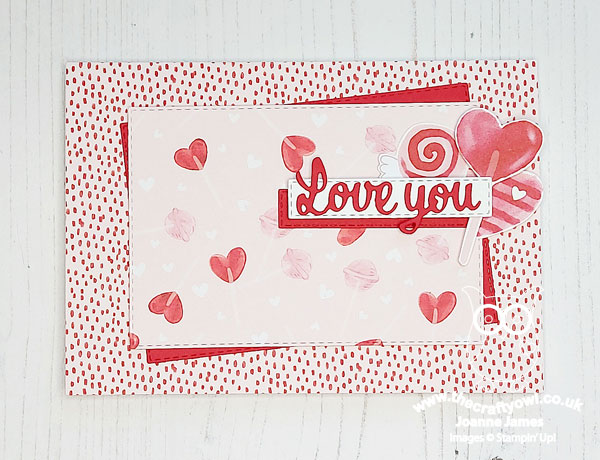
 

Here's the low-down on today's card:

Sweet Talk - The Sunday Stamps sketch was crying out for a showcase of some lovely patterned paper (check out the DT cards on the link above - they are amazing!) so I decided to go all-out pink and red hearts and use another two contrasting patterns from the Sweet Talk paper pack that I used for yesterday's card. I used one for my card base, then with a layer of Real Red in between, added a panel decorated with pink and red lollipops and hearts - so sweet!

All About The Angles - Today card is all about the angles, or more specifically, rectangles! I used two large ones for the central tilted panels, then two smaller ones for the sentiment detail. The Stitched Rectangle Dies are such a great way to frame a piece of paper or scene and add subtle detail, without detracting from the main event. 

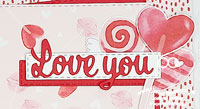
All About Love - The die cut 'love you' sentiment on the front of my card is actually part of the larger diecut sentiment in the 'Love You More Than' Dies set, where I just used the first two words. I love to look at diecut word sets to see how they can be repurposed or reused with other sets to expand their range of use:
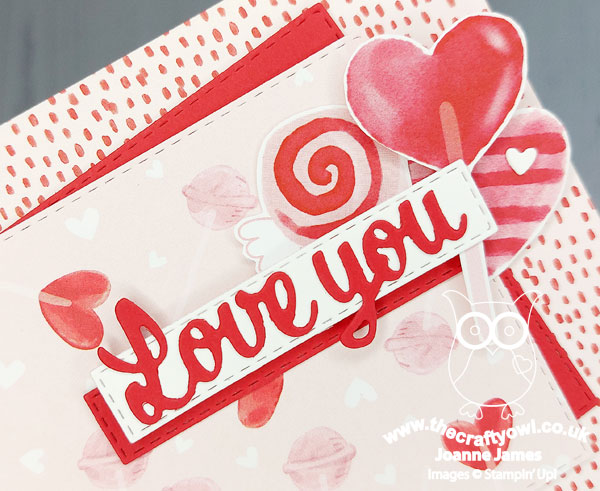
I fussy cut some lollipops and sweets from another of the sheets of Sweet Talk patterned paper and tucked these in just beneath my sentiment for an extra fun touch.

I added a sentiment from 'A Wish For Everything' to the inside of my card - this is one of my favourite sentiment sets:
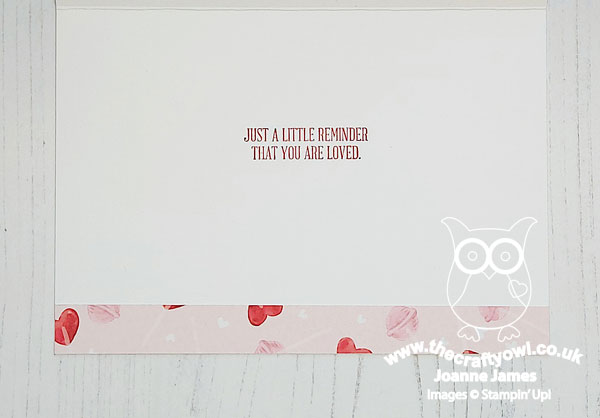
My card can be used at any time to remind the recipient that they are loved - after all, to love is for always, not just for Valentine's!

Here is the visual summary of the key products used on today's project for you to pin for easy reference:
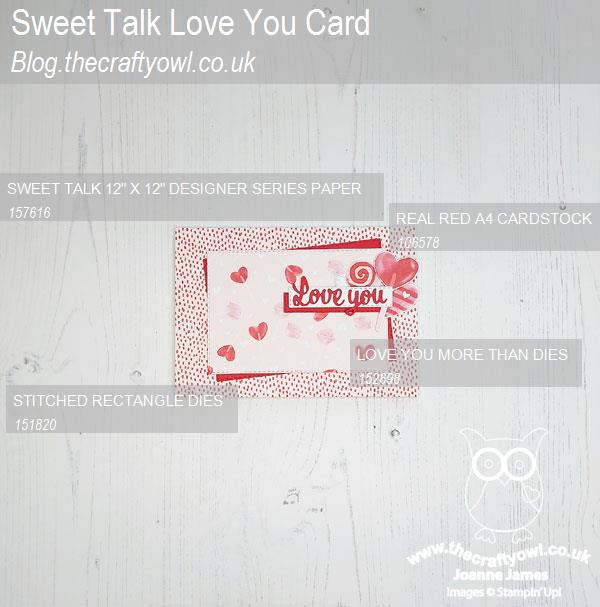
 

You can see all of my Product and 'How To' summaries on my 'How To - Tips and Techniques' Pinterest board in case you've missed any. 

A tictactoe board offers so many creative possibilities - how does this week's board inspire you? Why not have a go? We would love to see you in the gallery and who knows - you might be selected for Designer's Choice and be eligible to be a guest designer on a future challenge. 

Enjoy your evening; I am out this evening attending a music recital that includes a performance of a piece of music that Rebecca wrote for her GCSE Music exam earlier this year. When I asked if she'd like to come with me, she said 'Why would I want to do that? I wrote it, so I know what it sounds like - I'm off to hockey training!' And that was the end of that - you can't fault teenage logic!

I'll be back tomorrow with another project. Until then, happy stampin'!


Stampin' Up! Supplies Used: 

Table built using Product Table Builder by The Crafty Owl - Independent Stampin' Up! Demonstrator.

A Day Without Chocloate For AYSI 244

by Joanne James19. February 2021 13:00

Today I'm sharing my design team card for our new challenge over at As you See It where it's time for an interesting 'fill in the blank' challenge:


The colour that makes me feel cosy? Hmm, well for me this is closely associated with my chosen theme today: chocolate! I love chocolate of all kinds and am particularly partial to a good quality milk or 70% dark, and there is something about the silky sensation when a square of chocolate melts on the tongue that leaves me feeling warm and cosy inside - or indulged, but either way I'll take it! So my colour today is brown and I decided to pair it with this week's challenge over at Inspired By where they are asking us to feature a quote on our card (I also used their sketch layout this week) - take a look:


 Here's the low-down on today's card:

Nothing's Better Than - The choclates in the 'Nothing's Better Than' stamp set were perfect for my card today. I used some retired cardstock in Chocolate Chip for my cardbase and stamped the outline chocolate stamp all over for a tone-on-tone background. I also stamped a couple of these chocolate trios on some Very Vanilla in Chocolate Chip and outlined in Early Espresso, then trimmed one chocolate from each, and used them to decorate my quote panel.  

Love You More Than - My quotation is made up from a combination of stamps in the 'Nothing's More Than' stamp set and a stacked diecut of the word 'chocolate' for a little added emphasis. I diecut it 3 times and glue them together for added dimension:


I love how this is an 'unfinished' quotation - this really is so me, I mean a day without chocolate?! Something I don't ever like to contemplate!

Chocolate Box Memories - I decided to use a stitched scallop rectangle as the base for my quotation - the shape reminded me of the almost velvet-like top sheet that used to sit in chocolate boxes in years gone by - do you know the ones I mean? I also chose to use Very Vanilla as opposed to Basic White, as a nod to white chocolate, which is more cream than white in colour.

Here is the visual summary of the key products used on today's project for you to pin for easy reference:

 to follow.

You can see all of my 'How To' summaries on my 'How To - Tips and Techniques' Pinterest board in case you've missed any. 

Here's a summary of our challenge rules:

  • Create any card, scrapbooking page, 3D project or packaging project that fits the challenge.
  • Please include the challenge graphic and link back to the challenge in your blog post. Turn off word verification so we can leave you lots of lovely comments. Make sure you link the post not the whole blog to the Linky. Use #AYSIXXX when uploading to a public gallery.
  • If you’re unsure about ‘the rules’, check the details under the Challenge Guidelines tab on the As You See It Challenge homepage.
  • In a Fill in the Blank challenge, complete the sentence in the Challenge Banner with the phrase that is true for you and create your project using the words you used. Tell us what you said in your blog or on your site.
We look forward to seeing your creations in the AYSI gallery.

Enjoy your day and I'll be back tomorrow with another project. Until then, happy stampin'!


Stampin' Up! Supplies Used:

Cake and Cookies For PP513

by Joanne James18. October 2020 09:00

Today it's Sunday and time for this week's new challenge over at The Paper Players! It's the turn of the queen of diecuts, the lovely Laurie, to host this week and she has a Clean and Simple challenge for you to work with:


REMEMBER THIS IS CLEAN AND SIMPLE WEEK 
 
What do we mean by Clean and Simple?
 
Minimal layers and embellishments
Plenty of open space, aka "white" space
Simple and uncluttered 

I actually have a few cards for you today! First up - cake! A quick review of my stamp collection told me I had no current cake or cupcake stamps - go figure! So I decided to use Linda's sketch over at Freshly Made Sketches this week:

 myI used my current Playful Alphabet Dies, along with some retired Patio Party designer series paper and last year's 'Piece of Cake' stamp set to create a couple of clean and simple cake-themed cards. Here's the first one using the negative space of the diecut letters:


And a close up of that fun sentiment:


And here's the second card, using the same paper and alternative colour base with the actual diecut letters, popped up on foam adhesive sheets:


Both cards finish with this sentiment on the inside:


Perfect for birthdays or other occasions! Here's a picture of them both together:


The Patio Party paper actually dates back to 2013 so I'm thinking there won't be many of you with some of this on your shelves (unless you are a paper hoarder like me!!) so I also made a third card using current products and this week's Global Design Project sketch:

For this card I reached for my 'Nothing's Better Than' bundle and tweaked my sentiment to create a festive cookie card:


I paired my cookies with some festive plaid from the Plaid Tidings DSP pack (15% off in this month's DSP sale!); having photographed my card, I wish I'd added a sprig of holly too (maybe I'll go back and add one on before I send it!) but to be fair this card is less clean and simple than the first two, with a few more layers and elements so probably best I quit when I did!


Here is the visual summary of the key products used on the above project for you to pin for easy reference:


You can see all of my Product and 'How To' summaries on my 'How To - Tips and Techniques' Pinterest board in case you've missed any. 

Before you reach for your ink and papers, check out what our amazing team has created to inspire you this week:

Here's a quick recap of our challenge rules:
 
1.  Create a new paper project
2.  Upload your creation to your blog with a link back to us and provide a direct link to the post featuring your challenge submission.
3.  Please link your card to no more than four challenges, TOTAL.
4.  Have FUN!

You can see all of my 'How To' summaries on my 'How To - Tips and Techniques' Pinterest board in case you've missed any. 

Enjoy your day; we will be having a quiet family day today as we head into the start of the half-term holiday for one of the James Juniors at least (the other has another 4 days of school to go!). I managed to get some crafting done yesterday so will definitely be back tomorrow with another project. Until then, happy stampin'!


Stampin' Up! Supplies Used: 

Table built using Product Table Builder by The Crafty Owl - Independent Stampin' Up! Demonstrator.

Today's Plan: Consume Cocktails

by Joanne James30. July 2020 11:00

Today I'm just squeaking in my card for the current Fab Friday challenge, helped along by the sketch at Hand Stamped Sentiments:


I love these bold, bright colours, but they did cause me to procrastinate over how to use them to best effect! There are some lovely cards in the gallery that use them as accents against a primarily white background, which looks great. In the end I decided to go full-on colour and even add a little sparkle  - take a look:


Here's the low-down on today's card:

Anyone For Cocktails? - I decided to make another card using the 'Nothing's Better Than' stamp set and co-ordinating dies and featuring a colourful cocktail. These tropical colours reminded me of those fabulous rainbow-ombre type cocktails that you get that have red in the bottom, rising through orange to yellow and I wanted to recreate that on my card. It's really easy to do: just ink your stamp in yellow, then with a sponge dauber add orange and then lastly red to the bottom of the stamp respectively before stamping to achieve an easy ombre effect.

Ombre Sparkle - I cut into my Rainbow Glimmer Paper to create a fun, sparkly orange/yellow ombre diecut to mimic the colours and effect of my cocktail. I also added some clear WInk of Stella to my cocktail glass too for a little added shimmer - check it out here:


Stitched Rectangles Windows - Instead of adding mats to the top of my card as per the HSS sketch, I decided to get creative with my Rectangle Stitched Dies and create a custom aperture in my Bermuda Bay card base, then added some in-colour DSP in Bermuda Bay featuring the circle design, to echo my feature circle, behind.

Here is the visual summary of the key products used on today's project for you to pin for easy reference:

You can see all of my 'How To' summaries on my 'How To - Tips and Techniques' Pinterest board in case you've missed any. 

I was supposed to post this card yesterday but my day just seemed to run away with me - do you ever have days like that? I've just finished a fun online demonstration session this morning so wanted to squeeze this in before cracking on with the rest of today's activities, which unfortunately do not include consuming cocktails!! Ah well, never mind. Enjoy your day and I'll be back tomorrow with another project. Until then, happy stampin'!


Stampin' Up! Supplies Used:

To follow.


New Online Exclusives

There are new products available exclusively in the online store from 5 November - check them out here.

Latest Kits!

Stampin Cut and Emboss

The Perpetual Beauty Calendar Kit and Cherry Blossoms Treat Boxes Kit are the latest kits in the online store - get yours here!

Shop Online

Access my online shop 24 x 7, 365 days of the year:

Current December hostess code:

9NKXDTTR

Shop Online

Mini Catalogue

BROWSE THE CATALOGUE

'Tis The Season - the new Stampin' Up! Mini Catalogue is here! For more details and to download your copy click here

Scrapbooking

Stampin' Up! has introduced a new range of 12x12" scrapbooking product and kit - the full range is now available to purchase online. To download a copy of the new digital Scrapbooking Catalogue click here.

2024-25 Annual Catalogue

BROWSE THE CATALOGUE

Click on the image to download your copy of the 2024-25 annual catalogue. For a full list of current SU! supplies, go to my online store. If you would like any help or advice, please drop me a line at joanne@thecraftyowl.co.uk or give me a call on 07773 421446 - I'd be happy to help.

Join My Team

It's always a great time to join Stampin’ Up! New team members can get £130 worth of products for only £99 + free business supplies + free shipping + all the fun being a part of Stampin’ Up! Stampin' Up! has something for everyone: join my growing team and benefit from my support to enjoy Stampin' Up! however you choose.

If you're interested, call me for a chat to understand how I can help you realise your goals. Alternatively, if you have already decided to sign up and you just can't wait, please click here for the link to the online form where you can sign up and order your starter kit right away! 

About Me

Hi I'm Joanne and live in Northampton and when I'm not looking after my husband and two beautiful children, am an avid crafter with a passion for all things Stampin' Up!

I must confess that I have never been a big rubber stamper - until I discovered Stampin' Up! that is. I love the fact that I can get such great results with co-ordinating stamps, inks, papers and punches - the possibilities are endless! Join me on my stamping journey as I share the things I love and be inspired to create amazing things yourself!

Follow Me

Monthly Newsletter

Box Builder

Click the button above to use Box Buster to create your custom box design using the Envelope Punch Board!

Kits Collection Now Available!

Stampin Cut and Emboss

The new Kits Collection from Stampin' Up! is now available!

Click here to see the current kits available and order yours online today.

I Design For


Stampin' Up Stuff

This is my personal blog and is not endorsed by Stampin’ Up! I hope you find it a plentiful source of ideas and personal inspiration but please don't copy my designs for contest submission or use for classes, publication or sale without express permission.

DSP Special Release

Check out 3 popular designer series paper designs in fresh new colourways! Available exclusively in the online store from 3 December - check them out here

Last Chance Products

Last Chance Products will now be updated every other month - check them out here.