Bubble Over Large Letters Party Banner Decoration

by Joanne James31. March 2018 08:00


Today it's the last day to snap up a Sale-A-Bration freebie, whether that's free stamps with your starter kit when you join my team, extra hostess rewards when you place an order of £200 or more or a free gift with a purchase of £45 or more. You only have until 10.50pm this evening though, so don't leave it too late!


I'm sharing the last of my Sale-A-Bration makes with you today, a party banner featuring the Bubble Over stamp set and Bottles & Bubbles Framelits Dies, and the FREE Bubbles & Fizz Designer Series Paper - take a look:


My banner letters are courtesy of the Letters For You stamp set and co-ordinating Large Letters framelits, on some layered circles before adding to the pennants featuring all of the designer paper designs. Here's a picture of it hanging properly at last November's Onstage event:


This is a great set for making part banners for a birthday or summer BBQ celebration (if it stops raining for long enough here in the UK to light one, of course!) and the Bubbles and Fizz designer papers add great colour and pattern with a fun party vibe.

Here is the visual summary of the key products used on today's project for you to pin for easy reference:


You can see all of my 'How To' summaries on my 'How To - Tips and Techniques' Pinterest board in case you've missed any. 

I'll be back tomorrow with this week's project for our new challenge over at The Paper Players. Until then, happy stampin'!


Stampin' Up! Supplies Used:

Table built using Product Table Builder by The Crafty Owl - Independent Stampin' Up! Demonstrator.

Large Letters and Numbers Brother Football Birthday Card #GDP103

by Joanne James7. September 2017 20:30

Good evening lovely readers! I was tempted to share a Christmas card today but as it's my birthday I thought a birthday card was in order. Not one to me though - instead one that I made for Ben from Rebecca for his birthday recently - another masculine card to fit with the theme over at the Global Design Project this week which also happens to use this week's Color Throwdown colour palette too:


I decided to make another slightly larger card than usual as I wanted to be able to personalise it - take a look:


Here's the lowdown on today's card:

Recipe For Success - Every time I make a card with someone in particular in mind, I try to choose something personal or meaningful to that individual; after all, that has to be the biggest benefit of crafting your own. That is no more so than when it's a card for your nearest and dearest, and Rebecca was clear this card needed some key things: the number 10, the word 'brother', some form of birthday greeting and both a football and the colour red - the colour of Ben's beloved Manchester United football team. Armed with such clear requirements, it made the job of designing this card super easy.

Numbers and Letters - I used both my large letters and numbers today. My letters were stamped using 'Letters For You' again like yesterday's card and cut out with the Large Letters Framelits. I used my numbers to create a tone-on-tone repeating background pattern of the number 10; a good way to include it without having it front and centre. I also used the banner die from the Large Numbers Framelits for my happy birthday banner.

Retro Rubber - I substituted the 'O' in 'BROTHER' with a football, courtesy of a little 'retro rubber' from the long-retired stamp set, 'Great Sport'. I'm so glad I held on to this set - I have used the football and basketball in this set sooo many times!! A true blast from the past - so one for a link up with SUO Challenges too this week as this is their theme, how appropriate!

Here is the visual summary of the key products used on today's project for you to pin for easy reference:


You can see all of my 'How To' summaries on my 'How To - Tips and Techniques' Pinterest board in case you've missed any. 

What kinds of stamps have you held on to and would never part with? Do leave me a comment below - Id love to know!

I hope you enjoyed today's post; I'll be back tomorrow with another project - definitely for Christmas and with a little more retro rubber thrown in! Until then, happy stampin'!


Stampin' Up! Supplies Used:

Table built using Product Table Builder by The Crafty Owl - Independent Stampin' Up! Demonstrator.

High Tide Birthday Card For Dad #GDP103

by Joanne James6. September 2017 20:25

Good evening lovely readers! So today was the day that saw my precious James Juniors return to school - I got lots of work done, but boy was the house quiet! So we are about to return to our school routines and something close to normal working will resume. I've been busy making lots of Christmas samples in readiness for my open house on Friday however September is also a big birthday month for us, with several family members and friends celebrating birthdays (my good self included!) So today I'm sharing a card that I made for my Dad's birthday that fits perfectly with the theme over at the Global Design Project this week:

I decided to make a slightly larger card than usual as I wanted to be able to personalise it - take a look:


I decided to use the High Tide stamp set for my card - such a great set for masculine cards and one that you can use to make quite colourful masculine cards (they don't always have to be brown :-) ) I stamped my beach scene off to the left as I wanted it to act as something of a background for my sentiment, then paired the Happy Birthday from the 'Butterfly Basics' stamp set with my stamped and diecut 'DAD' - you know how much I love these letters and co-ordinating framelits! I'm not generally one for frills, especially on a masculine card, so pretty ribbon was a no-no for me, however I did add some burlap beneath my diecut letters for a little extra touch - I think it fits nicely with the beachy theme too.

If you like the High Tide set and live local to me, you might like to know that this is the set we will be using in one of my October Monthly Technique Classes - get in touch if you would like more information.

Here is the visual summary of the key products used on today's project for you to pin for easy reference:


You can see all of my 'How To' summaries on my 'How To - Tips and Techniques' Pinterest board in case you've missed any. 

I hope you enjoyed today's quick post; I'll be back tomorrow with another project. Until then, happy stampin'!


Stampin' Up! Supplies Used:

Table built using Product Table Builder by The Crafty Owl - Independent Stampin' Up! Demonstrator.

Thoughtful Branches Family Tree Home Decor Frame

by Joanne James3. August 2016 10:00

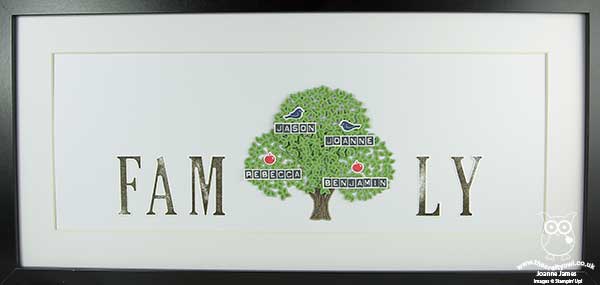
Happy Wednesday everyone! As promised, I have another project today using the limited time stamp set and thinlits bundle 'Thoughtful Branches' - a home decor frame that includes my family tree. As soon as I saw this set I knew it would be perfect for a family tree idea that I've had in mind for a while, so combined with my 'Letters For You' stamp set and co-ordinating Large Letters Framelits I set to work. Here is my finished project:
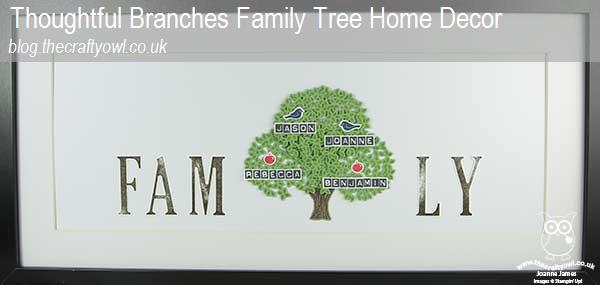
 

This is a rather large project - it has a finished frame size of 9" x 19 3/4" - so was something of a challenge to photograph - but I absolutely love it! 

Here's the low-down on today's project:

Letters For You - I recently invested in this letters bundle - 'invested' being the key word here, as at £119.50 the bundle is the most expensive in the catalogue - but so worth it for projects like this one. The set has the whole alphabet along with useful punctuation and just like the Large Numbers Framelits and Number of Years stamp set, it is a set that can be used for so many projects and is timeless - a definite 'keeper'. I stamped my letters in Early Espresso and cut them out using my Big Shot and co-ordinating framelits, then substituted the 'I' in 'FAMILY' with my family tree.

Thoughtful Branches Tree - I stamped and cut out my tree trunk, then in order to create a tree big enough to comfortably accommodate my family members, I cut three treetops and layered them to create a fuller tree. Each one was backed with another base (so I cut 6 tree tops in all) for rigidity and I layered them together for added dimension. 

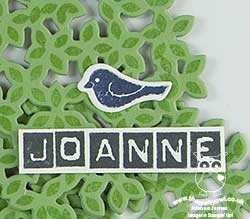
Family Touches - I stamped the names of each of my family members in black onto Whisper White cardstock using the modern Labeler Alphabet and cut them out by hand, then placed them in my tree in descending order of age and with a couple of birds to identify the parents and the apples identifying my children. Here's a close up of the tree so that you can see all of the elements in more detail:
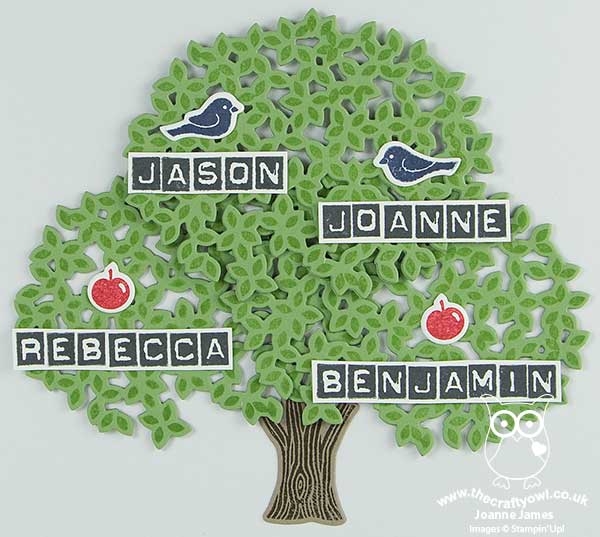
This took longer to work out and put together than explain - but I am so pleased with the end result and am looking forward to hanging it on the wall. You are so going to want to get the Thoughtful Branches Bundle this month!

Here is the visual summary of the key products used on today's project for you to pin for easy reference:
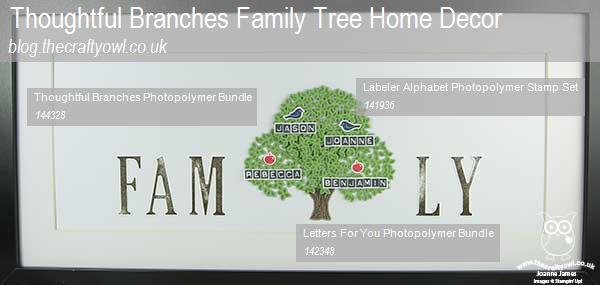
 

You can see all of my 'How To' summaries on my 'How To - Tips and Techniques' Pinterest board in case you've missed any. 

I'm linking today's project up with the team over at SUO Challenges where the theme this week is 'Delightful Dies' - the two I've used on this project are definitely firm favourites.

Enjoy your day; I'm off for a bike ride and some fresh air whilst the unpredictable British weather holds! I'll be back tomorrow with this week's new challenge over at Create With Connie and Mary. Until then, happy stampin'!
 

Stampin' Up! Supplies Used:

Table built using Product Table Builder by The Crafty Owl - Independent Stampin' Up! Demonstrator.

Current Promotions

Stampin Cut and Emboss

Save up to 30% off on all your favourite kits from 1 to 31 October! 

Click here to see the current kits available and order yours online today.

Join My Team

It's always a great time to join Stampin’ Up! During October you can get even more in your starter kit! New team members can get £160 worth of products for only £99 + free business supplies + free shipping + all the fun being a part of Stampin’ Up! Stampin' Up! has something for everyone: join my growing team and benefit from my support to enjoy Stampin' Up! however you choose.

If you're interested, call me for a chat to understand how I can help you realise your goals. Alternatively, if you have already decided to sign up and you just can't wait, please click here for the link to the online form where you can sign up and order your starter kit right away! 

Shop Online

Access my online shop 24 x 7, 365 days of the year:

Current October hostess code:

4XPEYCB9

Shop Online

Scrapbooking

Stampin' Up! has introduced a new range of 12x12" scrapbooking product and kit - the full range is now available to purchase online. To download a copy of the new digital Scrapbooking Catalogue click here.

Mini Catalogue

BROWSE THE CATALOGUE

'Tis The Season - the new Stampin' Up! Mini Catalogue is here! For more details and to download your copy click here

2024-25 Annual Catalogue

BROWSE THE CATALOGUE

Click on the image to download your copy of the 2024-25 annual catalogue. For a full list of current SU! supplies, go to my online store. If you would like any help or advice, please drop me a line at joanne@thecraftyowl.co.uk or give me a call on 07773 421446 - I'd be happy to help.

Latest Kits!

Stampin Cut and Emboss

The Christmas Ornaments Kit and Card Keeper Kit are the latest kits in the online store - get yours here!

New Online Exclusives

There are new products available exclusively in the online store from 5 November - check them out here.

About Me

Hi I'm Joanne and live in Northampton and when I'm not looking after my husband and two beautiful children, am an avid crafter with a passion for all things Stampin' Up!

I must confess that I have never been a big rubber stamper - until I discovered Stampin' Up! that is. I love the fact that I can get such great results with co-ordinating stamps, inks, papers and punches - the possibilities are endless! Join me on my stamping journey as I share the things I love and be inspired to create amazing things yourself!

Follow Me

Monthly Newsletter

Box Builder

Click the button above to use Box Buster to create your custom box design using the Envelope Punch Board!

Kits Collection Now Available!

Stampin Cut and Emboss

The new Kits Collection from Stampin' Up! is now available!

Click here to see the current kits available and order yours online today.

I Design For


Stampin' Up Stuff

This is my personal blog and is not endorsed by Stampin’ Up! I hope you find it a plentiful source of ideas and personal inspiration but please don't copy my designs for contest submission or use for classes, publication or sale without express permission.