Joy of Noel Shadow Box Christmas Card PP669

by Joanne James3. December 2023 08:00

Today it's Sunday and time for this week's new challenge over at The Paper Players! It's the turn of the fabulous Jaydee to host this week and she has a timely theme challenge for us to work with:
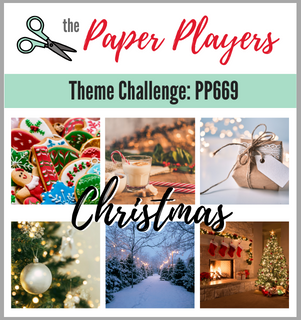
 

It's beginning to look a lot like ... Christmas! It is indeed, so Jaydee has chosen the perfect theme this week! At the start of December I like to make those 'special' cards for friends and family - those over-the-top, fancy ones that you hand deliver. I set aside my usual clean-and-layered self and throw caution to the wind, so I thought I'd share one of those cards with you today - take a look:
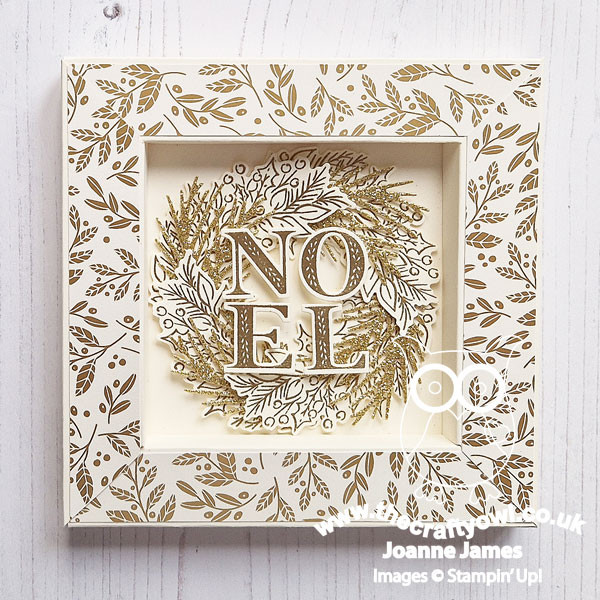
 

Here's the low-down on today's card:

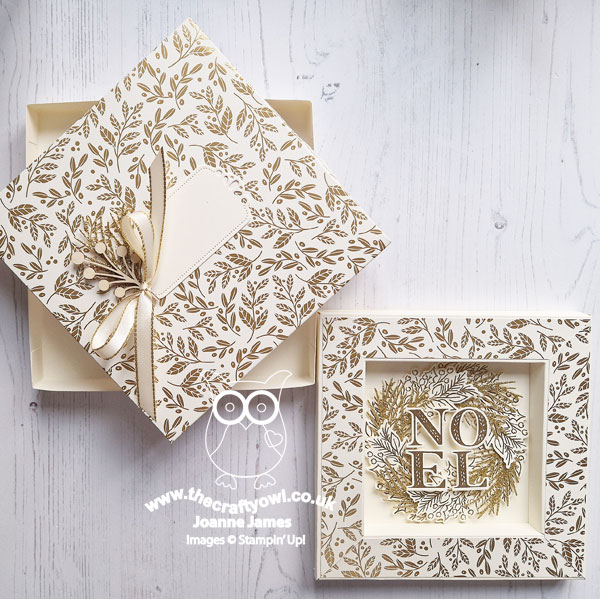
A Fancy Shadow Box - Today's card is part card, part home decor. Measuring 5 3/4" square by 1/2" deep, the front of the card comprises a shadow box frame, with the main design in the centre. I've made non-festive versions of this card in a 6"x6" size that I've shared on my blog previously, but I've never made a Christmas one. This kind of card does take a little longer to make, but I think it's so worth it for a special occasion, don't you? It's also great for those who like to keep their cards and bring out year after year, as it is as much a decoration as it is a card.

Shining Brightly - I used one of the gold and vanilla patterns from the Shining Brightly specialty designer series paper to decorate the frame of my card. Now, I know this paper is now sold out in Europe, but it's been in and out of stock all season due to its popularity, so I'm hoping that for those of you who stocked up, you appreciate a project that shows it in all its glory. Given that my shadow box card has depth, I need to create a box 'envelope' to send it in and I used more of this paper for the lid. You can see my box in the photo below:
Joy of Noel - The real star of the show is the 'Joy of Noel' bundle that features in the centre of my frame. By far and away my favourite bundle from this year's mini catalogue, it really is fabulous. This bundle is still available and if you purchase it from me, you will receive a free copy of the 'Join in With Joanne & Jan' Joy of Noel tutorial that I created with my talented friend Jan Clothier. I combined gold embossed foliage and gold glitter pine needles with a gold embossed NOEL for the centrepiece - the foiling and glimmer paper add so much beautiful festive sparkle, don't you think?
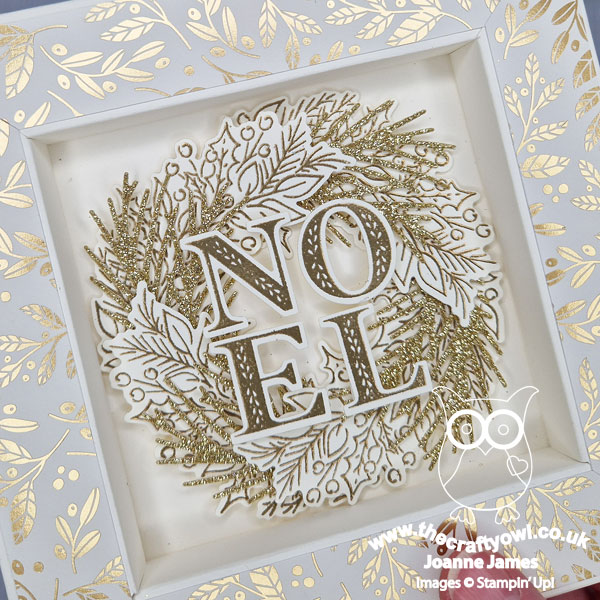
A gold embossed sentiment inside completes my fancy card. What do you think? Do you like to make fancy cards for the special people in your life? Do leave me a comment below - I'd love to hear what you think.  

I'm also playing along with a few challenges: My card follows the sketch at 52 Christmas Card Throwdown (I hope they'll forgive me the sentiment placement), it's a glitter entry over at Inkspirational and finally I've been saving this one for my entry over at SUO Challenges - my favourite holiday catalogue product, actually products with the bundle and paper!!


Here is the visual summary of the key products used on today's project for you to pin for easy reference:
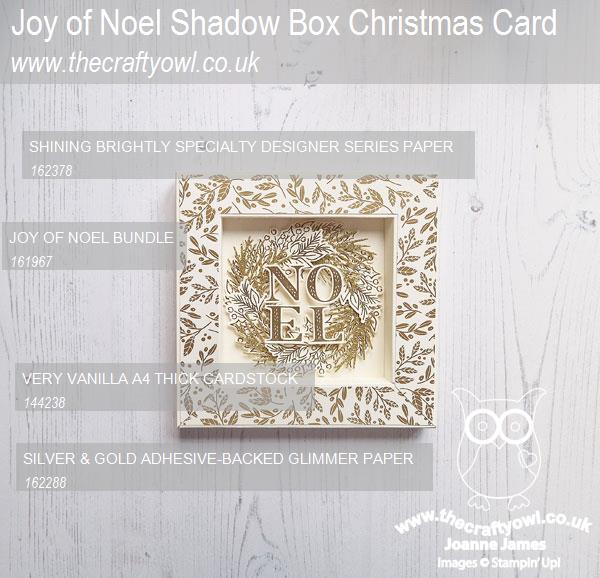
 

You can see all of my Product and 'How To' summaries on my 'How To - Tips and Techniques' Pinterest board in case you've missed any. 

Before you reach for your ink and papers, check out what our amazing team has created to inspire you this week:

Here's a quick recap of our challenge rules:
 
1.  Create a new paper project
2.  Upload your creation to your blog with a link back to us and provide a direct link to the post featuring your challenge submission.
3.  Please link your card to no more than four challenges, TOTAL.
4.  Have FUN!

Enjoy your day; I will be spending mine with more Christmas preparations and getting ready for an upcoming vacation - more about that in a future post! I'll be back tomorrow with another project. Until then, happy stampin'!


Stampin' Up! Supplies Used: 
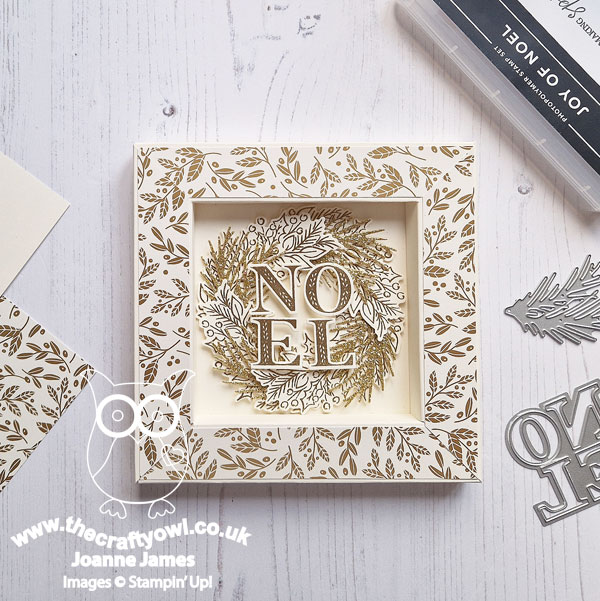
Table built using Product Table Builder by The Crafty Owl - Independent Stampin' Up! Demonstrator.

Shining Brightly Star Trio AYSI 313

by Joanne James1. December 2023 12:00

Today I'm sharing my design team card for our new challenge over at As you See It where it's time for a speed stamping challenge chosen by Deborah:


The Shining Brightly specialty designer series paper is the only current 'starry' product that I have in my stash, so that was my starting point for today's card. As I rummaged through my stamp sets and other supplies to find things that would co-ordinate, I came across some wooden stars from last year's Christmas Memories & More packs that I had previously coloured gold for another project but not used. The stars were the same design as those on the paper and so my design was born! I remembered the sketch from Sketch Saturday and grabbed a Night of Navy card base and offcut, a circle die, some gold twine, gold foil, Versamark and gold embossing powder and the 'Joy of Noel' stamp set and set my timer for just under 10 minutes. This is my finished card: 


 Here's the low-down on today's card:

I added my DSP to my cardfront, then diecut three circles from the Navy panel, tied it with gold trim and added it to my card with dimensionals and added a wooden star to the centre of each aperture. I then heat-embossed my sentiment and fussy cut it, then added some gold foil behind it and fussy cut that too before adding to my card:


So how long did my card take? I used the full 10 minutes, although most of that time was spent heat embossing and fussy cutting my sentiment and foil shadow. I set my timer for just under 10 minutes so that it would give me a warning time to stop fussy cutting and allow me the last bit to add dimensionals and stick it to my card. I could have added it as a straight label which would have taken much less time, but I really wanted to fussy cut it to make it narrower. So what do you think? What starry creation will you create in 10 minutes or less?

Here is the visual summary of the key products used on today's project for you to pin for easy reference:


You can see all of my 'How To' summaries on my 'How To - Tips and Techniques' Pinterest board in case you've missed any. 

Here's a summary of our challenge rules:

  • Create any card, scrapbooking page, 3D project or packaging project that fits the challenge.
  • Please include the challenge graphic and link back to the challenge in your blog post. Turn off word verification so we can leave you lots of lovely comments. Make sure you link the post not the whole blog to the Linky. Use #AYSIXXX when uploading to a public gallery.
  • If you’re unsure about ‘the rules’, check the details under the Challenge Guidelines tab on the As You See It Challenge homepage.
  • In a speed stamping challenge, please time yourself and say in your post how long your card took to complete. 
We look forward to seeing your creations in the AYSI gallery.

Enjoy your day and I'll be back tomorrow with another project. Until then, happy stampin'!


Stampin' Up! Supplies Used:

Table built using Product Table Builder by The Crafty Owl - Independent Stampin' Up! Demonstrator.

Joy Of Noel CAS Christmas Tag Card PP667

by Joanne James19. November 2023 08:00

Today it's Sunday and time for this week's new challenge over at The Paper Players! It's the turn of the fabulous LeAnne to host this week and she has a fun clean and simple challenge for us to work with:


Make a tag or feature a tag on your project - just remember to keep it clean and simple! I had another vellum idea I wanted to try out and LeAnne's challenge today gave me the perfect opportunity - take a look:


Here's the low-down on today's card:

First things first: I used a piece of retired Expressions In Ink Specialty Designer Series Paper for my card base for ease, but you could easily recreate this alcohol ink effect using some Stampin' Blends and drops of rubbing alcohol. I then cut my tag shape out of the centre of my designer paper panel, before gluing it to my white cardbase (minus the tag). I cut 5 extra tags out of white carstock and added these behind the DSP one, so that when they were glued back into the space the stacked tag would have added depth. I cut another tag out of vellum (I used a scrap of Shaded Spruce for the reinforcer) and stamped the large foliage stamp from the 'Joy of Noel' stamp set in Versamark off the edge and heat embossed it in gold. When it is added (tied not glued) to the tag stack I created earlier, the design is clear and the vellum softens the alcohol ink effect on the tag below:

A gold heat embossed sentiment from the 'Christmas Classics' stamp set, along with some gold elegant trim and a trio of festive pearls, complete my card. 

I really like the finished effect - minimal layers and embellishments, lots of white space and enough gold to add a little festive flair. The foliage stamp in the 'Joy of Noel' stamp set is so versatile - although it's a line stamp, it doesn't have to be coloured - there are so many different ways to use it. If you would like even more inspiration using the 'Joy of Noel' stamp set, you can search my blog for lots more examples or better still, this is the bundle that features in this month's 'Join In With Joanne and Jan' tutorial that I have created with my NZ friend, the lovely Jan Clothier - if you purchase this bundle from me this month you will receive our  tutorial for FREE with full instructions for 4 additional projects using this fabulous set.

Back to today's project! Here is the visual summary of the key products used on today's project for you to pin for easy reference:


You can see all of my Product and 'How To' summaries on my 'How To - Tips and Techniques' Pinterest board in case you've missed any. I'm also linking today's project up over at Less Is More where the theme is 'anything CAS goes'. 

Before you reach for your ink and papers, check out what our amazing team has created to inspire you this week:

Here's a quick recap of our challenge rules:
 
1.  Create a new paper project
2.  Upload your creation to your blog with a link back to us and provide a direct link to the post featuring your challenge submission.
3.  Please link your card to no more than four challenges, TOTAL.
4.  Have FUN!

Enjoy your day; it's a rather wet and miserable weekend here so I will be staying indoors today I think - maybe some festive baking will be on the cards! I'll be back tomorrow with another project. Until then, happy stampin'!


Stampin' Up! Supplies Used: 

Table built using Product Table Builder by The Crafty Owl - Independent Stampin' Up! Demonstrator.

Clean and Simple Christmas Classics Noel CCS 525

by Joanne James7. November 2023 13:00

It's Tuesday and time for a new challenge over at CAS Colours & Sketches. Nancy is hosting this month and our first challenge is a colour challenge: 


I thought these colours would work perfectly for a Christmas card, but feel free to use them any way you choose. Here's my card for today:


Here's the low-down on today's card:

Those bright red 'NOEL' letters will by now be familiar to my regular readers - the 'Joy of Noel' stamp set is my number one stamp set this Christmas. I added them to foam adhesive sheets before diecutting with the co-ordinating die. For today's card I've paired them with the other die set in the suite, the Christmas Classics Dies, and added them to the holly decorative label that I cut from Mossy Meadow. I added a little Boho Blue ink to my Basic White card base with a blending brush and added some Real Red (retired) glittered enamel dot berries to the stems for a pop of festive colour. Check out the sparkle when they catch the light:

This is one of those cards that really is so quick and easy - I think the simple design is really effective though and the label really draws the eye to those fabulous letters.

Here is the visual summary of the key products used on today's project for you to pin for easy reference:


You can see all of my 'How To' summaries on my 'How To - Tips and Techniques' Pinterest board in case you've missed any. 

As a reminder, for our colour challenges, you must use all of the stated challenge colours. You may also use neutral colours; however, the challenge colours should be the most noticeable ones featured on your card. We use Stampin' Up! colour names for reference, but you are welcome to use any other companies' products as long as you match the challenge colours as closely as possible.

Enjoy your day and I'll be back soon with another project. Until then, happy stampin'!


Stampin' Up! Supplies Used:

Table built using Product Table Builder by The Crafty Owl - Independent Stampin' Up! Demonstrator.

Christmas Classics Noel Slimline Christmas Card

by Joanne James21. October 2023 09:00

Today I'm sharing a card that's a little more involved so perfect for a spot of weekend crafting! I used the fabulous sketch over at Tuesday Morning Sketches for my layout:

I've made quite a few cards with my 'Joy of Noel' bundle and wanted to try something a little different with this slimline layout - take a look:


Here's the low-down on today's card:

Joy Of Christmas - The colour scheme for today's card was inspired by the beautiful piece of Joy of Christmas Designer Series Paper I used for the first layer on my card. A white background covered in red berries and festive holly and pine foliage, this paper is perfect for a traditional Christmas card. Whilst much of this panel is covered by the other layers of the card, enough of it can be seen to tie in the other elements. 

Joy of Noel - Most if not all of my other cards using the NOEL 'Joy of Noel' stamps and dies have positioned the letters in a square. This slimline format allowed for me to use the letters in a column (still broken with 'joyous') - this works really well. I originally stamped my letters in Real Red onto Basic White, but they didn't have enough impact. I swapped them for Real Red cardstock embossed with silver and liked this much better. The silver picks up on the grey outlines of the base DSP and the silver and red combo stands out much better and the red ties in with both the red frame I used for the sentiment panel and the two strips of Real Red cotton ribbon I used on the base DSP layer.  

Christmas Classics - For the square layers of the sketch, I used a couple of diecuts of the Christmas Classics foliage border square die. I originally used a sild colour of green for this layer, but it was too stark. Eventually I cut the layers out of a piece of (retired) Garden Green check paper that resulted in a softer, more interesting variegated look. I added some extra detail with a green Blends marker, along with a few red rhinestones for a little extra red berry detail:

This card has seven layers, but I think each of them serves a purpose and makes a valuable contribution to the overall design, which I love. What do you think - does this celebration of festive foliage remind you of a traditional Christmas? Do leave me a comment below - I'd love to hear your thoughts.  

Here is the visual summary of the key products used on today's project for you to pin for easy reference:


You can see all of my 'How To' summaries on my 'How To - Tips and Techniques' Pinterest board in case you've missed any. 

Enjoy your day and I'll be back tomorrow with my card for our new challenge over at The Paper Players. Until then, happy stampin'!


Stampin' Up! Supplies Used:

Table built using Product Table Builder by The Crafty Owl - Independent Stampin' Up! Demonstrator.

Joy Of Noel Slimline Christmas Card CC&S 523

by Joanne James17. October 2023 12:00

It's Tuesday and time for a new challenge over at CAS Colours & SketchesThis week's challenge is a sketch challenge and Lucy has asked that we create a slimline card with a central sentiment panel:


Feel free to flip or rotate the sketch when making your card. For my card today I decided to have another outing with the beautiful 'NOEL' stamps and dies from the 'Joy of Noel' bundle - take a look:


Here's the low-down on today's card:

The slimline layout worked really well to keep the square design of the 'NOEL' letters, which I heat embossed in gold onto Very Vanilla cardstock. I added the 'Joyous' on vellum, so that it didn't obscure the letters and edged the central panel with some thin strips of gold foil. Here's a close up of that layered sentiment:


Above and below that I added a couple of panels of Shining Brightly designer series paper - the starry design is open enough to still work on an otherwise clean and simple card. I adore this paper and so do many of you, judging by the speed with which it comes into and out of stock in the online store! I was hoping that when I posted my card today I would be able to tell you it was back in stock again - but alas, the most recent stocks have once again been depleted. I placed more orders yesterday for customer who had been patiently waiting for it; additional supplies are still due in soon, so keep an eye on the online store if it's on your list.

Here is the visual summary of the key products used on today's project for you to pin for easy reference:


You can see all of my 'How To' summaries on my 'How To - Tips and Techniques' Pinterest board in case you've missed any. 

Enjoy your day; we are having a week of breakdowns in the James household: so far the broadband, my steam iron and the central heating are all casualties! The latter means that I am spending as little time as possible at my desk, so a short post from me as I'm off for a romp through the countryside to keep warm! I'll be back tomorrow with another project. Until then, happy stampin'!


Stampin' Up! Supplies Used:

Table built using Product Table Builder by The Crafty Owl - Independent Stampin' Up! Demonstrator.

Joy Of Noel Shining Brightly Christmas Card AYSI308

by Joanne James22. September 2023 12:00

Today I'm sharing my design team card for our new challenge over at As you See It where it's time for a sketch challenge chosen by Heather H:


I love a good sketch and since I've been playing with my 'Joy of Noel' set this week putting the finishing touches to projects for next month's 'Create With Joanne & Jan' tutorial set, which I collaborate on with my AYSI teamie Jan Clothier, I thought this sketch lent itself to another Christmas card featuring this versatile bundle - take a look:


Here's the low-down on today's card:

Shining Brightly - Instead of pairing the bundle with the papers in the suite, I decided to use one of the navy and gold patterns in the 'Shining Brightly' Specialty paper pack for the vertical panel. Along with the gold and vanilla patterns in the pack, these papers are truly stunning - and popular! They have been out of stock for a few weeks, but are due back in sometime next week. I will be ordering another pack for sure so if you are also wanting to add these papers to your collection, be sure to let me know so that I can notify you as soon as they come in -  I have a growing list!

Joyous Noel - I just love the sentiments in the 'Joy of Noel' set, especially the NOEL letters. Each one is individual, but since they stamp and diecut in this square pattern, I decided to use them backed with a square of gold foil for my next layer and overlay them with 'Joyous' for the last bit of my sentiment, which I fussy cut by hand. 

Going For Gold - I stamped and heat-embossed the letters in gold onto Night of Navy cardstock before diecutting them, to create a seamless look. This card is quite shiny but you can see the detailing on the stamped image below:

A trio of (retired) gold gems complete my card. This card is actually quite simple to recreate, although I did spend ages procrastinating first time around! I just love the simple elegance - this is most definitely a 'me' card!

Here is the visual summary of the key products used on today's project for you to pin for easy reference:


You can see all of my 'How To' summaries on my 'How To - Tips and Techniques' Pinterest board in case you've missed any. 

Here's a summary of our challenge rules:

  • Create any card, scrapbooking page, 3D project or packaging project that fits the challenge.
  • Please include the challenge graphic and link back to the challenge in your blog post. Turn off word verification so we can leave you lots of lovely comments. Make sure you link the post not the whole blog to the Linky. Use #AYSIXXX when uploading to a public gallery.
  • If you’re unsure about ‘the rules’, check the details under the Challenge Guidelines tab on the As You See It Challenge homepage.
  • In a sketch challenge, you are welcome to rotate or flip a sketch. You can replace shapes used such as substituting a circle panel for a square panel. However, we must be able to still see the basis of the original sketch in your finished product.
We look forward to seeing your creations in the AYSI gallery.

Enjoy your day; I am hoping to get a little extra crafting done this weekend so will hopefully be back tomorrow with another project. Until then, happy stampin'!


Stampin' Up! Supplies Used:

Table built using Product Table Builder by The Crafty Owl - Independent Stampin' Up! Demonstrator.

Current Promotions

Stampin Cut and Emboss

Save up to 30% off on all your favourite kits from 1 to 31 October! 

Click here to see the current kits available and order yours online today.

Join My Team

It's always a great time to join Stampin’ Up! During October you can get even more in your starter kit! New team members can get £160 worth of products for only £99 + free business supplies + free shipping + all the fun being a part of Stampin’ Up! Stampin' Up! has something for everyone: join my growing team and benefit from my support to enjoy Stampin' Up! however you choose.

If you're interested, call me for a chat to understand how I can help you realise your goals. Alternatively, if you have already decided to sign up and you just can't wait, please click here for the link to the online form where you can sign up and order your starter kit right away! 

Shop Online

Access my online shop 24 x 7, 365 days of the year:

Current October hostess code:

4XPEYCB9

Shop Online

Scrapbooking

Stampin' Up! has introduced a new range of 12x12" scrapbooking product and kit - the full range is now available to purchase online. To download a copy of the new digital Scrapbooking Catalogue click here.

Mini Catalogue

BROWSE THE CATALOGUE

'Tis The Season - the new Stampin' Up! Mini Catalogue is here! For more details and to download your copy click here

2024-25 Annual Catalogue

BROWSE THE CATALOGUE

Click on the image to download your copy of the 2024-25 annual catalogue. For a full list of current SU! supplies, go to my online store. If you would like any help or advice, please drop me a line at joanne@thecraftyowl.co.uk or give me a call on 07773 421446 - I'd be happy to help.

Latest Kits!

Stampin Cut and Emboss

The Christmas Ornaments Kit and Card Keeper Kit are the latest kits in the online store - get yours here!

New Online Exclusives

There are new products available exclusively in the online store from 5 November - check them out here.

About Me

Hi I'm Joanne and live in Northampton and when I'm not looking after my husband and two beautiful children, am an avid crafter with a passion for all things Stampin' Up!

I must confess that I have never been a big rubber stamper - until I discovered Stampin' Up! that is. I love the fact that I can get such great results with co-ordinating stamps, inks, papers and punches - the possibilities are endless! Join me on my stamping journey as I share the things I love and be inspired to create amazing things yourself!

Follow Me

Monthly Newsletter

Box Builder

Click the button above to use Box Buster to create your custom box design using the Envelope Punch Board!

Kits Collection Now Available!

Stampin Cut and Emboss

The new Kits Collection from Stampin' Up! is now available!

Click here to see the current kits available and order yours online today.

I Design For


Stampin' Up Stuff

This is my personal blog and is not endorsed by Stampin’ Up! I hope you find it a plentiful source of ideas and personal inspiration but please don't copy my designs for contest submission or use for classes, publication or sale without express permission.