Crafting With You Times Two AYSI307

by Joanne James8. September 2023 12:00

Today I'm sharing my design team card for our new challenge over at As you See It where it's time for a fun speed challenge chosen by Heather C:


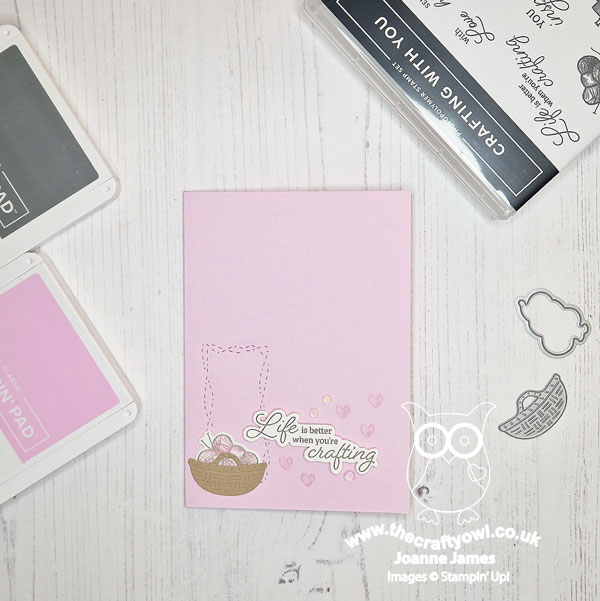
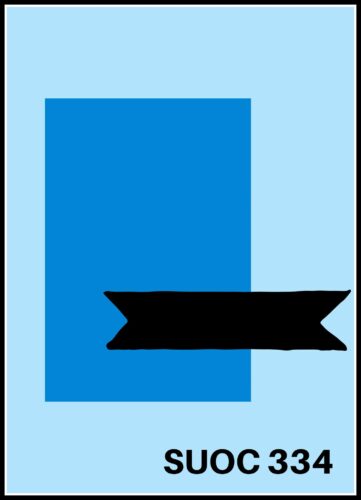
Hobbies - what a fun theme this week and so many options, even when working against the clock! My hobbies include running, playing piano, cross stitch and stamp collecting (the postal kind although my rubber stamp collection is extensive too!) to name but a few, but I'm sure that my choice of crafting for my card today won't surprise you at all!  - Since we are against the clock with no more than 10 minutes at our disposal, quick cards are the order of the day! I ended up making two cards during my crafting session and each came in well within the time limit, so I thought I'd share both since each uses a different approach to saving time! Both cards feature the 'Crafting With You' bundle and the first card I created uses the sketch layout over at SUO Challenges - take a look:


 Here's the low-down on today's card:

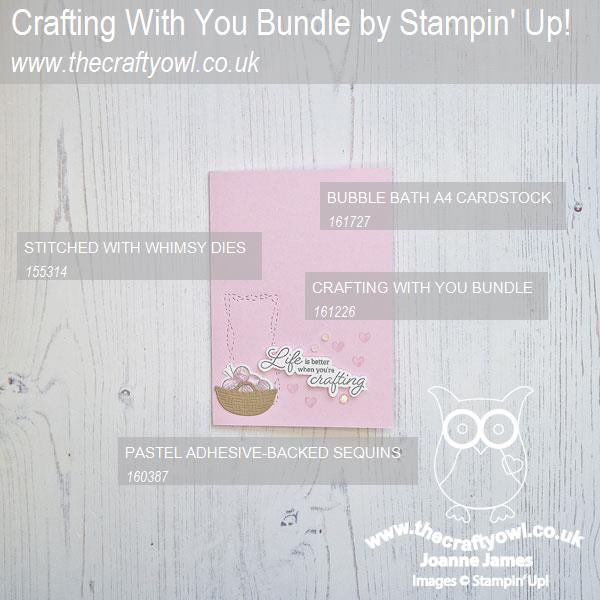
Preparation Is Key - The key to a quick card is preparation. You can gather your materials before you start the clock, so knowing exactly what I was going to create I gathered my Bubble Bath card base, offcuts of white and Crumb Cake cardstock, mounted the stamps I was going to use onto blocks and placed them in front of the open ink pads in the correct colours, selected the dies I needed, the necessary tools and gathered together any other supplies such as ribbon and sequins that I had in Bubble Bath in case I wanted to add some final embellishments. Then I pressed start on my stopwatch!

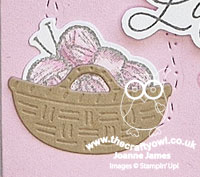
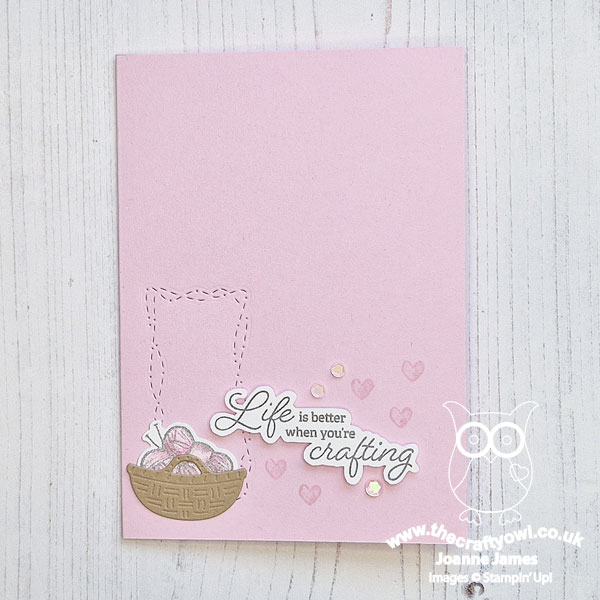
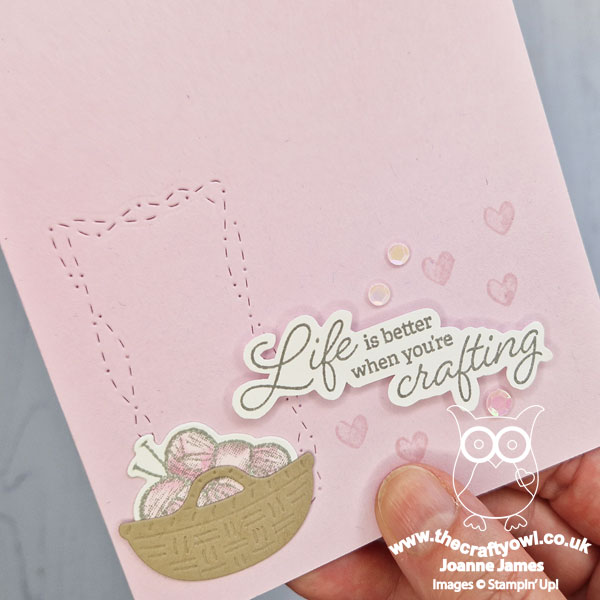
Monochrome Makes Easy - This first card sticks to a simple monochrome pink colour scheme, with just a little grey for the sentiment and outline. This is another good way to save time when you need to make a quick card - keeping colours to a minimum requires much less co-ordination. I stamped and fussy cut the sentiment, stamped the balls of wool and coloured them, then diecut them along with the basket and the stitched frame (I don't know why, but this frame always reminds me of unravelled wool so I thought it would work well with my knitting theme) in one pass through the diecutting machine to save time. I added all of the elements to my card base, then added some tone-on-tone stamped hearts and a trio of self-adhesive sequins to complete my card:


Time taken? Just 6 minutes and 29 seconds!


I even surprised myself at how quickly this came together, especially as one of the biggest time savers - no diecutting - is something I often struggle with. This card just shows though that so long as you are smart about it and at least minimise it or run as much through in one go as possible, you can make it work. I'm also linking this card up over at Less Is More where the current challenge is 'anything goes' - as long as it's clean and simple!

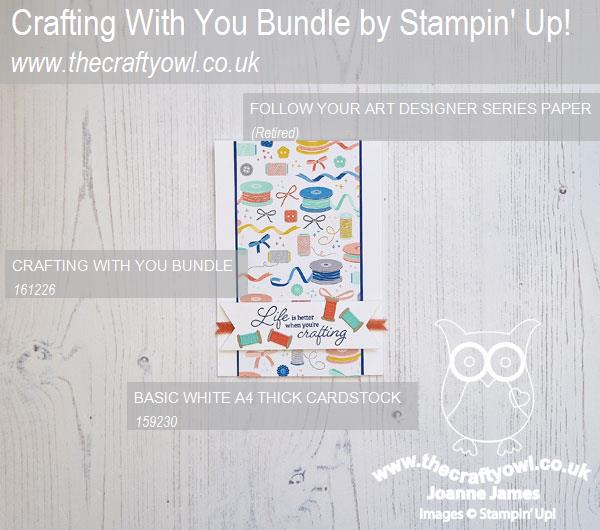
The Ultimate Speed Hack - Having cleaned my stamps and cleared away the debris from my first card, I thought I'd have a go at a second version, this time using the current sketch layout over at Atlantic Hearts Sketch Challenge, for a second card using my favourite speed hack of all: designer series paper! Designer paper is a great way to maximise pattern and detail with minimal time and effort and I knew I had some of this fabulous, albeit retired, Follow Your Art designer series paper in my stash and I have been itching to pair it with the current 'Crafting With You' bundle, so this was the perfect opportunity. This was the card that I created:


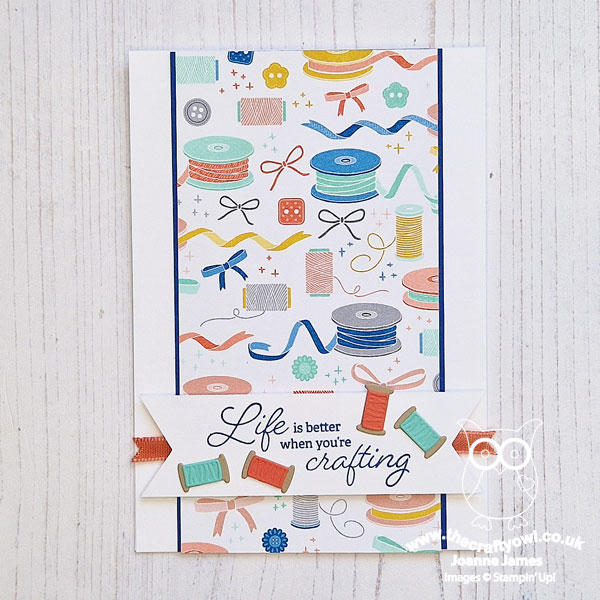
Still simple in design: the vertical panel of DSP does much of the work, with a simple banner sentiment that I decorated with a piece of (retired) Calypso Coral ribbon and 4 cotton reels that I diecut using some co-ordinating scraps of cardstock:


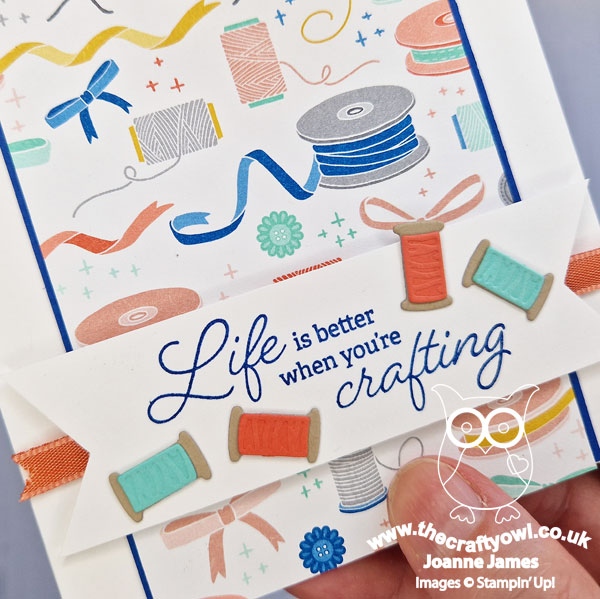
This card took slightly longer at 7 minutes and 16 seconds (no photo I'm afraid, I accidentally reset my stopwatch before I could grab a photo so you'll just have to take my word for it!) - whilst those cotton reels were all cut in a single pass, as there are 4 dies in the set, they are small and fiddly to glue. I also had OCD on those banner ends for the cardstock and ribbon, so allowed myself time to get them even. I think this card is my favourite of the two - hence me using it as my ASYI card. I hope you found my tips and tricks useful for creating cards in a hurry - why not make a card celebrating one of your hobbies and join us for our current challenge?

Here is the visual summary of the key products used on today's projects for you to pin for easy reference:


You can see all of my 'How To' summaries on my 'How To - Tips and Techniques' Pinterest board in case you've missed any. 

Here's a summary of our challenge rules:

  • Create any card, scrapbooking page, 3D project or packaging project that fits the challenge.
  • Please include the challenge graphic and link back to the challenge in your blog post. Turn off word verification so we can leave you lots of lovely comments. Make sure you link the post not the whole blog to the Linky. Use #AYSIXXX when uploading to a public gallery.
  • If you’re unsure about ‘the rules’, check the details under the Challenge Guidelines tab on the As You See It Challenge homepage.
  • In a speed stamping challenge, please time yourself and say in your post how long your card took to complete. 
We look forward to seeing your creations in the AYSI gallery.

Enjoy your day. We are expecting another day of glorious sunshine here so I will be making the most of it! I'll be back tomorrow with another project. Until then, happy stampin'!


Stampin' Up! Supplies Used:

Table built using Product Table Builder by The Crafty Owl - Independent Stampin' Up! Demonstrator.


Welcome Little One For Our First Paper Players Challenge of 2020 PP472

by Joanne James5. January 2020 10:00

Today it's Sunday and time for our first challenge of 2020 over at The Paper Players! It's the turn of the fabulous Jaydee to host this week and she has a fun theme challenge for you to work with:


Our theme is 'something new' - a new year, a new season, new job, new baby - so many possibilities! I took some new product to make a card to welcome the arrival of a new baby, using Brian's layout over at CAS(E) This Sketch this week as my starting point and this is what I came up with - take a look:


Here's the low-down on today's card:

Welcome Witty-cisms - The sweet pram stamp I used on today's card sis from a new stamp set called 'Witty-cisms', inspired by one of Stampin' Up!'s Million Dollar Sales Achievers, Lisa Fast. A collection of fun stamps with witty sayings and cute hand-drawn illustrations, they are perfect for lots of different occasions and also for a spot of quick colouring if that's your thing. These images are great for quick and simple cards and can also be dressed up with a few layers and embellishments into something more detailed as I've done here.

Baby Blue - I chose to go monochromatic with today's colours and feature Coastal Cabana on my card as I had all the right bits and pieces in my collection (I used some retired Brights DSP but the current gingham would look lovely too). I stamped my image in Basic Grey as opposed to black to soften the image, which is something I often do on a baby card. I love cards like this - it would be just as easy to make in pink or a neutral too.

A Simple Embellishment Trio - I used some of the new white crinkle ribbon for a soft bow and a silver 'made with love' charm and felt border from the Follow Your Art Embellishment Kit to add the finishing touches to my card - I think that little heart charm is a neat play on words for a new arrival.

Here is the visual summary of the key products used on today's project for you to pin for easy reference:


You can see all of my Product and 'How To' summaries on my 'How To - Tips and Techniques' Pinterest board in case you've missed any. 

Before you reach for your ink and papers, check out what our amazing team has created to inspire you this week - including our fabulous new trio of guest designers, Allisa, Stef and Mary:

Here's a quick recap of our challenge rules:
 
1.  Create a new paper project
2.  Upload your creation to your blog with a link back to us and provide a direct link to the post featuring your challenge submission.
3.  Please link your card to no more than four challenges, TOTAL.
4.  Have FUN!

You can see all of my 'How To' summaries on my 'How To - Tips and Techniques' Pinterest board in case you've missed any. 

Enjoy your day; we are looking forward to a leisurely family lunch today before we are all back to school and work at various points next week. I have a card prepared though so will be back tomorrow with another project. Until then, happy stampin'!


Stampin' Up! Supplies Used: 

Table built using Product Table Builder by The Crafty Owl - Independent Stampin' Up! Demonstrator.

A Pig With Sparkle for PP457

by Joanne James1. September 2019 09:00


Today it's Sunday and the first of September; where is the year disappearing?! It's time for this week's new challenge over at The Paper Players and it's the turn of the fabulous LeAnne to host this week and she has a fun theme challenge for you to work with:


I had limited options for today's theme: cows, pigs or ducks! Limits are often helpful though as they really help focus the mind. I was so tempted to use my current farmyard favourite, those funny cows from the 'Over The Moon' set, however I decided to give some love to one of my other farmyard friends that has been a little neglected of late and took the opportunity to play along with the fourth week of the Freshly Made Sketches celebrations too - take a look:


Here's the low-down on today's card:

This Little Piggy - Whilst pigs are often to be found down on the farm, I'm not sure you'd see many of the flying variety! I do love this flying porcine creature though and I decided that on today's card she really needed wings to be proud of, so I created a stand-out pair in white glimmer paper and paper-pieced them - how cool are they?!

Artistic Touches - I used some of the patterned paper and felt accessories from the Follow Your Art Suite on my card today, heat embossing some clouds in white across my designer paper for added detail, along with a white twine bow. 

Frame It - I did a creative interpretation of the FMS sketch today and created a continuous scene, using a frame created from a pair of square Stitched Shape Framelits to draw the eye to my pig and sentiment and keep true to the sketch, rather than create my scene on a central square. 

Here is the visual summary of the key products used on today's project for you to pin for easy reference:


You can see all of my Product and 'How To' summaries on my 'How To - Tips and Techniques' Pinterest board in case you've missed any. 

Before you reach for your ink and papers, check out what our amazing team has created to inspire you this week:

Here's a quick recap of our challenge rules:
 
1.  Create a new paper project
2.  Upload your creation to your blog with a link back to us and provide a direct link to the post featuring your challenge submission.
3.  Please link your card to no more than four challenges, TOTAL.
4.  Have FUN!

You can see all of my 'How To' summaries on my 'How To - Tips and Techniques' Pinterest board in case you've missed any. 

Enjoy your day; we are enjoying the last few days of the summer holiday before the James Juniors begin a new school year later this week. I'll be back tomorrow with another project. Until then, happy stampin'!


Stampin' Up! Supplies Used: 

Table built using Product Table Builder by The Crafty Owl - Independent Stampin' Up! Demonstrator.

Follow Your Art In Purple In Under 10 Minutes

by Joanne James5. August 2019 16:00

Today I'm sharing a card that I made yesterday for the new challenge over at As you See It using this week's sketch over at Freshly Made Sketches, that also works for the challenge over at Just Add Ink this week:


Whilst I didn't set out to combine all three of these challenges this week, with the challenge over at As You See It being speed stamping, today's card was definitely no accident - take a look:


Here's the low-down on today's card:

It's All In The Preparation - I'll be honest: I rarely make a card in under 10 minutes! For me the fun is in the planning and designing and I often make multiple bits and pieces and 'tinker' with my cards until I'm happy with them. That said, it can be done - the key is in the preparation. Fortunately for me, the AYSI speed stamping challenge requires you to complete a card in under 10 minutes and the clock starts as soon as you put ink to paper; you can decide on your design and gather your supplies in advance. So I grabbed Jen B's FMS sketch (a great go-to design) my co-ordinating shades of purple (Gorgeous Grape and Highland Heather) in cardstock, ink and markers, a Whisper White card base, stamps, dies, Big Shot and got ready to start my timer!

'C' Is For Craft - I decided to base my card around the stamps and dies in the 'Follow your Art' suite. I stamped my ink bottle and clip (and a couple of sentiments to diecut, although I didn't then use these as I stamped directly onto my card base) then ran them through my Big Shot with the purple die cut pieces, making two runs to get the duplicates. I added a quick dash of colour to my stamped diecut pieces, then set about constructing. It was only when I had finished my card that I realised it would be perfect for Just Add Ink this week too; it will a least spare the girls another of my Christmas cards, which I seem to have made for their last few challenges!!

Speedy Indeed - So I did work at fever pace and my desk looked like a bomb had gone off once I'd finished, but I managed to finish my card in 9 minutes and 46 seconds - hurrah! It was helped by the fact that my card base and mat layers were already cut to size - I keep a box of sizes that I use a lot ready prepared so that I can just 'grab and go' - the most time-consuming aspects were poking out the paper clips from the dies without tearing and tying the twine bow. Purple is one of my favourite colours, so this was a fun speed challenge indeed! Lastly, a disclaimer: I decorated a co-ordinating envelope too, but completed this outside of the speed stamping time - I couldn't quite manage this in the time constraints as well!

Here is the visual summary of the key products used on today's project for you to pin for easy reference:


You can see all of my 'How To' summaries on my 'How To - Tips and Techniques' Pinterest board in case you've missed any. 

I like my finished card so much I think I'm going to create a few more of these and send them to the ladies who are booked to attend my Creative Escapes Craft Retreat in October - this is the perfect time to stay up late and craft together!! I still have a couple of spaces left if you would like to join us for a fun weekend; you can get the full details here.

Enjoy your day and I'll be back tomorrow with another project. Until then, happy stampin'!


Stampin' Up! Supplies Used:

Table built using Product Table Builder by The Crafty Owl - Independent Stampin' Up! Demonstrator.

Follow Your Art For PP443

by Joanne James26. May 2019 09:00

Today it's Sunday and time for this week's new challenge over at The Paper Players! It's the turn of the fabulous LeAnne to host this week and she has my favourite, a sketch challenge, for you to work with:


I sometimes struggle with making when we are in transition between an old and new Stampin' Up! catalogue - just too much to choose from! - so I was glad of a sketch this week to help things along. I decided to get creative with one of my favourite new suites from the upcoming catalogue called Follow Your Art - take a look:


Here's the low-down on today's card:

Follow Your Art - The Follow Your Art Suite is perfect for creatives and crafty types. With stamps, co-ordinating dies and papers featuring stamps, ink, reinkers, glue guns, buttons, ribbons and more, there are so many ways to follow your own art with this set. My card features a background piece of Follow Your Art Designer Series Paper and a fun reel of ribbon with heart detail that I coloured with my Stampin' Blends to anchor my sentiment.

A Great Little Gift - One of the other fun items in this suite is the Follow your Art Embellishment kit. With pretty coloured clips, embellishments, twine and four sheets of pretty stitched felt shapes, there are lots of great embellishments for your handcrafted projects. They come in this gorgeous little box too, which you could use to store or gift cards in or give the kit to someone as a gift in itself. Check it out:


I used a felt border beneath my sentiment and added some twine to the centre of a couple of my diecut buttons for a fun touch.

Buttons, Buttons and More Buttons - Buttons feature in this set in more ways than one: I added some diecut paper ones and for the vertical panel I embossed a panel using the new Button Button Embossing folder for additional texture and dimension.

Here is the visual summary of the key products used on today's project for you to pin for easy reference:


You can see all of my Product and 'How To' summaries on my 'How To - Tips and Techniques' Pinterest board in case you've missed any. 

Before you reach for your ink and papers, check out what our amazing team has created to inspire you this week:

Here's a quick recap of our challenge rules:
 
1.  Create a new paper project
2.  Upload your creation to your blog with a link back to us and provide a direct link to the post featuring your challenge submission.
3.  Please link your card to no more than four challenges, TOTAL.
4.  Have FUN!

You can see all of my 'How To' summaries on my 'How To - Tips and Techniques' Pinterest board in case you've missed any. 

Enjoy your day; we have a long Spring Bank holiday weekend to look forward to so I'm hoping the sun will be shining and allow me some gardening time. I'll be back tomorrow with another project. Until then, happy stampin'!


Stampin' Up! Supplies Used: 

Table built using Product Table Builder by The Crafty Owl - Independent Stampin' Up! Demonstrator.

Mini Catalogue

BROWSE THE CATALOGUE

The mini catalogue is now live! Read and download your copy here.

Shop Online

Access my online shop 24 x 7, 365 days of the year:

Current March hostess code:

S9F2XJJW

Shop Online

Join My Team

It's always a great time to join Stampin’ Up! New team members can get £130 worth of products for only £99 + free business supplies + free shipping + all the fun being a part of Stampin’ Up! Stampin' Up! has something for everyone: join my growing team and benefit from my support to enjoy Stampin' Up! however you choose.

If you're interested, call me for a chat to understand how I can help you realise your goals. Alternatively, if you have already decided to sign up and you just can't wait, please click here for the link to the online form where you can sign up and order your starter kit right away! 

Latest Kit!

Stampin Cut and Emboss

The Rock Legend Kit has all you need to make 8 cards with coordinating envelopes. Along with the new Panda Friends Kit, both are available from January 4th for just £14 each - get yours here!

2023-24 Annual Catalogue

BROWSE THE CATALOGUE

Click on the catalogue for a full list of current SU! supplies - if you would like to order any of the items featured, please drop me a line at [email protected] or give me a call on 07773 421446 - I'd be happy to help.

New Online Exclusives

There will be new products available exclusively in the online store from 5 March - check them out here.

About Me

Hi I'm Joanne and live in Northampton and when I'm not looking after my husband and two beautiful children, am an avid crafter with a passion for all things Stampin' Up!

I must confess that I have never been a big rubber stamper - until I discovered Stampin' Up! that is. I love the fact that I can get such great results with co-ordinating stamps, inks, papers and punches - the possibilities are endless! Join me on my stamping journey as I share the things I love and be inspired to create amazing things yourself!

Follow Me

Monthly Newsletter

Box Builder

Click the button above to use Box Buster to create your custom box design using the Envelope Punch Board!

Kits Collection Now Available!

Stampin Cut and Emboss

The new Kits Collection from Stampin' Up! is now available!

Click here to see the current kits available and order yours online today.

I Design For


Stampin' Up Stuff

This is my personal blog and is not endorsed by Stampin’ Up! I hope you find it a plentiful source of ideas and personal inspiration but please don't copy my designs for contest submission or use for classes, publication or sale without express permission.