Video Tutorial: How To Make Baker's Twine Looped Flowers

by Joanne James25. May 2016 20:03

Wednesday - how did we get to the middle of the week already?! I've had a busy couple of days, with today including my fortnightly coffee and card drop-in session at Bells in Kingsthorpe, Northampton followed by a get-together over lunch with one of my team members. I am busy preparing my new catalogue samples and getting my catalogues ready to go out to both my online and face to face customers. If you've purchased Stampin' Up! products from me in the last six months, a complimentary catalogue will be winging its way out to you within the next week. If you haven't purchased from me recently but would like a copy of the new catalogue, please do get in touch with me either via email [email protected] or by phone and I will arrange to send a catalogue out to you too!

Today I have a video tutorial to share with you! Do you remember this card that I made a while ago?


I used this fun flower embellishment made with the It's My Party Baker's twine to decorate my Botanical Builder Framelits Die colour-blocked card. You can read more about it on the original blog post here if you missed it or would like to refresh your memory.

I promised you a video tutorial on how to make those cute baker's twine looped flower embellishments and finally here it is: 

They really are such fun to make and can be used to dress up cards and packaging and can be made from all kinds of baker's twine and linen thread. 

I hope you enjoyed today's video and it inspires you to have a go and try something new. I'll be back tomorrow with a fun birthday card for this week's new challenge over at Create With Connie and Mary. Until then, happy stampin'!

Washi Feather Be Brave Card

by Joanne James4. April 2016 07:00

Another Monday, another week - welcome lovely readers! I enjoyed a lovely day yesterday, with a family lunch, a long cycle ride, more planting of seedlings for the garden and yet more Easter chocolate (we are slowly getting through it!) Today's card is for this week's challenge over at Casology where the cue word is 'washi':

I was thrilled to have my weather cards last week chosen as Honourable Mentions (you can see those cards here and here) and couldn't resist playing along again this week as I try to hone my 'clean and simple' design skills. I'm also entering today's card into this week's challenge over at Simply Less Is More where this week's challenge is to use 'white space that isn't white'. Let me show you my card and then I'll explain a little more what that means:

The key features of today's project are as follows:

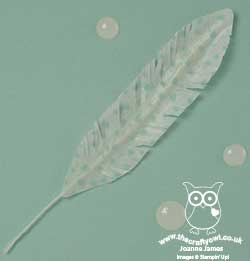
Washi Feather - I have lots of washi tape (I don't hoard it quite as badly as designer series paper, but close!) and rarely use it; I consulted with my 'Things to do with Washi Tape' Pinterest board where I have saved lots of ideas and thought it was about time I tried something a little different, so settled on creating the feather you see on today's card. I used some retired tape as I liked the subtle pattern on this one, but you could use any current tape for a similar effect. It's really easy to do: you just tape both sides of a piece of baker's twine or strand of jute ribbon as I did here, then use your paper snips to shape your feather. 

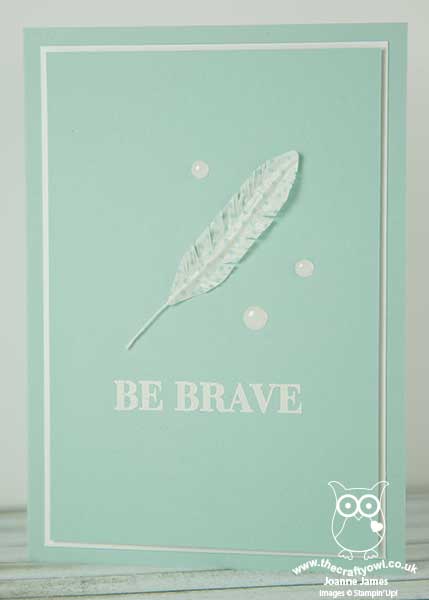
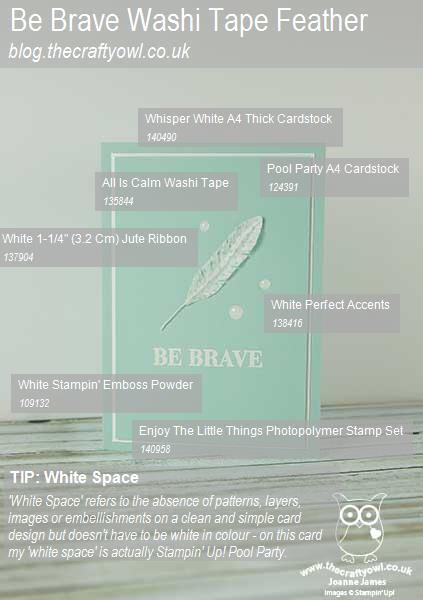
White Space That Isn't White - The creation of 'white space', that is an area of your card with no image, layer, pattern or embellishment, is one of the things that designers often find tricky with this kind of card. 'White space' doesn't refer to the colour of the base layer, although often a white base is used - rather it refers to leaving an large proportion of the card blank. I chose to use Pool Party as my colour of choice today and with the exception of my feather, trio of white Perfect Accents, sentiment and thin border frame, there is nothing else on my card front, meeting the 'white space' clean and simple brief.

Make A Statement - My clean and simple card needed a clean yet bold sentiment. My feather started me thinking about Red Indians (don't ask!) and Indian braves. I remembered this sentiment in the 'Enjoy The Little Things' stamp set; whilst designed to go with the kit of the same name, it stands alone and works well with my lone feather. I stamped it in Versamark and heat embossed in white I think this would be a great card to send to someone battling an illness or difficult circumstance, where a little encouragement is needed.

Here's the visual summary of the key supplies used to make this card for you to save for future reference:


You can see all of my 'How To' summaries on my 'How To - Tips and Techniques' Pinterest board in case you've missed any. 

This is the second full week of the Easter holidays for the James juniors. I'm not sure what our week will have in store, but you can be sure it will include more fun activities that don't include school work!

Enjoy your day and I'll be back tomorrow with another project; until then, happy stampin'!

Stampin' Up! Supplies Used:

Table built using Product Table Builder by The Crafty Owl - Independent Stampin' Up! Demonstrator.

Enjoy The Little Things

by Joanne James19. January 2016 07:00

Good morning lovely readers! Today I am sharing a card for this week's challenge over at Pals Paper Arts:

PPA-283-Jan14

I'm not usually one to gravitate towards colour challenges (I'm more of a sketch gal as you well know!) but I thought this was a great colour combo chosen by the equally great Brian King and so that, combined with the fact that he finds my English spelling of the word 'colour' in and of itself rather quirky, I just had to play along! Here's my card:

I decided to make a bold statement using blocks of colour, with Basic Black as my base and each of the other colours cut with both the positive and negative pieces of the intricate leaf framelit from the Botanical Builder Framelits Dies and pieced together for my base. I stamped my sentiment in Versamark and heat embossed it in white on an oval of Basic Black, which I then popped up on dimensionals in the centre of my card. What to use to tie the whole thing together though? I decide to have a go at making a loopy flower out of the new thick baker's twine that comes in the challenge colours; I made a few but decided one was enough to ground my sentiment and bring the whole thing together. If you've never made one of these before, they are really not that tricky when you know how. With that in mind, I made another short technique tutorial to show you how it's done - I haven't yet had time to edit it though, so will share with you later in the week. 

That's all from me today; I have a private class this morning with a wonderful group of seniors at a local residential care home and then a few jobs this afternoon before taking the James Juniors for their music lessons. Another busy day!

Back tomorrow with another project; until then, happy stampin'!


Stampin' Up! Supplies Used:

Table built using Product Table Builder by The Crafty Owl - Independent Stampin' Up! Demonstrator.


Mini Catalogue

BROWSE THE CATALOGUE

The mini catalogue is now live! Read and download your copy here.

Shop Online

Access my online shop 24 x 7, 365 days of the year:

Current April hostess code:

VDKNV7BH

Shop Online

Join My Team

It's always a great time to join Stampin’ Up! New team members can get £130 worth of products for only £99 + free business supplies + free shipping + all the fun being a part of Stampin’ Up! Stampin' Up! has something for everyone: join my growing team and benefit from my support to enjoy Stampin' Up! however you choose.

If you're interested, call me for a chat to understand how I can help you realise your goals. Alternatively, if you have already decided to sign up and you just can't wait, please click here for the link to the online form where you can sign up and order your starter kit right away! 

Latest Kit!

Stampin Cut and Emboss

The Rock Legend Kit has all you need to make 8 cards with coordinating envelopes. Along with the new Panda Friends Kit, both are available from January 4th for just £14 each - get yours here!

2023-24 Annual Catalogue

BROWSE THE CATALOGUE

Click on the catalogue for a full list of current SU! supplies - if you would like to order any of the items featured, please drop me a line at [email protected] or give me a call on 07773 421446 - I'd be happy to help.

New Online Exclusives

There are new products available exclusively in the online store from 5 March - check them out here.

About Me

Hi I'm Joanne and live in Northampton and when I'm not looking after my husband and two beautiful children, am an avid crafter with a passion for all things Stampin' Up!

I must confess that I have never been a big rubber stamper - until I discovered Stampin' Up! that is. I love the fact that I can get such great results with co-ordinating stamps, inks, papers and punches - the possibilities are endless! Join me on my stamping journey as I share the things I love and be inspired to create amazing things yourself!

Follow Me

Monthly Newsletter

Box Builder

Click the button above to use Box Buster to create your custom box design using the Envelope Punch Board!

Kits Collection Now Available!

Stampin Cut and Emboss

The new Kits Collection from Stampin' Up! is now available!

Click here to see the current kits available and order yours online today.

I Design For


Stampin' Up Stuff

This is my personal blog and is not endorsed by Stampin’ Up! I hope you find it a plentiful source of ideas and personal inspiration but please don't copy my designs for contest submission or use for classes, publication or sale without express permission.