Elongated Birthday Edgelit Rainbow Cupcake Card

by Joanne James12. March 2019 21:00

I've had two days of back-to-back classes so things have been fairly busy here!  A quick post from me today to share the card that I mentioned in my Paper Players post on Sunday. Our theme this week is 'colours of the rainbow' so I couldn't resist creating one with the cupcake die in the Detailed Birthday Edgelit Die set too - take a look:


Here's the low-down on today's card:

A Rainbow Of Cupcakes - Just like Sunday's card - you can see it here if you missed it - I wanted to utilise all of the colours of the rainbow on my card. I played around with the edgelits on this card too in order to accommodate this, cutting two sets of three cupcakes from one piece of Whisper White cardstock to give me a total of six cupcakes. I used my seventh and final rainbow colour, violet, or in this case Highland Heather, as the background for my card and to highlight the detail on the cupcake cases.

 A Little Paper Piecing - The pieces for the cupcake details are larger and easier to manipulate than for the presents die, so on today's card I used the edgelits to cut a set of cupcakes in each colour and used the pieces from the frosting to inlay them into my white die surround.

Go Long - As a result of using two diecuts joined at the centre, my cardfront is long and narrow as opposed to the standard A6 size that I usually make. This is a nice way to ring the changes with a card and with my BoxBuster tool and trusty Envelope Punch Board on hand to make a custom envelope, need not be an issue when it comes to needing to mail it.

There's very little stamping on today's card - just a heat-embossed sentiment on the front and a greeting with cupcake decoration inside:

Here is the visual summary of the key products used on today's project for you to pin for easy reference:


You can see all of my 'How To' summaries on my 'How To - Tips and Techniques' Pinterest board in case you've missed any. 

I'll be back tomorrow with another project. Until then, happy stampin'!


Stampin' Up! Supplies Used:

Table built using Product Table Builder by The Crafty Owl - Independent Stampin' Up! Demonstrator.

Rainbow Presents Detailed Birthday Edgelit Card For PP432

by Joanne James10. March 2019 09:00

Today it's Sunday and time for this week's new challenge over at The Paper Players! It's the turn of the fabulous Claire to host this week and she has a fun theme challenge for you to work with:


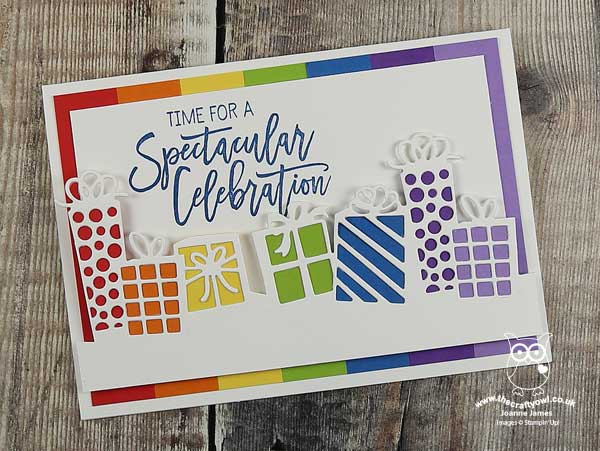
Colours of the rainbow - I love it! I decided a rainbow collection of birthday presents were the order of the day - take a look:


Here's the low-down on today's card:

I Can Sing A Rainbow - However you remember it (my personal favourite mnemonic is 'Richard Of York Gave Battle In Vain'), the perfect rainbow has seven colours: red, orange, yellow, green, blue, indigo and violet and I was determined to feature them all on my card! In addition to using cardstock in each of the rainbow colours to back my presents die (a great way to use up your scraps), I also created a background consisting of a vertical strip of each to tie in with the rainbow theme.  

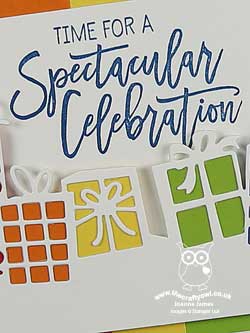
Seven Present Solution - The focal point of my card is definitely the rainbow presents, courtesy of the fabulous Detailed Birthday Edgelit Dies. The eagle-eyed amongst you will notice that the actual die has only five presents, not seven. To create my row of seven gifts, I placed the die and white cardstock in my Bigshot and rolled through once, without going to the very end of the die, then moved the die along and rolled it again, to create a longer length of presents that I then trimmed to fit. Job done!

Birthday Cheer Inside and Out - There's very little stamping on this card - just a greeting on the front and a little more on the inside, courtesy of the co-ordinating 'Birthday Cheer' stamp set:

Here is the visual summary of the key products used on today's project for you to pin for easy reference:


You can see all of my Product and 'How To' summaries on my 'How To - Tips and Techniques' Pinterest board in case you've missed any. 

I just love this set and card - the fun colours make it suitable for any person,  boy or girl, young or old - and this will definitely be a staple in my card box. Well, this one and the one that I will feature in another post later this week with a similar rainbow theme!

Before you reach for your ink and papers, check out what our amazing team has created to inspire you this week:

Here's a quick recap of our challenge rules:
 
1.  Create a new paper project
2.  Upload your creation to your blog with a link back to us and provide a direct link to the post featuring your challenge submission.
3.  Please link your card to no more than four challenges, TOTAL.
4.  Have FUN!

You can see all of my 'How To' summaries on my 'How To - Tips and Techniques' Pinterest board in case you've missed any. 

Enjoy your day; ours was a busy one yesterday at the swimming pool so I'm hoping today will be a little more relaxing. I'll be back tomorrow with another project. Until then, happy stampin'!


Stampin' Up! Supplies Used: 

Table built using Product Table Builder by The Crafty Owl - Independent Stampin' Up! Demonstrator.

Birthday Cheer Birthday Card And Gift Voucher Wallet

by Joanne James29. January 2019 21:00

Today I'm sharing a card with a layout inspired by the current Fab Friday sketch:


I also have a matching gift voucher wallet too - more of that later. First to my card - take a look:


Here's the low-down on today's card:

Birthday Cheer - The only stamping on the front of today's card is the background, where I added tone-on-tone confetti, and the sentiment. there are some lovely sentiments and bold images in the Birthday Cheer stamp set, but this card is really about the diecut, which takes centre stage. I've used it to make a birthday card but it could be easily adapted for a Christmas card too in an alternative colourway. I did do a little stamping on the inside too, using one of the larger sentiments:


Colouring Options - The diecuts can be used in lots of ways: on their own, paper-pieced, paper-backed, stencilled or coloured with markers to name just a few. On my card, I coloured the presents using a combination of my Stampin' Write Markers and Stampin' Blends using another identical diecut as a stencil guide. On my gift voucher wallet below, I used whole pieces of cardstock behind each present to give more even blocks of colour. I think I prefer the version below, but will definitely be experimenting with these dies a little more to find intersting ways to add colour to them. 

The Perfect Gift - I had a gift voucher wallet to make up for one of my customers who wanted to gift her sister with Stampin' Up! vouchers for her birthday, so I decided to make it to co-ordinate with my card above and send both. I always make my Stampin' Up! gift voucher wallets in a long, narrow design, so I just needed to elongate my diecut and alter the greeting on the front slightly to something more appropriate:

Did you know you can get Stampin' Up! gift vouchers from me for any amount and any occasion? They do make a great gift, either for yourself or others. If you're ever at a loss for what to buy you nearest and dearest, just give me a call and we can take the pain out of gift giving and give the gift of choice!


Here is the visual summary of the key products used on today's project for you to pin for easy reference:


You can see all of my 'How To' summaries on my 'How To - Tips and Techniques' Pinterest board in case you've missed any. 

Enjoy your day and I'll be back tomorrow with another project. Until then, happy stampin'!


Stampin' Up! Supplies Used:

Table built using Product Table Builder by The Crafty Owl - Independent Stampin' Up! Demonstrator.

Mini Catalogue

BROWSE THE CATALOGUE

The mini catalogue is now live! Read and download your copy here.

Shop Online

Access my online shop 24 x 7, 365 days of the year:

Current April hostess code:

VDKNV7BH

Shop Online

Join My Team

It's always a great time to join Stampin’ Up! New team members can get £130 worth of products for only £99 + free business supplies + free shipping + all the fun being a part of Stampin’ Up! Stampin' Up! has something for everyone: join my growing team and benefit from my support to enjoy Stampin' Up! however you choose.

If you're interested, call me for a chat to understand how I can help you realise your goals. Alternatively, if you have already decided to sign up and you just can't wait, please click here for the link to the online form where you can sign up and order your starter kit right away! 

Latest Kit!

Stampin Cut and Emboss

The Rock Legend Kit has all you need to make 8 cards with coordinating envelopes. Along with the new Panda Friends Kit, both are available from January 4th for just £14 each - get yours here!

2023-24 Annual Catalogue

BROWSE THE CATALOGUE

Click on the catalogue for a full list of current SU! supplies - if you would like to order any of the items featured, please drop me a line at [email protected] or give me a call on 07773 421446 - I'd be happy to help.

New Online Exclusives

There are new products available exclusively in the online store from 5 March - check them out here.

About Me

Hi I'm Joanne and live in Northampton and when I'm not looking after my husband and two beautiful children, am an avid crafter with a passion for all things Stampin' Up!

I must confess that I have never been a big rubber stamper - until I discovered Stampin' Up! that is. I love the fact that I can get such great results with co-ordinating stamps, inks, papers and punches - the possibilities are endless! Join me on my stamping journey as I share the things I love and be inspired to create amazing things yourself!

Follow Me

Monthly Newsletter

Box Builder

Click the button above to use Box Buster to create your custom box design using the Envelope Punch Board!

Kits Collection Now Available!

Stampin Cut and Emboss

The new Kits Collection from Stampin' Up! is now available!

Click here to see the current kits available and order yours online today.

I Design For


Stampin' Up Stuff

This is my personal blog and is not endorsed by Stampin’ Up! I hope you find it a plentiful source of ideas and personal inspiration but please don't copy my designs for contest submission or use for classes, publication or sale without express permission.