Beautiful Friendship Stamparatus Wreath Builder Card PP493

by Joanne James31. May 2020 09:00

Today it's Sunday and time for this week's new challenge over at The Paper Players! It's the turn of the fabulous Jaydee to host this week and she has a fun tic-tac-toe challenge for you to work with:


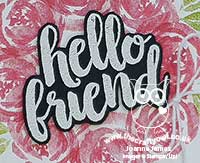
I decided to go across the top row with Flowers/Girly/Birthday and wanted to share with you a card I made using one of my most favourite stamp sets of all time, Beautiful Friendship - take a look:


Here's the low-down on today's card:

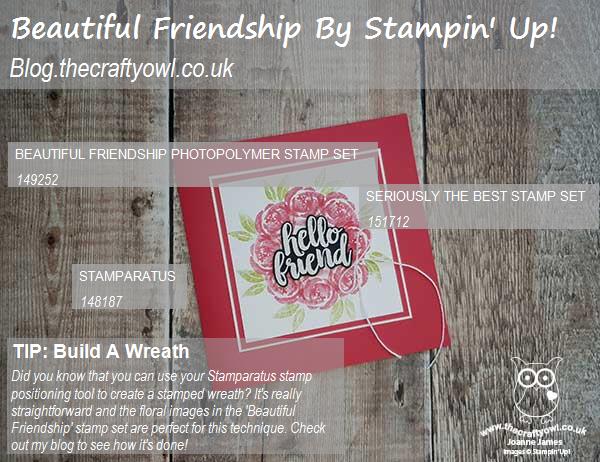
I ADORE the 'Beautiful Friendship' stamp set and have made a ton of cards with it recently, having held an online class using this set. In between  my online classes, I have been running a whole host of online demonstration sessions either sharing different ideas using the class stamp set, revisiting previously learned techniques, or sometimes a combination of both. This card was a result of one of those sessions, where I held I refresher session showing how to use your Stamparatus to create wreaths. The single rose in the 'Beautiful Friendship' set is perfect to create a simple wreath, so armed with my favourite of the retiring in-colors, Lovely Lipstick, and ringing the changes with a 6" x 6" square card, this was what I came up with. 

Have you ever used your Stamparatus to create a floral wreath? Here's a short speeded-up clip of my demonstration (without sound) that shows how easy it is to do:

https://youtu.be/1LgZ-ttfvIE

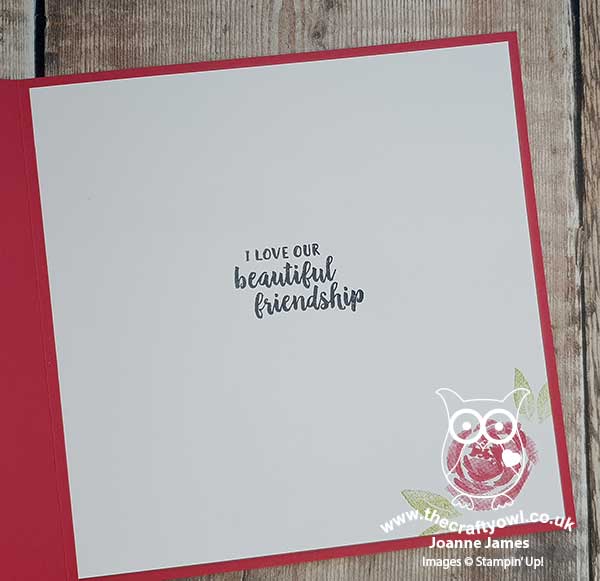
I then added a heat-embossed fussy cut sentiment from the soon-to-be-retired 'Seriously The Best' stamp set and a simple twine bow to the front of my card and added a little decoration to the inside too:


Did you find the above speeded up video clip useful? If you would like to take part in one of my online classes or attend my online demonstration sessions, do check out my class schedule on the events section of my Facebook page or on the 'Classes' tab on my website, or just drop me a line for more information.

I'm linking today's card up over at SUO Challenges where the current theme is Designer's Choice - this one is definitely one of mine!

Here is the visual summary of the key products used on today's project for you to pin for easy reference:


You can see all of my Product and 'How To' summaries on my 'How To - Tips and Techniques' Pinterest board in case you've missed any. 

Before you reach for your ink and papers, check out what our amazing team has created to inspire you this week:

Here's a quick recap of our challenge rules:
 
1.  Create a new paper project
2.  Upload your creation to your blog with a link back to us and provide a direct link to the post featuring your challenge submission.
3.  Please link your card to no more than four challenges, TOTAL.
4.  Have FUN!

You can see all of my 'How To' summaries on my 'How To - Tips and Techniques' Pinterest board in case you've missed any. 

Enjoy your day; I'll be spending mine in and out of my 'By One Get One Free' party over on my Facebook page as I clear out my retiring stamps to make way for the new, whilst sitting in the garden enjoying the warm sunshine!nI'll be back tomorrow with another project. Until then, happy stampin'!


Stampin' Up! Supplies Used: 

Table built using Product Table Builder by The Crafty Owl - Independent Stampin' Up! Demonstrator.


Perennial Essence Friendship Card - PP492

by Joanne James24. May 2020 09:00

Today it's Sunday and time for this week's new challenge over at The Paper Players! It's the turn of the fabulous LeAnne to host this week and she has my favourite, a sketch challenge for you to work with:


I struggled a little with this week's sketch - so many possibilities I was spolied for choice! In the end, I went super simple. I love the rich colours of the inspiration photo over at Just Add Ink this week and they reminded me of one of the patterns in the Perennial Essence DSP pack, so that's where I ended up - take a look:


Here's the low-down on today's card:

I mounted a piece of Perennial Essence paper onto a white mat and Pretty Peacock base, and framed it with a double-stitched rectangle frame before adding my sentiment banner. I heat embossed my sentiment, from the 'To A Wild Rose' stamp set, in gold onto the front of my card and finished with 'to call you my friend' inside my card. I added a few gold glittery enamel dots and my card was complete - I didn't want to do anything else to detract from that beautiful paper! I actually made two of these cards, and with the scrap of paper I had left over I made a third card that I added a gold foil Heirloom embossed frame to but no sentiment, but thought I would share with you as I still think it's rather a lovely goodbye to these two products:


I'm calling this one my 'Faux Monet' - up close you can see the canvas-effect detail of the paper and it's gorgeous.

Here is the visual summary of the key products used on today's project for you to pin for easy reference:


You can see all of my Product and 'How To' summaries on my 'How To - Tips and Techniques' Pinterest board in case you've missed any. 

Before you reach for your ink and papers, check out what our amazing team has created to inspire you this week:

Here's a quick recap of our challenge rules:
 
1.  Create a new paper project
2.  Upload your creation to your blog with a link back to us and provide a direct link to the post featuring your challenge submission.
3.  Please link your card to no more than four challenges, TOTAL.
4.  Have FUN!

You can see all of my 'How To' summaries on my 'How To - Tips and Techniques' Pinterest board in case you've missed any. 

Enjoy your day; I am hoping for warmer temperatures and much less wind today, as I have some flowers to plant out in the garden. Yesterday was so windy it was impossible to do anything constructive outside, especially with my overgrown lockdown hair blowing into my eyes! I'll be back tomorrow with another project. Until then, happy stampin'!


Stampin' Up! Supplies Used: 

Table built using Product Table Builder by The Crafty Owl - Independent Stampin' Up! Demonstrator.

Birthday Jubilee Brights For PP490

by Joanne James10. May 2020 09:00

Today it's Sunday and time for this week's new challenge over at The Paper Players! It's the turn of the fabulous Claire to host this week and she has a colour challenge for you to work with:


I love Claire's bright colour palette this week! I have been planning my next online class so had the Birthday Jubilee bundle out on my desk and along with Brian's sketch over at CAS(E) This Sketch this week my card came together pretty quickly - take a look:


Here's the low-down on today's card:

I cut two panels in Melon Mambo using one of the Jubilee Beauty Dies and used them to frame my sentiment, adding a couple of floral garlands coloured with my Stampin' Blends in each of the colours. I used my old retired Melon Mambo Blendabilities for the pink flowers; I've some good news for you if you're a Blends fan though - there is a new Melon Mambo Blends combo in the new annual catalogue - woohoo! A little extra stamping inside and decoration on the envelope flap complete my card:


The Birthday Jubilee bundle is retiring at the end of the month and the Jubilee Birthday dies are currently discounted to £16.80, so if you like them now is the time to pick up a bargain! My next online class is on Monday 25th May and features this bundle. You can see the full details here; if you would like to join us, then do message me to book on. I would love to see you there!

Here is the visual summary of the key products used on today's project for you to pin for easy reference:


You can see all of my Product and 'How To' summaries on my 'How To - Tips and Techniques' Pinterest board in case you've missed any. 

Before you reach for your ink and papers, check out what our amazing team has created to inspire you this week:

Here's a quick recap of our challenge rules:
 
1.  Create a new paper project
2.  Upload your creation to your blog with a link back to us and provide a direct link to the post featuring your challenge submission.
3.  Please link your card to no more than four challenges, TOTAL.
4.  Have FUN!

You can see all of my 'How To' summaries on my 'How To - Tips and Techniques' Pinterest board in case you've missed any. 

Enjoy your day; happy Mother’s Day wishes to those overseas who are celebrating - I hope you are all spoiled rotten! The weather is supposed to turn here today with rain and much colder temps forecast, so I think my time sitting in the garden will be limited. I guess I might have to do some indoor jobs instead!  I'll be back tomorrow with another project. Until then, happy stampin'!


Stampin' Up! Supplies Used: 

Table built using Product Table Builder by The Crafty Owl - Independent Stampin' Up! Demonstrator.


#ShareSunshine With We'll Walrus Be Friends For PP489

by Joanne James3. May 2020 09:00

Today it's Sunday and time for this week's new challenge over at The Paper Players! It's my turn to host this week and I have a fun theme challenge for you to work with:


I have been looking at the sentiments in the new #ShareSunshine product giveback download and decided to use one of the funny ones on my card today - take a look:


Here's the low-down on today's card:

#ShareSunshine - The #ShareSunshine PDF download is the Covid-19 Product Giveback that I shared with you here last week. It includes lots of fun sentiments related to the current social distancing and unique times we find ourselves in that are great for sharing with friends and family to let them know we are thinking of them. I chose to feature the fun 'I've Just Been Working On My Homebody' sentiment and hunted through my stamp sets to find a suitably fit individual ...

We'll Walrus Be Friends - ... and the rotund walrus in 'We'll Walrus Be Friends' was just the thing! I created a repeating background with my stamp. Is it only me that feels like this chap of late? Too much cake and not enough exercise!!

Starburst Punch - The PDF download comes with a list of the ink colours used and co-ordinating products for each of the images and the one I chose fits the Starburst Punch perfectly. I cropped mine first with a 2" circle punch and mounted it onto my Mango Melody starburst; the former is carrying over but the Starburst Punch is retiring so if this is on your wishlist, now is the time to add it to your shopping basket.

Here is the visual summary of the key products used on today's project for you to pin for easy reference:


You can see all of my Product and 'How To' summaries on my 'How To - Tips and Techniques' Pinterest board in case you've missed any. 

Before you reach for your ink and papers, check out what our amazing team has created to inspire you this week:

Here's a quick recap of our challenge rules:
 
1.  Create a new paper project
2.  Upload your creation to your blog with a link back to us and provide a direct link to the post featuring your challenge submission.
3.  Please link your card to no more than four challenges, TOTAL.
4.  Have FUN!

You can see all of my 'How To' summaries on my 'How To - Tips and Techniques' Pinterest board in case you've missed any. 

I can't wait to see what happy projects you have to share with us in the Paper Players gallery this week!

Enjoy your day; I will be spending time in the garden and trying to make Sunday feel less like any other day of the week since they all seem to roll into one at the moment! I might make up more Covid cards with my download printouts too to send out to friends and family as I have a few ideas. I'll be back tomorrow with another project. Until then, happy stampin'!


Stampin' Up! Supplies Used: 

Table built using Product Table Builder by The Crafty Owl - Independent Stampin' Up! Demonstrator.

Mosaic Mood Framed Birthday Card PP488

by Joanne James26. April 2020 09:00

Today it's Sunday and time for this week's new challenge over at The Paper Players! It's the turn of the lovely Laurie to host this week and she has my favourite, a sketch challenge for you to work with:


I pondered Laurie's sketch this week and resisted the urge to go clean and simple and instead went for lots of layers and details. I'm on a mission to use up some of my designer series paper (well, I need to justify buying the new designs when the new catalogue arrives!) so decided I would make one the focus of my card - take a look:


Here's the low-down on today's card:

Mosaic Mood - I received a free pack of Mosaic Mood paper at Onstage when the current catalogue was launched and I have to confess it wasn't a pattern that I was immediately drawn to. I didn't like the accompanying stamp set and left to my own devices I probably would not have purchased it at all. Truth is, this paper has surprised me - I have had lots of fun with it, cutting out the patterns and stripes and have made lots of projects with it. It was a good choice for my card today - I chose a background pattern and then a floral for the framed centre and decorated my frame with a fussy cut rose and leaves. Funny how things work out, right?

Heirloom Frames - I used one of the embossed Heirloom Frames to separate my two designs. The texture adds interest and detail to the layers on my card.

A Well Written Sentiment - The team over at TGIF Challenges are featuring diecut sentiments on their projects for the current challenge and that was just what I needed for my sentiment still to have impact and be seen. I chose to use the 'birthday' from the Well Written Framelits - they are perfect paired with the 'Well Said' stamp set, both of which are carrying over into the new catalogue I am pleased to say - these are keepers!

Here is the visual summary of the key products used on today's project for you to pin for easy reference:


You can see all of my Product and 'How To' summaries on my 'How To - Tips and Techniques' Pinterest board in case you've missed any. 

Before you reach for your ink and papers, check out what our amazing team has created to inspire you this week:

Here's a quick recap of our challenge rules:
 
1.  Create a new paper project
2.  Upload your creation to your blog with a link back to us and provide a direct link to the post featuring your challenge submission.
3.  Please link your card to no more than four challenges, TOTAL.
4.  Have FUN!

You can see all of my 'How To' summaries on my 'How To - Tips and Techniques' Pinterest board in case you've missed any. 

Enjoy your day; I spent the morning crafting yesterday so have lots to share with you this week! Yesterday turned into a glorious day of sunshine so we enjoyed time outside and an evening BBQ, with a welcome break from online lessons. Hopefully today will allow for more of the same! I'll be back tomorrow with another project. Until then, happy stampin'!


Stampin' Up! Supplies Used: 

Table built using Product Table Builder by The Crafty Owl - Independent Stampin' Up! Demonstrator.

Clean and Simple Modern Heart PP487

by Joanne James19. April 2020 09:00

Today it's Sunday and time for this week's new challenge over at The Paper Players! It's the turn of the wonderful Anne Marie to host this week and she has a sparkly clean and simple challenge for you to work with:


I decided to go back to one of my annual catalogue favourites, Modern Heart, for today's card - take a look:


Here's the low-down on today's card:

A Touch of Sparkle - So with the emphasis on sparkle for today's card, I started with a base of Shimmery white. Difficult to see in the photos, the whole of the cardfront has a subtle sparkle which is so pretty in real life. I paired this with my modern heart, heat embossed in gold, that I decorated with a trio of gilded gems and a tiny geometrical heart fussy cut from gold glimmer paper. 

Clean and Simple - Whilst this week is all about sparkle, it's also 'clean and simple' week. So does today's card meet the guidelines? Minimal layers and embellishments - check. Plenty of open space, aka "white" space - check. Simple and uncluttered - check. Remember to follow this check list if you are going to play along this week!

Hearts of Blue - I decided to use blues for my card colour today; every other time I've used this set it has been with female cards in mind, so I thought it would be nice to create something with a more masculine feel. The unfussy nature of this card suits a more masculine card too - check out the detail on the heart itself:

I added a little fussy cut detail to the sentiment too for an additional pop of navy blue. I'm linking today's card up over at SUO Challenges where they are featuring embossing - this time I'm going with heat embossing.

Here is the visual summary of the key products used on today's project for you to pin for easy reference:


You can see all of my Product and 'How To' summaries on my 'How To - Tips and Techniques' Pinterest board in case you've missed any. 

Before you reach for your ink and papers, check out what our amazing team has created to inspire you this week:

Here's a quick recap of our challenge rules:
 
1.  Create a new paper project
2.  Upload your creation to your blog with a link back to us and provide a direct link to the post featuring your challenge submission.
3.  Please link your card to no more than four challenges, TOTAL.
4.  Have FUN!

You can see all of my 'How To' summaries on my 'How To - Tips and Techniques' Pinterest board in case you've missed any. 

Enjoy your day; yesterday was wet and miserable here, so perfect for crafting; I'm hoping today will be brighter and therefore offer more chance to get outside, but either way I'm sure there will be fun to be had in one form or another! I'll be back tomorrow with another project. Until then, happy stampin'!


Stampin' Up! Supplies Used: 

Table built using Product Table Builder by The Crafty Owl - Independent Stampin' Up! Demonstrator.

Ornate Style Friendship Card PP486

by Joanne James12. April 2020 09:00

Happy Easter Sunday wishes everyone! As it's Sunday and time for this week's new challenge over at The Paper Players! It's the turn of the fabulous Jaydee to host this week and she has a beautiful colour challenge for us to work with:


I used Jacquie's sketch over at Freshly Made Sketches as the basis for my card today (I used a Layered Square Die instead of a diamond, turning it onto it's point) which showcases the main floral stamp from the Ornate Garden Suite pre-release - take a look:


Here's the low-down on today's card:

Ornate Style - The Ornate Style stamp set is one of two that feature in the Ornate Garden Suite that is on early pre-release from the new 2020-21 Stampin' Up! catalogue; you can read more about the whole suite in my earlier post here if you missed it. I used the main floral stamp in the Ornate Style stamp set as the focal point for my card. I heat embossed the image in silver onto Whisper White cardstock and coloured it with my Seaside Spray, So Saffron and Smoky Slate Blends. I added the single flower stem from the same set to the inside of my card:

I haven't added a sentiment yet; I might turn this into a birthday card, as I have lots of them coming up, but for the time being I've left it black until I've decided.

Something Blue - I used Seaside Spray as the main colour on my card today: for my base, a layer of in-colour DSP inside my aperture and a trio of faceted enamel dots. I've used this same colour combination before on these projects, where I used So Saffron as the main colour. Which one do you prefer? Feel free to leave me a comment below, I'd love to hear your thoughts.

Ornate Thanks - I finished my card with a heat embossed sentiment from another of the stamp sets in the Ornate Garden Suite, called Ornate Thanks. This is a great set with lots of sentiment combinations and I particularly like the style of the handwritten font.

Here is the visual summary of the key products used on today's project for you to pin for easy reference:


You can see all of my Product and 'How To' summaries on my 'How To - Tips and Techniques' Pinterest board in case you've missed any. 

Before you reach for your ink and papers, check out what our amazing team has created to inspire you this week:

Here's a quick recap of our challenge rules:
 
1.  Create a new paper project
2.  Upload your creation to your blog with a link back to us and provide a direct link to the post featuring your challenge submission.
3.  Please link your card to no more than four challenges, TOTAL.
4.  Have FUN!

You can see all of my 'How To' summaries on my 'How To - Tips and Techniques' Pinterest board in case you've missed any. 

Enjoy your day; we will of course be hunting for Easter eggs today and spending much of the afternoon consuming large quantities of chocolate whilst making the most of our own company - again! Safe safe everyone! I'll be back tomorrow with another project. Until then, happy stampin'!


Stampin' Up! Supplies Used: 

Table built using Product Table Builder by The Crafty Owl - Independent Stampin' Up! Demonstrator.

Bonanza Buddies Toucan Birthday Cards For PP485

by Joanne James5. April 2020 09:00

Today it's Sunday and time for this week's new challenge over at The Paper Players! It's the turn of the fabulous LeAnne to host this week and she has a fun theme challenge for you to work with:


Cards featuring animals you would find at the zoo! Well, since none of us are able to visit the zoo in the current climate, our gallery this week will be the next best thing! Armed with the current sketch over at the Global Design Project this week I knew exactly where I was headed - take a look:


Here's the low-down on today's card:

Party Toucan - I had to reach for the Bonanza Buddies suite for my card today and that fun party toucan in particular - I love visiting these colourful birds at the zoo! I used a piece of Bonanza Buddies paper, featuring lions and koala bears too, as the base pattern, then fussy cut one of the larger toucans carrying balloons from another sheet of paper. There isn't much stamping on today's card - just a greeting on the front and then a co-ordinating sentiment inside and another toucan, stamped this time in the corner:


A Doily Banner - The banner that I used from my sentiment on the front of my card is from the Doily Wishes DIe set - it was the perfect size and shape to fit under the stitched circle that I used to back my toucan. 

Twocan Toucan - This card was a quick and easy make and a great storecupboard standby so I decided to make two at the same time as it was not twice the effort once everything was to hand. On my second card I used a different toucan, this time one wearing a party hat:


 I love the bright colours of these fun birthday cards and they are perfect for any gender too. Here's one last photo of both my cards together:


Here is the visual summary of the key products used on today's project for you to pin for easy reference:


You can see all of my Product and 'How To' summaries on my 'How To - Tips and Techniques' Pinterest board in case you've missed any. 

Before you reach for your ink and papers, check out what our amazing team has created to inspire you this week:

Here's a quick recap of our challenge rules:
 
1.  Create a new paper project
2.  Upload your creation to your blog with a link back to us and provide a direct link to the post featuring your challenge submission.
3.  Please link your card to no more than four challenges, TOTAL.
4.  Have FUN!

You can see all of my 'How To' summaries on my 'How To - Tips and Techniques' Pinterest board in case you've missed any. 

Enjoy your day; we are forecast a warm day here in the UK so we will be undoubtedly spending some of our time outside in the garden. Yesterday was gorgeous and the James girls went for a long bike ride for our daily exercise yesterday, passing all of the sheep in the fields with their newborn lambs, frolicking about without a care in the world. Oh to be a lamb right now! I'll be back tomorrow with another project. Until then, happy stampin'!


Stampin' Up! Supplies Used: 

Table built using Product Table Builder by The Crafty Owl - Independent Stampin' Up! Demonstrator.

Pink Birthday Crocuses for PP484

by Joanne James29. March 2020 10:00


Today it's Sunday and time for this week's new challenge over at The Paper Players! It's my turn to host this week and as it's the fifth Sunday of the month we have a tic-tac-toe challenge for you to work with:


I'm getting used to the idea of a tic-tac-toe board; my starting point tends to be as many options as possible, so I ended up with 3 lines complete: central row - diecut, spring, birthday, and far right column - DSP, birthday, flowers and lastly the diagonal pink, spring, DSP - talk about over-achiever! I used Amy's sketch over at Freshly Made Sketches for my layout (great layout, Amy!) and decided to use one of my favourite new florals for a new purpose - take a look:


Here's the low-down on today's card:

Crocuses Are Not Just For Easter - I love the 'Easter Promise' stamp set and the crocus stamps. They are perfect for spring and I decided that they would make a pretty birthday card too. I chose my favourite pink, Melon Mambo, for today's card - did you know that you can actually get pink crocuses? I didn't, but Google showed me some so as my kids so often say, well it must therefore be true! I coloured and fussy cut a couple of the bunches for the front of my card, then added the row to the inside for a little extra detail:


Label Me Bold - I used the Happy Birthday from 'Label Me Bold' on today's card; plain block sentiments are perfect for something simple where the florals are the main focus. 

Pretty In Pink Watercolour - I decided to use a rough watercolour to colour my crocuses. I stamped them in Stazon on watercolour paper and then added loose colour in layers, deliberately not keeping inside the lines (which was hard for the perfectionist in me!) and I just love the finished effect:


I added a twine bow and some champagne rhinestones to complete my card. I just LOVE this card - do you ever make a card that totally ticks all of your boxes? This is one of mine!

Here is the visual summary of the key products used on today's project for you to pin for easy reference:


You can see all of my Product and 'How To' summaries on my 'How To - Tips and Techniques' Pinterest board in case you've missed any. 

Before you reach for your ink and papers, check out what our amazing team has created to inspire you this week:

Here's a quick recap of our challenge rules:
 
1.  Create a new paper project
2.  Upload your creation to your blog with a link back to us and provide a direct link to the post featuring your challenge submission.
3.  Please link your card to no more than four challenges, TOTAL.
4.  Have FUN!

You can see all of my 'How To' summaries on my 'How To - Tips and Techniques' Pinterest board in case you've missed any. 

Enjoy your day; the clocks went forward overnight so we have an hour less today, although in the grand scheme of things at the moment I'm not sure it will matter that much! We spent some time together yesterday completing a fiendishly tricky quiz that Ben has been set by school, so I think this afternoon it might be time to involve the grandparents in our endeavours! I'll be back tomorrow with another project. Until then, happy stampin'!


Stampin' Up! Supplies Used: 

Table built using Product Table Builder by The Crafty Owl - Independent Stampin' Up! Demonstrator.

Pressed Petals Spring Florals For PP483

by Joanne James22. March 2020 09:00

Today it's Sunday and time for this week's new challenge over at The Paper Players! It's the turn of the fabulous Claire to host this week and she has my favourite, a sketch challenge for you to work with:


I had an idea in my head as to what I was going to do with this sketch until I pulled my DSP box off the shelf and saw something that inspired me to go in a completely different direction! I ended up making three cards in one go, two using Claire's sketch. They are all different but do have one thing in common - Pressed Petals Specialty Designer Series Paper. Here's my first card:


The Pressed Petals Specialty Designer Series Paper has photographic images of real pressed petals on one side and one of the sheets in the pack has distinct sectional designs to cut out and use on card fronts, and two of the sections feature floral ovals which I thought would work for Claire's sketch. They also reminded me of Laurel's pretty Inspired By badge this week which comprised of pressed florals so I'm linking my first card up there. I stamped my sentiment in the centre of the wreath (I needed a get well card so used this one from the 'Dandelion Wishes' stampset) and fussy cut it out, mounted it on a panel of Mossy Meadow wrapped with the Magnolia Lane linen ribbon and twine and paired this with a Rococco Rose card base and added a trio of faceted dots to finish.

I decided to make another card using another of the sections, this time switching out the ribbon and adding a stamped and diecut sentiment combo to make an Easter card that is great for the current Just Us Girls challenge where the challenge is to feature shades of blue, green and yellow on your card:


I'm also linking my Easter card up to SUO Challenges where the current theme is Spring.

I created one last card to use up the strip of daisies. I inset it within a split Rococco Rose panel that I popped up on dimensionals and paired it with a sentiment from 'Peaceful Moments', this time using the current InspireCreate sketch rather than Claire's - it was ideal to save this piece from wallowing in my snippets box:


Here is the visual summary of the key products used on today's projects for you to pin for easy reference:


You can see all of my Product and 'How To' summaries on my 'How To - Tips and Techniques' Pinterest board in case you've missed any. 

Before you reach for your ink and papers, check out what our amazing team has created to inspire you this week:

Here's a quick recap of our challenge rules:
 
1.  Create a new paper project
2.  Upload your creation to your blog with a link back to us and provide a direct link to the post featuring your challenge submission.
3.  Please link your card to no more than four challenges, TOTAL.
4.  Have FUN!

Enjoy your day; it's Mother's Day here in the UK but due to our social distancing everyone will be at home in their own houses, which will feel strange. I'm looking forward to being waited on by the James Juniors and Skype calls with the other Mums in our extended family, maybe with some quality jigsaw time too! I'll be back tomorrow with another project. Until then, happy stampin'!


Stampin' Up! Supplies Used: 

Table built using Product Table Builder by The Crafty Owl - Independent Stampin' Up! Demonstrator.

Mini Catalogue

BROWSE THE CATALOGUE

The mini catalogue is now live! Read and download your copy here.

Shop Online

Access my online shop 24 x 7, 365 days of the year:

Current April hostess code:

VDKNV7BH

Shop Online

Join My Team

It's always a great time to join Stampin’ Up! New team members can get £130 worth of products for only £99 + free business supplies + free shipping + all the fun being a part of Stampin’ Up! Stampin' Up! has something for everyone: join my growing team and benefit from my support to enjoy Stampin' Up! however you choose.

If you're interested, call me for a chat to understand how I can help you realise your goals. Alternatively, if you have already decided to sign up and you just can't wait, please click here for the link to the online form where you can sign up and order your starter kit right away! 

Latest Kit!

Stampin Cut and Emboss

The Rock Legend Kit has all you need to make 8 cards with coordinating envelopes. Along with the new Panda Friends Kit, both are available from January 4th for just £14 each - get yours here!

2023-24 Annual Catalogue

BROWSE THE CATALOGUE

Click on the catalogue for a full list of current SU! supplies - if you would like to order any of the items featured, please drop me a line at [email protected] or give me a call on 07773 421446 - I'd be happy to help.

New Online Exclusives

There are new products available exclusively in the online store from 5 March - check them out here.

About Me

Hi I'm Joanne and live in Northampton and when I'm not looking after my husband and two beautiful children, am an avid crafter with a passion for all things Stampin' Up!

I must confess that I have never been a big rubber stamper - until I discovered Stampin' Up! that is. I love the fact that I can get such great results with co-ordinating stamps, inks, papers and punches - the possibilities are endless! Join me on my stamping journey as I share the things I love and be inspired to create amazing things yourself!

Follow Me

Monthly Newsletter

Box Builder

Click the button above to use Box Buster to create your custom box design using the Envelope Punch Board!

Kits Collection Now Available!

Stampin Cut and Emboss

The new Kits Collection from Stampin' Up! is now available!

Click here to see the current kits available and order yours online today.

I Design For


Stampin' Up Stuff

This is my personal blog and is not endorsed by Stampin’ Up! I hope you find it a plentiful source of ideas and personal inspiration but please don't copy my designs for contest submission or use for classes, publication or sale without express permission.