On To Adventure Holidaymaker for PP481

by Joanne James8. March 2020 10:00

Today it's Sunday and time for this week's new challenge over at The Paper Players! It's the turn of the fabulous Laurie to host this week and she has a vibrant colour challenge for you to work with:


I spent much of this week undertaking last-minute preparations for my weekend craft retreat, so was short on time to create and lacking my creative mojo. Anyway, I had to keep it quick and this is what I came up with - take a look:


I stamped my lady from the 'On to Adventure' stamp set and coloured her with my Stampin' Blends, then mounted her on a layered circle and stamped my sentiment onto a Coastal Cabana scalloped rectangle. A sprinkling of champagne rhinestones finish my card.

Super simple this week!

Here is the visual summary of the key products used on today's project for you to pin for easy reference:


You can see all of my Product and 'How To' summaries on my 'How To - Tips and Techniques' Pinterest board in case you've missed any. 

Before you reach for your ink and papers, check out what our amazing team has created to inspire you this week:

Here's a quick recap of our challenge rules:
 
1.  Create a new paper project
2.  Upload your creation to your blog with a link back to us and provide a direct link to the post featuring your challenge submission.
3.  Please link your card to no more than four challenges, TOTAL.
4.  Have FUN!

Enjoy your day; I will be on day two of my weekend craft retreat. Yesterday we had a ball, so I'm sure today will be just as much fun! More about that later in the week. I'll be back in a couple of days with another project. Until then, happy stampin'!


Stampin' Up! Supplies Used: 

Table built using Product Table Builder by The Crafty Owl - Independent Stampin' Up! Demonstrator.

Easter Promise Heat Embossed Crocus – PP480

by Joanne James1. March 2020 10:00

Today it's Sunday and it's also the first of March - happy St David's Day to all my fellow Welsh men and women! It's time for this week's new challenge over at The Paper Players! It's the turn of the wonderful Anne Marie to host this week and she has a theme challenge for you to work with:


 I am in a bit of a clean and simple card making groove of late - and today I have another CAS creation for you. I decided to take this week's sketch over at CAS Colours & Sketches and make another Easter card - take a look:


Here's the low-down on today's card:

Turn Up The Heat - Do you remember the first time you practised heat embossing? It's one of those techniques that is always a real 'wow' as you turn on your heat gun and see the powder turn into molten metallic magic on your stamped image. It adds such a great shine to projects and a raised edge that makes it easy to colour inside too. If you look at the close up photo below you can see the dimension and shine that it adds:


My top tip for a neat effect and minimal splatter when heat embossing is to always rub your cardstock with an embossing buddy before you stamp your image in Versamark and sprinkle with your embossing powder; this will keep the powder where you want it and not cause it to stick in areas where it isn't required.

Crocus Colours - The colour scheme on today's card is inspired by the most common traditional crocus colours: a warm honey yellow, bright purple and pale yellow. I used a Highland Heather base - I embossed the front using my Subtles Embossing Folder - and coloured my flowers using Highland Heather, Mango Melody and So Saffron Stampin' Blends markers to compliment my gold heat embossing.

Easter Promise - The stamp set I used today is called 'Easter Promise' and has both sentiments and these gorgeous crocus flowers that are perfect for celebrating Easter. I heat embossed the trio of crocus and then used my largest Stitched Circle Die to create a partial diecut around them (that's the 'hat' shape on the sketch!) and I then heat embossed my sentiment and fussy cut it so that I could position it where I wanted it. I also decorated the envelope front and back and the inside of my card and continued with the heat embossing and colouring theme:

For a CAS card it took a little while with all of the heat embossing and colouring, but it was so worth it - this card is so, so pretty! Here is the visual summary of the key products used on today's project for you to pin for easy reference:


You can see all of my Product and 'How To' summaries on my 'How To - Tips and Techniques' Pinterest board in case you've missed any. 

Before you reach for your ink and papers, check out what our amazing team has created to inspire you this week:

Here's a quick recap of our challenge rules:
 
1.  Create a new paper project
2.  Upload your creation to your blog with a link back to us and provide a direct link to the post featuring your challenge submission.
3.  Please link your card to no more than four challenges, TOTAL.
4.  Have FUN!

Enjoy your day; I will be spending the day at home escaping the winds and rain and hoping to get some quality time in my craft room in between catching up on household chores and making sure the youngest of the James Juniors is prepared for this week's mock Common Entrance examinations - not much then!  I'll be back tomorrow with another project. Until then, happy stampin'!


Stampin' Up! Supplies Used: 

Table built using Product Table Builder by The Crafty Owl - Independent Stampin' Up! Demonstrator.

Colour Blocked Easter Daffodil Card

by Joanne James24. February 2020 09:00

Happy Monday everyone! The kiddos are back to school so I'm hoping for a productive crafting week! Today I'm sharing the other card that I made using this week's Paper Players sketch (you can see my design team post from yesterday here if you missed it) that was inspired by the spring colours over at CAS Colours and Sketches this week:

I bought my first bunches of daffodils last week and have been busy working with Spring flowers in my craft room for the last few days in readiness for my upcoming Spring Weekend Craft Retreat; it's pouring down with rain here in the UK again and I am so keen to see an end to Winter now! I'm ready to welcome Spring and these colours were perfect to bring a little more seasonal colour my way - take a look:


Here's the low-down on today's card:

I stamped this stem of daffodils from the retired set 'You're Inspired' stamp set and coloured them with my Stampin' Blends and then created another colour blocked background using the three challenge colours and my stitched rectangle dies to sit behind it. These kinds of backgrounds are easy to create - my top tip would be to cut your three strips of coloured cardstock and adhere them to a piece of Whisper White cardstock before running through the diecutting machine; this keeps them perfectly aligned and in one piece. I added a heat embossed sentiment and some twine to my stamped layer to complete my card.

Daffodils are one of my favourite flowers; I love their sunny colour combinations and they are so cheery when the weather outside is anything but!

Here is the visual summary of the key products used on today's project for you to pin for easy reference:


You can see all of my 'How To' summaries on my 'How To - Tips and Techniques' Pinterest board in case you've missed any. 

Enjoy your day; I'll be spending mine escaping from the weather and instead being brightened up with the colours of my craft supplies! I'll be back tomorrow with another project. Until then, happy stampin'!


Stampin' Up! Supplies Used:

Table built using Product Table Builder by The Crafty Owl - Independent Stampin' Up! Demonstrator.

Colour Blocked Beautiful Moments for PP479

by Joanne James23. February 2020 10:00

Today it's Sunday and time for this week's new challenge over at The Paper Players! It's the turn of the fabulous LeAnne to host this week and she has my favourite, a sketch challenge for you to work with:


I struggled a little with this week's sketch - I think it was because there were so many things I wanted to do with that central panel! In the end I decided to make a couple of cards. Here's the first one - using blue, green and a friendship sentiment from the current Festive Friday inspo list - featuring one of my favourite sets from the current Spring catalogue - take a look:


Here's the low-down on today's card:

Beautiful Moments is one of my favourite new stamp sets! I am so pleased to be able to add this one to my collection that feature other images drawn by the same artist; this set was inspired by $1million Sales Achiever Jacque Williams and contains three separate images of girls of varying ages. I think they are so beautiful. I kept things simple by stamping my image onto Shimmery White paper and colouring with my aquapainter and then created a colour-block background using the three main colours of my main image. I actually made this card to send to a friend of mine who's been having a tough time of it recently - I added one of the other sentiments from the inside as a perfect reminder that she is cherished:


I can't wait to make more cards using the other images in this set, so watch this space! I'll update my post later with the second card that I made with this week's sketch. 

Here is the visual summary of the key products used on today's project for you to pin for easy reference:


You can see all of my Product and 'How To' summaries on my 'How To - Tips and Techniques' Pinterest board in case you've missed any. 

Before you reach for your ink and papers, check out what our amazing team has created to inspire you this week:

Here's a quick recap of our challenge rules:
 
1.  Create a new paper project
2.  Upload your creation to your blog with a link back to us and provide a direct link to the post featuring your challenge submission.
3.  Please link your card to no more than four challenges, TOTAL.
4.  Have FUN!

Enjoy your day; we have a busy day today with one of the James Juniors playing hockey this afternoon and the other spending all day on the indoor ski slopes  learning to ski in advance of a school trip to Italy in a couple of months time. So I'm expecting two tired children for dinner this evening! I'll be back tomorrow with another project. Until then, happy stampin'!


Stampin' Up! Supplies Used: 

Table built using Product Table Builder by The Crafty Owl - Independent Stampin' Up! Demonstrator.


Hoot Hoot Hooray Team Anniversary Cards for PP478

by Joanne James16. February 2020 10:00


Today it's Sunday and time for this week's new challenge over at The Paper Players! It's the turn of the fabulous Jaydee to host this week and she has a fun clean and simple challenge for you to work with:
    

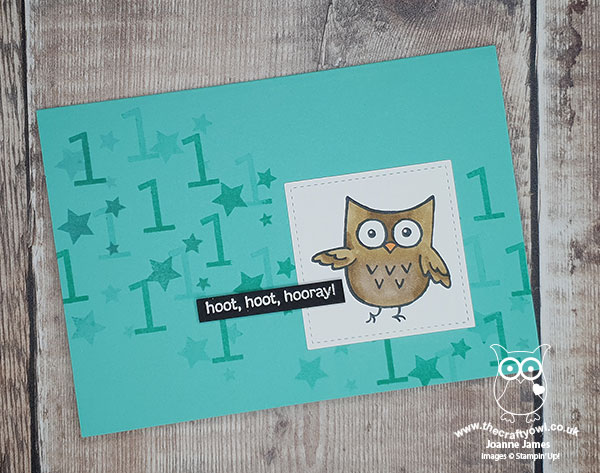
I needed some anniversary cards for my Stampin’ Up! downline team so armed with this week’s TGIF Challenge sketch (which would make a great scrapbook layout too) and some new stamps I set to work - take a look:


Here's the low-down on today's card:

Hoot Hoot Hooray - The sweet little owl that is the star of today’s card comes from one of the stamp sets in the ‘Experience Creativity’ brochure. Designed with beginners in mind, this is a stamp set that is super easy to use: stamp, colour and go! I bought this set just for the owl - my team are called the Hoots and I just couldn’t resist this owl and sentiment perfect for team celebrations - but it contains a good mix of all-occasion stamps which make it useful if you’re just starting out.

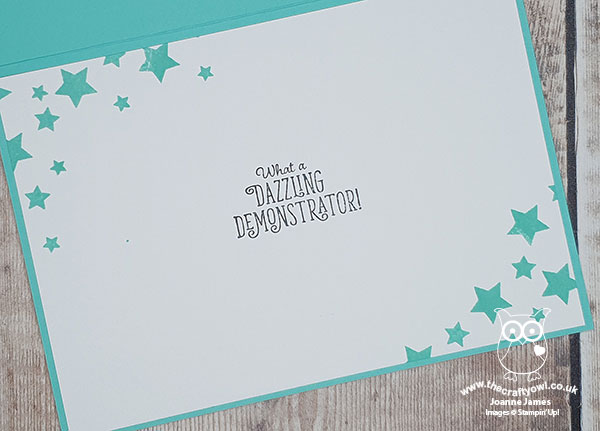
Dazzling Demonstrators - I stamped the inside of my card with a demonstrator-only stamp set, along with some stars to continue the theme of the outside:

Whilst my card is designed to celebrate the demonstrators that are on my team and how long they have been with Stampin’ Up!, you could just as easily swap out the inside greeting for a birthday one and use the card to celebrate a child’s birthday.

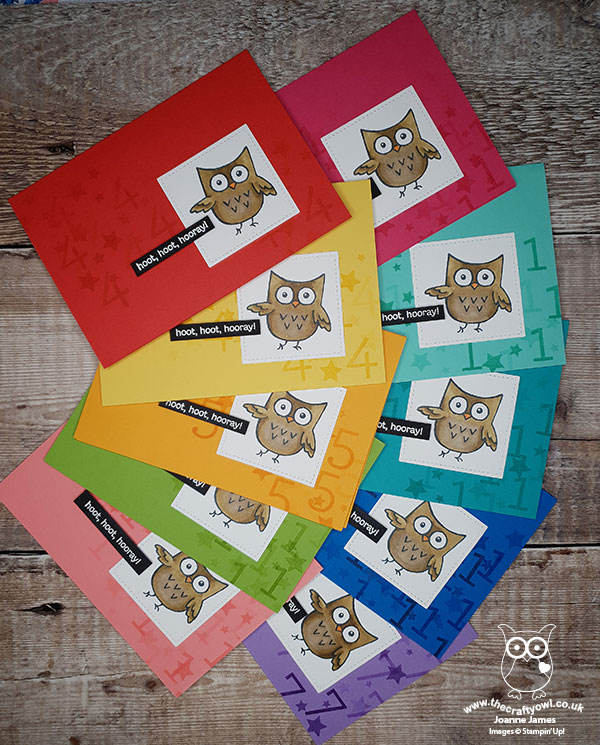
A Family Party - On the base of my card front, I used a number corresponding to the appropriate anniversary year and the star stamp from the ‘Family Party’ stamp set to create a tone-on-tone pattern, stamping each full strength and for a second time before re-inking to create a random pattern with a little depth. I have quite a number of Stampin’ Anniversaries to celebrate in coming months - Sale-A-Bration is a popular time to join so it also means lots of anniversaries too - so I created a whole bunch of these for up and coming celebrations, in a rainbow of bright colours - here‘s the whole collection:

This is a great CAS design that made it easy for me to create multiples with each one being slightly different but all with a common theme. I can’t wait to get these in the post to my various team members and add a little colour to their day. Sale-A-Bration is a great time to join Stampin’ Up! and the earlier you do it, the longer you can benefit from your product discount before you even need to meet your first quarterly minimum. If you would like to know more about the benefits of joining, then do get in touch with me and I will happily explain in more detail. Alternatively just go for it, you really have nothing to lose - click here to make it happen.

Here is the visual summary of the key products used on today's project for you to pin for easy reference:


You can see all of my Product and 'How To' summaries on my 'How To - Tips and Techniques' Pinterest board in case you've missed any. 

Before you reach for your ink and papers, check out what our amazing team has created to inspire you this week:

Here's a quick recap of our challenge rules:
 
1.  Create a new paper project
2.  Upload your creation to your blog with a link back to us and provide a direct link to the post featuring your challenge submission.
3.  Please link your card to no more than four challenges, TOTAL.
4.  Have FUN!

You can see all of my 'How To' summaries on my 'How To - Tips and Techniques' Pinterest board in case you've missed any. 

Enjoy your day; I'll be hunkering down with the rest of the James clan avoiding Storm Dennis and hoping he leaves less destruction in his wake than last week’s storm Ciara. On the upside, our new fence is rock solid and I think could withstand nuclear attack! I’ll  back tomorrow with another project. Until then keep warm and enjoy your weeken. Happy stampin'!


Stampin' Up! Supplies Used: 

Table built using Product Table Builder by The Crafty Owl - Independent Stampin' Up! Demonstrator.

The Power of Hope For PP477

by Joanne James9. February 2020 10:00

Today it's Sunday and time for this week's new challenge over at The Paper Players! It's the turn of the fabulous Ann to host this week and she has a fun colour challenge for you to work with:


Ann's colours this week are perfect for Valentine's however armed with the 'blank slate' over at InspireCreate this week I decided to use a little of something old with a little of something new to create my card today - take a look:


Here's the low-down on today's card:

Power of Hope - So first to my something new! The pagoda and sentiment on today's card are from one of the free Sale-A-Bration stamp sets, called 'Power of Hope'. This set has some lovely oriental images, including a chinese lantern and geisha girl. I used the pagoda and one of the uplifting sentiments in the set.

Embossed Stone - The Power of Hope stamp set is combined with the Stone 3D embossing folder as one of the bundles of items that you can receive free with a £90 (as opposed to £45) Sale-A-Bration purchase. I used it emboss my card base and create a textured frame for my stamped area although I think it will prove useful on other projects too.

Seasonal Layers - For my 'something old', I used my perennial favourite, the Seasonal Layers Thinlits to add a diecut cherry blossom branch to the front of my card. I added colour to the centres of the flowers using my Stampin' Blends markers and the co-ordinating Colourful Seasons stamp set, which I also used to add a touch of decoration to the inside of my card:


Whilst I haven't used them for a while, this stamp set and dies are one of the most used bundles in my collection. They really are so useful on so many projects, whatever the season. As for the Japan-influenced Power of Hope bundle, whilst I wouldn't ordinarily choose this style of stamp set, it's different to anything else I own and will I'm sure have its uses. Bottom line is it was free, so I'm most certainly not complaining! 

Here is the visual summary of the key products used on today's project for you to pin for easy reference:


You can see all of my Product and 'How To' summaries on my 'How To - Tips and Techniques' Pinterest board in case you've missed any. 

Before you reach for your ink and papers, check out what our amazing team has created to inspire you this week:

Here's a quick recap of our challenge rules:
 
1.  Create a new paper project
2.  Upload your creation to your blog with a link back to us and provide a direct link to the post featuring your challenge submission.
3.  Please link your card to no more than four challenges, TOTAL.
4.  Have FUN!

You can see all of my 'How To' summaries on my 'How To - Tips and Techniques' Pinterest board in case you've missed any. 

Enjoy your day; one of the James Juniors is off to a paintballing party today (rather him than me!). The rest of us will be battoning down the hatches and staying indoors away from the stormy winds that are expected in the UK today. I'll be back tomorrow with another project (or two!). Until then, happy stampin'!


Stampin' Up! Supplies Used: 

Table built using Product Table Builder by The Crafty Owl - Independent Stampin' Up! Demonstrator.

From My Heart Valentine's Card for PP476

by Joanne James2. February 2020 10:00

Today it's Sunday and time for this week's new challenge over at The Paper Players! It's the turn of my sweet friend Claire to host this week and she has a timely theme challenge for you to work with:


It's the first Sunday in February and the month of Valentine's so love is definitely in the air! I combined our challenge this week with the colour palette over at Global Design Project and Julee's Mojo Monday sketch and am linking up with Just Us Girls where they are looking for bows. All of these elements came together for my love-filled card - take a look:


Here's the low-down on today's card:

From My Heart - My card today features three of the patterns in the From The Heart specialty designer series paper. With playful patterns featuring red and pink foil accents on some designs, these papers are perfect for Valentine's Day cards and packaging. I used a pink and red random heart design for my largest panel and layered two of the foiled heart designs for the uppermost layer and focal point of my card. Check out the foil effect - so pretty:


Two Hearts Are Better Than One - I loved the layering of Julee's sketch and decided it would be a great way to showcase my favourite foiled heart pattern in the paper pack. I layered it on a pink heart from another of the designs, both of which I punched out using the punches in the Heart Punch pack: one has straight edges and the other scalloped and they nest together beautifully. I love it when you can punch shapes out of paper this easily - it makes card making a breeze! 

Add A Bow - I finished my card with a fancy glossy red satin ribbon bow. The foil detailing and the faceted gems make this card something special and a luxurious bow seemed like the perfect way to complete my card.

Here is the visual summary of the key products used on today's project for you to pin for easy reference:


You can see all of my Product and 'How To' summaries on my 'How To - Tips and Techniques' Pinterest board in case you've missed any. 

Before you reach for your ink and papers, check out what our amazing team has created to inspire you this week:

Here's a quick recap of our challenge rules:
 
1.  Create a new paper project
2.  Upload your creation to your blog with a link back to us and provide a direct link to the post featuring your challenge submission.
3.  Please link your card to no more than four challenges, TOTAL.
4.  Have FUN!

Enjoy your day; I will be crafting and getting ready for my technique class tomorrow and might even sneak in a movie this afternoon. To my fellow PP teamies and anyone else stateside who is watching the Super Bowl and hosting or attending a Super Bowl party - enjoy!

I'll be back tomorrow with another project. Until then, happy stampin'!


Stampin' Up! Supplies Used: 

Table built using Product Table Builder by The Crafty Owl - Independent Stampin' Up! Demonstrator.

Life Is Short - Buy The Shoes for PP475

by Joanne James26. January 2020 10:00

Today it's Sunday and time for this week's new challenge over at The Paper Players! It's my turn to host this week and I have my favourite, a sketch challenge, for you to work with:


My sketch involves an element of repeating pattern, which can be any shape you like. Whilst I used my stitched circles as a background for my pattern repeat, today's card is all about the shoes - and some rather special shoes at that! Take a look:


Here's the low-down on today's card:

Words To Live By - I love the sentiments in the 'Dressed to Impress' stamp set but my favourite is without doubt this one - I mean, has there ever been a truer word spoken?! I am one of those people who love shoes; I don't own as many pairs now as I once did and I've never owned a pair of floral high heels, but I would love to - so I would love to receive a birthday card like this! I used the florals in the stamp set to decorate the inside too, with a birthday sentiment from the Peaceful Moments stamp set:


Best Dressed Shoes - This is one of those cards that looks pretty simple, but took a long time to execute! I stamped twelve shoes onto Whisper White cardstock and used my All Dressed Up Dies to cut them out, then added some colour to the Petal Pink and Mint Macaron Stampin' Blends to the inside contours of the shoes for a little contrast. Then I stamped twelve shoes (plus two for the envelope) onto a selection of the Best Dressed Designer Series papers, choosing a selection of the small floral patterns and making sure that the shoes were stamped in a similar orientation so that the designs would co-ordinate and the shoes would look like pairs, then I fussy cut the outsides of the shoes and paper-pieced them onto the white backgrounds. Time consuming yes, but I love the finished effect!

Pick of The Pastels - I decided to mount each of my pairs of shoes on a stitched circle and used a selection of pastels inspired by the Best Dressed DSP (although I used Pool Party Instead of Mint Macaron as the latter was too dark). My sentiment was stamped in Blackberry Bliss on a shortened Stitched Rectangle to complete my card.

Here is the visual summary of the key products used on today's project for you to pin for easy reference:


You can see all of my Product and 'How To' summaries on my 'How To - Tips and Techniques' Pinterest board in case you've missed any. 

Before you reach for your ink and papers, check out what our amazing team has created to inspire you this week:

Here's a quick recap of our challenge rules:
 
1.  Create a new paper project
2.  Upload your creation to your blog with a link back to us and provide a direct link to the post featuring your challenge submission.
3.  Please link your card to no more than four challenges, TOTAL.
4.  Have FUN!

I'm looking forward to visiting your blogs this week and taking a look at your interpretation of this week's sketch.

Enjoy your day; we did all our sport Friday and yesterday, so today it's a quiet day with homework, ironing and maybe a movie. Enjoy the rest of your weekends and I'll be back tomorrow with another project. Until then, happy stampin'!


Stampin' Up! Supplies Used: 

Table built using Product Table Builder by The Crafty Owl - Independent Stampin' Up! Demonstrator.

Clean and Simple Dressed To Impress for PP474

by Joanne James19. January 2020 10:00

Today it's Sunday and time for this week's new challenge over at The Paper Players! It's the turn of the fabulous Laurie to host this week and she has a fun clean and simple challenge for you to work with:


I knew immediately where I was going with today's card and using the current layout over at CAS Colours & Sketches ended up making not one but two cards!  Laurie's theme gave me the perfect excuse to break out my new 'Dressed To Impress' stamp set and co-ordinating Best Dressed designer series papers to create a couple of clean and simple cards perfect for a fashionista. Here's the first one, featuring the lipstick:


I coloured my image with my Stampin' Blends and added just a small piece of designer paper behind to preserve the all-important white space. Finally I stamped the scrolled word in a contrasting colour and popped it up over my black sentiment for added interest.

I liked this card so much I made another, this time featuring the shoe:


On each of my cards, I stamped my lipstick/shoe image on a post-it note and masked my main image to stamp a second one. My first lipstick looked lonely and as for the shoes, it had to be a pair - I mean, who buys a single shoe?! 

And here's another picture of both cards together:


So which one do you prefer? I liked the solid pink lipstick DSP on the first one ... until I used the shoes DSP which whilst it has larger images, is on a white background so feels a little 'cleaner'. So now I'm not so sure - as always, I welcome your thoughts! Here is the visual summary of the key products used on today's projects for you to pin for easy reference:


You can see all of my Product and 'How To' summaries on my 'How To - Tips and Techniques' Pinterest board in case you've missed any. 

Before you reach for your ink and papers, check out what our amazing team has created to inspire you this week:

Here's a quick recap of our challenge rules:
 
1.  Create a new paper project
2.  Upload your creation to your blog with a link back to us and provide a direct link to the post featuring your challenge submission.
3.  Please link your card to no more than four challenges, TOTAL.
4.  Have FUN!

You can see all of my 'How To' summaries on my 'How To - Tips and Techniques' Pinterest board in case you've missed any. 

Enjoy your day; we have a family lunch planned and a day of homework for the Juniors and ironing for me! Hope you have an enjoyable rest of your weekend. I'll be back tomorrow with another project. Until then, happy stampin'!


Stampin' Up! Supplies Used: 

Table built using Product Table Builder by The Crafty Owl - Independent Stampin' Up! Demonstrator.

Congratulations Peaceful Poppies for PP473

by Joanne James12. January 2020 10:00

Today it's Sunday and time for this week's new challenge over at The Paper Players! It's the turn of the fabulous Anne Marie to host this week and she has what I'm sure will be a popular colour challenge for you to work with:


The reason I think Anne Marie's colour palette will be popular this week is that all of her key colours feature in the new Peaceful Poppies designer series paper from Stampin' Up! and try as I might to go in a different direction, I couldn't help but cut into my pack for today's card. With the help of Judy's great sketch over at Freshly Made Sketches this week, I was able to let the paper do all the talking - take a look:


Here's the low-down on today's card:

Peaceful Poppies - Peaceful Poppies is one of the headline suites of the new Stampin' Up! Spring Mini Catalogue and it appears on the front cover. Beautiful line-art images accented by watercolour effects, all inspired by a field of poppies, the suite contains not one, but two bundles along with a range of co-ordinating accessories. My regular readers will know that I am a lover of designer series paper and I think the Peaceful Poppies paper is some of the most beautiful I've ever seen. One of the designs looks just like a painting and is perfect for card fronts and I cut a piece of this, featuring both Poppy Parade and Rich Razzleberry coloured poppies.

Neutral Black - My paper choice was so pretty, I couldn't bring myself to add much more to the front of my card. I used a Poppy Parade card base and added a double mount to frame my patterned paper, in Old Olive and Basic Black. I also decided to heat emboss my sentiment in white on black, as opposed to stamping the other way around - using black to 'frame' my picture and sentiment ties in to the black line-drawn design of the paper, so whilst used sparingly my neutral choice plays an important role.

Beautiful Inside And Out - Having done very little stamping on the front of my card, I decided a little interior decoration along with my split/masked sentiment was needed to redress the balance:

I added a poppy to the front of my envelope too - no naked envelopes here this week!

Here is the visual summary of the key products used on today's project for you to pin for easy reference:
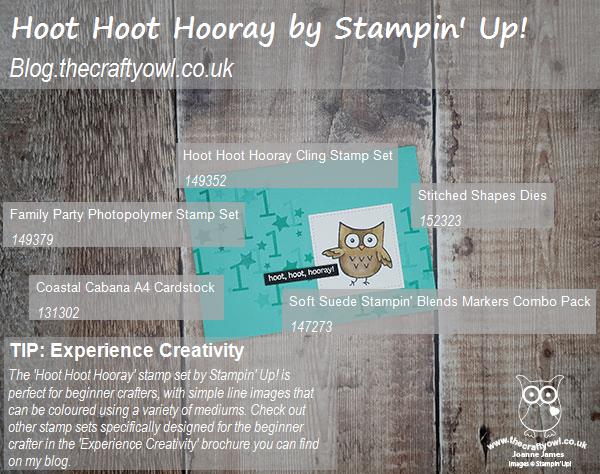
 

You can see all of my Product and 'How To' summaries on my 'How To - Tips and Techniques' Pinterest board in case you've missed any. 

Before you reach for your ink and papers, check out what our amazing team has created to inspire you this week:

Here's a quick recap of our challenge rules:
 
1.  Create a new paper project
2.  Upload your creation to your blog with a link back to us and provide a direct link to the post featuring your challenge submission.
3.  Please link your card to no more than four challenges, TOTAL.
4.  Have FUN!

You can see all of my 'How To' summaries on my 'How To - Tips and Techniques' Pinterest board in case you've missed any. 

Enjoy your day; we had a day of sport yesterday so today should be a quieter one. I spent yesterday making final preparations for my class tomorrow, however if I'm lucky I might squeeze in a little extra crafting today - here's hoping! I'll be back tomorrow with another project. Until then, happy stampin'!


Stampin' Up! Supplies Used: 

Table built using Product Table Builder by The Crafty Owl - Independent Stampin' Up! Demonstrator.

Mini Catalogue

BROWSE THE CATALOGUE

The mini catalogue is now live! Read and download your copy here.

Shop Online

Access my online shop 24 x 7, 365 days of the year:

Current April hostess code:

VDKNV7BH

Shop Online

Join My Team

It's always a great time to join Stampin’ Up! New team members can get £130 worth of products for only £99 + free business supplies + free shipping + all the fun being a part of Stampin’ Up! Stampin' Up! has something for everyone: join my growing team and benefit from my support to enjoy Stampin' Up! however you choose.

If you're interested, call me for a chat to understand how I can help you realise your goals. Alternatively, if you have already decided to sign up and you just can't wait, please click here for the link to the online form where you can sign up and order your starter kit right away! 

Latest Kit!

Stampin Cut and Emboss

The Rock Legend Kit has all you need to make 8 cards with coordinating envelopes. Along with the new Panda Friends Kit, both are available from January 4th for just £14 each - get yours here!

2023-24 Annual Catalogue

BROWSE THE CATALOGUE

Click on the catalogue for a full list of current SU! supplies - if you would like to order any of the items featured, please drop me a line at [email protected] or give me a call on 07773 421446 - I'd be happy to help.

New Online Exclusives

There are new products available exclusively in the online store from 5 March - check them out here.

About Me

Hi I'm Joanne and live in Northampton and when I'm not looking after my husband and two beautiful children, am an avid crafter with a passion for all things Stampin' Up!

I must confess that I have never been a big rubber stamper - until I discovered Stampin' Up! that is. I love the fact that I can get such great results with co-ordinating stamps, inks, papers and punches - the possibilities are endless! Join me on my stamping journey as I share the things I love and be inspired to create amazing things yourself!

Follow Me

Monthly Newsletter

Box Builder

Click the button above to use Box Buster to create your custom box design using the Envelope Punch Board!

Kits Collection Now Available!

Stampin Cut and Emboss

The new Kits Collection from Stampin' Up! is now available!

Click here to see the current kits available and order yours online today.

I Design For


Stampin' Up Stuff

This is my personal blog and is not endorsed by Stampin’ Up! I hope you find it a plentiful source of ideas and personal inspiration but please don't copy my designs for contest submission or use for classes, publication or sale without express permission.