by Joanne James25. May 2013 21:01A change from owls today! I thought I would share with you one of the 'make and take' projects I made at the Stampin' Up! regional training event in Telford a couple of weeks ago, a little box made using the Two Tags die containing a set of mini notelets. So first, a close up of the box itself:
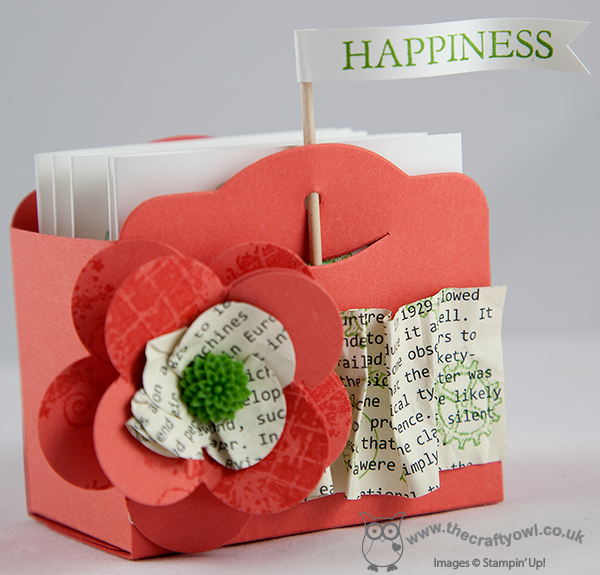
The box was decorated with a double-layered fancy flower, stamped with one of the stamps from the Clockworks stamp set and the centre and box front finished with some stamped First Edition designer series paper. An in-colour Gumball Green dahlia adds the accent colour that really makes this project 'pop'. The box contains a set of notelets, decorated with Clockworks and a sentiment from the One in a Million stamp set:
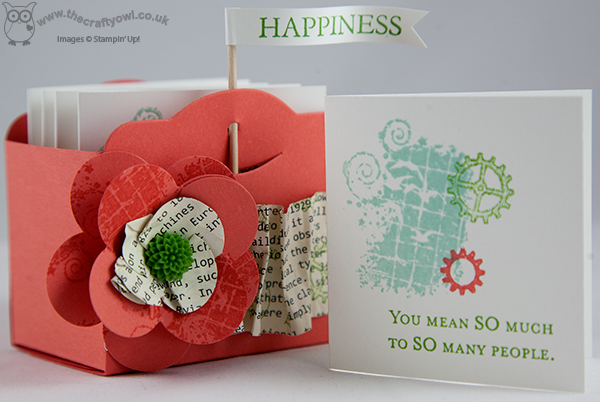
This would make a lovely gift set - it's always handy to have a set of notelets on hand. I like the flag detail on the box too; do you recognise the 'happiness' stamp? It's actually a section of the wedding sentiment stamp in the 'One in a Million' set - I've just trimmed away the first part that said 'Wishing you a lifetime of' - a neat trick to extend the versatility of your stamps.
That's all for today; back tomorrow with another project (assuming I can tear myself away from the lovely weather outside!) - until then, happy stampin'!
Stampin' Up Supplies:
Stamps: One in a Million, Clockworks
Cardstock: Calypso Coral, Whisper White, First Edition Designer Series Paper
Ink/Stampin' Write Markers: Calypso Coral, Gumball Green, Pool Party
Tools: Two Tags Bigz Die, Big Shot, Fancy Flower Punch
Finishing Touches: In Colour Dahlia
4bfb0695-1bc3-4d2a-970d-3ccd70fb6f2c|0|.0|96d5b379-7e1d-4dac-a6ba-1e50db561b04
Tags: 3D Projects, Big Shot, boxes, One In A Million, one layer cards, Stampin' Up, Stampin' Up Card, Stampin' Up Card ideas, Stampin' Up Supplies, First Edition, Clockworks, Two Tags Bigz Die, Fancy Flower Punch
3D Projects | Boxes | Cards | Stamping
by Joanne James8. April 2013 21:13I've been really busy in my craft room today, creating swaps for a training event next weekend; not yet finished, so will share later in the week. Meanwhile, with another simple Spring Sampler card - this time a trio of stamps on a one layer card:
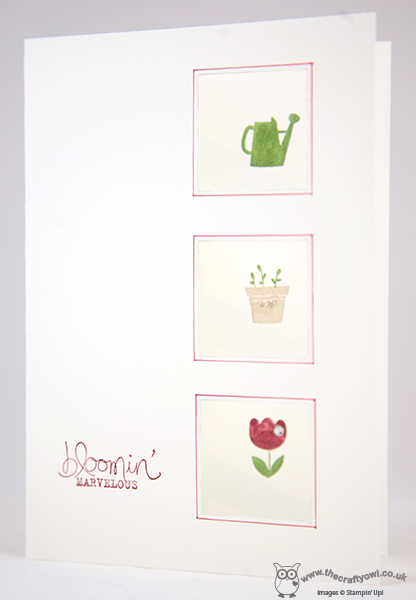
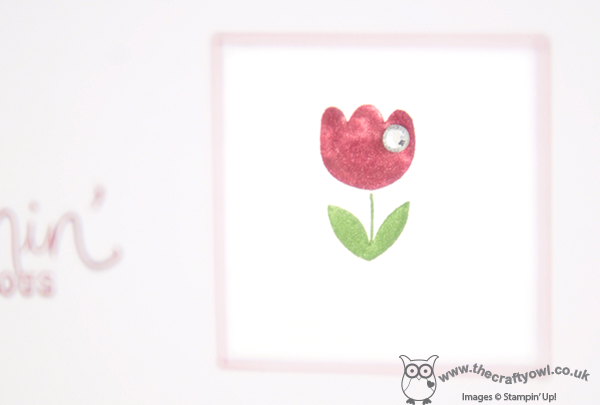
In order to achieve a 'false' layering effect, the three stamped images are on the 'inside' of the card and pop through the windows at the front which are outlined to give definition. The front of the card is then stamped with the sentiment 'Bloomin' Marvelous' - retired Sale-A-Bration I know, but seemed to fit so well with my gardening pictoral story/theme. Lastly, I added a rhinestone to the tulip in the bottom frame to add interest.
As much as I love simple cards, I do find one layer cards such a challenge! Tomorrow I'll show you another one I made with a similar layout to this one, but with more layers; you can compare and see the difference. Until then, happy stampin'!
Stampin' Up Supplies:
Stamps: Spring Sampler, Bloomin' Marvelous (Sale-A-Bration 2013 - retired)
Cardstock: Whisper White
Ink/Stampin' Write Markers: Raspberry Ripple, Gumball Green, Crumb Cake
Tools: 1 1/4" Square Punch, Stamp-a-ma-jig
Finishing Touches: Basic Rhinestones
by Joanne James6. April 2013 13:42Back to blog normality to day after all the excitement of the last few days - with an earlier post than usual, as my daughter is in a swimming gala this evening so I won't be at my laptop this evening as usual. I've got a pair of cards to share with you today, both of which are one layer cards. I really struggle with one layer cards - with all the lovely cardstock, designer paper, ribbon and embellishments that Stampin' Up! offers, just to use one sheet of card is often impossible! Anyway, I challenged myself to come up with some one layer designs and so using my Spring Sampler set again - LOVE this set! - I came up with this:
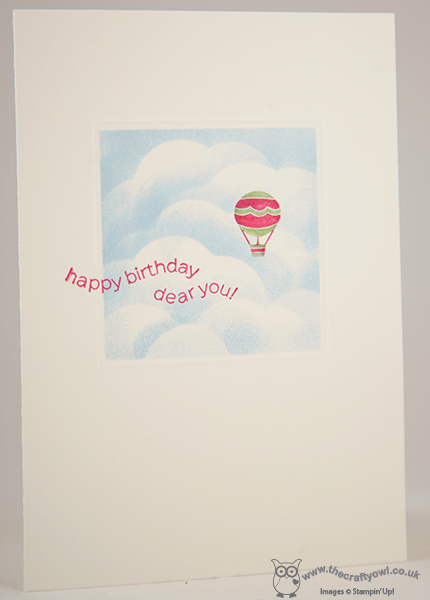
I'm really quite pleased with the result - the clouds give the image lots of interest, even though it's one layer. If you look closely, you'll see that I also scored around the masked image to add depth and definition, allowing the sentiment to 'flow' over the top. The words are from a retired birthday hostess set, but were perfect for this card - they added movement and I think make it look as if the words are being carried on the wind with the balloon. Spurred on by this card, I then made a second one to the same design but using the kite stamp in the Spring Sampler set:
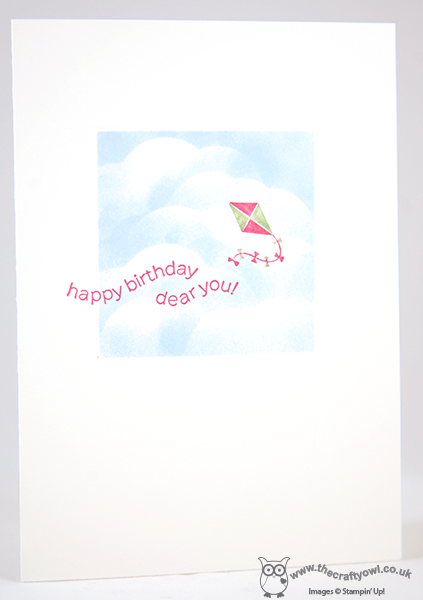
The scored line is more difficult to see on this one - photographing almost wholly white cards also presents something of a challenge, but you get the idea I'm sure. You could also use the Bitty Banners set for a wavy sentiment, although when I tried one I couldn't resist cutting it out and putting it on a dimensional - so no longer a one but two layer card!
Hope you like this pair of cards - I really like them and they spurred me on to consider other one layer options and not be put off by one layer cards in the future. I'm off to get ready for the gala; back tomorrow with more stamping loveliness, but until then - happy stampin'!
Stampin' Up Supplies:
Stamps: Spring Sampler, Happiest Birthday Wishes (hostess - retired)
Cardstock: Whisper White
Ink/Stampin' Write Markers: Rose Red, Wild Wasabi, Bashful Blue
Tools: Simply Scored