Window Box Thinlit Gift Box And The Benefits Of Crafting Together

by Joanne James8. May 2017 20:00

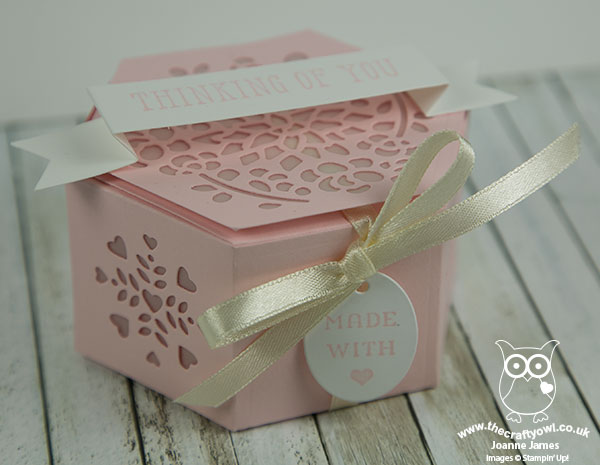
As promised on Friday (Saturday was consumed with homework, swimming and the first cricket match of the season - goodness, doesn't that game go on FOREVER?!! - so I didn't get to post this the as planned), today I'm sharing with you another of the makes from one of last month's technique classes, featuring the Window Box Thinlits dies. In addition to using them to make the birthday card I shared on Friday and an Easter basket, we also made a box with the thinlits and one of the decorative pieces. Here is our finished box:


Here's the low-down on today's project:

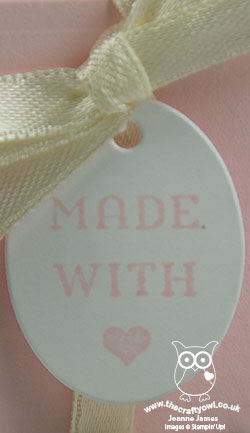
Window Box Thinlits - The Window Box Thinlits make the most adorable hexagonal box that is incredibly versatile. It can be used as packaging for a small gift or would be the perfect size for a wedding favour; it also makes a beautiful table decoration if you place a battery-operated tealight inside and looks lovely if a number of them are clustered together in this way. You can build it plain, decorate with designer series paper or use the selection of cutout dies to give extra pattern to the side and top panels. The box above has the side panels cut out and backed with vellum, along with a layered vellum backed top, so that the ribbon tie sits below the vellum panel and allows the sentiment banner to sit neatly across the top of the box.

So Much More Than A Box - The Window Box Thinlits are so much more than a standard box though. This versatile thinlit die set can also be used to make other items, such as sail boats and baskets, and can be used to create alternative boxes in different shapes and sizes too. The benefit of featuring this set in a class is that you can demonstrate and show the class participants how to do the slightly more unusual things in a hands-on way and be there to answer their questions and queries as you go. It's also a good opportunity to ensure everyone understands what each thinlit piece is for, any hints and tricks and sometimes how to avoid common pitfalls when using the item in question.

Love What We Do, Share What We Love - Stampin' Up!'s Statement of the Heart is "To love what we do and share what we love, as we help others enjoy creativity and worthwhile accomplishments ... in this we make a difference". There are many ways as a demonstrator that this can be achieved and I'm someone who loves to share my projects in a variety of ways. I love the 'art' of blogging (I find it relaxing and in many ways a kind of free therapy!) and sharing my projects with you, but in the online world not everyone who reads my blog or sees my projects on Pinterest or other social media channels leaves feedback or a comment to say what they think. That's one of the things I love about face-to-face classes - the feedback is immediate and it is instantly gratifying to share my love of Stampin' Up! with those that attend my classes and see them leave at the end of a session having learned lots, made some beautiful things and be brimming with ideas of how they can use their Stampin' Up! purchases to bring them continued and lasting crafting pleasure. There's nothing quite like it! 

I would love to see you at one of my classes and share my knowledge and experience of how to get the best from your Stampin' Up! products 'up close and personal'. You can see the current list here but do check back regularly for updates as new classes are added from time to time and will be updating shortly with a new set of classes featuring new items from the new 2017-18 Annual Stampin' Up! Catalogue. 

Here is the visual summary of the key products used on today's project for you to pin for easy reference:


You can see all of my 'How To' summaries on my 'How To - Tips and Techniques' Pinterest board in case you've missed any. 

I'll be back tomorrow with another project. Until then, happy stampin'!


Stampin' Up! Supplies Used:

Table built using Product Table Builder by The Crafty Owl - Independent Stampin' Up! Demonstrator.

Window Box Thinlits Happy Birthday Candle Card

by Joanne James5. May 2017 20:00

Did you miss me? I've been away from my blog this week simply because, well, life got in the way! I've been busy preparing for a big team training event that I'm hosting the weekend after next and I've had preparation for next week's classes to take care of, so whilst I've content prepared for both that I will share in due course, I seem to have struggled to find the time to write any posts.

Anyways, I'm here a little earlier this evening and thought I would share with you one of the makes from one of last month's technique classes, featuring the Window Box Thinlits dies. In addition to using them to make an Easter basket and a pretty box, we also made a simple card that featured the co-ordinating Window Shopping stamp set and one of the decorative pieces. Here it is:


The card features the bright colours that are a feature of the candle-printed designer series paper from the Party Animal Suite: Tangerine Tango, Pacific Point, Emerald Envy, Crushed Curry. A bold happy birthday sentiment, along with a Stitched Framelit square that w as run through the Big Shot for a second time with the candle die from the Window Box thinlit set form the basis of the central panel. Wondering how I coloured my candles? I used Party Animal Washi Tape, just running a few strips across the base before adding the diecut popped up on dimensionals. You can see the detail more closely here:


This is one of those 'go to' cards - quick and easy to put together and in this colour combination pretty much suitable for anyone. A great standby card or one to make if you're short on time and need a card in a hurry!

I'm so glad that the Window Shopping stamp set and Window Box Thinlits are carrying over into the new annual catalogue - they are so useful. The current discounted bundle price won't carry over though, so if you would like get the 10% bundle discount for purchasing before products, be sure to purchase before the end of May.

Here is the visual summary of the key products used on today's project for you to pin for easy reference:


You can see all of my 'How To' summaries on my 'How To - Tips and Techniques' Pinterest board in case you've missed any. 

I'll be back tomorrow with one of the other projects from last month's technique class featuring the Window Box Thinlits. If you live in or around Northampton, I would love to see you at one of my classes. You can see the current list here but do check back regularly for updates as new classes are added from time to time. Until tomorrow, happy stampin'!


Stampin' Up! Supplies Used:

Table built using Product Table Builder by The Crafty Owl - Independent Stampin' Up! Demonstrator.

Mini Catalogue

BROWSE THE CATALOGUE

The mini catalogue is now live! Read and download your copy here.

Shop Online

Access my online shop 24 x 7, 365 days of the year:

Current March hostess code:

S9F2XJJW

Shop Online

Join My Team

It's always a great time to join Stampin’ Up! New team members can get £130 worth of products for only £99 + free business supplies + free shipping + all the fun being a part of Stampin’ Up! Stampin' Up! has something for everyone: join my growing team and benefit from my support to enjoy Stampin' Up! however you choose.

If you're interested, call me for a chat to understand how I can help you realise your goals. Alternatively, if you have already decided to sign up and you just can't wait, please click here for the link to the online form where you can sign up and order your starter kit right away! 

Latest Kit!

Stampin Cut and Emboss

The Rock Legend Kit has all you need to make 8 cards with coordinating envelopes. Along with the new Panda Friends Kit, both are available from January 4th for just £14 each - get yours here!

2023-24 Annual Catalogue

BROWSE THE CATALOGUE

Click on the catalogue for a full list of current SU! supplies - if you would like to order any of the items featured, please drop me a line at [email protected] or give me a call on 07773 421446 - I'd be happy to help.

New Online Exclusives

There will be new products available exclusively in the online store from 5 March - check them out here.

About Me

Hi I'm Joanne and live in Northampton and when I'm not looking after my husband and two beautiful children, am an avid crafter with a passion for all things Stampin' Up!

I must confess that I have never been a big rubber stamper - until I discovered Stampin' Up! that is. I love the fact that I can get such great results with co-ordinating stamps, inks, papers and punches - the possibilities are endless! Join me on my stamping journey as I share the things I love and be inspired to create amazing things yourself!

Follow Me

Monthly Newsletter

Box Builder

Click the button above to use Box Buster to create your custom box design using the Envelope Punch Board!

Kits Collection Now Available!

Stampin Cut and Emboss

The new Kits Collection from Stampin' Up! is now available!

Click here to see the current kits available and order yours online today.

I Design For


Stampin' Up Stuff

This is my personal blog and is not endorsed by Stampin’ Up! I hope you find it a plentiful source of ideas and personal inspiration but please don't copy my designs for contest submission or use for classes, publication or sale without express permission.