Watercolour World Adventure Awaits AYSI300

by Joanne James2. June 2023 12:00

Today I'm sharing my design team card for our new challenge over at As you See It where we have a special challenge for you - we are celebrating our 300th challenge! It's theme week and our wonderful leader Heather C has chosen the theme of 'adventure' for our milestone challenge:


I was inspired by the patriotic red, white and blue colours of the Card Concept and the sketch over at Try Stamping on Tuesday to create my clean and layered card - take a look:


Here's the low-down on today's card:

Today's card uses a combination of 'something old (retired), something carried over and something new': my something new is those Nested Essentials Dies again, where I used one to create the aperture in my vellum layer to 'frame' my map, courtesy of the background stamp 'Watercolour World'. I  bordered it with a thin strip of red and white stripes and finding nothing in my current stash that has an adventure theme or wording, I finished my card with a sentiment made from a retired Sweet Silhouettes die and the 'Let's Set Sail' stamp set:

I really like the effect of the vellum frame - a great way to focus on the map, without the frame obscuring the detail. A great tip when you use vellum in a frame in this way is to cut your piece wider than you need and wrap it around the layers below and adhere firmly on the reverse. This way your vellum layer stays in place, without there being any unsightly visible glue on the front of your card.

A simple layered card that I will keep ready for when one of the many teenagers I know announces they are heading to foreign parts for a gap year adventure.

Here is the visual summary of the key products used on today's project for you to pin for easy reference:


You can see all of my 'How To' summaries on my 'How To - Tips and Techniques' Pinterest board in case you've missed any. 

What does the theme of adventure mean to you? Why not make a project and share it with us for our current challenge. Since we are celebrating, there will be 6 winners this week, one chosen by each member of the Design Team and each will be eligible to receive a prize from Stampin' Up! or Clarity.

Here's a summary of our challenge rules:

  • Create any card, scrapbooking page, 3D project or packaging project that fits the challenge.
  • Please include the challenge graphic and link back to the challenge in your blog post. Turn off word verification so we can leave you lots of lovely comments. Make sure you link the post not the whole blog to the Linky. Use #AYSIXXX when uploading to a public gallery.
  • If you’re unsure about ‘the rules’, check the details under the Challenge Guidelines tab on the As You See It Challenge homepage.
We look forward to seeing your creations in the AYSI gallery.

Enjoy your day and I'll be back tomorrow with another project. Until then, happy stampin'!


Stampin' Up! Supplies Used:

Table built using Product Table Builder by The Crafty Owl - Independent Stampin' Up! Demonstrator.

Sailing Home Slimline Congratulations Card PP543

by Joanne James30. May 2021 09:00

Today it's Sunday and time for this week's new challenge over at The Paper Players! It's the turn of the fabulous LeAnne to host this week and as it's the fifth Sunday of the month we have a tic-tac-toe challenge board for you to work with:


I went down the first column of our TicTacToe board with blue/die-cut/heat embossing and decided to use Jen's Freshly Made Sketches layout and make another slimline card that was totally inspired by the fabulous nautical photo over at The Card Concept - take a look: 


Here's the low-down on today's card:

Sailing Home - I took the inspiration for my 'clean and layered' card from The Card Concept's great nautical inspiration photo this week, specifically the cushion at the top of the photo, with the blue and red stripes on cream. I incorporated these into my design but decided to change out the anchor for the sailboat that features on the central cushion as it fitted better with my sentiment, as I wanted to make a congratulations/good luck for the future-type card. I heat-embossed the large sailboat from the 'Sailing Home' stamp set in white on Night of Navy then diecut it with my Come Sail Away dies. A 'thank you' too to the team over at The Card Concept for choosing this card as one of their Honourable Mentions recently and for their kind comments on a card that felt quite out of my comfort zone but was totally inspired by their awesome photo!

A Beautiful World - For my sentiment I used both the retired stamp set 'Beautiful World' and paired it with one of my favourite diecuts from the retired Summer Silhouettes dies - the long, slimline design is perfect for showcasing the long 'adventure' diecut, which I cut a couple of times and glued together for added height. I also added another stamped greeting from the same stamp set to the inside of my card:

A Cautionary Tale - So I'm sure you are looking at today's card and thinking it came together really quickly; to be fair, if I made a second one it probably wouldn't take long at all. For this one that was not the case though! I spent quite a bit of time deciding on which nautical elements to incorporate on my card and then just as I had everything stuck together, I decided my card needed a little something extra so decided to add a trio of stamped gulls. And that was where the disaster happened! I missed one part of one of the gulls, and then slipped with my stamp-a-ma-jig when I went back in to correct. So what to do? Luckily I managed to remove the top vanilla panel with some dental floss (such a craft room life-saver!) and then I removed the top portion and replaced with another one, with birds correctly stamped before I glued into place. Crisis averted - and let that be a lesson to you: don't glue everything down until you are completely sure your stamping is complete! I do like the addition of the birds though, so it was worth it:

This is one of those cards that I would not have made without the photo that inspired it, but I love it! What do you think? Do you like the current trend for slimline designs? Do leave me a comment below, I'd love to hear your thoughts.

Here is the visual summary of the key products used on today's project for you to pin for easy reference:


You can see all of my Product and 'How To' summaries on my 'How To - Tips and Techniques' Pinterest board in case you've missed any. 

Before you reach for your ink and papers, check out what our amazing team has created to inspire you this week:

Here's a quick recap of our challenge rules:
 
1.  Create a new paper project
2.  Upload your creation to your blog with a link back to us and provide a direct link to the post featuring your challenge submission.
3.  Please link your card to no more than four challenges, TOTAL.
4.  Have FUN!

You can see all of my 'How To' summaries on my 'How To - Tips and Techniques' Pinterest board in case you've missed any. 

Enjoy your day; I am looking forward to spending some time in the garden today as we are enjoying some warmer weather here in the UK for a change - it bodes well for our Bank Holiday weekend for sure. I'll be back tomorrow with another project. Until then, happy stampin'!


Edited to add: I was the Challenge Winner over at The Card Concept with this card!

Stampin' Up! Supplies Used:

Table built using Product Table Builder by The Crafty Owl - Independent Stampin' Up! Demonstrator.

Back To School CAS Inspiration PP504

by Joanne James16. August 2020 09:00

Today it's Sunday and time for this week's new challenge over at The Paper Players! It's the turn of the amazing Claire to host this week and she has a timely Clean and Simple challenge for you to work with:


Back to school is still a few weeks away here in the UK, but I'm all for getting organised! Hopefully the Juniors will be returning to school properly; this is a big year for us, with one about to embark on GCSEs and the other moving schools for the start of year 9. So I have a couple of cards to share with you today, each made with them in mind. Here's the first one, that was inspired by the current sketch, colours and photo over at Sugar Pea Designs:


I used the sweet image of a young lady reading a book whilst sheltered under a tree from the annual catalogue hostess set, 'Summer Days', and coloured with my Blends in the likeness of Miss Rebecca, before cropping with my (retired) Circle Framelits and mounting on a Night Of Navy card base, with a Cherry Cobbler banner piece tied with some twine from my stash. The sentiment on the front of my card is from the 'Rooted In Nature' stamp set and I used another stamp from this set to complete the inside of my card:


My second card uses this week's Freshly Made Sketches layout from Jen B where I challenged myself to embrace the diagonal and got creative with my diecut sentiment - take a look:


I added a 'd' from the 'adventure' die and added it to the 'inspire' die in the Sweet Silhouettes set and combined with a 'be' from the Rooted In Nature set to create my sentiment and backed it with a black strip for a chalkboard effect, then anchored it with a stamped and punched red apple that I added a couple of clear epoxy dots too for a little shine:


And I finished off the inside with an inspirational quote from the 'Silhouette Scenes' stamp set: 


Here is the visual summary of the key products used on today's projects for you to pin for easy reference:


You can see all of my Product and 'How To' summaries on my 'How To - Tips and Techniques' Pinterest board in case you've missed any. 

Before you reach for your ink and papers, check out what our amazing team has created to inspire you this week:

Here's a quick recap of our challenge rules:
 
1.  Create a new paper project
2.  Upload your creation to your blog with a link back to us and provide a direct link to the post featuring your challenge submission.
3.  Please link your card to no more than four challenges, TOTAL.
4.  Have FUN!

You can see all of my 'How To' summaries on my 'How To - Tips and Techniques' Pinterest board in case you've missed any. 

Enjoy your day; we have no special plans today and the weather is looking pretty poor, so I think it will be baking and board games for us! I'll be back tomorrow with another project. Until then, happy stampin'!


Stampin' Up! Supplies Used: 

Table built using Product Table Builder by The Crafty Owl - Independent Stampin' Up! Demonstrator.
 
 
Table built using Product Table Builder by The Crafty Owl - Independent Stampin' Up! Demonstrator.

Sweet Silhouettes Go In The Direction Of Your Dreams

by Joanne James27. July 2020 07:00

Happy Monday everyone! It's the start of a new week and I am here with a card using some 'oldie but goodie' products from the annual catalogue for a couple of challenges:

Tic-Tac-Toe Challenge   

I went down the centre of The Paper Craft Crew's TicTacToe board - watercolour background, favourite colour (Melon Mambo Pink), Anything But Floral - and whilst I don't have any fairground-related stamps, was totally inspired by those pink swings in the Just Us Girls photo - take a look:


Here's the low-down on today's card:

Sweet Silhouettes - I diecut a tree using my Sweet Silhouettes Dies for the uppermost layer on my card and cut it first so that I could check my positioning even though I added it last. I snipped a small branch off the left hand side in order to enable my card to still fit in a standard envelope when complete.

In The Pink - Melon Mambo is one of my favourite pink colours and I thought it would be the perfect colour for a feminine, watercoloured background behind my swinging girl. I also added a touch of Magenta Madness to the top of the panel to emphasise the ombre effect of my panel and used a Melon Mambo card base. Once my watercoloured panel was dry, I spritzed it liberally with shimmer spray; it's difficult to see on the main photo but give this card such a beautiful lustre - you can see it a little better on the image below:


Silhouette Scenes - To compliment my pink background, I used my Stamparatus to add a well-inked stamp of the young girl on her swing. I stamped it a few times to get a good solid image; the slight flecking is due to the texture of the watercolour paper which prevents a truly solid print being achieved. I also stamped a suitable sentiment from the same set below and added a few sequins to further compliment the pink.

This card is heading to a valued member of my team who is constantly striving and reaching for bigger and better things - I hope she likes it!

Here is the visual summary of the key products used on today's project for you to pin for easy reference:


You can see all of my 'How To' summaries on my 'How To - Tips and Techniques' Pinterest board in case you've missed any. 

Enjoy your day; I have an online class today amongst other things so today will be a busy one! I'll be back tomorrow with another project. Until then, happy stampin'!


Stampin' Up! Supplies Used:

Table built using Product Table Builder by The Crafty Owl - Independent Stampin' Up! Demonstrator.

Tags: , , , , ,

Cards | Shop Online | Shop Stampin' Up! Online | Stamping

A Mountain Air Adventure Times Two TTT 74

by Joanne James23. July 2020 18:00

It's Thursday and time for a new challenge over at TicTacToe! It's the turn of Team X to host this week and I am the featured designer. This is the fun board that we are playing along with: 


I decided to go long and skinny with today's card and went both across the first row - mountain/sunshine/adventure - and down the first column - mountain/hot air balloon/pink and create a summer evening landscape - take a look:


Here's the low-down on today's card:

Brayered Sunset - I started by taking a selection of inks and a sponge brayer to create my sunset sky. I masked a space for my sun and after stamping in my mountains reverse-masked the mountains and sky and sponged in my dark pink setting sun.

Mountain Air - I used the mountains from the 'Mountain Air' stamp set to create my mountain landscape. This is an interesting set of reversible stamps that I initially bought for scrapbooking as you can make great scenes with them, but they also work for cards and especially the 'long and skinny' design that is all the rage currently. I created depth by stamping off and only adding the detailing to the foremost layer. I used a combination of blues to create a silhouette-type feel and stamped in a trio of hot air balloons from the retired 'Above The Clouds' stamp set in blue too to add to the effect.

Sweet Silhouette Adventure - I added a diecut 'adventure' from the Sweet Silhouettes Dies set to the front of my card as it seemed to fit with my scene. This would be a great card to send to someone about to embark on a gap year who is planning to travel; I'm not sure there are any teens able to do this currently, so will have to add this to my box for the future when we can all move more freely again. In the meantime, we can but dream of adventures far and wide!

I actually created a couple of brayered backgrounds whilst I was getting inky, so here's a second, slightly smaller card with the same design and a more pink sky:

Finally here's both of my cards together - which one do you prefer?

Here is the visual summary of the key products used on today's project for you to pin for easy reference:


You can see all of my Product and 'How To' summaries on my 'How To - Tips and Techniques' Pinterest board in case you've missed any. 

A tictactoe board offers so many creative possibilities - how does this week's board inspire you? Why not have a go? We would love to see you in the gallery and who knows - you might be selected for Designer's Choice and be eligible to be a guest designer on a future challenge. 

Enjoy your evening; I'll be back tomorrow with another project. Until then, happy stampin'!


Stampin' Up! Supplies Used: 

Table built using Product Table Builder by The Crafty Owl - Independent Stampin' Up! Demonstrator.

Delightfully Detailed Forever Wedding Card

by Joanne James18. May 2020 07:00


Monday already - where does the week go?! I meant to blog this card last Friday and the end of the week simply ran away from me. Anyway, today I'm sharing a card that I made for this week's Less Is More Challenge and the current challenge over at Addicted to CAS:


Yes, LIM wanted cards in cream and white and Addicted to CAS have the code word of flower. I have done all-white type cards before and these are always a challenge. I haven't managed to play along over at Less Is More in a while so thought this would be a good time to remedy that - take a look at what I created:


Here's the low-down on today's card:

A Laser Cut Cheat - I used some retired Delightfully Detailed Lasercut Specialty Paper for my showcase floral flourish on today's card. It's white on one side and vanilla on the other. For today's card, I used the white side against a vanilla card base and snipped a piece to the size I wanted from a larger 12" x 12" sheet. This paper is still available on the Clearance Rack (just click on the link below) if you would like to recreate my card.

It's All About Texture - When using only shades of cream and white, I find texture plays an important role in creating interest, whilst maintaining a clean and simple feel. So in addition to my laser-cut floral flourish, I embossed my card base with the Subtles Embossing Folder and added a simple diecut sentiment from white sparkle glimmer paper for added interest. 

Inside Reversal - I added another piece of laser-cut paper inside my card, this showing the reversed side so that the vanilla shows up against the white lining. I stamped my sentiment in Sahara Sand to maintain the neutral feel: 


Here is the visual summary of the key products used on today's project for you to pin for easy reference:


You can see all of my 'How To' summaries on my 'How To - Tips and Techniques' Pinterest board in case you've missed any. 

I do have another card to share today so I'll be back with that later! Until then, happy stampin'!


Stampin' Up! Supplies Used:

Table built using Product Table Builder by The Crafty Owl - Independent Stampin' Up! Demonstrator.

Mirrored Lily Pad Inspire Card

by Joanne James4. February 2020 21:00

I've had a super busy day today but I did manage to finally find time this evening to photograph a card I made last week for the current challenge over at Fusion so wanted to share that with you:

I took my inspiration from the sketch and the photo - albeit minus the cute critter! - with my green and yellow floral combination - take a look:


Here's the low-down on today's card:

Lovely Lily Pad - I thought a couple of yellow lilies would be a fun way to incorporate both a yellow flower and the sketch, so I stamped them in Mango Melody onto Daffodil Delight cardstock and placed them to mirror each other behind the sentiment. All the better for being a FREE stamp set too - one that can be yours with any Stampin' Up! purchase of £45.

Lily Pad Dies - This card has lots of layers courtesy of the Lily Pad Dies, another Sale-A-Bration product that you can earn FREE, this time with a £90 purchase. So worth it though - check out the dimension on those layered petals and the lovely border die too:


A Silhouette Sentiment - I finished my card with a sentiment diecut from the Sweet Silhouettes Die set, in black for a contrast. I really like this sunny card; I made it especially to send to someone who inspires me every day so the sentiment really does say it all.

Here is the visual summary of the key products used on today's project for you to pin for easy reference:


You can see all of my 'How To' summaries on my 'How To - Tips and Techniques' Pinterest board in case you've missed any. 

Enjoy your evening and I'll be back tomorrow with another project. Until then, happy stampin'!


Stampin' Up! Supplies Used:

Table built using Product Table Builder by The Crafty Owl - Independent Stampin' Up! Demonstrator.

Tags: , , , , , , ,

Silhouette Scenes Brother Birthday Card PP454

by Joanne James11. August 2019 09:00


Today it's Sunday and time for this week's new challenge over at The Paper Players! It's the turn of the lovely Jaydee to host this week and she has an interesting colour challenge for you to work with:
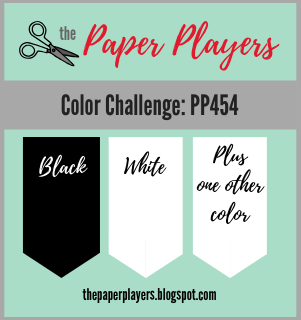
    

I had an idea of I wanted to do with this week's colour palette and the sketch from TGIF Challenges was just what I needed to turn my idea into a reality (although I made my base horizontal rather than vertical and used an extra-large card base) - take a look:
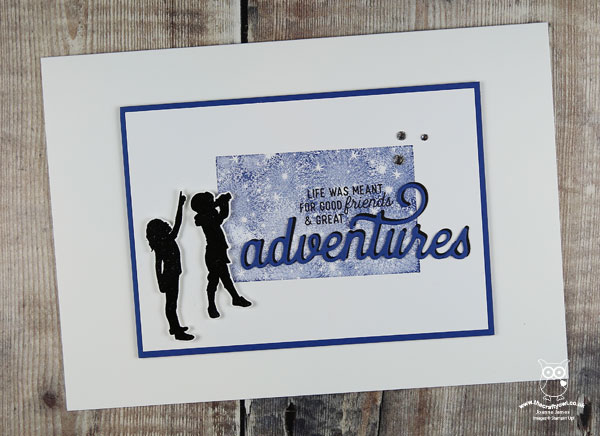
 

Today is a special day in the James household: the youngest of the James Juniors celebrates his 12th birthday. I'm not sure where those years have gone, but I did need as a result need a couple of special birthday cards to celebrate. Today's card is the card I made for Ben from Rebecca and features Blueberry Bushel as my featured additional colour. Here's the low-down on today's card:

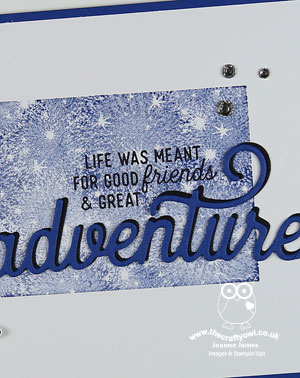
When Is An Adventure Not An Adventure? - The two figures on today's card from the Silhouette Scenes stamp set so remind me of Ben and Rebecca. I can honestly say they truly are each others best friends and always have been. Even as they approach their teens, they still enjoy each others company more than anyone else's - and I love that about them! So it seemed only right to feature them together on my card. I could have stamped the sentiment 'as is', however I wanted to feature the 'adventure' diecut to tie in with the sketch - but I needed it in the plural. Luckily for me, the Sweet Silhouettes dies also incude the word 'inspire' - so I diecut this too, snipped away the letter 's' and paper-pieced it seamlessly to my 'adventure'. Clever, right? :-) I diecut both twice, once in Blueberry Bushel and again in Basic Black and offset this one behind; this allows the diecut to stand out from the background a little better.

A Starry Sky - Since I only had one colour to pair with my black and white, a sponged or brayered sky wasn't really an option. The starry stamp in the 'Bokeh Dots' set came to the rescue; the distinktive nature of this stamp meant that even with one colour, there would be enough variation to create interest. 

Sisterly Love - Lastly, not content with my tinkering of sentiments, I did the same on the inside. Do you recognise this sentiment from an existing stamp set? I'll give you a clue - it's in the 'A Wish For Everything' stamp set, but it doesn't look quite like this:
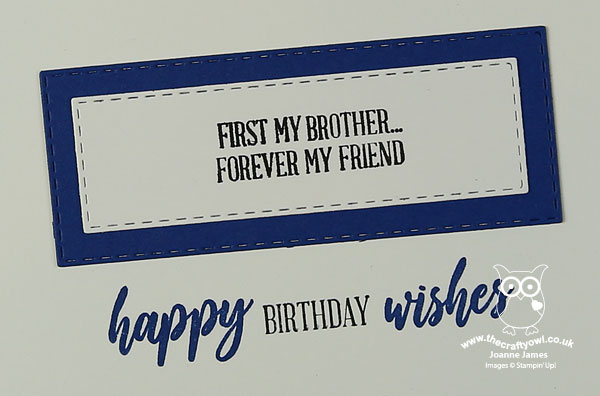
 

Did you spot it? I took the stamp that reads 'First my Mother...forever my friend' and masked out the 'Mo' of Mother and replaced it with the 'Br' from another stamp in this set that reads 'Hope this new year is filled with promises of many bright tomorrow's':


It took a little while to ink and mask with my Stampin' Write marker, but I'm really pleased with the result. Do you look for opportunities to create your own customised sentiments out of your stamp collection when you don't have the perfect fit? Do share any that you've created - I'd love to know what other combinations there are.

Here is the visual summary of the key products used on today's project for you to pin for easy reference:
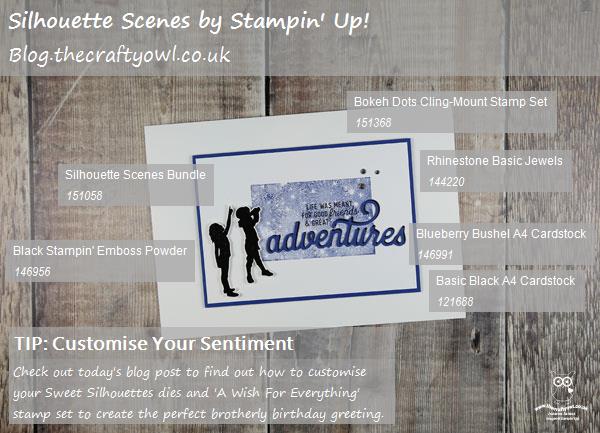
 

You can see all of my Product and 'How To' summaries on my 'How To - Tips and Techniques' Pinterest board in case you've missed any. 

Before you reach for your ink and papers, check out what our amazing team has created to inspire you this week:

Here's a quick recap of our challenge rules:
 
1.  Create a new paper project
2.  Upload your creation to your blog with a link back to us and provide a direct link to the post featuring your challenge submission.
3.  Please link your card to no more than four challenges, TOTAL.
4.  Have FUN!

You can see all of my 'How To' summaries on my 'How To - Tips and Techniques' Pinterest board in case you've missed any. 

Enjoy your day; we will be celebrating with cake, an escape room outing and a best friend sleepover - wish me luck! I have my monthly technique class tomorrow but I'll be back tomorrow with another project. Until then, happy stampin'!


Stampin' Up! Supplies Used: 

Table built using Product Table Builder by The Crafty Owl - Independent Stampin' Up! Demonstrator.

New Online Exclusives

There are new products available exclusively in the online store from 5 November - check them out here.

Latest Kits!

Stampin Cut and Emboss

The Layered Landscapes Kit and Nature's Paintings Kit are the latest kits in the online store - get yours here!

Shop Online

Access my online shop 24 x 7, 365 days of the year:

Current November hostess code:

9NKXDTTR

Shop Online

Mini Catalogue

BROWSE THE CATALOGUE

'Tis The Season - the new Stampin' Up! Mini Catalogue is here! For more details and to download your copy click here

Scrapbooking

Stampin' Up! has introduced a new range of 12x12" scrapbooking product and kit - the full range is now available to purchase online. To download a copy of the new digital Scrapbooking Catalogue click here.

2024-25 Annual Catalogue

BROWSE THE CATALOGUE

Click on the image to download your copy of the 2024-25 annual catalogue. For a full list of current SU! supplies, go to my online store. If you would like any help or advice, please drop me a line at joanne@thecraftyowl.co.uk or give me a call on 07773 421446 - I'd be happy to help.

Join My Team

It's always a great time to join Stampin’ Up! During October you can get even more in your starter kit! New team members can get £160 worth of products for only £99 + free business supplies + free shipping + all the fun being a part of Stampin’ Up! Stampin' Up! has something for everyone: join my growing team and benefit from my support to enjoy Stampin' Up! however you choose.

If you're interested, call me for a chat to understand how I can help you realise your goals. Alternatively, if you have already decided to sign up and you just can't wait, please click here for the link to the online form where you can sign up and order your starter kit right away! 

About Me

Hi I'm Joanne and live in Northampton and when I'm not looking after my husband and two beautiful children, am an avid crafter with a passion for all things Stampin' Up!

I must confess that I have never been a big rubber stamper - until I discovered Stampin' Up! that is. I love the fact that I can get such great results with co-ordinating stamps, inks, papers and punches - the possibilities are endless! Join me on my stamping journey as I share the things I love and be inspired to create amazing things yourself!

Follow Me

Monthly Newsletter

Box Builder

Click the button above to use Box Buster to create your custom box design using the Envelope Punch Board!

Kits Collection Now Available!

Stampin Cut and Emboss

The new Kits Collection from Stampin' Up! is now available!

Click here to see the current kits available and order yours online today.

I Design For


Stampin' Up Stuff

This is my personal blog and is not endorsed by Stampin’ Up! I hope you find it a plentiful source of ideas and personal inspiration but please don't copy my designs for contest submission or use for classes, publication or sale without express permission.