Mini Gingerbread And Peppermint Christmas Greetings CCS 432

by Joanne James10. August 2021 12:00

This week's challenge is a sketch challenge and Bhavya has asked that we use four images stacked vertically, interspersed with a sentiment. Feel free to flip or rotate the sketch when making your card.


My card today was completely driven by the need to find four images and a sentiment that would fit on a card front; that and my current phase of fussy-cutting images from designer paper! Here's what I came up with:


Here's the low-down on today's card:

Super simple this one! I fussy cut four of the mini gingerbread images from the Gingerbread and Peppermint designer series paper, along with a base from the same pack to give a little border on each side, and stacked them on dimensionals, interspersing with a sentiment stamped in Real Red taken from the Poinsettia Petals stamp set:


That's all there is to it - super simple and very little stamping too!

Here is the visual summary of the key products used on today's project for you to pin for easy reference:


You can see all of my 'How To' summaries on my 'How To - Tips and Techniques' Pinterest board in case you've missed any. 

As a reminder, for our colour challenges, you must use all of the stated challenge colours. You may also use neutral colours; however, the challenge colours should be the most noticeable ones featured on your card. We use Stampin' Up! color names for reference, but you are welcome to use any other companies' products as long as you match the challenge colours as closely as possible.

This is a big week in the James household, so blogging will be a little less frequent than usual. Today my nephew received his A Level results: an A and two A*s, which he is thrilled with and is testament to his hard work and effort in recent months. Tomorrow it is the turn of the James Junior who turns 14 - we have some exciting surprise birthday celebrations planned which I will share later in the week! Enjoy your day and I'll be back tomorrow with another project. Until then, happy stampin'!


Stampin' Up! Supplies Used:

Table built using Product Table Builder by The Crafty Owl - Independent Stampin' Up! Demonstrator.

Festive Foliage Red and White Split Panel Christmas Card Times Two

by Joanne James28. July 2021 17:00

Today I have a couple of festive Christmas cards that I made using my favourite 'Festive Foliage' background stamp from the annual catalogue - here's the first one:


I stamped one background stamp in Real Red on Basic White and another in Versamark onto Real Red cardstock and heat embossed it in white, then split the panels and swapped them so that there is one of each on each card for contrast. Here's the second one:


I added a sentiment from 'Poinsettia Petals' on a label cut with my Tasteful Labels Dies and backed each with some white glittered organdy ribbon from the upcoming mini catalogue:  


Here is the visual summary of the key products used on today's project for you to pin for easy reference:


You can see all of my 'How To' summaries on my 'How To - Tips and Techniques' Pinterest board in case you've missed any. 

I've been looking at creative ways to use background stamps for my upcoming online class in September that features both the 'Festive Foliage' and 'Daisy Garden' background stamps and will look at ways to use them for all-year round cards. A split panel card is a great way to create two cards quickly using the same background stamp, so today's post is a nice taster for my class ladies who are already signed up for this class. If you would like to join them, you can find full details for this and all my online classes on my Facebook Page here or just message me for more information.

I used the sketch over at Inspire.Create and the monochromatic red colour scheme from over at The Rainbow Challenge as further inspiration for my cards today and since I'm still doing Christmas I'm also linking up with Christmas Craft Creations and their 'anything goes' theme.


The weather here has alternated today between brilliant sunshine and torrential downpours and apart from giving up on using the washing line completely, I have successfully managed to get a whole bunch of errands run whilst dodging the rain (mostly!) Since we are on the summer holidays, the children are taking turns to help out with cooking the evening meal. One is more enthusiastic than the other (I wonder if you can guess which one!) Needless to say, if I survive the flour tornado that is currently my kitchen, I will be eating Turkish-style flatbread pizzas for dinner this evening! Enjoy the rest of your day and I'll be back tomorrow with another project. Until then, happy stampin'!


Stampin' Up! Supplies Used:

Table built using Product Table Builder by The Crafty Owl - Independent Stampin' Up! Demonstrator.

Poinsettia Double Fan Fold Christmas Card PP519

by Joanne James29. November 2020 09:00

Today it's Sunday and time for this week's new challenge over at The Paper Players! It's the fifth week of the month and the turn of the amazing Anne Marie to host with a fun TicTaToe challenge board for you to work with:
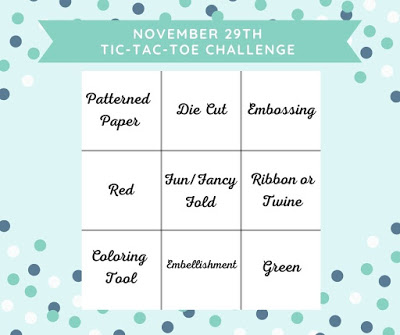
    

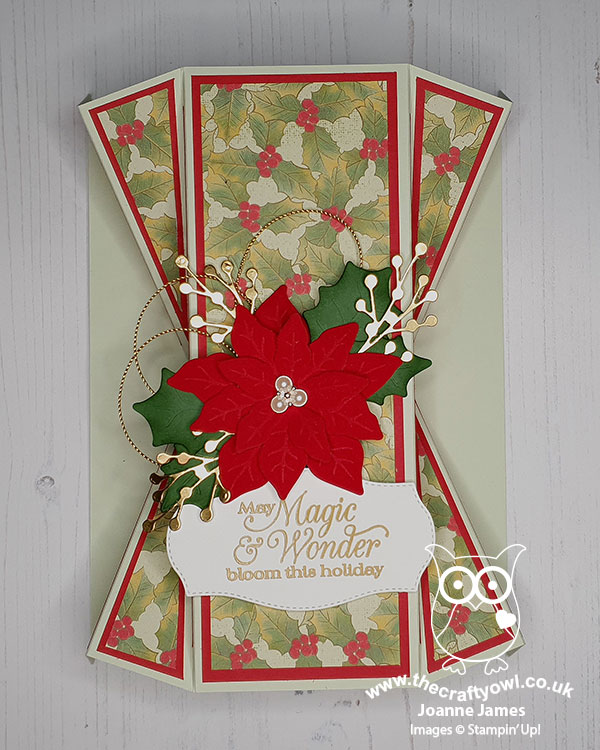
I decided to go all-out with a fancy fold card today and originally was aiming for the central column of the board with diecut - fancy fold - embellishment; by the time I'd finished my card, I had inadvertently covered every square except 'colouring tool'! This card (almost!) has it all - take a look:
 

Here's the low-down on today's card:

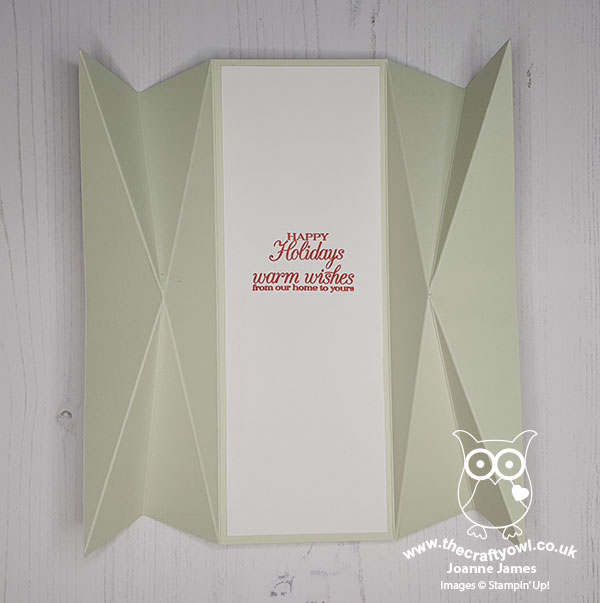
Double Fan Fancy Fold - I chose to make a double fan fancy fold card today as I've seen lots of these doing the rounds this season and for a fancy fold, they really aren't that tricky. I did a little bit of internet searching for a template, but in the end decided to make my own. My card measures 8 1/4" x 9", scored on the vertical at 1 1/2", 3", 6" and 7 1/2" and then scored on the diagonal as shown below. The basic outline is really straightforward - cutting the mats and layers to decorate was a little more time consuming, but worth it as they look lovely when finished. The card then has space on the reverse for the panel that would otherwise have been on the inside:
 

Poinsettia Showcase - I chose my favourite holly paper from the Poinsettia Place pack for my panels and chose to create a single layered poinsettia for my centrepiece. I cut a three layered flower from red velvet paper for my poinsettia using the poinsettia dies and added some holly leaves and gold berry sprigs. The red velvet paper is gorgeous and perfect for a showcase flower such as this - I wish you could feel the texture of it; it embosses beautifully too, as you can see on the close up below:
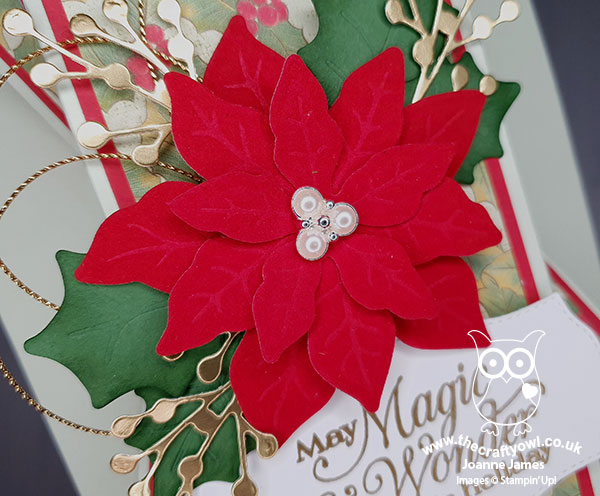
 

Pearls and Shine - I added a beaded pearl embellishment to the centre of my flower for the perfect finishing touch. Combined with the velvet paper, touches of gold foil and twine and gold embossed sentiment, this makes for quite a special Christmas card.

I'm linking my card up over at TGIF Challenges where the theme is 'Have a magical Christmas' (my sentiment was the perfect choice!) and over at SUO Challenges where the theme is also Christmas.

Here is the visual summary of the key products used on today's project for you to pin for easy reference:
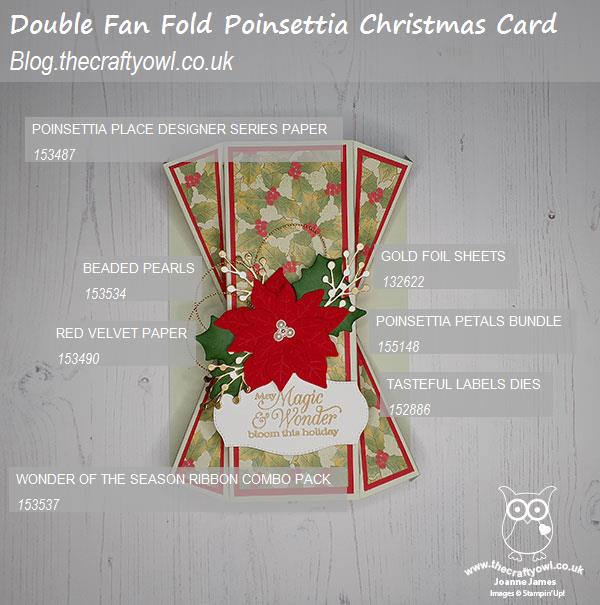
 

You can see all of my Product and 'How To' summaries on my 'How To - Tips and Techniques' Pinterest board in case you've missed any. 

Before you reach for your ink and papers, check out what our amazing team has created to inspire you this week:

Here's a quick recap of our challenge rules:
 
1.  Create a new paper project
2.  Upload your creation to your blog with a link back to us and provide a direct link to the post featuring your challenge submission.
3.  Please link your card to no more than four challenges, TOTAL.
4.  Have FUN!

You can see all of my 'How To' summaries on my 'How To - Tips and Techniques' Pinterest board in case you've missed any. 

Enjoy your day; for the first time ever whilst still in November, I think we are decorating the house for Christmas this afternoon. The James Juniors have been pestering me all week and to be honest I think we could all use a little festive cheer, so decorations it is!  I'll be back tomorrow with another project. Until then, happy stampin'!


Stampin' Up! Supplies Used: 

Table built using Product Table Builder by The Crafty Owl - Independent Stampin' Up! Demonstrator.

Sounds of the Season CAS Christmas Bells PP517

by Joanne James15. November 2020 09:00

Today it's Sunday and time for this week's new challenge over at The Paper Players! It's the turn of the amazing Ann to host this week and she has a timely Clean and Simple challenge for you to work with:


Our theme this week is 'Hooray For The Holidays'. With Christmas just around the corner I decided to go with another card to add to my growing pile, but you could choose Thanksgiving or any holiday you like - as long as your card is clean and simple.  So what do we mean by Clean and Simple?

  • Minimal layers and embellishments
  • Plenty of open space, aka "white" space
  • Simple and uncluttered

I decided to use the Sounds of the Season jingle bells again on my card this week, this week changing from silver to gold and pairing with red for the challenge over at Less Is More. I also used the sketch over at CAS Colours and Sketches which gave me the perfect opportunity to use a die from the Dove of Hope Dies that I haven't been able to find a good use for until now - take a look:


 The die was just perfect to create a couple of lengths of holes to show the gold foil below, to compliment my diecut bells and gold heat embossed sentiment. You can see the detail a little better on the angled shot below - the weather has been so poor here in the UK that I've struggled to photograph the foil without artificial light, which is never as clear as daylight:


A quick clean and simple check:
  • Minimal layers and embellishments with one main focal point - yes
  • Lots of open 'white' (or in my case red!) space - yes
  • Simple and uncluttered - yes
I'd call that a result! 
 
Here is the visual summary of the key products used on today's project for you to pin for easy reference:


You can see all of my Product and 'How To' summaries on my 'How To - Tips and Techniques' Pinterest board in case you've missed any. 

Before you reach for your ink and papers, check out what our amazing team has created to inspire you this week:

Here's a quick recap of our challenge rules:
 
1.  Create a new paper project
2.  Upload your creation to your blog with a link back to us and provide a direct link to the post featuring your challenge submission.
3.  Please link your card to no more than four challenges, TOTAL.
4.  Have FUN!

You can see all of my 'How To' summaries on my 'How To - Tips and Techniques' Pinterest board in case you've missed any. 

Enjoy your day; my day will definitely be spent indoors today, so I'm thinking cooking, crafting and a movie could be the order of the day! I'll be back tomorrow with another project. Until then, happy stampin'!


Stampin' Up! Supplies Used: 

Table built using Product Table Builder by The Crafty Owl - Independent Stampin' Up! Demonstrator.

Plush Poinsettia Specialty Paper Banner Christmas Card

by Joanne James9. November 2020 19:25

Happy Monday everyone! I had a fun card class this morning and encouraged by the ladies on my call (thank you Deborah!), instead of getting on with my household chores this afternoon, whilst the edited recording of my class video was rendering I decided to make a 'quick' card which has resulted in an extra post for today because I used the current Freshly Made Sketches layout so I'm squeezing in a link up:

I'd been mulling over what to feature on Judy's banner element and finally settled on some of the gorgeous Plush Poinsettia specialty paper - take a look:


Here's the low-down on today's card:

This card wouldn't take long at all if I was to make it again from scratch, but I spent ages procrastinating over colours and backgrounds so it ended up taking way longer than it should have! It really is pretty straightforward: a banner of the lovely textured flocked white vellum, popped up on a panel of Real Red and a Whisper White card base, with a white-on-red heat-embossed sentiment from the Poinsettia Petals stamp set on some stitched rectangles, with a final embellishment of some sheer ribbon tied with two tiny (retired) jingle bells from my stash because I felt without it my card, whilst beautifully 'clean', was lacking a little something. 

Here's another view of that gorgeous paper, even though I'm not sure the camera really does it justice:


Here is the visual summary of the key products used on today's project for you to pin for easy reference:


You can see all of my 'How To' summaries on my 'How To - Tips and Techniques' Pinterest board in case you've missed any. 

I'll be back shortly with the post that I actually intended for today! Until then, happy stampin'!


Stampin' Up! Supplies Used:

Table built using Product Table Builder by The Crafty Owl - Independent Stampin' Up! Demonstrator.

Merry and Bright Trimming The Town Christmas Card

by Joanne James28. September 2020 11:47

Happy Monday everyone! Today I'm earlier with my blog post as I was determined to be in time to share my card using Jacquie's sketch over at Freshly Made Sketches this week:

Such a great sketch; so simple yet so many ways you could interpret it! I have actually used this sketch twice this week - you will see it again on Thursday in my TicTacToe Design Team challenge card - but for today's card I couldn't resist creating layers and having some fun with one of my favourite Christmas Designer Series Papers - take a look:


Here's the low-down on today's card:

It's All About Trimming The Town - Today's card is very much all about the designer series paper. And as papers go, the Trimming The Town Designer Series Paper really has it all: cosy villages and winter scenes, whimsical homes and co-ordinating images, many of which can be cut out using the Home Together Dies, and two sheets of festive sentiments in a range of European languages. I used the paper for my snowy background, then used my Home Together Dies to cut out two houses, a wreath and a tree to decorate my card. I even fussy cut a sentiment and added this to my snowdrift. 

Layered Landscape - I decided to focus on creating my scene across the horizontal strip that features on Jacquie's FMS sketch, using two separate Whisper White 'snowdrifts' to add structure and form to my landscape, also cut using the Home Together Dies, then tucked my house in between and added my tree and sentiment to the front. This creates lots of interest and dimension, but in a small horizontal space, which keeps the clean feel of my card. You can see the layers better below:


What No Stamping? - Today's card is essentially a 'no stamping' card; I did stamp a sentiment on the inside and wanted to share it with you since the Coming Home stamp set is an image-only set. I have been trawling my other stamp sets for sentiments for house- and home-related greetings, especially because I am using the Trimming The Town Suite for my Creative Escapes Craft Retreat this weekend and I want to be able to share my suggestions with the ladies attending. The greeting I used inside today's card comes from the Poinsettia Place stamp set:

I'll share others as I use them on my cards in the coming weeks. So what do you think of this paper-based card? Does it tick your box? Do let me know in the comments below - I'd love to hear your thoughts. 

Here is the visual summary of the key products used on today's project for you to pin for easy reference:


You can see all of my 'How To' summaries on my 'How To - Tips and Techniques' Pinterest board in case you've missed any. 

Enjoy your day: I'm doing one of my favourite things, making treats to go out in the boxes with my virtual retreat boxes this weekend. I'll be back tomorrow with another project. Until then, happy stampin'!


Stampin' Up! Supplies Used:

Table built using Product Table Builder by The Crafty Owl - Independent Stampin' Up! Demonstrator.

Scrapbooking

Stampin' Up! has introduced a new range of 12x12" scrapbooking product and kit - the full range is now available to purchase online. To download a copy of the new digital Scrapbooking Catalogue click here.

Mini Catalogue

BROWSE THE CATALOGUE

'Tis The Season - the new Stampin' Up! Mini Catalogue is here! For more details and to download your copy click here

Shop Online

Access my online shop 24 x 7, 365 days of the year:

Current September hostess code:

JQEHTZGK

Shop Online

2024-25 Annual Catalogue

BROWSE THE CATALOGUE

Click on the image to download your copy of the 2024-25 annual catalogue. For a full list of current SU! supplies, go to my online store. If you would like any help or advice, please drop me a line at joanne@thecraftyowl.co.uk or give me a call on 07773 421446 - I'd be happy to help.

Join My Team

It's always a great time to join Stampin’ Up! New team members can get £130 worth of products for only £99 + free business supplies + free shipping + all the fun being a part of Stampin’ Up! Stampin' Up! has something for everyone: join my growing team and benefit from my support to enjoy Stampin' Up! however you choose.

If you're interested, call me for a chat to understand how I can help you realise your goals. Alternatively, if you have already decided to sign up and you just can't wait, please click here for the link to the online form where you can sign up and order your starter kit right away! 

Latest Kits!

Stampin Cut and Emboss

The Christmas Ornaments Kit and Card Keeper Kit are the latest kits that will be arriving in the online store later this month - get yours here!

New Online Exclusives

There are new products available exclusively in the online store from 3 July - check them out here.

About Me

Hi I'm Joanne and live in Northampton and when I'm not looking after my husband and two beautiful children, am an avid crafter with a passion for all things Stampin' Up!

I must confess that I have never been a big rubber stamper - until I discovered Stampin' Up! that is. I love the fact that I can get such great results with co-ordinating stamps, inks, papers and punches - the possibilities are endless! Join me on my stamping journey as I share the things I love and be inspired to create amazing things yourself!

Follow Me

Monthly Newsletter

Box Builder

Click the button above to use Box Buster to create your custom box design using the Envelope Punch Board!

Kits Collection Now Available!

Stampin Cut and Emboss

The new Kits Collection from Stampin' Up! is now available!

Click here to see the current kits available and order yours online today.

I Design For


Stampin' Up Stuff

This is my personal blog and is not endorsed by Stampin’ Up! I hope you find it a plentiful source of ideas and personal inspiration but please don't copy my designs for contest submission or use for classes, publication or sale without express permission.