Floral Boutique Birthday Card

by Joanne James19. September 2016 07:00

Happy Monday everyone! Apologies if you struggled to see my blog yesterday; my web hosting company was undertaking some account migration activity that was supposed to be 'behind the scenes', but resulted in some outages along the way. My website still isn't fully functioning but my blog is at least now back online - let's hope it stays that way!

I am starting the week off bright and early with a card for this week's challenge over at TGIF Challenges where the theme is to use the negative space left after making a die cut in a positive way:
This is a technique I love to use and can be very effective. Here's the card I made for my lovely Mother-In-Law's birthday last week that demonstrates it beautifully:
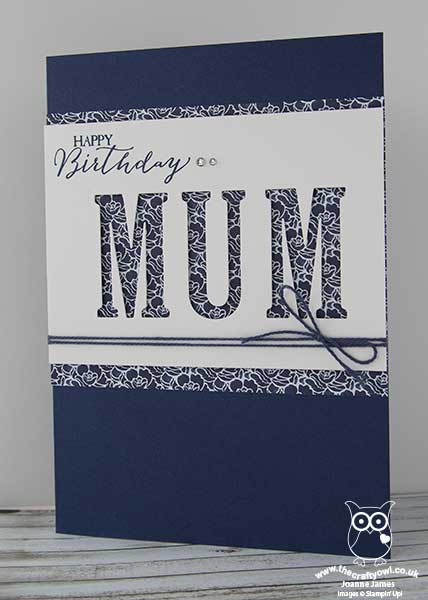
 

Here's the low-down on today's card:

Large Letters Framelits - I used my Large Letter Framelits to create the negative die cut space on my card. I've said it before, but in case you were sleeping/skipped a bit/not paying attention or all of the above, these framelits, whilst pricey, are an investment item - they will see you through so many projects they are well worth the spend.

Floral Boutique - My negative space not only makes light work of some important personalisation here, but it also serves to showcase this gorgeous navy and white Floral Boutique Designer Series Paper. The hand-painted blooms are gorgeous and the negative space does a great job of focusing in on the paper, which would not stand out as much if the positive die cut letters had been used.

Finishing Touches - The 'happy birthday' from Birthday Basics completes my sentiment, along with a couple of rhinestones and some Night of Navy solid baker's twine tied in a bow. I used the Floral Phrases stamp set to decorate the envelope and inside of my card too.

This type of card is quite straightforward to make; the most important consideration is to ensure your letter dies are perfectly aligned. I am happy to report that my Mother-in-Law loved her birthday card, which co-ordinated with some Floral Boutique goodies as a birthday gift. Me - I loved this card so much, I created a masculine version for my Dad, who celebrates his birthday tomorrow; hopefully I'll share this one later this week. 

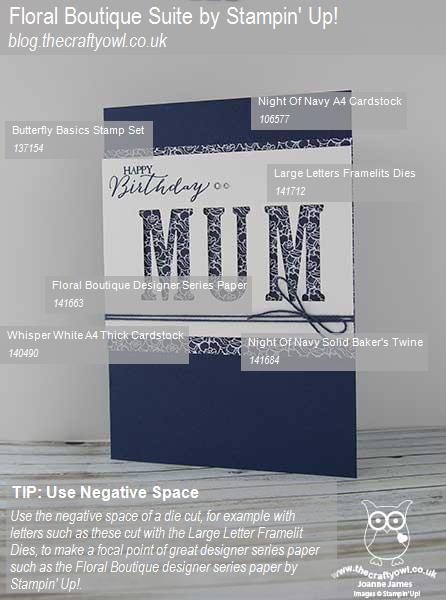
Here is the visual summary of the key products used on today's project for you to pin for easy reference:
 

You can see all of my 'How To' summaries on my 'How To - Tips and Techniques' Pinterest board in case you've missed any.   

Back tomorrow with another project; until then, happy stampin'!


Stampin' Up! Supplies Used: 

Table built using Product Table Builder by The Crafty Owl - Independent Stampin' Up! Demonstrator.

Floral Phrases Congratulations Card

by Joanne James30. June 2016 08:05

Today it's time for a new challenge over at Create With Connie and Mary and this week we have a sketch for you:


For my card today I decided to go with a classically elegant wedding/anniversary card using the new Floral Phrases stamp set that is part of the Floral Boutique suite:

Here's the low-down on today's card:

Hand Painted Florals - The stamps in the Floral Phrases set, just like the co-ordinating Floral Boutique designer papers, have the appearance of hand painted images when stamped, with gradations in colour for artistic effect. They also include a beautiful script and some heartfelt sentiments - I included the one in my card in the thumbnail above.

Not Quite Mirrored - I stamped the floral image then rotated it through 180 degrees and stamped it again to give me my focal point. The images are not a mirror image of each other, yet combining the two images in this way does create a seamless focal point, with the join covered by my sentiment banner. 

A Classic Colour Combination - Navy and white is a classic colour combination that features throughout the Floral Boutique suite. I wound some Night of Navy solid baker's twine around my card behind my banner and added a strip of gold sequins to add a little extra sparkle to my otherwise monochromatic card.

Today's card is a nice easy one to re-create and perfect for a summer wedding - why not have a go yourself?

Here is the visual summary of the key products used on today's project for you to pin for easy reference:


You can see all of my 'How To' summaries on my 'How To - Tips and Techniques' Pinterest board in case you've missed any. 

Do visit the other Design Team members to see what they did with this week's sketch; there's lots of inspiration over on their blogs too!

We have a big day today: it's finally time for The Wizard of Oz and Rebecca's performance of the Dorothy. She has four performances today, so I'm wishing her well - I'll report back in full tomorrow! Enjoy your day and I'll be back tomorrow with another project; until then, happy stampin'!


Stampin' Up! Supplies Used:

  • Floral Phrases Clear-Mount Stamp Set
  • Night Of Navy Solid Baker's Twine
  • Night Of Navy A4 Cardstock
  • Night Of Navy Classic Stampin' Pad
  • Whisper White A4 Thick Cardstock
  • Gold Sequin Trim

Tags: , , , , , ,

Cards | Shop Online | Stamping

Scrapbooking

Stampin' Up! has introduced a new range of 12x12" scrapbooking product and kit - the full range is now available to purchase online. To download a copy of the new digital Scrapbooking Catalogue click here.

Mini Catalogue

BROWSE THE CATALOGUE

'Tis The Season - the new Stampin' Up! Mini Catalogue is here! For more details and to download your copy click here

Shop Online

Access my online shop 24 x 7, 365 days of the year:

Current September hostess code:

JQEHTZGK

Shop Online

2024-25 Annual Catalogue

BROWSE THE CATALOGUE

Click on the image to download your copy of the 2024-25 annual catalogue. For a full list of current SU! supplies, go to my online store. If you would like any help or advice, please drop me a line at joanne@thecraftyowl.co.uk or give me a call on 07773 421446 - I'd be happy to help.

Join My Team

It's always a great time to join Stampin’ Up! New team members can get £130 worth of products for only £99 + free business supplies + free shipping + all the fun being a part of Stampin’ Up! Stampin' Up! has something for everyone: join my growing team and benefit from my support to enjoy Stampin' Up! however you choose.

If you're interested, call me for a chat to understand how I can help you realise your goals. Alternatively, if you have already decided to sign up and you just can't wait, please click here for the link to the online form where you can sign up and order your starter kit right away! 

Latest Kits!

Stampin Cut and Emboss

The Christmas Ornaments Kit and Card Keeper Kit are the latest kits that will be arriving in the online store later this month - get yours here!

New Online Exclusives

There are new products available exclusively in the online store from 3 July - check them out here.

About Me

Hi I'm Joanne and live in Northampton and when I'm not looking after my husband and two beautiful children, am an avid crafter with a passion for all things Stampin' Up!

I must confess that I have never been a big rubber stamper - until I discovered Stampin' Up! that is. I love the fact that I can get such great results with co-ordinating stamps, inks, papers and punches - the possibilities are endless! Join me on my stamping journey as I share the things I love and be inspired to create amazing things yourself!

Follow Me

Monthly Newsletter

Box Builder

Click the button above to use Box Buster to create your custom box design using the Envelope Punch Board!

Kits Collection Now Available!

Stampin Cut and Emboss

The new Kits Collection from Stampin' Up! is now available!

Click here to see the current kits available and order yours online today.

I Design For


Stampin' Up Stuff

This is my personal blog and is not endorsed by Stampin’ Up! I hope you find it a plentiful source of ideas and personal inspiration but please don't copy my designs for contest submission or use for classes, publication or sale without express permission.