Winter Meadow Christmas Deer PP668

by Joanne James26. November 2023 08:00

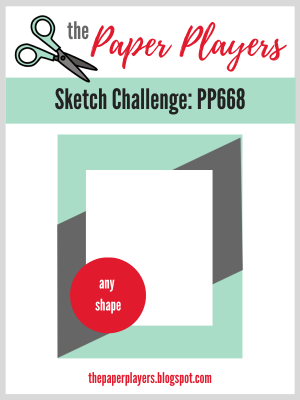
Today it's Sunday and time for this week's new challenge over at The Paper Players! It's the turn of the fabulous Ann to host this week and she has my favourite, a sketch challenge for us to work with:


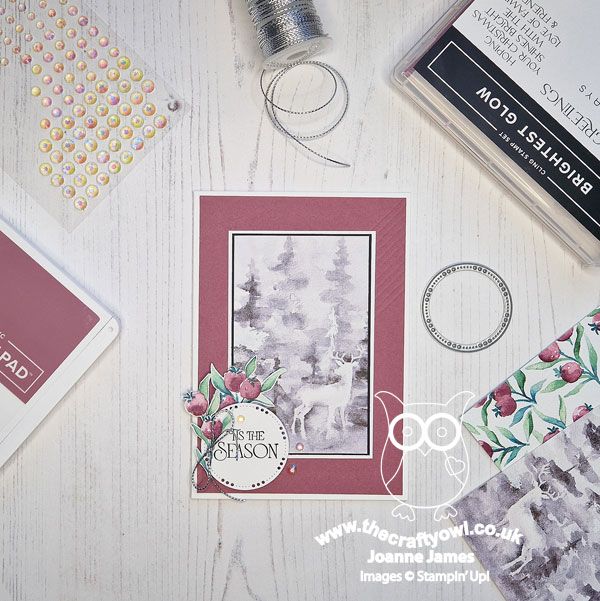
I had the idea that the central panel would be a great way to showcase one of the Winter Meadow designer series paper designs - take a look:


Here's the low-down on today's card:

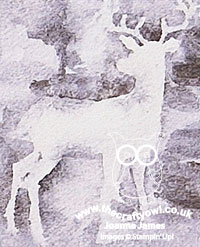
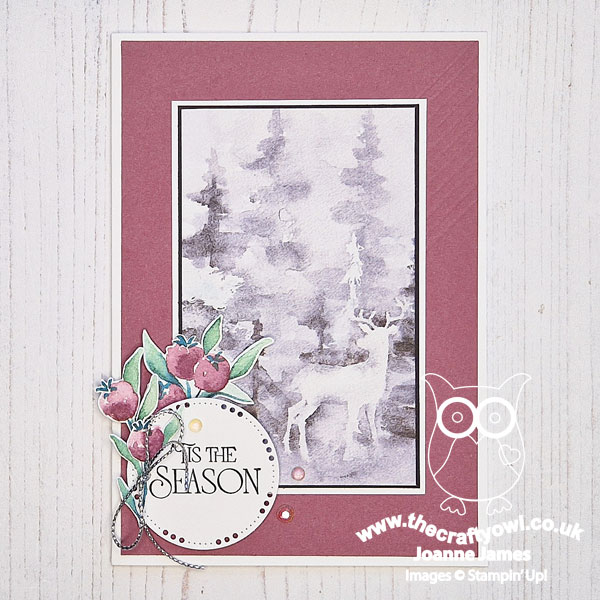
One of the designs in the Winter Meadow designer series paper pack has a deer pattern that can be split into 6 and used as card fronts. I took the one that had the deer on the right hand side of the panel and cut it down to fit my central rectangle. I added a background panel of Moody Mauve and scored in the diagonal lines (these are quite difficult to see in the photos I'm afraid, but add a lovely subtle detail in real life) and fussy cut a couple of berry stems from another of the sheets in the paper pack to decorate my sentiment, which is from the 'Brightest Glow' stamp set and cut with one of the Labels Aglow dies:

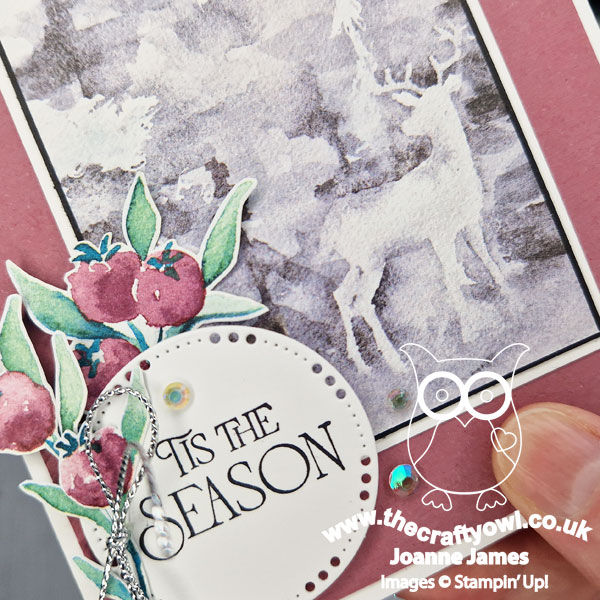
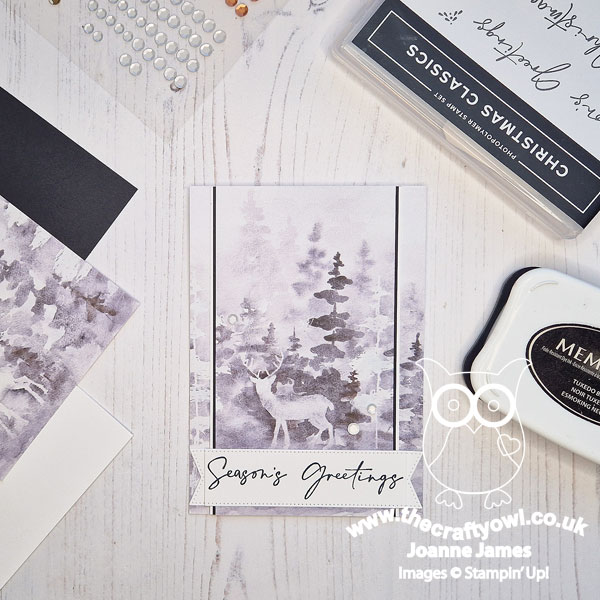
I really liked this card, although I did think that I lost a lot of the impact of the deer panel once I'd cut it down. Whilst I had the papers out on my desk, I decided to make a second card using another panel of the deer paper, this time using Kim's open layout over at Freshly Made Sketches this week:

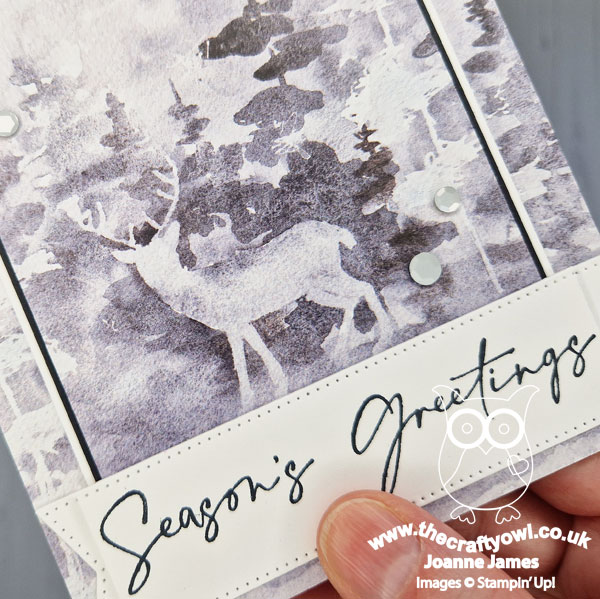
I cut the single panel into three and built up the central section with a couple of layers of black and white cardstock, adding my sentiment from the 'Christmas Classics' stamp set onto a stitched label:


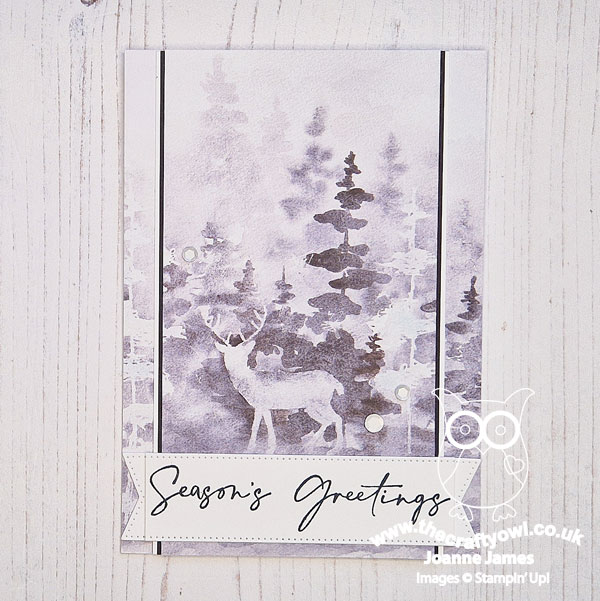
I let the paper do all the work as far as this card is concerned and added only a trio of three pale silver sequins to complete my card:


So two cards for you today - hope you like them! I'm also linking my first card up over at Time Out Challenges where the current challenge is Winter/Holiday.

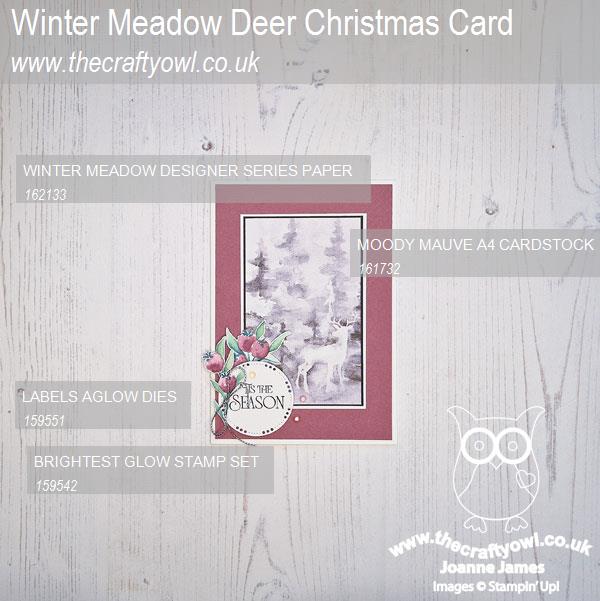
Here is the visual summary of the key products used on today's projects for you to pin for easy reference:


You can see all of my Product and 'How To' summaries on my 'How To - Tips and Techniques' Pinterest board in case you've missed any. 

Before you reach for your ink and papers, check out what our amazing team has created to inspire you this week:

Here's a quick recap of our challenge rules:
 
1.  Create a new paper project
2.  Upload your creation to your blog with a link back to us and provide a direct link to the post featuring your challenge submission.
3.  Please link your card to no more than four challenges, TOTAL.
4.  Have FUN!

Enjoy your day; I'll be back later in the week with another project. Until then, happy stampin'!


Stampin' Up! Supplies Used: 

Table built using Product Table Builder by The Crafty Owl - Independent Stampin' Up! Demonstrator.


Christmas Joy To You PP666

by Joanne James12. November 2023 08:00

Today it's Sunday and time for this week's new challenge over at The Paper Players! It's my turn to host this week and I have a festive colour challenge for us to work with:


Red, green and gold is one of my favourite festive colour combinations so I wanted to see what you would all make with it this week. You can add any other colour of your choice; for today's card I added a little Old Olive and using Jen M's square layout over at Freshly Made Sketches made a traditional Christmas card to add to my growing stash - take a look:


Here's the low-down on today's card:

The sketch layout was perfect to showcase a large panel of designer series paper, so I chose a vibrant holly pattern from the Joy of Christmas paper pack. I used the slanted panel to feature my bold sentiment from the 'Joy To You' stamp set, which I stamped in Real Red onto a white panel cut with one of the Scalloped Contour Dies to which I added a holly and pine diecut embellishment:


I wrapped my panel of DSP with some gold simple elegant trim (great for saving bulk on cards that need to be mailed at this time of year) and added a bow to my foliage to complete my card. This card actually came together quite quickly once I'd decided on my elements; the paper does much of the hard work with such a busy pattern, it really doesn't need much else. So what will you make with this week's colour combination? Whilst these colours are my festive favourites, you don't have to make a Christmas project with them - the choice is yours!

Here is the visual summary of the key products used on today's project for you to pin for easy reference:


You can see all of my Product and 'How To' summaries on my 'How To - Tips and Techniques' Pinterest board in case you've missed any. 

Before you reach for your ink and papers, check out what our amazing team has created to inspire you this week:

Here's a quick recap of our challenge rules:
 
1.  Create a new paper project
2.  Upload your creation to your blog with a link back to us and provide a direct link to the post featuring your challenge submission.
3.  Please link your card to no more than four challenges, TOTAL.
4.  Have FUN!

Enjoy your day; I had a super busy day yesterday, with a flying overnight visit for my university-loving daughter and a hockey match for the youngest of the James Juniors. My laundry service has gone into overdrive once more, so today will be spent ironing and baking and hopefully squeezing in a little crafting to finish a few projects that are in bits on my desk. I'm usually one of those people that makes one thing at a time, but since I've had to snatch a quick 30 minutes here and there over the last couple of days, I've started several things and am yet to finish a single one! Hopefully I'll be back tomorrow to share one of them. Until then, happy stampin'!


Stampin' Up! Supplies Used: 

Table built using Product Table Builder by The Crafty Owl - Independent Stampin' Up! Demonstrator.

Christmas Classics Shining Brightly TTT234

by Joanne James9. November 2023 18:00

It's Thursday and time for a new challenge over at TicTacToe! It's the turn of Team X to host this week and I am our featured designer this week. This is the fun board that we are playing along with: 


I went along the bottom left to top right diagonal with gold metallic/holly/vanilla and using the fab layout over at Try Stamping on Tuesday (no optional plaid I'm afraid) I made a festive Christmas card that also has a direct nod to the Global Design Project #GDP419 theme this week - take a look:


Here's the low-down on today's card:

I just love the Shining Brightly speciality designer paper - the vanilla and navy colour scheme with embossed gold is so luxurious and perfect for fancy Christmas cards and packaging - and this paper did kind of inspire my TTT board this week, so I couldn't not feature it on my card. I used a panel of the foliage pattern on the lower portion of my card, then added a simple gold border to neaten the join of my paper to my layered foliage cut using the Christmas Classics Dies that I used to decorate the upper portion of my card. I used a combination of Very Vanilla, gold foil and distressed gold paper for texture and visual interest, finishing with some pearls and gold elegant twine trim:

My sentiment from the 'Christmas Classics' sentiment was my direct nod the #GDP419 board - 'Tis The Season had me instantly singing 'Deck The Halls With Boughs of Holly, 'Tis The Season To Be Jolly, Fa La La La La ...' (I hope that's not given you an earworm!) for my simple banner greeting. I love this gold and vanilla colour combo - so elegant. What is your favourite festive colour combo? Do leave me a comment below - I'd love to hear your thoughts.

Here is the visual summary of the key products used on today's project for you to pin for easy reference:


You can see all of my Product and 'How To' summaries on my 'How To - Tips and Techniques' Pinterest board in case you've missed any. 

A tictactoe board offers so many creative possibilities - how does this week's board inspire you? Why not have a go? We would love to see you in the gallery and who knows - you might be selected for Designer's Choice and be eligible to be a guest designer on a future challenge. 

Enjoy your day; I'll be back tomorrow with another project. Until then, happy stampin'!


Stampin' Up! Supplies Used: 

Table built using Product Table Builder by The Crafty Owl - Independent Stampin' Up! Demonstrator.

Clean and Simple Christmas Classics Noel CCS 525

by Joanne James7. November 2023 13:00

It's Tuesday and time for a new challenge over at CAS Colours & Sketches. Nancy is hosting this month and our first challenge is a colour challenge: 


I thought these colours would work perfectly for a Christmas card, but feel free to use them any way you choose. Here's my card for today:


Here's the low-down on today's card:

Those bright red 'NOEL' letters will by now be familiar to my regular readers - the 'Joy of Noel' stamp set is my number one stamp set this Christmas. I added them to foam adhesive sheets before diecutting with the co-ordinating die. For today's card I've paired them with the other die set in the suite, the Christmas Classics Dies, and added them to the holly decorative label that I cut from Mossy Meadow. I added a little Boho Blue ink to my Basic White card base with a blending brush and added some Real Red (retired) glittered enamel dot berries to the stems for a pop of festive colour. Check out the sparkle when they catch the light:

This is one of those cards that really is so quick and easy - I think the simple design is really effective though and the label really draws the eye to those fabulous letters.

Here is the visual summary of the key products used on today's project for you to pin for easy reference:


You can see all of my 'How To' summaries on my 'How To - Tips and Techniques' Pinterest board in case you've missed any. 

As a reminder, for our colour challenges, you must use all of the stated challenge colours. You may also use neutral colours; however, the challenge colours should be the most noticeable ones featured on your card. We use Stampin' Up! colour names for reference, but you are welcome to use any other companies' products as long as you match the challenge colours as closely as possible.

Enjoy your day and I'll be back soon with another project. Until then, happy stampin'!


Stampin' Up! Supplies Used:

Table built using Product Table Builder by The Crafty Owl - Independent Stampin' Up! Demonstrator.

Deck The Halls With The Joy of Christmas AYSI 311

by Joanne James3. November 2023 12:00

Today I'm sharing my design team card for our new challenge over at As you See It where it's time for a festive recipe challenge chosen by Jane:


So many lovely things to incorporate! I chose Christmas as my holiday and grabbed the sketch over at Atlantic Hearts for my layout (I flipped my sentiment/foliage panels) - take a look:


Here's the low-down on today's card:

I added a split panel of Joy of Christmas designer series paper with a panel of white cardstock embossed with the Merry Melody 3D Embossing Folder, adding a wrap of festive red satin ribbon to join them together. I used a sentiment from the 'Christmas Classics' stamp set featuring the beginning of the Christmas carol of the same name and backed this with the square foliage die from the Christmas Classics bundle cut out of retired platinum foil - it has a matt shine that picks out the subtle grey detailing in the designer paper:

Some diecut greenery and a wooden textural element, along with a red ribbon bow, complete my card. I love the texture and dimension on this card - definitely one for hand delivering rather than posting, but so many interesting elements. 

Here is the visual summary of the key products used on today's project for you to pin for easy reference:


You can see all of my 'How To' summaries on my 'How To - Tips and Techniques' Pinterest board in case you've missed any. 

Here's a summary of our challenge rules:

  • Create any card, scrapbooking page, 3D project or packaging project that fits the challenge.
  • Please include the challenge graphic and link back to the challenge in your blog post. Turn off word verification so we can leave you lots of lovely comments. Make sure you link the post not the whole blog to the Linky. Use #AYSIXXX when uploading to a public gallery.
  • If you’re unsure about ‘the rules’, check the details under the Challenge Guidelines tab on the As You See It Challenge homepage.
We look forward to seeing your creations in the AYSI gallery.

Enjoy your day; we are hoping to attend the annual fireworks display at school this evening, assuming it stops raining and we are spared from the worst of Storm Ciaran - keep your fingers crossed for me! I'll be back tomorrow with another project. Until then, happy stampin'!


Stampin' Up! Supplies Used:

Table built using Product Table Builder by The Crafty Owl - Independent Stampin' Up! Demonstrator.

Christmas Classics Noel Slimline Christmas Card

by Joanne James21. October 2023 09:00

Today I'm sharing a card that's a little more involved so perfect for a spot of weekend crafting! I used the fabulous sketch over at Tuesday Morning Sketches for my layout:

I've made quite a few cards with my 'Joy of Noel' bundle and wanted to try something a little different with this slimline layout - take a look:


Here's the low-down on today's card:

Joy Of Christmas - The colour scheme for today's card was inspired by the beautiful piece of Joy of Christmas Designer Series Paper I used for the first layer on my card. A white background covered in red berries and festive holly and pine foliage, this paper is perfect for a traditional Christmas card. Whilst much of this panel is covered by the other layers of the card, enough of it can be seen to tie in the other elements. 

Joy of Noel - Most if not all of my other cards using the NOEL 'Joy of Noel' stamps and dies have positioned the letters in a square. This slimline format allowed for me to use the letters in a column (still broken with 'joyous') - this works really well. I originally stamped my letters in Real Red onto Basic White, but they didn't have enough impact. I swapped them for Real Red cardstock embossed with silver and liked this much better. The silver picks up on the grey outlines of the base DSP and the silver and red combo stands out much better and the red ties in with both the red frame I used for the sentiment panel and the two strips of Real Red cotton ribbon I used on the base DSP layer.  

Christmas Classics - For the square layers of the sketch, I used a couple of diecuts of the Christmas Classics foliage border square die. I originally used a sild colour of green for this layer, but it was too stark. Eventually I cut the layers out of a piece of (retired) Garden Green check paper that resulted in a softer, more interesting variegated look. I added some extra detail with a green Blends marker, along with a few red rhinestones for a little extra red berry detail:

This card has seven layers, but I think each of them serves a purpose and makes a valuable contribution to the overall design, which I love. What do you think - does this celebration of festive foliage remind you of a traditional Christmas? Do leave me a comment below - I'd love to hear your thoughts.  

Here is the visual summary of the key products used on today's project for you to pin for easy reference:


You can see all of my 'How To' summaries on my 'How To - Tips and Techniques' Pinterest board in case you've missed any. 

Enjoy your day and I'll be back tomorrow with my card for our new challenge over at The Paper Players. Until then, happy stampin'!


Stampin' Up! Supplies Used:

Table built using Product Table Builder by The Crafty Owl - Independent Stampin' Up! Demonstrator.

Christmas Classics Fresh Freesia Christmas Card

by Joanne James17. October 2023 20:00

Today I have an additional late post to share a card I made for the following challenges:


I had been mulling over the lovely colour palette at Just Add Ink for a few days and when I saw the new sketch over at Hand Stamped Sentiments today I had an idea! Since the Great British Bake Off was replaced by World Cup Rugby on the TV schedules this evening, I took the opportunity to grab some extra craft time and make my idea a reality - take a look:


Here's the low-down on today's card:

I thought these colours would make a slightly unconventional Christmas card and I had the 'Christmas Classics' bundle out on my desk, looking for an opportunity to use the fabulous label and foliage dies. I decided to use the foliage-embellished label for the diagonal element, extending it from a label to stretch across the width of my cardfront. I cut the label again out of Berry Burst and paper-pieced the berries to the Pretty Peacock base. To add a little extra interest, I diecut a couple of holly leaves out of some variegated Bright & Beautiful DSP and added these behind a circle of distressed gold paper:


I finished my card with a few Fresh Freesia Tinsel Gems. I like this unusual Christmas colour scheme; what are your favourite unconventional colour combinations? Do leave me a comment below - I'd love to hear your thoughts!

Here is the visual summary of the key products used on today's project for you to pin for easy reference:


You can see all of my 'How To' summaries on my 'How To - Tips and Techniques' Pinterest board in case you've missed any. 

Enjoy your day and I'll be back soon with another project. Until then, happy stampin'!


Stampin' Up! Supplies Used:

Table built using Product Table Builder by The Crafty Owl - Independent Stampin' Up! Demonstrator.

Winter Meadow Christmas Classics For FF0144

by Joanne James29. September 2023 09:00

Yay it's Friday - almost the weekend!! Today I have my card for the new challenge over at Festive Friday Card Making and Paper Crafting Challenge


The challenge that we are celebrating this week is 'World Mental Health Day' which is on October 10th. Remember the fun thing is that at Festive Friday you do not need to actually celebrate the occasion; your goal is to simply use three or more items from the inspiration list on your project. This week I used blue, green, sparkle and metallic embellishment and this is what I came up with:


I used the sketch layout over at Sketch Saturday and decided to create a Christmas card for my stash! Here's the low-down on today's card:

Winter Meadow - The papers featured on today's card were the starting point for my creation. They are from the Winter meadow designer series paper collection and both the patterns featured are opposite sides of the same sheet. I decided to edge my card with the berry paper to allow that lovely bright blue wash to take centre stage. These papers have pretty water-coloured designs featuring festive winter foliage and are so pretty. 

Timeless Arrangements - I used a sentiment from the 'Christmas Classics' stamp set and paired it with one of the labels and foliage from the Timeless Arrangement Dies - don't be afraid to mix and match your products and sets to give them a whole new look and feel. 

Silver Sparkles - My metallics and sparkle come from the silver-edged ribbon I used to join my papers, the thin strips of silver glimmer paper and those blue rhinestone berries that I added to my diecut foliage to tie in with the border pattern. Check out the sparkle:


 I heat embossed my sentiment in silver and added a trio of matt silver sequins to complete my card.

Here is the visual summary of the key products used on today's project for you to pin for easy reference:


You can see all of my 'How To' summaries on my 'How To - Tips and Techniques' Pinterest board in case you've missed any. 

How does our board inspire you? I can’t wait to see what YOU create! For more inspiration, be sure to visit the rest of the Festive Friday Card Making and Paper Crafting Challenge Design team:

Enjoy your day and I'll be back tomorrow with another project. Until then, happy stampin'!


Stampin' Up! Supplies Used:

Table built using Product Table Builder by The Crafty Owl - Independent Stampin' Up! Demonstrator.

Shining Brightly Navy And Gold Christmas Wreath For FMS600

by Joanne James23. August 2023 12:00

Today I'm sharing a card that is special in more ways than one! It contains a sneak peek of some new Christmas products from the upcoming mini catalogue but more importantly I am a guest with the lovely ladies over at Freshly Made Sketches where the team are celebrating their 600th challenge - wow! I love to play along with their sketches whenever I get the opportunity and I was thrilled to be asked to join them alongside a number of other esteemed guests to celebrate this momentous occasion! This is the sketch we are basing our designs on:


I decided I would create a wreath with the circular element - this is what I came up with:  


Here's the low-down on today's card:

I diecut a couple of Country Wreaths Dies wreaths, one in brushed gold and one in gold foil, and layered them onto a panel of Shining Brightly specialty designer series paper on a Night of Navy card base. This is one of six single-sided foiled designs in Very Vanilla and Night of Navy in the pack - and they are all gorgeous! I heat-embossed my sentiment in gold onto navy cardstock - this is also from a new stamp set called 'Christmas Classics' - and added this to my card, along with a gold twine bow and trio of matt gold sequins:


I also added a little extra stamping from the same set to the inside of my card - check out the corner detail:


I just love the gold and navy colour combination of this card - expect to see lots more in this colourway in the upcoming festive season! 

Here is the visual summary of the key products used on today's project for you to pin for easy reference:


You can see all of my 'How To' summaries on my 'How To - Tips and Techniques' Pinterest board in case you've missed any. 

Be sure to check out the designs from the Freshly Made Sketches Team and the other guest designers this week - there will be some fabulous inspiration there for sure. Thank you and a huge congratulations from me to the team for inviting me to take part in the celebrations - here's to the next 600 challenges!

Enjoy your day and I'll be back on Friday with this week's new challenge over at As You See It. Until then, happy stampin'!


Stampin' Up! Supplies Used:

Table built using Product Table Builder by The Crafty Owl - Independent Stampin' Up! Demonstrator.

Mini Catalogue

BROWSE THE CATALOGUE

The mini catalogue is now live! Read and download your copy here.

Shop Online

Access my online shop 24 x 7, 365 days of the year:

Current April hostess code:

VDKNV7BH

Shop Online

Join My Team

It's always a great time to join Stampin’ Up! New team members can get £130 worth of products for only £99 + free business supplies + free shipping + all the fun being a part of Stampin’ Up! Stampin' Up! has something for everyone: join my growing team and benefit from my support to enjoy Stampin' Up! however you choose.

If you're interested, call me for a chat to understand how I can help you realise your goals. Alternatively, if you have already decided to sign up and you just can't wait, please click here for the link to the online form where you can sign up and order your starter kit right away! 

Latest Kit!

Stampin Cut and Emboss

The Rock Legend Kit has all you need to make 8 cards with coordinating envelopes. Along with the new Panda Friends Kit, both are available from January 4th for just £14 each - get yours here!

2023-24 Annual Catalogue

BROWSE THE CATALOGUE

Click on the catalogue for a full list of current SU! supplies - if you would like to order any of the items featured, please drop me a line at [email protected] or give me a call on 07773 421446 - I'd be happy to help.

New Online Exclusives

There are new products available exclusively in the online store from 5 March - check them out here.

About Me

Hi I'm Joanne and live in Northampton and when I'm not looking after my husband and two beautiful children, am an avid crafter with a passion for all things Stampin' Up!

I must confess that I have never been a big rubber stamper - until I discovered Stampin' Up! that is. I love the fact that I can get such great results with co-ordinating stamps, inks, papers and punches - the possibilities are endless! Join me on my stamping journey as I share the things I love and be inspired to create amazing things yourself!

Follow Me

Monthly Newsletter

Box Builder

Click the button above to use Box Buster to create your custom box design using the Envelope Punch Board!

Kits Collection Now Available!

Stampin Cut and Emboss

The new Kits Collection from Stampin' Up! is now available!

Click here to see the current kits available and order yours online today.

I Design For


Stampin' Up Stuff

This is my personal blog and is not endorsed by Stampin’ Up! I hope you find it a plentiful source of ideas and personal inspiration but please don't copy my designs for contest submission or use for classes, publication or sale without express permission.