Vintage Leaves Autumn Home Decor Wreath

by Joanne James20. October 2015 22:27

I've had a busy day today with my 'Shake It Up!' Children's Craft Class making the shaker cards featured in the 'To You And Yours Shaker Cards Project Kit'. We all had tremendous fun and made lots of great cards. I'll share a picture from our class at the end of today's post, however in the meantime my blog project to share with you today is the one that my Facebook followers had a sneak peek of last week that I made with a lovely group of ladies - our Autumn leaf wreaths. We based our design on this one created by Stampin' Up! Artisan Designer Alison Okamitsu; I made a large wreath like Alison's to hang on my front door and the ladies liked it so much they wanted to create a similar, smaller version - here is ours:


We used a selection of muted colours and the wonderful Vintage Leaves stamp set and cut out the leaves using our Big Shot and co-ordinating Leaflets Framelits (one of the catalogue 15% off bundles if you are a bargain-hunter!), some pinecones, a few leaves punched with the bird builder punch and a burlap bow to finish. Isn't that pretty? The ladies were all so very pleased with their wreaths and their stamping as this is something of a first for them! 

This was a private class that I held for a group of like-minded friends who often invite me to run a class just for them. If you have a group of friends that you would like to arrange a crafty get-together with, or would simply like to join in with one of my existing scheduled classes, then do get in touch - I would love to hear from you! Don't forget the offer of additional Stampin' rewards is also still valid until the 9th November - party sales of £200 or more will earn an extra 3% of Stampin' Rewards (formerly known as Hostess Credits) so if you have a long wish list, I've still a few slots left so contact me to book your party today!

Before I go, let me share a photo of the James Juniors proudly displaying their handiwork from this morning's class:

Like mother, like daughter (and son!) as the saying goes - what else can I possibly add?!

Back tomorrow with another project; until then, happy stampin'!


Stampin' Up! Supplies Used:

Table built using Product Table Builder by The Crafty Owl - Independent Stampin' Up! Demonstrator.


Witching Decor Project Kit - Halloween Witches Hat

by Joanne James5. October 2015 21:39

So today I thought we would have a change from cards and I would share with you the 3D project that I made on World Card Making Day. I know, topsy turvy, but since crafting with friends is in itself something to be celebrated, it seemed a great way to spend the day. So the project in question is the Witching Decor Project Kit in the seasonal catalogue. Normally this isn't the kind of project I would make, however the female James junior of the house, Rebecca, absolutely loved it and wore me down until I promised to buy it for her to create! 

So she invited her friend and fellow crafting enthusiast Nicholas over for the afternoon and we spent a pleasant few hours putting our respective hats together. Here is Rebecca's finished hat in all its glory:

Now if you've seen the photo in the catalogue, you will see a few differences between this one and that one. the first is the shape: the one in the catalogue looks crumpled and 'worn in' (a little like the sorting hat in the Harry Potter stories!). The trouble was, once put together Rebecca decided she wanted hers to have a perfect point, so since she still managed to tie on her bell and have it tinkle, she couldn't bring herself to crumple the end! It must be a girl thing - Nicholas had no such issues and his had a wonderfully worn in appearance! 

You might also notice the rather enthusiastically sponged edging to the 'Happy Halloween' label; the kit recommends using Soft Suede for a 'worn' look, yet having made one like this the children universally agreed that this didn't work for them at all and orange was most definitely needed! So we made another label - there are enough labels for 3 each of the stamp designs, in fact the whole kit is very generous in its contents; we made interchangeable labels and still had labels, flags, rhinestones and lots of leaves left over. All for just £20 and the co-ordinating 'Witches' Night' stamp set. I have a class scheduled to make this kit on 13th October - it would also make a great project for a girls' night in. I have a few calendar slots left in October so if this is something that interests you, please get in touch.

The leaves that are threaded around the edge of the hat are all pre-punched and can be used just as they are, as the children did on their hats (they just wanted to get them threaded and had no time for extra sponging!). They could also be sponged and distressed to add more texture and colour, or even stamped with the Vintage Leaves set to add more detail. 

We were so absorbed in our task, I didn't even take a photograph of us at work to share with you. Suffice to say, the children had a great time and I am loving the addition of the hat to our Halloween home decor. 

This is a great kit and very easy to construct - you might say child's play! It would be a great kit to make with children as part of the build up to your 'trick or treat' festivities. 

That's all from me today - back tomorrow with another project and some exciting children's news too! Until then, happy stampin'!


Stampin' Up! Supplies used:

Table built using Product Table Builder by The Crafty Owl - Independent Stampin' Up! Demonstrator.


Howl-o-Ween Treat Matchbox Style Halloween Pop Up Card

by Joanne James4. October 2015 10:00

Did you have fun celebrating World Card Day yesterday? I sent the afternoon crafting, but making home decor rather than cards as Rebecca had a friend round and we spent a couple of hours putting together our Witching Decor Project kits. It did rather put me in the mood for today's new challenge over at The Paper Players! This week it's my turn to host again and since it's the first Sunday in October I have a fun theme challenge for you:


Yes that's right - it's Halloween! I took the opportunity to have some fun with my Howl-o-ween Treat Stamp set and the co-ordinating Boo To You framelits and created something that's been on my general 'to do' list for ages - a matchbox style pop up card. Lots of photos today - here's my card from the outside:


My outer box sleeve is made from Tangelo Twist cardstock decorated with the fun ghost patterned paper from the Happy haunting DSP set - I've been wanting to use this pattern for ages! - and a tag punched with the Ornate Tag Topper punch attached with some Tangelo Twist satin ribbon available on the Clearance Rack currently while stocks last!) My tag is decorated with some bats courtesy of the Project Life Seasonal Snapshot 2015 set and the Trick or Treat sentiment from the Howl-o-Ween treat set. The question is though, which will it be - trick or treat? Let's take a look inside the box:


 I made the drawer tray using Basic Black cardstock and my trusty Envelope Punch Board, and lined it with more Happy Haunting DSP. I used my framelits to cut a 'Boo!' out of black glimmer paper - so perfect for Halloween projects - and stamped a bright green owl, complete with pumpkin basket and spider hanging down from a piece of black baker's twine. Here's another view - oh and I backed my owl with a partial spider web doily too: 


I made my box quite large so that I could accommodate both my pop up owl and greeting and a little something behind. If you look closely in the photo above you can just catch a glimpse of what it is - it also determined the colour of my owl. Can you see what it is? How about a brightly coloured spider to scare your nearest and dearest:

This time more trick than treat (although I've a feeling there are plenty of little ones out there who may think otherwise, given the potential for the odd practical joke or two!), however you could always include a bar of chocolate instead. I hope you like my fun Halloween card - I think the bright orange spider is my favourite!

Before you reach for your ink and papers, check out what our amazing team has created to inspire you this week:

The Paper Players Design Team
Anne Marie Hile - on leave
 
 
Here's a quick recap of our challenge rules:
 
1.  Create a new paper project
2.  Upload your creation to your blog with a link back to us and provide a direct link to the post featuring your challenge submission.
3.  Please link your card to no more than three challenges, TOTAL.
4.  Have FUN! 


I look forward to seeing your Halloween-themed cards this week. I'm off for a morning of basketball and then home for birthday lunch - today it's my husband who's celebrating; I'll share his birthday cards with you later this week.

Back tomorrow with another project; until then, happy stampin'!


Stampin' Up! Supplies Used:

Table built using Product Table Builder by The Crafty Owl - Independent Stampin' Up! Demonstrator.


5 Reasons To Buy The Perpetual Calendar Kit - You Know You Want To!

by Joanne James1. August 2015 15:00

Today I want to share one of the fabulous kits that was first introduced with the Spring Summer seasonal catalogue earlier this year and has since been carried over into the main catalogue: the Perpetual Birthday Calendar kit. Now I'm a big fan of kits for a number of reasons:

  1. I think they make great gifts, for crafters and non-crafters alike
  2. Combine with a stamp set, glue and an ink pad or two, they contain everything you need to complete your project - including step-by-step instructions
  3. They are great for travelling and 'crafting on the go'
  4. They are great for the time-strapped crafter - you can complete a whole project or significant number of cards in a short space of time
  5. For someone like me, who uses a lot of creative energy designing my own cards and classes for others, they can be truly relaxing - little thought required!

I spent a pleasurable afternoon with my good friend and downline Barbara recently and we made up our kits together. Here's a quick photograph of the front of my finished calendar:

And here are some great photos courtesy of Stampin' Up! that show firstly everything that you get in the box:

Perpetual Birthday Calendar Project Kit by Stampin' Up!

And secondly what some of the other months look like completed:

There are more than enough bits and pieces to make the kit (SU! kits are very generous and usually have plenty of spares leftover!) and the nice thing about this kit is that the box can be used as a giftbox, with ribbon to finish, so if you didnt want to gift the actual kit to someone to make, you could have all the fun of making it and then gift the finished article to someone - win, win! And who doesn't need a birthday calendar?? (Or are you all so much better at remembering birthdays than I am?!) The co-ordinating stamp set is also great for creating quick and easy cards and notelets too, either on its own of combined with other sets. 

If you needed further convincing, watch this great little video from Stampin' Up! that demonstrates just what a great kit this is:

I really recommend you watch the video before commencing this project as the written instructions are quite small and it also gives lots of hints and tips about putting the project together. Alternatively, you can contact me to express an interest in attending my next project class for this calendar kit or arrange for to hold a private class for you in your home with a group of friends - I'll bring the ink, stamps, adhesives and kits and we can spend a fun few hours putting them together!

That's all from me today - back tomorrow with a new challenge over at The Paper Players. Until then, happy stampin'!


Stampin' Up! Supplies Used:

Table built using Product Table Builder by The Crafty Owl - Independent Stampin' Up! Demonstrator.


Masculine Mini Treat Bag Thinlit Card and Self-Closing Gift Bag Punch Board Bag

by Joanne James7. June 2015 10:00

Yay it's Sunday and time for a new challenge over at The Paper Players - and this week I'm the hostess! With Father's Day approaching, I thought that masculine cards would make a great theme this week and it would at least encourage me to be organised!

I have lots of photos to share with you today, as I made not just one but two projects: a fun card using the mini treat bag thinlits and a matching gift bag using my new Gift Bag Punch Board - oh how I love this!

So first to my card: I've seen a few of these fun cards on Pinterest using the Mini Treat Bag Thinlits Die to create a fancy shirt with a sliding insert (one of my favourites is this one by Julie Kettlewell) and have been wanting to have a go at creating my own version for a while. Here it is: 

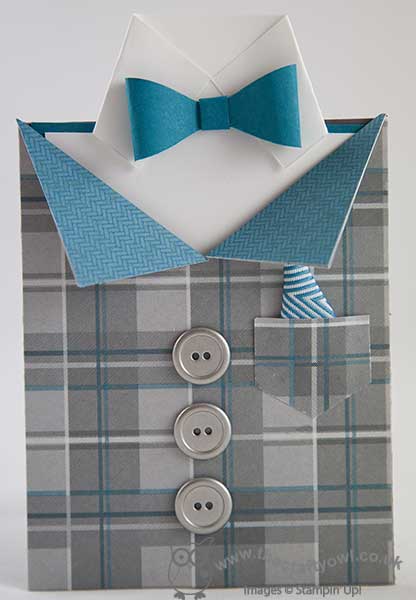
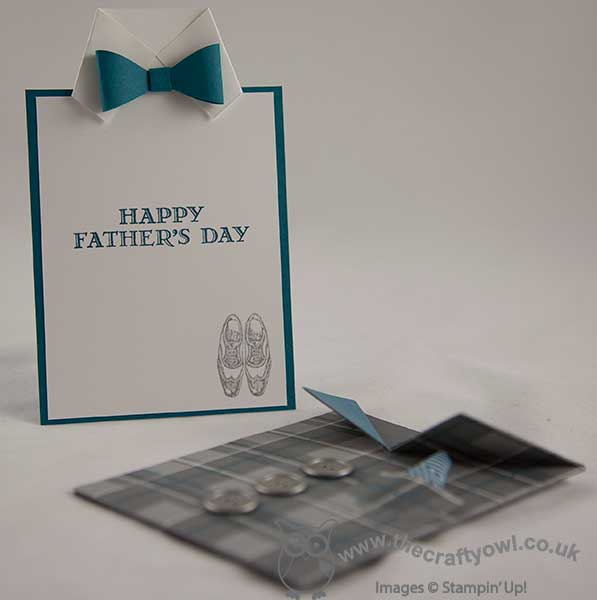
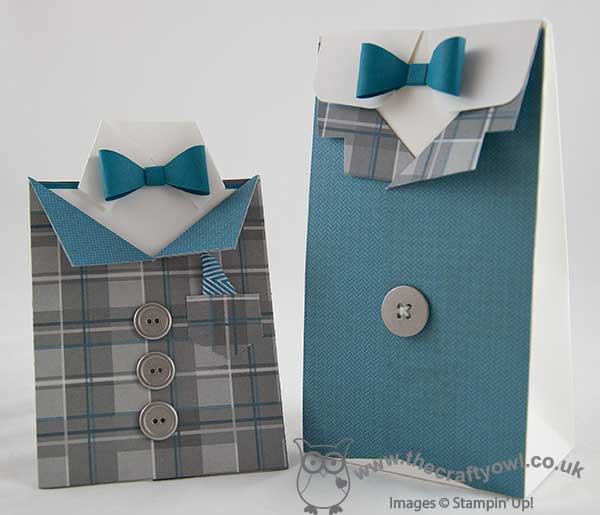
I have used the now retired Adventure Bound DSP for my card - this paper is just so fabulous for masculine cards and I hope you all stocked up before it retired! The Mini Treat Bag Thinlits are great for making simple slider cards as well as treat bags; I added silver buttons, a pocket punched with my hexagon punch and with a snippet of Island Indigo chevron ribbon in for a handkerchief. For my insert, I cut it taller than my pocket, then snipped in a third of the way each side to create my turned down collar and added my bow tie. The picture below shows the insert with my stamped sentiment from the 'Guy Greetings' stamp set and a pair of shoes to finish off this dapper outfit:

Pleased as I was with this cute little card, I couldn't stop there; I had to create a matching gift bag using my new Gift Bag Punch Board. I think this is going to be one of my new favourite tools - it is so easy to use and offers so many creative possibilities that go beyond the constraints of the board. Here is my bag:

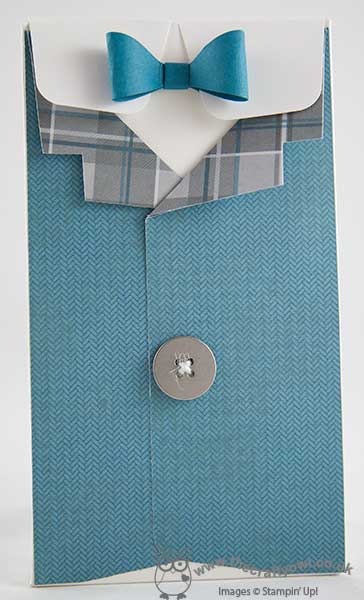
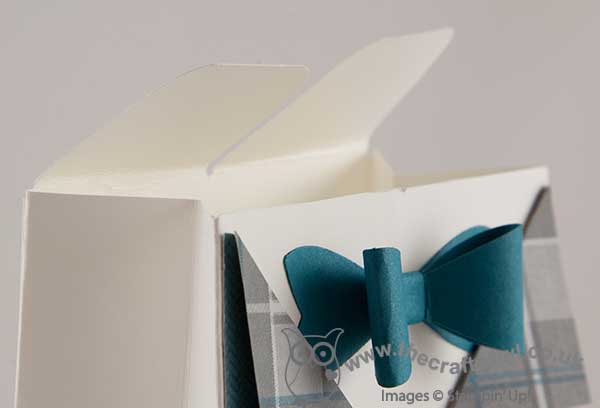
I made my bag using the 'L' measurements on the board and used a sheet of Whisper White cardstock measuring 9 1/2" x 12". Once I'd punched the bottom according to the board instructions, I flipped it around and did the same on the other end, cutting away all except the long flap on the back of the bag, which I then also punched in the middle to create my collar. I then used the collar as the close mechanism for my bag, by tucking it underneath the bow tie - the photo below of the open bag illustrates that more clearly:

I then added two pieces of DSP with co-ordinating lapels and a large silver button threaded with a piece of white jute ribbon trim to finish my bag. Here are both items together:

I'm really pleased with this project duo; the gift bag is large enough for a couple of pairs of socks, some toiletries, a sweet treat (or two!) - pretty much anything that might be on a Dad's wish list. I hope you like them too and they inspire you to create some fun masculine projects this week! Before you reach for your ink and papers, check out what our amazing team has created to inspire you this week, including our three new guest designers:

The Paper Players Design Team
 
 
Here's a quick recap of our challenge rules:
 
1.  Create a new paper project
2.  Upload your creation to your blog with a link back to us and provide a direct link to the post featuring your challenge submission.
3.  Please link your card to no more than three challenges, TOTAL.
4.  Have FUN! 

I look forward to seeing your masculine creations in the gallery this week. I'm off to finish preparations for this week's technique classes and tackle my mountain of ironing. How does the saying go - no rest for the wicked?!

Back tomorrow with another project; until then, happy stampin'!


Stampin' Up! Supplies Used:

Table built using Product Table Builder by The Crafty Owl - Independent Stampin' Up! Demonstrator.


Bohemian Petite Cafe Gift Bag

by Joanne James6. June 2015 21:51

Just time to squeeze in a quick post from me today to share a really quick and easy packaging idea using the Stampin' Up! Petite Cafe gift bags and some lovely new product from the 2015-16 Stampin' Up! Annual Catalogue:

Isn't the little shopping trolley so cute?! This was a gift to me from my wonderful upline Monica recently and I wanted to share the lovely bag with you. It is decorated with the new Bohemian DSP and a stamped scallop circle with one of the stamps from the new 'Friendly Wishes' stamp set. The banners were punched in seconds using the new Triple Banner Punch and the bag was finished off with some Venetian Crochet Trim and Metallic Gold Baker's Twine. What was inside? Well, that would be telling...but it was yummy!

With packaging so quick and easy to recreate there really is no excuse not to add the handmade touch to your sweet treats!

Back tomorrow with a special project for the new challenge over at The Paper Players where I am the hostess this week. Come back then - I guarantee you won't want to miss it! Until then, happy stampin'! 


Stampin' Up! Supplies Used:

Table built using Product Table Builder by The Crafty Owl - Independent Stampin' Up! Demonstrator.


Home Decor Spring Flower Wreath using Stampin' Up! Flower Frenzy Bigz L Die

by Joanne James6. May 2015 09:37

Good morning everyone - today I have something a little different for you! I ran a very successful class a little while ago to make a beautiful home decor Spring flower wreath. I am demonstrating how to make this wreath at a Spring Open Evening at Bell Of Northampton this evening so thought this was a good opportunity to share it with you too:

We started with a polystyrene wreath base and covered it with a roll of burlap, then decorated it with a selection of flowers made with a variety of dies and punches. The largest flower, leaves and the bases for the medium flowers were made using the Big Shot and Flower Frenzy Bigz L Die; the remaining flowers were made using a combination of the retiring Blossom punch, the Pansy punch and the Petite Petals punch. The Blossom punch and Flower Frenzy Bigz die are now out of stock, as is the patterend paper that I used, but you could make something similar with other punches and dies. We used a variety of buttons, brads and embellishments to decorate our flowers: I used Vintage Faceted Buttons, Something Borrowed Embellishments and some retired brads from my stash to decorate mine. I chose Elegant Eggplant, Smoky Slate and Pear Pizzazz as my colourway but each of the ladies tailored their colour choices and embellishments to their personal preferences. Here's a closeup of my flowers - I think they are gorgeous:


I created an album with pictures of their finished wreaths on my Facebook page here - you really should go and check them out as there are some amazing pieces and they all look so very different in the various colourways. If you haven't already, perhaps you could give me a 'like' whilst you're there - I'm only 10 away from my next milestone!

If you live in or around Northampton and would like to see me demonstrate how to make these flowers, do pop along to Bell's between 6-9pm this evening:

I hope you like today's project - it's one of my favourites! Back tomorrow with a card for this week's new challenge over at Create With Connie and Mary. Until then, happy stampin'!Full details via the link above and on my Facebook Page. There are lots of other demonstrations taking place - there will be someone fabulous chefs in residence cooking up delicious treats, a little pampering as well as other in-store delights that will all make for a pleasant browsing experience.


Stampin' Up! Supplies Used:

Table built using Product Table Builder by The Crafty Owl - Independent Stampin' Up! Demonstrator.


Easter Egg Hunt Basket with the Berry Basket Bigz Die

by Joanne James5. April 2015 10:00

It's Sunday - my favourite day of the blogging week! It's time for a new challenge over at The Paper Players and this week the lovely Jaydee has a fun theme for us:

Use any die cut on your project - boy did I deliberate over this! I use die cuts all the time and my Big Shot is my crafting best friend, but what to share? I made several cards, all trying to showcase different aspects of dies and diecuts, but none of them were working for me; I think I was trying too hard! After much deliberating I decided to share a 3D project instead and since it's Easter Sunday today what better than an Easter basket made with the Berry Basket Bigz Die, along with some cute little tags all ready for today's Easter egg hunt:

The basket itself is really easy to make using the die: I made mine out of So Saffron cardstock with a Pink Pirouette trim and handle, and having stamped some eggs on the basket using my Subtles Stampin' Write markers, I finished my completed basket with a couple of pink bows punched from the Bow Builder punch and a stamped tag tied on with some Marina Mist chevron ribbon. I then used my Big Shot, Handpicked framelit dies and my Alphabet rotary stamp to make a whole bunch of tags ready to place around the garden for our Easter egg hunt today - here are just a selection:

I made them out of coaster board, so that they would be extra-strong and added coloured punched out arrows to some of them to add to the fun.

There are some great projects from the Design Team this week - do pop by their blogs and take a look:

The Paper Players Design Team
 
Here's a quick recap of our challenge rules:
 
1.  Create a new paper project
2.  Upload your creation to your blog with a link back to us and provide a direct link to the post featuring your challenge submission.
3.  Please link your card to no more than three challenges, TOTAL.
4.  Have FUN! 

I hope you like today's project - there are so many different dies to choose from, I can't wait to see what you come up with for your cards and projects in our gallery this week. I'm off to play Easter bunny and follow the James juniors around the garden collecting eggs, then attempt to persuade them to not eat them all before lunch! Back tomorrow with another project; until then, happy stampin'!


Stampin' Up! Supplies Used:

Table built using Product Table Builder by The Crafty Owl - Independent Stampin' Up! Demonstrator.


Fun Children's Easter Projects using the Stampin' Up! Curvy Keepsake Box Thinlit Die

by Joanne James3. April 2015 22:26

It's Good Friday already so I thought it was about time I shared with you some of the fun Easter projects that I've been making with my children and their friends in recent weeks. Both James Juniors love to craft and Rebecca especially likes the opportunity to spend some time in my craft room whenever she can. At the start of the Easter holidays, we had a big group of their friends round and spent a fun morning making these cute Easter treat boxes using one of my favourite products, the Curvy Keepsake Box Thinlit Die:

I couldn't resist creating some Easter themed containers using this die, further to the popularity of my Christmas ones - you can see my tips on using this thinlit die in my Stampissimo video with Paula Gorry from Stampin' Up! here.

The girls made cute bunnies - I've seen lots of different versions floating around Pinterest, but for mine I decided to use my Flower Fair framelits to create the ears and the various pieces from my trusty Owl Builder punch for the face, along with some strands of split white jute ribbon for his whiskers and some added detail with a Smoky Slate marker and my white gel pen.

The boys made these cute Easter chicks:

The boys were slightly younger, so we went with something a little less complicated with less small pieces required for the face.

In addition, everyone also made a little Easter bag, inspired by this one created by Brian King and using this fabulous little tutorial by Val Moody to create the basic bag shape:

We kept things simple with some tone-on-tone stamping using the 'For Peep's Sake' Easter-themed stamp set and a little tag made with the handpicked framelits. These little bags are so easy to make and the perfect size for your mini Easter eggs. Everyone chose their own colours - here's a couple of pictures I took on the day of some of the children's finished projects:


Not many 'action' photos I'm afraid - just too much going on. It was a busy few hours of crafting with 16 children taking part, but they were all so well behaved and thoroughly enjoyed making some great treat boxes to take home. I have another easy Easter-themed project to share with you tomorrow, so do pop back then if you're in need of some last minute Easter inspiration. Until then, happy stampin'!


Stampin' Up! Supplies Used:

For the rabbit box:

Table built using Product Table Builder by The Crafty Owl - Independent Stampin' Up! Demonstrator.


For the chick box:

Table built using Product Table Builder by The Crafty Owl - Independent Stampin' Up! Demonstrator.


For the Mini Egg Bag:

Table built using Product Table Builder by The Crafty Owl - Independent Stampin' Up! Demonstrator.


Sale-A-Bration Ends Today - Mini Treat Bags Thinlits Dies

by Joanne James31. March 2015 22:16

Well, what a Sale-A-Bration this has been! I have enjoyed it immensely - some of the best free products we've seen as part of this promotion and I would like to thank everyone who has shopped with me, hosted a party or joined my team during the last 3 months. Today I wanted to share some little packages I made last month for my recent Stampers Six Club customers and new recruits using the Mini Treat Bag Thinlits Dies. I've had to make quite a few of these so I was glad to be able to make good use of some of the fabulous Best Year Ever paper I earned free during Sale-A-Bration:

These treat bags are so easy to make and come with a range of fun thinlit pieces that can be used to decorate them or embellish cards or other projects. I kept these quite simple, with a layered panel on the front in co-ordinating cardstock and added some Calypso Coral pompom trim to the decoration with a mini peg to hold the bags shut - here's a close-up:

Whilst the paper may no longer be available, the Mini Treat Bag Thinlits Dies are in the seasonal catalogue and still available until 2nd June and there are a whole bunch of other DSPs available that would look just as good. These bags really are so cute and it's easy to make lots of these in no time at all; they would make great party bag favours too. 

That's me done for today; back tomorrow with a fun card and news of a new set of Wednesday Weekly Deals. Until then, happy stampin'!


Stampin' Up! Supplies Used:

Table built using Product Table Builder by The Crafty Owl - Independent Stampin' Up! Demonstrator.


Mini Catalogue

BROWSE THE CATALOGUE

The mini catalogue is now live! Read and download your copy here.

Shop Online

Access my online shop 24 x 7, 365 days of the year:

Current April hostess code:

VDKNV7BH

Shop Online

Join My Team

It's always a great time to join Stampin’ Up! New team members can get £130 worth of products for only £99 + free business supplies + free shipping + all the fun being a part of Stampin’ Up! Stampin' Up! has something for everyone: join my growing team and benefit from my support to enjoy Stampin' Up! however you choose.

If you're interested, call me for a chat to understand how I can help you realise your goals. Alternatively, if you have already decided to sign up and you just can't wait, please click here for the link to the online form where you can sign up and order your starter kit right away! 

Latest Kit!

Stampin Cut and Emboss

The Rock Legend Kit has all you need to make 8 cards with coordinating envelopes. Along with the new Panda Friends Kit, both are available from January 4th for just £14 each - get yours here!

2023-24 Annual Catalogue

BROWSE THE CATALOGUE

Click on the catalogue for a full list of current SU! supplies - if you would like to order any of the items featured, please drop me a line at [email protected] or give me a call on 07773 421446 - I'd be happy to help.

New Online Exclusives

There are new products available exclusively in the online store from 5 March - check them out here.

About Me

Hi I'm Joanne and live in Northampton and when I'm not looking after my husband and two beautiful children, am an avid crafter with a passion for all things Stampin' Up!

I must confess that I have never been a big rubber stamper - until I discovered Stampin' Up! that is. I love the fact that I can get such great results with co-ordinating stamps, inks, papers and punches - the possibilities are endless! Join me on my stamping journey as I share the things I love and be inspired to create amazing things yourself!

Follow Me

Monthly Newsletter

Box Builder

Click the button above to use Box Buster to create your custom box design using the Envelope Punch Board!

Kits Collection Now Available!

Stampin Cut and Emboss

The new Kits Collection from Stampin' Up! is now available!

Click here to see the current kits available and order yours online today.

I Design For


Stampin' Up Stuff

This is my personal blog and is not endorsed by Stampin’ Up! I hope you find it a plentiful source of ideas and personal inspiration but please don't copy my designs for contest submission or use for classes, publication or sale without express permission.