Something Borrowed Mother's Day Necklace

by Joanne James16. March 2015 20:47

Happy Monday everyone! No card today - I'm sharing a little 3D project for a change. Last week I was booked to craft with a local Brownie pack to help them make gifts for Mother's Day. I know a few of the Brownies - and mums! - so couldn't share our little project until today, for fear of letting their secret out of the bag. Now we all know that with a special gift it's as much about the packaging as what's inside, so this is what our gifts looked like from the outside:


Each girl had one of the Tiny Treat Boxes to decorate with papers from the All Aboom DSP stack - so pretty for spring - and one covered, each box was finished with a colour-co-ordinated bow made using the Bow Builder punch. We had great fun making these - and used hundreds of glue dots in the process!! Inside the box, it opened to reveal:

Each of them made a delicate silver necklace using one of the Simply Borrowed Embellishments for decoration, beautifully presented on a co-ordinated cardstock insert. How pretty is that? The girls were so pleased with their handiwork and all smuggled them home to keep them as a surprise until yesterday. I had lots of messages from mums today who were thrilled with their gifts, so I think we can safely say it was a job well done!

I love crafting with children, whether my own, when running children's birthday parties or in larger groups such as this. If you live in or around Northampton and would like more information about children's parties or running a Crafty Owl activity for a larger group such as a Brownie or Girl Guide group, then do get in touch - I would love to discuss options with you.

That's all from me today; back tomorrow with a card for you. Until then, happy stampin'!


Stampin' Up! Supplies Used:

Table built using Product Table Builder by The Crafty Owl - Independent Stampin' Up! Demonstrator.


A Sweet Tweet For You!

by Joanne James13. February 2015 22:00

Yay it's Friday! It's been a long week and I'm glad the weekend is finally here. As it's Valentine's Day tomorrow, both James Juniors were keen to take some sweet treats into school to share with their class mates. I found these lovely heart-shaped jelly beans, that fitted perfectly into the thin cello bags:

This is just the first few - production became quite intense at one point and included boy- and girl themed packaging. You can see pictures of the total effort over on my Facebook page. These pretty pink ones were of course headed in the direction of the young ladies; we were stamping the tab top from the 'Hey, Valentine' set in a variety of pinks and colouring in with Blendabilities. Here's a close-up:

I definitely like the Melon Mambo one best (I'm such a 'brights' girl at heart) but they all look cute, especially with the addition of a heart-shaped Hodgepodge clip too. This little bag topper is a perfect fit for these cello bags and will work just as well at any other time of year too, not just Valentines. I also made a batch for a children's birthday party that I am hosting tomorrow afternoon, in pinks and purples. Our cello bags are great value at 50 for £2.25 and make such a nice way to create beautifully decorated party favours.

I'm told that the treats were well received by everyone which is nice to know and provided the perfect start to our forthcoming week-long half-term break.

Back tomorrow with another project; until then happy stampin'!


Stampin' Up! Supplies Used:

Table built using Product Table Builder by The Crafty Owl - Independent Stampin' Up! Demonstrator.


Best Day Ever: Sale-A-Bration is Here and a New Spring-Summer Catalogue!

by Joanne James6. January 2015 12:04

Given that today is all about the start of Sale-A-Bration and the launch of the new Spring-Summer catalogue, today's card had to celebrate that! You can read the full scoop on my previous post here, but right now I'm sharing a card made with 2 of the 3 co-ordinating products that can be yours free with each £45 purchase and a new punch from the Spring-Summer catalogue that is sure to be a hit! I used the sketch layout over at As You See It for my card today:

Here is my rather 3-dimensional card today - check out those bows:

A simple card base of Sahara Sand, stamped with the 'Best Day Ever' stamp from the stamp set of the same name (the hearts are also from the same set) and decorated with some ribbons from the 'Best Year Ever' accessories pack. Instead of tying bows with this lovely silky ribbon, I decided to finish this otherwise simple card with some overstated punched bows, made using the new Bow Builder punch - how cute are they?! These are just perfect for decorating little treat boxes and gifts and are made in a jiffy - check out this video from Stampin' Up! that shows you just how easy they are to make:

How clever and easy is that?! I can see us all getting through a whole bunch of glue dots with these - don't forget to add those to your order!!

Back tomorrow with another project; until then, happy stampin'!


Stampin' Up! Supplies Used:

Table built using Product Table Builder by The Crafty Owl - Independent Stampin' Up! Demonstrator.


Gift Packaging Made Easy with the Gift Box Punch Board and Banner Framelits

by Joanne James27. December 2014 16:40

Merry Christmas to you all, my lovely blog readers! After a welcome few days break hosting Christmas for my family, today I'm back to the blog! I have a couple of pre-Christmas makes to share still; do you ever find yourself so busy crafting in the run up to the big day that you spend more time 'in the moment' rather than recording it and sharing? Well, this year that was definitely me! Today I am being treated to a day of rest - my seven year old has declared that he is doing the cooking today, from his new boy's cookbook (doing well so far - fresh fruit and pancakes for breakfast, followed by shepherd's pie for lunch) - so whilst he prepares a feast of chicken dippers for tea, I thought I would take the opportunity to get back into my blog. 

Today's share is some lovely gift packaging made with the Gift Box Punch Board, Envelope Punch Board and the Big Shot and Banner Framelits. I decorated some gifts using boxes made with the gorgeous Under the Tree speciality DSP and the Gift Box Punch board and some easy die cut tags to co-ordinate:


If your gift fits the standard boxes that the Gift Box Punch Board makes, it is a quick and easy 'no glue' packaging solution. With some ribbon and a fancy tag they really look the part:


I also made some bottle tags using the Banner framelits and a circle punch, again decorating with some simple wreaths cut with the Wonderful Wreath framelits - here's a close up:


As my regular readers will know, I am a big fan of the Envelope Punch Board and it is still my tool of choice for creating custom boxes - this is so easy to do with my BoxBuster tool - it enables you to create the perfect box size first time with no paper wastage. Here's one I made for my niece's Christmas gift that is the perfect case in point, this time finished with a tag made with the tree punch to co-ordinate with the Under The Tree paper:


If you are a fan of creating easy, attractive gift packaging, you will be pleased to know that the Gift Box Punch Board is carrying over and will still be available when the current Autumn-Winter seasonal catalogue ends. The Envelope Punch Board is always available as a standard annual catalogue item - phew, I don't know what I'd do if this tool was ever discontinued!

Back tomorrow with another of my pre-Christmas makes and a special announcement, so check back then for more crafting lovliness!

Until then, happy stampin'!


Stampin' Up! Supplies Used:

Table built using Product Table Builder by The Crafty Owl - Independent Stampin' Up! Demonstrator.


Snowflake Paper Christmas Wreath

by Joanne James21. December 2014 20:33

Sunday already?! Where are the days going??! I have been busy with my Christmas preparations and my focus has been on gift packaging these last few days, along with a few special Christmas cards. Most are going out of the door before they are even photographed though! Today I wanted to do a quick post to share a snowflake paper wreath that I made recently for a friend of mine:

It uses a whole bunch of retired product - the paper is from a couple of years ago (I can't even remember what it was called) and is decorated with snowflakes made from stamping Cherry Cobbler and Gumball Green on Very Vanilla carstock using the Festive Flurry stamp set, that I then cut out using the Big Shot and co-ordinating framelits and finished with a paper bow made using my Gift Bow Bigz Die. 

My friend specifically wanted this paper pattern as she wanted her wreath to co-ordinate with other festive pieces she had - as such I had to include a few pieces of solid colour cardstock just to enable me to get all the way around the wreath base; I am now officially out of this DSP pattern! I am going to make another of these wreath types at some point as I think it's really effective, although will probably choose a more traditional blue/silver colour scheme with my snowflakes. It was also quite easy to achieve: about 22 strips of DSP measuring 12" x 1 1/4", adhered to a styrofoam wreath and then the ends flagged.

That's all from me today - back soon with another project when time allows. Until then, happy stampin!

Tags: , , , , , , , , ,

3D Projects | Stamping

Holiday Home Through The Seasons Home Decor Frame - and my last Design Team post over at The Paper Players!

by Joanne James7. December 2014 07:00

It's Sunday and time for my Design Team post over at The Paper Players - and my last one, as my 6 month post has come to an end, boo hoo! These ladies have been an awesome bunch of people to work with and are a source of immense talent and inspiration. I shall miss designing with them, but will of course continue to play along with their weekly challenges.

This week Nance has a great challenge for us, to see out the end of the year in style - it is a 'black tie' challenge, to showcase holiday projects that are fancy:


I am sharing a rather different project today, which is not Christmas-specific but was designed using the Holiday Home stamp set and co-ordinating framelits from the Autumn-Winter seasonal catalogue and would make a lovely Christmas present to celebrate each and every season. Judging by the time it took me to complete it, I think it definitely qualifies as fancy! I made a 3D frame with a house for each month of the year, each one celebrating the seasons and events relevant to each month.

Here is my completed frame:

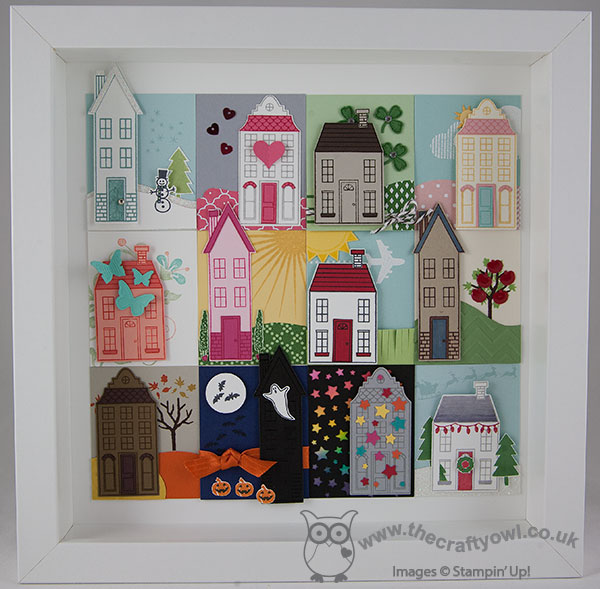
Each month is a little mini piece of artwork all by itself, with everything from a snowman and the winter snow to the shamrocks for St Patricks Day, summer sunshine and holiday aeroplanes to the autumn apple harvest, Halloween pumpkins and Santa and his reindeer and lots more in between. Each section uses a variety of papers, ribbons, embossing and colouring - far too many to list! If you have specific questions on any of the rectangles, please leave a comment below or drop me an email and I will be happy to provide further detail.

I hope you like my final Paper Players Design Team project; hop on over to the challenge blog to see what the others have come up with this week - as always there are some amazing projects! Do continue to visit and see what I come up with for future challenges as a participant and to the rest of the lovely Paper Players team and other guest designers, thanks a bunch ladies - you are all awesome and it's been a real pleasure working with you!

Back tomorrow with another project; until then, happy stampin'!


Stampin' Up! Supplies Used:

Table built using Product Table Builder by The Crafty Owl - Independent Stampin' Up! Demonstrator.


All is Calm Star Christmas Wreath

by Joanne James14. November 2014 21:36

Today I thought I would share with you the Christmas star wreath I made at my class yesterday. I used the All is Calm Speciality Designer Series Paper for my version, which looks like this:

I layered a circle of Lost Lagoon flat stars, cut out with my Stars framelits, onto my wreath base, then cut 12 stars out of the All Is Calm Speciality DSP for the 3D stars. Each of these stars was scored from the point to the opposite side then pinched together to create the dimension and once glued to the wreath base, finished with a selction of Brights, Neutrals, Subtles and silver buttons:

To finish, a length of the luxurious In-Colour Lost Lagoon satin ribbon to create a bow and hanging loop:

You can see another example of this wreath made with the Under The Tree Speciality DSP over on my Facebook page - it looks lovely in the kraft and more traditional, red, greens and browns, so do check it out. I have another of these classes next week where the ladies will be making them using other papers of their choice.

I hope you like today's project; this is going to be my indoor wreath as it matches my dining room colours perfectly; I have another two wreaths to share with you in coming weeks, so if home decor is your thing, keep an eye out for the other versions!

Back tomorrow with another project; until then, happy stampin'!


Stampin' Up! Supplies Used:

Table built using Product Table Builder by The Crafty Owl - Independent Stampin' Up! Demonstrator.


Tags: , , , , , , , , , ,

3D Projects | Classes

Framed All is Calm Advent Calendar Using Tiny Treat Boxes

by Joanne James4. November 2014 23:00

A late post from me today as I've spent a lovely day crafting with friends, followed by James family piano lessons this evening (3 out of 4 of us are learning!) so have only just got around to it. Our craft session was fun - we finished off some projects we started a little while ago, which always gives a good sense of achievement. With Christmas creeping ever closer, today I thought I would share with you the advent calendar I made for the James juniors, which is a case of a project by the lovely Julie Kettlewell. I love the Tiny Treat Boxes in this year's Stampin' Up! seasonal catalogue, which are of course perfect for making advent calendars. The sample in the catalogue shows just how easy it is to make something to a basic design, however having seen Julie's project a little while ago - you can see her original project here - I knew I wanted to create something similar. So without further ado, here is my framed advent calendar in all its glory:

Isn't it beautiful?! It is framed in a 20" frame/50cm, so is a substantial piece in terms of size and it makes a real statement. I chose to make mine using the All is Calm Speciality Designer Series Paper, here are some close ups:

This is the central panel, with a sentiment stamped using the Epic Alphabet and some trees punched using the Tree Punch and decorated with some frosted sequins.


Each of the boxes is covered on 5 sides using the All is calm DSP, then a number label made from a layered section using a 1 3/4" scalloped circle punch and a 1 3/8" circle punch, and numbers cut out of Dazzling Diamonds Glimmer Paper using the Perfect Print Numbers Bigz Die and the Big Shot.

This is a great project to showcase all of the lovely papers within the All is Calm DSP stack.

I adhered my boxes so that the flaps would open upwards and put my numbers in order from one through twenty four, however you could 'mix and match' if that's more your style. Each pack of treat boxes contains 25 boxes, so you have one spare to package an extra special treat for Christmas Day if that's your thing. I'm really pleased with how my calendar turned out and am busy acquiring lots of little treats to fill my boxes for the month of December. I can see this project becoming a real heirloom piece that we bring out year after year.

Hope you like today's project; back tomorrow with the new Wednesday Weekly Deals and my Design Team post for this week's challenge over at Colour Me...! Until then, happy stampin'!


Stampin' Up! Supplies Used:

Table built using Product Table Builder by The Crafty Owl - Independent Stampin' Up! Demonstrator.


Halloween Treats - Good To the Very Last Bite!

by Joanne James31. October 2014 16:00

I'm off to a Halloween party today with friends and I wanted to do a quick post to share with you some of the treats I made to take for the children. I found these cute mini pumpkins for the girls and slightly more scary eyeballs for the boys, and just tied them in some cellophane with the White and Tangerine Tango Two-tone Trim and added some cute tags:

I also found these cute chocolate Halloween figures that I dressed up with some covers made using the Scalloped Tag Topper Punch with a large oval punched out of the front section, and decorated with some colourful tags - I stamped the Halloween image from the 'Merry Everything' stamp set twice, once on Tangerine Tango then again on some scraps of retired Lucky Limeade cardstock and cut out the Dracula on the green cardstock and paper-pieced them together.

How cute are these? I'm entering these into this week's challenge over at Colour Q, as they were inspired by this week's colour scheme and challenge badge (I substituted Rich Razzleberry as my purple, since I didn't have and Concorde Grape):

Happy Halloween everyone! Back tomorrow with another project; until then, happy stampin'!


Stampin' Up! Supplies Used:

Table built using Product Table Builder by The Crafty Owl - Independent Stampin' Up! Demonstrator.


Behind The Scenes at Stampin' Up! - Shooting a Stampissimo Video

by Joanne James30. October 2014 07:00

Today I have something very special that I've had to keep under wraps for a little while: the latest Stampin' Up! UK Stampissimo video has just been published and guess what? I am the starring demonstrator! I was so excited to be asked by Paula Gorry, Stampin' Up! UK Business Development Manager, to create a project for the latest video with the theme of 'Winter Treats' that once I had a copy of the Autumn-Winter seasonal catalogue in my hands, it didn't take me long to decide what I was going to use - the fabulous new Curvy Keepsake Box Thinlits Die. You can make all kinds of customised boxes with this die, but for the theme of 'Winter Treats' I knew I wanted to create a range of Christmas characters, with Rudolf the Red-nose Reindeer being the star of the show. It meant I could combine the box die with another of my favourite catalogue products that you've seen me use so many times on different projects - the Autumn Wooden Embellishments (LOVE these and one pot lasts an age!)

Here is the reindeer box that I demonstrate in the video - how cute is this?!

The project itself needed to be simple enough to demonstrate whilst chatting at the same time - the purpose of Stampin' Up!'s range of Stampissimo videos is to spread the word about Stampin' Up! to both crafters and non-crafters who may not have heard of Stampin' Up! and give them some insight into the products and the demonstrators who sell them. Whilst they are based around demonstrating and sharing a particular product or project, the informational nature of these videos mean they last longer than your average tutorial so you need to get comfy!

You can get the details for how I made the box above and see lots of other boxes featured in the video itself, but I wanted to share with you some of the 'behind the scenes' photos from my day and give you a little insight into the fun that I had spending the day with Paula and Kelly in the studio, along with the now infamous 'Ben and Jerry' film crew of Ben and James, who do all of the filming for Stampin' Up!'s UK events and did such a fabulous job of recording the day and producing the final video.

This is what filming looks like from behind the scenes -  a real case of lights, camera, action! There are cameras that shoot from the front and from above in order to get a full range of shots and the necessary close-ups. When I shoot video tutorials at home I use an overhead camera, but I'm sitting at my desk. When you're standing up it is quite tricky because you have to be careful not to lean over your workspace, otherwise all the viewer sees is the top of your head! Sounds obvious, but I found out there is a real art to working with your arms outstretched and not leaning too far into your workspace.

Here are a couple of shots of Ben and James, the guys that produce the video - I struggle to tell them apart - they're twins! - but as you can see, one is slightly more camera-shy than the other:


They really are the nicest chaps you could wish to meet and I think they did a great job with the final edit, although I'll admit I'm biased!

This is my favourite photo of Paula and I on the day, taken mid-take once we were properly relaxed and into the swing of things - we really were having fun:

Lastly, here's one of us all post filming each displaying our favourite boxes, the chaps included. They decided the boxes were so easy to make, they might even have a go themselves at making some to grace their family festive table. At the UK training day at Telford earlier this year, the Stampin' Up! demonstrators were treated to a video of Ben and 'Jerry' making their first foray into crafting Stampin' Up! style, so this may well be their second!!

Also, note the festive pot plant on the edge of the desk and the Christmas tree in the video - Kelly and Paula did their best to make the studio look festive, which was quite tricky given that this was filmed some time ago when the sun was shining gloriously outside and it was not even remotely autumnal, let alone wintery! A big thank you the lovely Kelly Francis, who took all of the above pictures - she is an absolute star!

Here are some additional pictures of some of the finished boxes that feature in the video - this is Santa's helper, the mischievous elf: 

This is the man himself, Santa Claus - with his head!:

This one is Santa - without his head! Perfect if you are short on time or want something that's a little more adult-oriented:

Then we have the cutest snowman - check out his twirly carrot nose! 

Here they are altogether - one big happy Curvy Keepsake Box festive family:

I hope you found the 'behind the scenes' tour interesting - now here's the video that you've all been waiting for:

In summary, a truly great experience and yet another of the fantastic opportunities available to me as a Stampin' Up! demonstrator working with this amazing company that allows me to share what I love, be endlessly creative, manage and motivate a great team and have a job that totally fits around my family commitments and enables me to achieve the best work-life balance I've ever had.

If you're reading this and thinking that you would like to know more about the benefits of becoming a Stampin' Up! demonstrator, then do get in touch with me on 07773 421446  - I would love to have a no-obligation chat with you and tell you more.

If you would like to make Rudolf, the supplies list that links to my online store is below.

Back tomorrow with another project; until then, happy stampin'!


Stampin' Up! Supplies Used:

Table built using Product Table Builder by The Crafty Owl - Independent Stampin' Up! Demonstrator.


Mini Catalogue

BROWSE THE CATALOGUE

The mini catalogue is now live! Read and download your copy here.

Shop Online

Access my online shop 24 x 7, 365 days of the year:

Current April hostess code:

VDKNV7BH

Shop Online

Join My Team

It's always a great time to join Stampin’ Up! New team members can get £130 worth of products for only £99 + free business supplies + free shipping + all the fun being a part of Stampin’ Up! Stampin' Up! has something for everyone: join my growing team and benefit from my support to enjoy Stampin' Up! however you choose.

If you're interested, call me for a chat to understand how I can help you realise your goals. Alternatively, if you have already decided to sign up and you just can't wait, please click here for the link to the online form where you can sign up and order your starter kit right away! 

Latest Kit!

Stampin Cut and Emboss

The Rock Legend Kit has all you need to make 8 cards with coordinating envelopes. Along with the new Panda Friends Kit, both are available from January 4th for just £14 each - get yours here!

2023-24 Annual Catalogue

BROWSE THE CATALOGUE

Click on the catalogue for a full list of current SU! supplies - if you would like to order any of the items featured, please drop me a line at [email protected] or give me a call on 07773 421446 - I'd be happy to help.

New Online Exclusives

There are new products available exclusively in the online store from 5 March - check them out here.

About Me

Hi I'm Joanne and live in Northampton and when I'm not looking after my husband and two beautiful children, am an avid crafter with a passion for all things Stampin' Up!

I must confess that I have never been a big rubber stamper - until I discovered Stampin' Up! that is. I love the fact that I can get such great results with co-ordinating stamps, inks, papers and punches - the possibilities are endless! Join me on my stamping journey as I share the things I love and be inspired to create amazing things yourself!

Follow Me

Monthly Newsletter

Box Builder

Click the button above to use Box Buster to create your custom box design using the Envelope Punch Board!

Kits Collection Now Available!

Stampin Cut and Emboss

The new Kits Collection from Stampin' Up! is now available!

Click here to see the current kits available and order yours online today.

I Design For


Stampin' Up Stuff

This is my personal blog and is not endorsed by Stampin’ Up! I hope you find it a plentiful source of ideas and personal inspiration but please don't copy my designs for contest submission or use for classes, publication or sale without express permission.