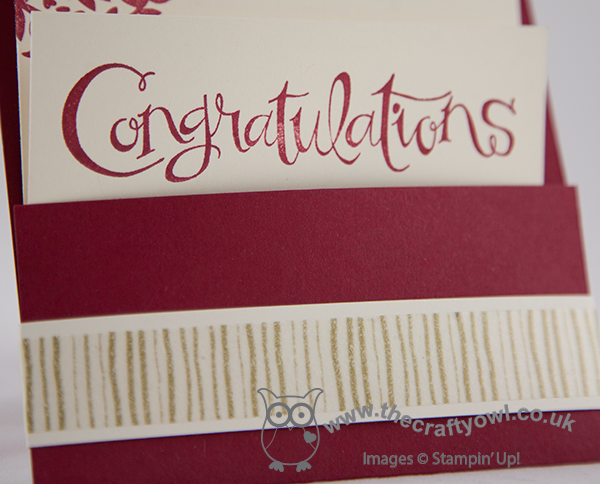
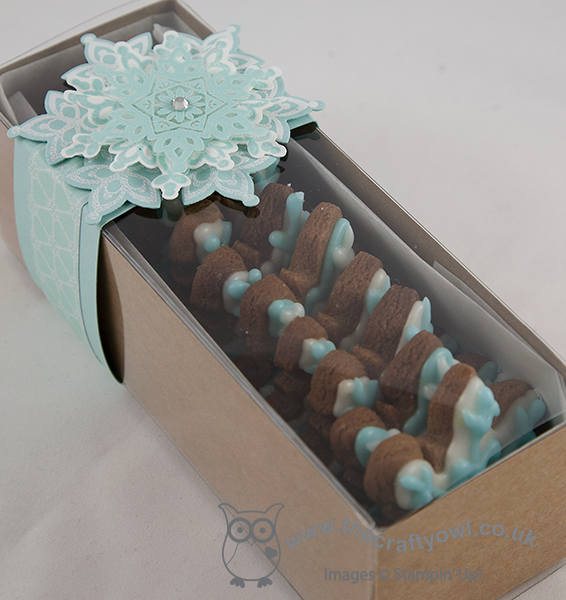
by Joanne James3. February 2014 21:18This week is a busy week for me, with a couple of classes and lots more going on. I held my first class of the week today and we had a lot of fun making cards using all of the items that can be yours free with a £45 spend during Sale-A-Bration. I'll share some of these cards with you later in the week (I don't want to spoil things for those ladies that haven't made them yet!) but today I wanted to share a short video tutorial for the first of the projects I've made using the Scalloped Tag Topper Punch. The Scalloped Tag Topper Punch is new in the Spring-Summer seasonal catalogue and, along with its neighbour the Angled Tag Topper Punch, can be used to make easy gift tags and bookmarks in one simple step, as the top is shaped and the hole punched for you in one easy movement. It is an incredibly versatile punch and can be used to create lots more besides.
I have filmed a series of tutorials that show the versatility of these punches and the first of these shows you how to make a basic treat holder. Here are some of the ones I created:
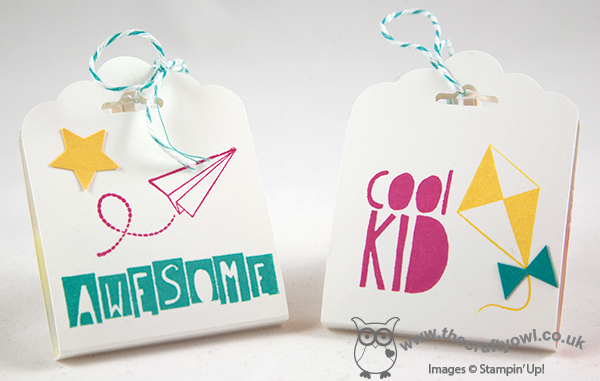
These were for my children as an after-school treat (they always complain I never greet them with sweets at the school gate, so this made a nice change!) and then I also created this more grown-up version:

I think these would make such lovely wedding favours and are so easy to make you could easily put together large quantities with minimal effort. I was inspired by these treat holders made by Mary Fish and adapted mine to suit the chocolate supplies on hand! Also, I have included both metric and imperial measurements in my tutorial, so you can create this treat holder with ease, whichever method you prefer.
So here's the first in my series of Scalloped Tag Topper Punch video tutorials - enjoy!
I hope you found my video useful; if you would like to purchase any of the items featured, please click on the links below and hop on over to my online store or give me a call if you're local to me and would like to save on postage costs. Back soon with news of some product shares that I've put together for those of you who have now had time to browse the new Spring-Summer catalogue and would like a little bit of everything! Until then, happy stampin'!
Stampin' Up! Supplies Used:
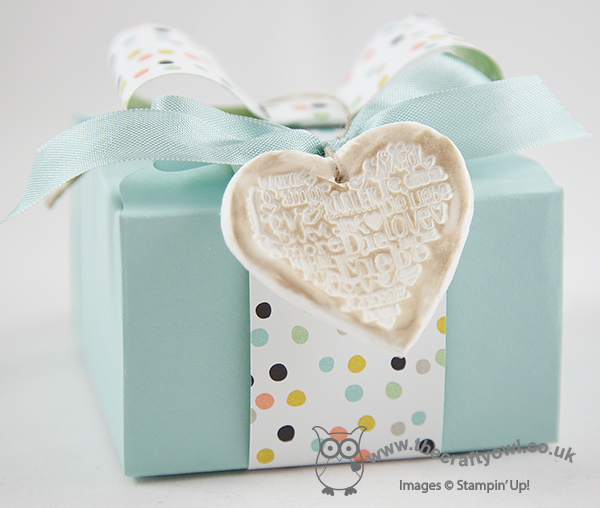
by Joanne James29. January 2014 20:50Today I have a little project to show you that is based on something I made using my Flowerfull Heart stamp at the beginning of January, but because I didn't have a voice I wasn't able to shoot a video to show you how to make it! Now that my beloved Flowerfull Heart stamp is no longer available to purchase, I decided to modify my original design and make it using one of the stamps in the new 'Language of Love' set that features in the Spring-Summer seasonal catalogue. I used Stampin' Up!'s Simply Pressed Clay to make an ornamental gift tag embellishment that you could use to decorate a card or package. Here's one on a box with a bow made out of some of the lovely Sale-A-Bration Sweet Sorbet DSP:
Here's a close-up of the tag, where you can really see the detail of the stamp:
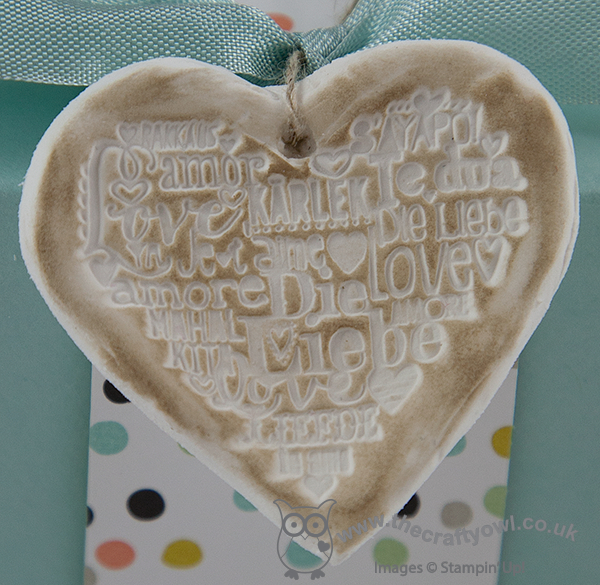
These tags really are quite easy to make, although you need to bear in mind it's a two stage process, as you will need to allow time for the clay to dry before you can colour and finish it. Here's a link to my video tutorial that shows you how it's done - it also includes some larger ornamental hearts made with my Flowerfull Heart (I couldn't resist!) - and some useful hints and tips for working with Simply Pressed Clay:
These tags would look beautiful attached to a wedding gift, or could even be an alternative wedding favour. I hope you found today's video tutorial useful and it inspires you to make interesting things with Stampin' Up!'s Simply Pressed Clay - leave me a comment and let me know what you come up with, or better still share a photo of your work on my Facebook Page!
Back tomorrow with another project; until then, happy stampin'!
Stampin' Up! Supplies Used:
9e5e4fa7-f4d4-4356-ad0b-61ab3a5b9bbc|0|.0|96d5b379-7e1d-4dac-a6ba-1e50db561b04
Tags: 3D Projects, Language of Love, Simply Pressed Clay, Stampin' Up, Stampin' Up Card, Stampin' Up Card ideas, Stampin' Up Supplies, video tutorial, Valentine's, Valentines, Weddings, Shop online
3D Projects | Stamping | Video Tutorials
by Joanne James10. January 2014 19:45Evening lovely blog readers! So big news of the day: my voice is (almost) back! Great news for me, not so great for my youngest when he announced he had lost his trainers following his PE lesson just 3 days into the new term - but that's a story for another time!
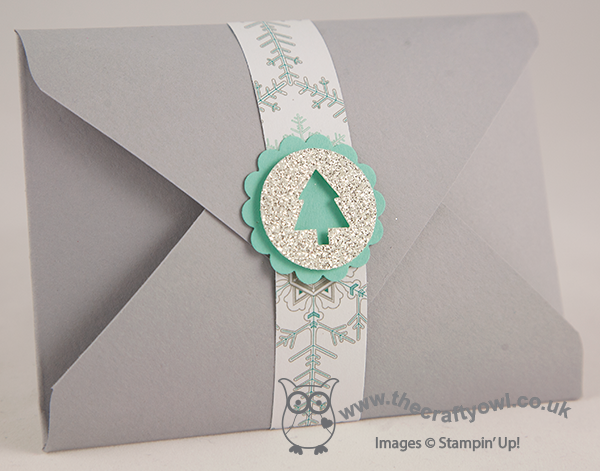
Today I'm going to share the last of this week's class projects: a gift card holder, once again made with the Envelope Punch Board. I've seen a few holders made in this way on the internet, but I adapted mine slightly to enable me to make it from half a sheet of A4, using metric measurements. So here is the finished gift card holder from the outside:

No apologies for once again using the Flowerfull Heart stamp (I still love it!), this time overlaid with 'love' cut from gold foil using the Expressions Thinlits die (don't forget these are only available to purchase until the 1st February). There's also another sneak peek of new product available in the Spring-Summer catalogue that launches on 28th January; did you spot it? Yes, it's the lovely gold washi tape which I paired here with Very Vanilla to make my pocket. There are lots of silver and gold items in the new catalogue, so if this is your thing, stay tuned - there will be more to come. The flap closure for the gift card holder is the bit you need the Envelope Punch Board for - it makes the two notches that enable the holder to stay closed and keep the gift card firmly in place.
When you unclasp the flap, this is what you see inside:
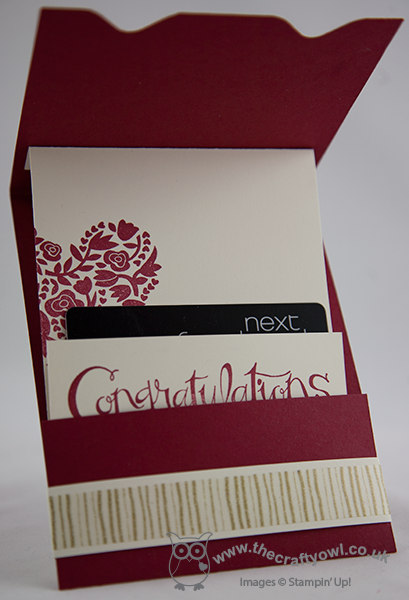
The insert is attached to the opening flap so that it slides out of the pocket as you open it and presents the gift card. I designed my gift card holder with a wedding or engagement gift in mind - vouchers or money seem very popular gifts these days, but you could easily adapt it for a birthday or other occasion. One thing is for sure - when it's as easy to make as this, there's really no excuse for a simply sticking a voucher in an envelope or worse still a carrier bag (believe me, it happens!!)
That's all the projects from my classes this week - I hope they've inspired you to go and be adventurous with your Envelope Punch Board. If you live local to me in Northampton and would like to attend any of my Stampin' Up! papercraft and card classes, you can find the current schedule of my card and project classes on my website here; please contact me for further information regarding location and any equipment you will need to bring. Classes must be booked at least 2 weeks in advance of the class date.
Back tomorrow with a Sale-A-Bration sneak peek; until then, happy stampin'!
Stampin' Up! Supplies Used:
2cbf2591-39f6-471a-9a05-7822cc150877|1|5.0|96d5b379-7e1d-4dac-a6ba-1e50db561b04
Tags: 3D Projects, Classes, Envelope Punch Board, Flowerfull Heart, Gift Voucher, Sassy Salutations, Shop online, Stampin' Up, Stampin' Up Card, Stampin' Up Card ideas, Stampin' Up Supplies, Weddings, Valentines
3D Projects | Cards | Classes | Envelope Punch Board | Stamping
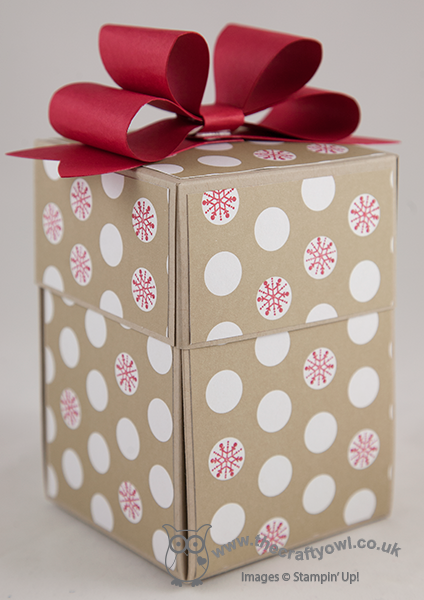
by Joanne James8. January 2014 15:26So for my second post today, I wanted to share with you one of the quick makes from my January classes, which are being held this week. This month we are featuring the Envelope Punch Board. Lots of my customers either purchased one or received one as a Christmas gift, but weren't really sure what to do with it other than make basic envelopes. They were truly inspired by my Easiest Ever Envelope Punch Board Cracker Video that I posted before Christmas, so I was keen to show them the full extent of their boards and just what they could do.
We started off by making square boxes - here's my version of the one we made:
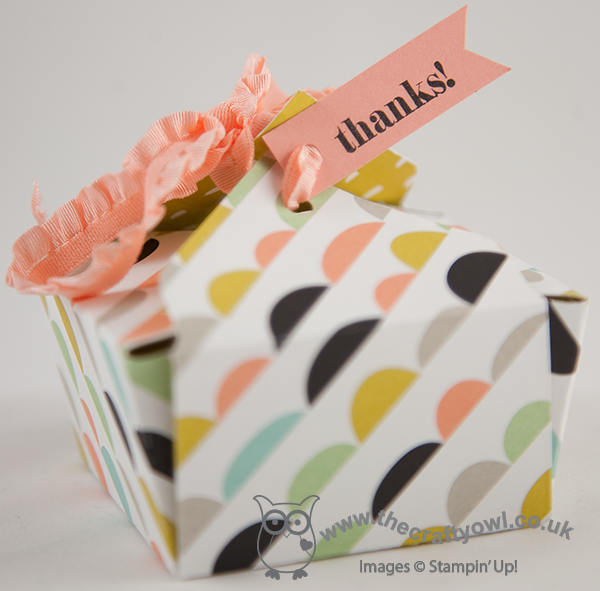
This is a simple 2" square box, made from a 6" x 6" square piece of paper, probably the easiest type of box to make. My class used the Modern Medley DSP for their boxes (there are some pictures over on my Facebook page if you would like to see them), but for my box here I thought I would give you another 'sneak peek' of product that will be available during this year's Sale-A-Bration promotion, starting 28th January. This is a sheet from the 'Sweet Sorbet' DSP collection - lovely fresh, spring colours with black (an unusual, but very workable colour combination). I finished my box with a small 'thanks' tag and some stretch ruffle trim in Crisp Cantaloupe to hold the box closed.
Back tomorrow with another of my class projects. until then, happy stampin'!
Stampin' Up! Supplies Used:
6aa5543d-b2e5-4d14-b8dc-304e99af2e39|0|.0|96d5b379-7e1d-4dac-a6ba-1e50db561b04
Tags: 3D Projects, boxes, Classes, Envelope Punch Board, Sale-a-bration 2014, Shop online, Stampin' Up, Stampin' Up Card, Stampin' Up Card ideas, Stampin' Up Supplies, Sweet Sorbet
3D Projects | Boxes | Envelope Punch Board
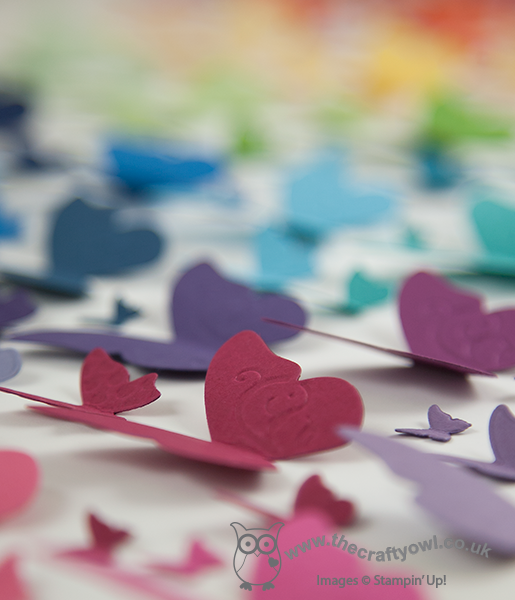
by Joanne James29. December 2013 13:00As you will have guessed if you read yesterday's post and saw my 'sneak peek', today's post features butterflies - quite a few, in fact! Ever since I saw this piece of wall art by Fiona Duthie on Pinterest I've wanted to have a go at creating a version of my own. Butterflies have a special meaning to one of my best and most dear friends and she is also someone who loves home décor, so I decided to create this piece as a Christmas gift for her. Here's my finished piece:
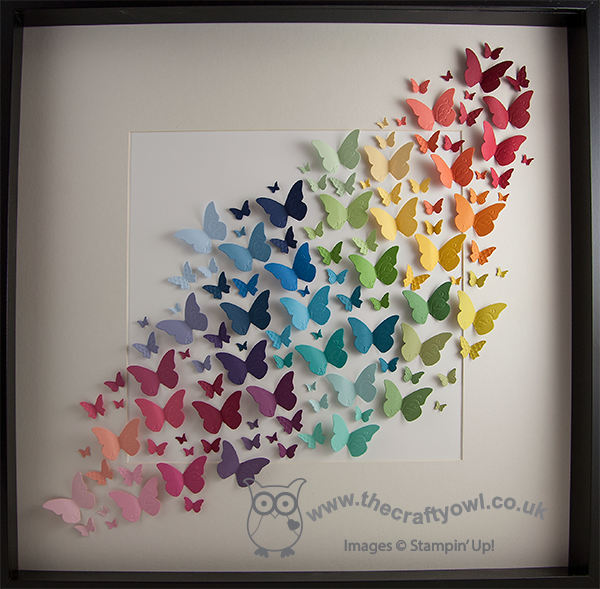
The finished piece measures 50cm x 50cm (approx. 20") so is a definite statement piece. I used a variety of colours across each of the Stampin' Up! colour families, including in-colours, along with one or two retired colours too. I wanted to give a full rainbow spectrum of colours, particularly given the size of the piece.
For the butterflies, I used the Beautiful Wings Embosslits to make the butterflies as opposed to a punch, as I wanted the texture that the embosslit provides - here's a closer look:
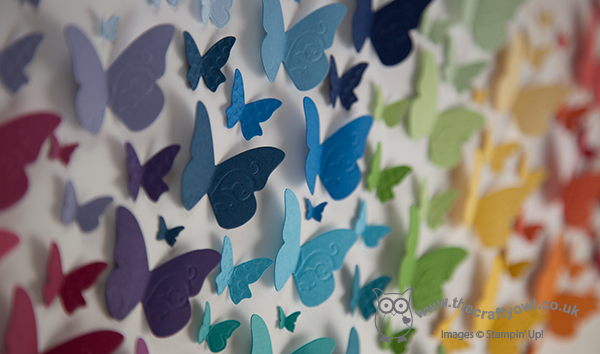
You could quite easily create a similar piece using one of the butterfly punches and it would be equally effective. I'm so pleased with the finished piece - it was quite tricky to photograph, but I hope you can get a sense of the movement it gives - it is so colourful and dramatic.
This is a nice early post from me today as I'm out with friends this evening on a cookery course, in an attempt to master the art of Indian cookery; it's the second one that hubby and I have attended (I'd like to say it's because we want to expand our repertoire, but it might just be that we need the practice - I'll have to get back to you on that!)
Back tomorrow with another project; until then, happy stampin'!
Stampin' Up! Supplies Used:
by Joanne James28. December 2013 20:33Another quick post from me today in between continuing festivities. We had one of our two annual trips to the pantomime today: this one our family visit to one of the smaller theatres in town, which is always guaranteed to put on a good show. This year was no exception - the performance of 'Wind In The Willows' was one of the best I've seen in some time and we all had a lovely time. If you're local to Northampton you really should visit the Royal before the run finishes - you won't regret it.
Now for today's project! As my regular blog readers will know, one of my other hobbies is biscuit baking and decorating. I've made lots of them in the last few weeks, mostly as gifts for teachers, friends and neighbours. I've packaged them in lots of different ways and often use jars tied with ribbon for my bite-size cookies, but one of my favourite methods of presentation for standard size biscuits has to be the Tag a Bag Gift Boxes - you can decorate and embellish, but I love the 'sneak peek' you get of the contents inside through the acetate sleeve. These boxes are also super sturdy, which is great for transporting their reasonably fragile contents. Many of my boxes were made and gifted before I got the chance to photograph them, but I managed to get a shot of my very last box before its departure:
I finished the box with a belly band of Pool Party layered with a strip of Winter Frost DSP through the centre and finished with a pretty triple-layered snowflake, just right for my festive snowflake iced gingerbread biscuits in a co-ordinating colourway. This particular box of biscuits was destined for Aaron, the UPS man who delivers my Stampin' Up! parcels all year round; just one of the many people I like to show my appreciation for, especially at this time of year.
Tomorrow I have a special project to share: not a Christmas themed project, but rather something I made for a dear friend of mine as a Christmas gift. Here's a little glimpse just to whet your appetite:
Hopefully you're intrigued - pop back tomorrow to see the whole thing. Until then, happy stampin'!
Stampin' Up! Supplies Used:
by Joanne James26. December 2013 20:29Today I'm going to share another of my Christmas projects, this time a fun packaging solution for a cute chocolate snowman that I bought at my local supermarket. From the outside, it looked like a fairly straightforward nicely packaged box, complete with bow:
It's when the box is opened that the 'reveal' happens - the snowman is sitting in the middle with the inside of the box decorated with four co-ordinating stamped 'snow day' snowmen:

I love the snowman stamp set in the 'Snow Day' set and as soon as I saw the chocolate snowman I knew the two belonged together. The box base uses one 12" x 12" sheet of Crumb Cake cardstock and is a great way to turn a simple chocolate gift into something extra-special.
Today is going to be an early night for me I think; after all the food and excesses of the last few days and a lovely long walk in the fresh air this afternoon, I am absolutely shattered! Back tomorrow with another project; until then, happy stampin'!
Stampin' Up! Supplies Used:
e255bd13-0bdf-4533-8c21-96bf506938a9|0|.0|96d5b379-7e1d-4dac-a6ba-1e50db561b04
Tags: 3D Projects, boxes, Christmas, Big Shot, Gift Bow Bigz L Die, Snow Day, Shop online, Stampin' Up, Stampin' Up Supplies, Exploding Box, Season of Style
3D Projects | Boxes | Stamping
by Joanne James22. December 2013 21:17Well it's been another busy few days here in the James household with a trip to the movies on Friday, a fun trip iceskating yesterday and swimming, grocery shopping and a pre-Christmas festive family get-together this evening. The big day is almost upon us, but I finally managed to get some photographs taken today in between all my last minute Christmas preparations and today would like to share some of my quick but attractive festive packaging ideas for stocking-fillers and small gifts. Here's the first one - a simple pouch made using the envelope punch board:
I made lots of these in various colours to tie in with the Winter Frost DSP stack to package some little gifts for the lovely ladies who have attended my classes over the past year (I can't tell you what's inside though - it's not Christmas Day yet ;-)! )
The second of my projects is a little stocking filler I made for my daughter - a pair of hairclips decorated with Frosted Finishes Embellishments and packaged in a cute little triangular carton that I made using a sheet of the Winter Frost DSP stack:
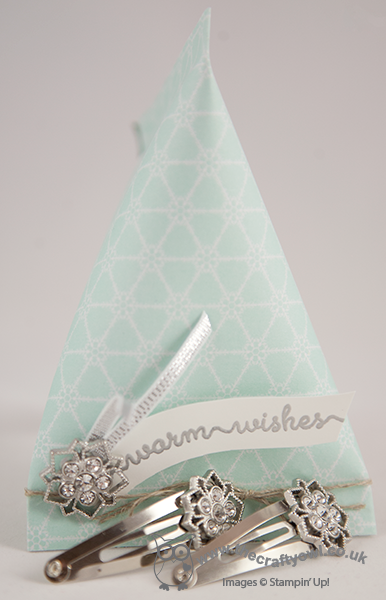
I embossed the 'warm wishes' sentiment from the 'Snow Day' stamp set using silver embossing powder and it added a real feel of luxury to the finished packaging. For the clips, I simply adhered a Frosted Finishes Embellishments using Crystal Effects to a couple of standard hair clips.
My last packaging idea that I'm going to share today is one of the lovely little muslin bags, which I stamped with the 'Love and Joy' single stamp and decorated with another Frosted Finishes embellishment, a ribbon tie and a little Dazzling Diamonds for some extra sparkle:
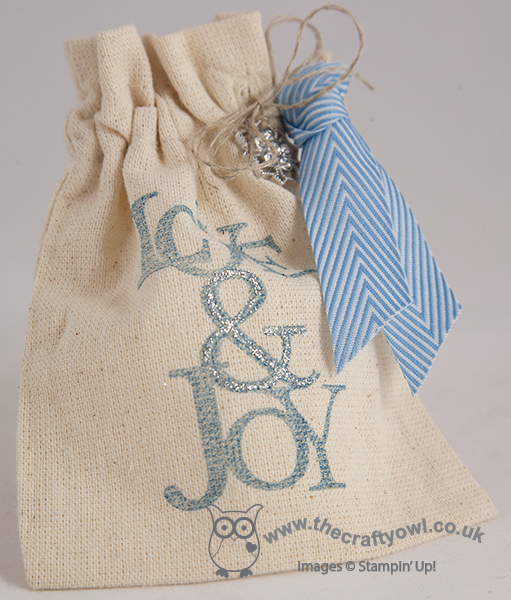
These bags are a great size and perfect for a little sweet treat or a small gift such as nail polish or some candles, or maybe a miniature bottle of a favourite tipple, a pack of playing cards or a micro torch for a more masculine gift.
So some easy ideas to make those little gifts extra special.
I have a date with a very large ironing basket tomorrow evening (the exciting life I lead!), but all being well will be back with another post as I've a few more Christmas-themed things to share and am running out of time in which to do it.
Until then, happy stampin'!
Stampin' Up! Supplies Used:
f179dbd2-3545-4e46-b6c7-8b9de0c424f5|0|.0|96d5b379-7e1d-4dac-a6ba-1e50db561b04
Tags: 3D Projects, Christmas, Snow Day, Love and Joy, Frosted Finish Embellishments, Envelope Punch Board, Merry Minis, circle punch, scallop circle punch, Shop online, Stampin' Up, Stampin' Up Card, Stampin' Up Supplies, Stampin' Up Card ideas
3D Projects | Stamping
by Joanne James11. December 2013 20:39Evening all! I've been busy in the kitchen today icing biscuits that I baked yesterday in readiness for end-of term teacher gifts later in the week. More to do tomorrow and I will endeavour to share some pictures later in the week, but for today something fun! A little while ago I entered a competition to create a video advertising a Stampin' Up! event or product. The winners were announced at this year's European Convention and whilst I didn't win, today I thought I would share with you my entry as it features - yes, you've guessed it - the Stampin' Up! Gift Bow Bigz Die!
This really is a great product, as there is so much you can do with it, including, but in no way exclusively, make the most beautiful bows. In addition, as with all Stampin' Up! dies, it will cut cut not only cardstock, but other materials too: cork, coaster board, fabric, felt and lots more. The inspiration for my video came from Bryony the elf, who features in one of my favourite Christmas movies, 'Arthur Christmas'. She is an ace gift wrapper whose catchphrase is "there's always time for a bow!". Here she is doing her thing:
And here I am, doing mine:
Did you spot the 'make' that I haven't shared with you separately? It really is so easy to use the Gift Bow Bigz Die to make so many different projects. I still have more I would like to share with you; I just need more hours in my day to make them all!
I hope you enjoyed today's fun video - back next time with more creative inspiration. Until then, happy stampin'!
Stampin' Up! Supplies Used:
by Joanne James9. December 2013 21:00So today is the start of the last week of school for the James' juniors, so there are lots of daily activities with Christmas in mind. I've just returned from watching my youngest in his Christmas school production, having given a stellar performance as the 'Bethlehem Census Man' (imagine town crier!) and delivered his one line with true dramatic style: "Hear ye, hear ye - census in Bethlehem! Your country needs you !" There's nothing like a Christmas production to make you feel like the festive season is upon us.
And so to today's creation with the Gift Bow Bigz Die: hot on the heels of yesterday's gift bow angel, a Christmas pudding tree ornament! Now, for my non-UK readers, you may not know that Christmas or plum puddings are a peculiarly British fayre, traditionally eaten after Christmas lunch on Christmas Day. They are eaten with either white sauce or brandy butter and are something of an acquired taste, or so my American friends told me after I sent them one for Christmas one year! So without further ado, here's a picture of the finished pudding:
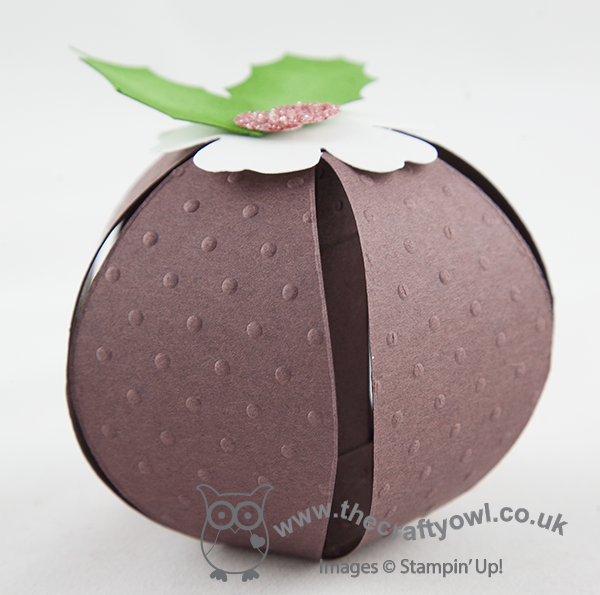
I made a few of these a while ago (tomorrow's post will explain all!) and I think they make another cute ornament for Christmas time. You could just follow the instructions to make a plain sphere out of patterned paper, but I decided mine needed dressing up, hence the Christmas pudding. I made a video showing you how easy they are to create using the Gift Bow Bigz Die from Stampin' Up!; the video also shares a handy technique for colouring your glimmer paper to match your product - did you know you can colour Stampin' Up!'s Glimmer Paper using your Stampin' Write markers? If not, watch the video to find out how:
I hope you like today's project - back tomorrow with something a little different, but still bow-related!
Until then, happy stampin'!
Stampin' Up! Supplies Used: