by Joanne James5. April 2014 20:27Another tulip card for you today - no apologies, I love this stamp! This card was inspired by the flecked pink tulips I received from my James juniors for Mother's Day last week. This card features this stamp used in another different way, this time to create an outlined background panel:
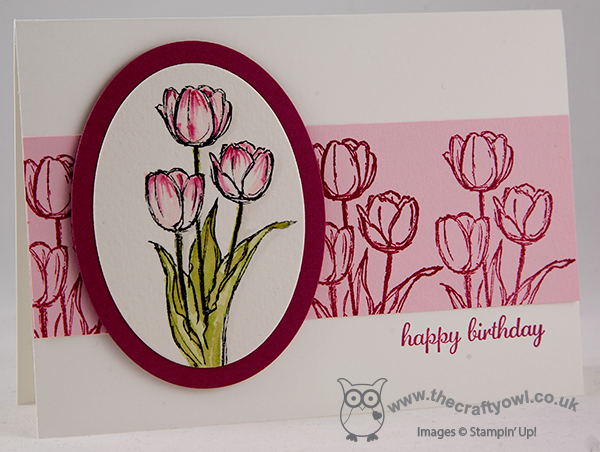
In splitting the tulips away from the sentiment on the original stamp, this makes it really easy to use the tulips for non-Easter cards, as I've done here. I used a Whisper White base, then stamped the tulips in Rose Red on a strip of Pink Pirouette cardstock. I then stamped the tulips again, this time in Black Stazon on watercolour paper and coloured with inks and my Aquapainter and cut out using my oval framelits and mounted on a second oval in Rose Red.
That's all for today; tomorrow's card may well have to be a 'get well soon' card as this afternoon my young son appears to have succumbed to the chicken pox - his THIRD dose in just 6 years!!! I didn't think this was even possible, but his itchy spots tell me otherwise. On the upside, at least it's the Easter holidays, so he should be over it by the time the new term starts :-)
Back tomorrow with another card; until then, happy stampin'!
Stampin' Up! Supplies Used:
bfde84b6-2625-4011-97c6-e19f66f05874|1|5.0|96d5b379-7e1d-4dac-a6ba-1e50db561b04
Tags: Blessed Easter, Express Yourself, Big Shot, Ovals Framelits, Shop online, Stamp-a-ma-jig, Stampin' Up, Stampin' Up Card, Stampin' Up Card ideas, Stampin' Up Supplies, Watercolouring
Cards | Stamping
by Joanne James4. April 2014 20:55Today I'm sharing another card from this week's classes - this time one of the scallop tag-closure cards that are all the rage at the moment in a lovely, deep purple. Here is my card:

The card is a standard A6 size (10.5cm x 14.9cm), but instead of being scored down the centre of the cardstock, I scored at 8.5cm and 19cm, marked the centre point and having guided the cardstock over the punch guides, I punched using the Scalloped Tag Topper Punch and trimmed away the excess on either side of the punched section. I love this punch - it really is so useful for tags, bookmarks, boxes, fancy cards and everything in between!
I also used my Aquapainter to colour this card, but instead of using watercolour paper I actually used Whisper White cardstock - I wanted to show my class attendees the differences in effect when you use different paper types. The sentiment was also stamped separately and punched out, which worked better on the narrower section. We split our sentiment away from the tulips at the start to allow for more flexibility when stamping, so this was really easy with no masking required.
That's all from me today; I'm entertaining family this weekend and off to play tooth fairy to my eldest this evening, who lost another of her baby teeth today - just need to make sure she's asleep first :-)
Back tomorrow with another card; until then, happy stampin'!
Stampin' Up! Supplies Used:
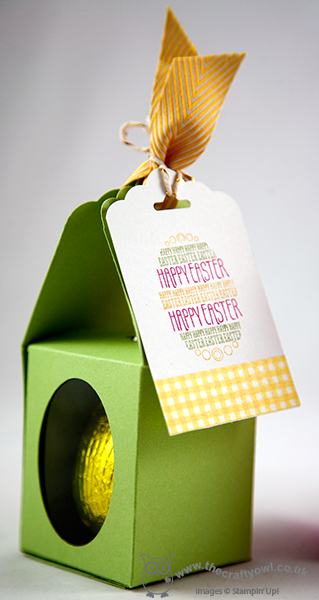
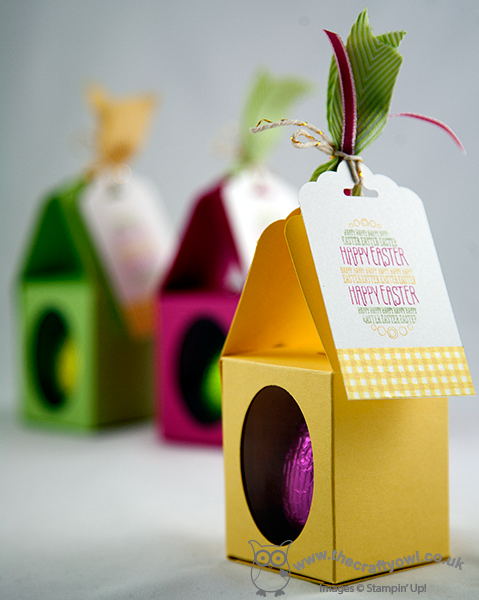
by Joanne James3. April 2014 21:03Evening everyone! I promised you a special project today and here it is! Several months ago Stampin' Up! asked me if I would create an Easter box for a magazine commission and that magazine hits the shelves of the newsagents today! The box I created for Stampin' Up! is featured in the April 2014 issue of Prima Baby and Parenting and is part of an extended feature on Easter Family Fun - great things to make and do with your family this Easter. There are cute cakes and biscuits to bake and this fabulous Easter egg box to make:
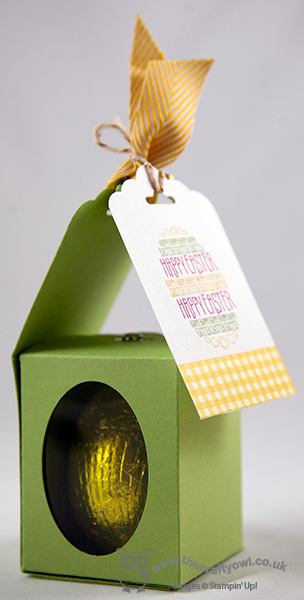
Here's another shot from a different angle showing a close up of the tag, stamped with the egg from the 'Eggstra Spectacular' stamp set:
Lastly the trio of boxes that the magazine used for the title page of the two-page spread:
Here is my photograph of the title page in the magazine itself - the facing page contains a step-by-step 'how to' tutorial showing how to make it:
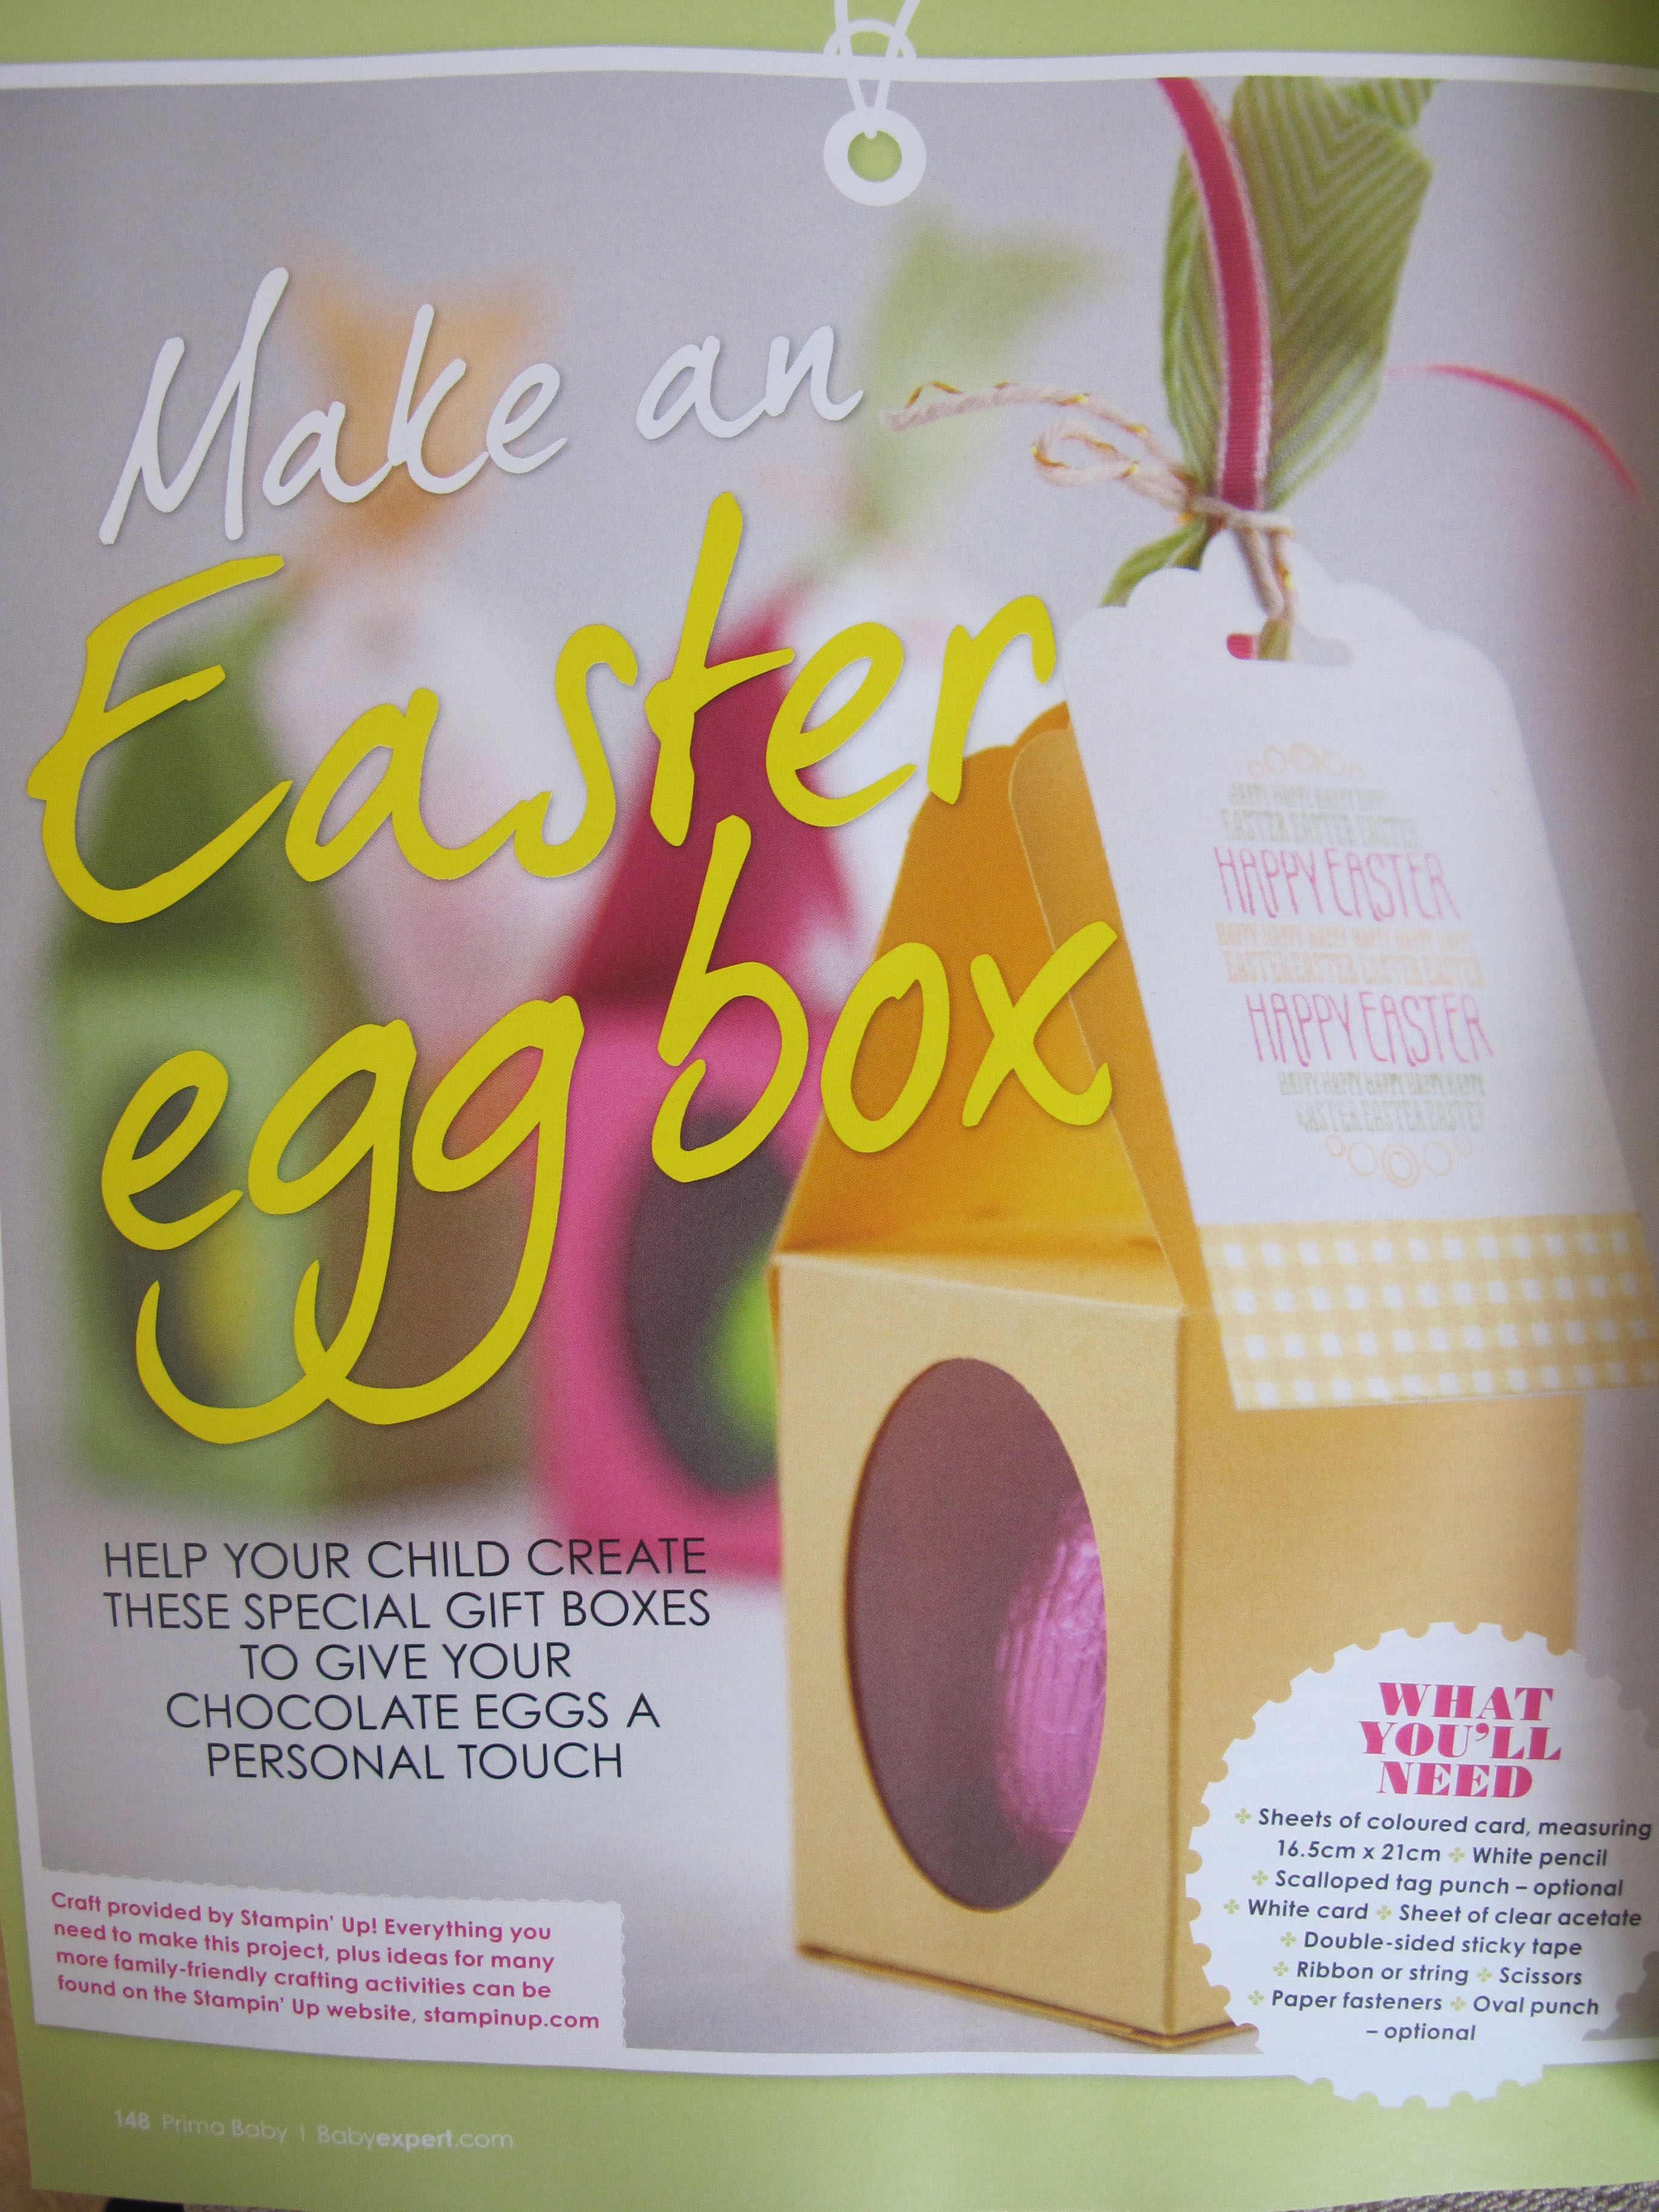
The sides of the body of the finished box measures 2" x 2 1/2" which is perfect for a small Easter egg (I used the ones you can buy in packs for Easter egg hunts) but this box could be used for anything small and attractive where you want to give a glimpse of the contents. If you would like a copy of the tutorial you can see it in this month's Prima Baby magazine - if you live in Northampton, you'd better get to the shops quick though before I buy all the copies :-) I also made a short video tutorial showing you how I made this box - click the link below to watch it:
That's all from me today; back tomorrow with another project; happy stampin'!
Stampin' Up! Supplies Used:
5a410a65-8882-46df-b9d9-50c6b2560efa|0|.0|96d5b379-7e1d-4dac-a6ba-1e50db561b04
Tags: 3D Projects, boxes, Candy Dot Brads, Easter, Eggstra Spectacular, Scalloped Tag Topper Punch, Shop online, Stampin' Up, Stampin' Up Card, Stampin' Up Card ideas, Stampin' Up Supplies, video tutorial
3D Projects | Boxes | Stamping
by Joanne James2. April 2014 17:22Another quick post from me today before I head out for my second card class of the week with another of the cards that we are making, featuring the 'Blessed Easter' stamp. This time I paired the stamp with the Hardwood background - love this stamp, especially in Smoky Slate grey:
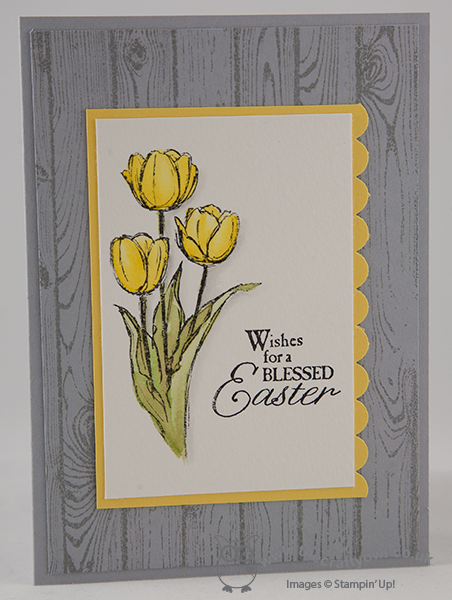
Unlike yesterday's card, I also used my Aquapainter to blend in some Smoky Slate ink around the tulips to create some subtle shading; shading in this way really makes the flowers stand out.
More lovely cards to share using this stamp in due course; off now to pack for my class.
Back tomorrow with another project - a rather special one too! until then, happy stampin!
Stampin' Up! Supplies Used:
by Joanne James1. April 2014 15:31Hello everyone! I can't quite believe it but James Juniors have broken up from school for their Easter holidays today - aargh! Where did that term go? Anyway, on the upside that will mean a few weeks of fun with hopefully not too much holiday homework. Today I've another quick post as I'm out hosting a crafty Stampin' Up! party this evening, so I'm blogging early (for me!) and thought I would share one of this week's class cards. In this month's classes my ladies are learning watercolouring techniques using Aquapainters and we are using the 'Blessed Easter' stamp set. All this month's cards are quite simple in design, as the aim is to spend the majority of the class time focusing on watercolouring and practising the technique rather than doing lots of stamping, cutting and sticking. Here is the first of this week's cards:
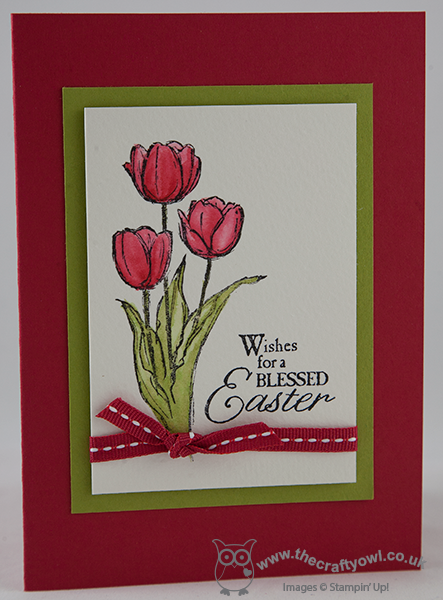
A Real Red card base and Pear Pizzazz panel, with the tulips and sentiment stamped onto watercolour paper using Jet Black Stazon and then coloured using the corresponding coloured inks and our Aquapainters. I think all the ladies in yesterday's class were pleasantly surprised at how easy it was to get a great result and the nice thing is even though everyone had the same tools, the cards all looked really different, depending on the individual shading and detail on the tulips. To finish we embellished with a piece of Real Red grosgrain ribbon.
That's all from me - I'm off to pack my bags for later. Back with more tulips later in the week; until then, happy stampin'!
Stampin' Up! Supplies Used:
by Joanne James29. March 2014 23:07I had a busy day in London yesterday so despite my best efforts to get ahead of myself I still didn't manage to blog yesterday and having had a class and put in my last Sale-A-Bration order I'm almost running out of time today, so before I do here is my intended share for yesterday, one of the Mother's Day cards I made in a couple of different colourways that I couldn't share before the day itself. Here it is in the predominantly pink colourway:
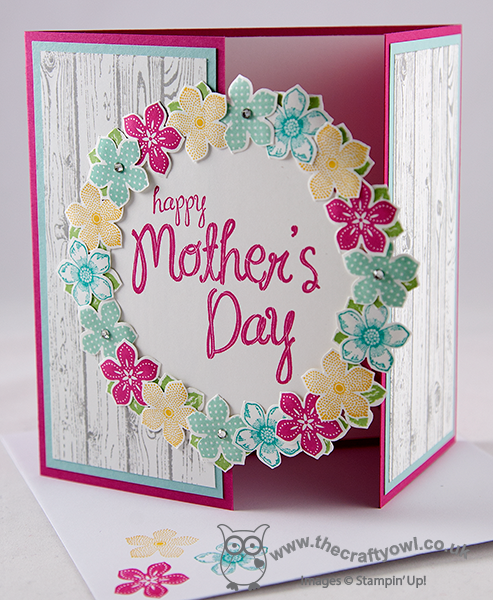
The card is similar to one I saw on Julie Kettlewell's blog here - I made a 5 1/2" x 5 1/2" square gatefold card and created an overlapping framed circle that I cut with my Circles Framelits and created a wreath of tiny stamped and punched flowers around the central bold 'Happy Mother's Day sentiment. I also made this card is an aqua colourway here using Coastal Cabana for the base:
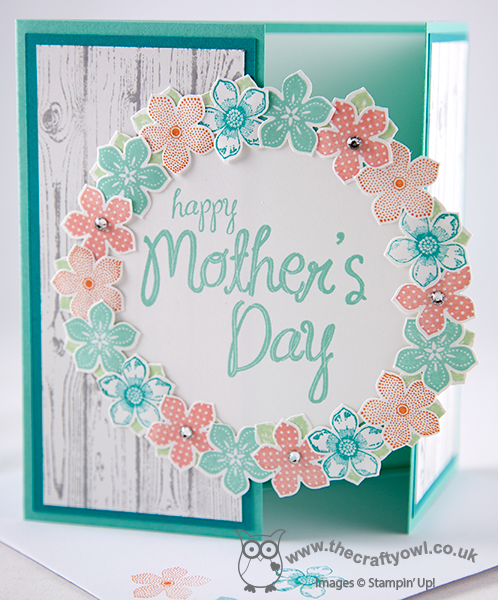
The hardwood background stamp makes such a great background for the focal point and some flower stamping inside and on the envelopes along with a few rhinestones just finishes off the card perfectly.
My Mother's Day was rather unconventional and was only spent with one of my offspring, which felt slightly strange, but Rebecca and I had a great day in London (she was so excited that she got to have her picture taken in front of Big Ben!) and the bonus is we get to have another Mother's Day next Sunday altogether to make up for it!
Back tomorrow with another project; until then, happy stampin'!
Stampin' Up! Supplies Used:
04fe73a3-d987-4b8e-ae26-b06fdce10abe|1|5.0|96d5b379-7e1d-4dac-a6ba-1e50db561b04
Tags: Hardwood, My Mother, Mother's Day, Petite Petals, Petite Petals Punch, Circles Framelits, Big Shot, Shop online, Stampin' Up, Stampin' Up Card, Stampin' Up Card ideas, Stampin' Up Supplies
Cards | Stamping
by Joanne James29. March 2014 22:13A quick (and late!) post from me today - I have one of the busiest weekends ever today and tomorrow. I've been putting the final touches to my class preparation for next week today and have spent the evening at the swimming pool with Rebecca as she was participating in a swimming gala. We are having a real 'girls versus boys' weekend; we each went to our separate swimming pools today (and Granny came along to watch Rebecca for the first time today too) and tomorrow Rebecca and I are travelling to London so that she can take part in an inter-school music festival with the rest of her school choir, whilst the boys have a fun day doing their own thing at home.
Anyway, with all that in mind there will be a couple of quick posts from me over the next couple of days. Today I'm sharing a gift I made for one of my customers who celebrated her birthday recently. If you follow me on Facebook, you will have see this photograph I posted yesterday of a lovely box I made using the Sweet Sorbet papers (yours free with a £45 spend during Sale-A-Bration - only 2 more days to go to plae a Sale-A-Bration order!)and my Box Buster tool and Envelope Punch Board:
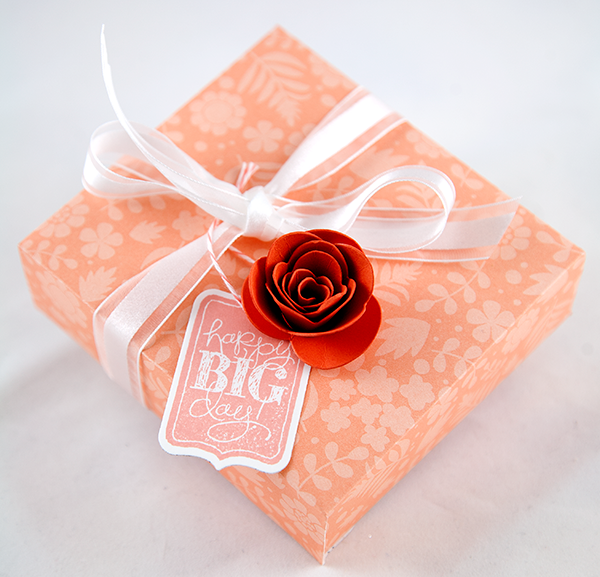
Today I thought I would share what was inside - a sweet little box frame:
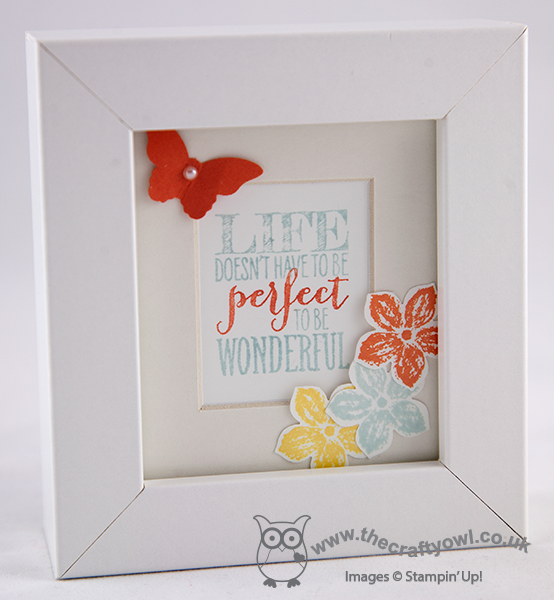
Just a simple stamped sentiment, decorated with a punched butterfly and a few flowers stamped and punched using the Petite Petals stamp set and co-ordinating punch. A decorated frame makes a lovely gift.
Back tomorrow with a card (or two!); until then, happy stampin'!
Stampin' Up! Supplies Used:
65600cd8-bb9b-4ae6-86f9-55f983360d71|0|.0|96d5b379-7e1d-4dac-a6ba-1e50db561b04
Tags: 3D Projects, Box Buster, boxes, Envelope Punch Board, Bitty Butterfly Punch, Petite Petals, Petite Petals Punch, Perfect Pennants, Shop online, Sale-a-bration 2014, Sweet Sorbet, Stamp-a-ma-jig, Stampin' Up, Stampin' Up Card, Stampin' Up Card ideas, Stampin' Up Supplies
3D Projects | Envelope Punch Board | Sale-a-bration | Stamping
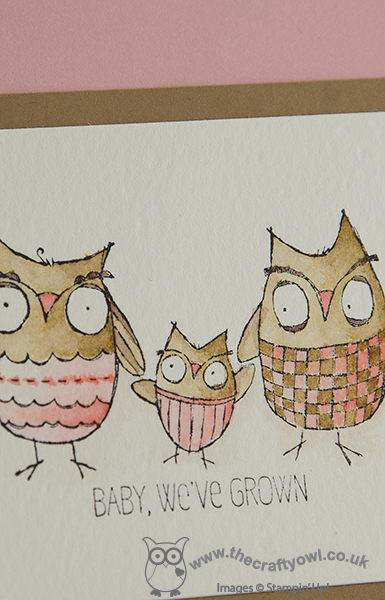
by Joanne James27. March 2014 22:55Today I’m sharing my entry for this week’s Less is More challenge where you have to create a card with three of something. I decided to indulge in a spot of watercolouring and use a new stamp of mine from the ‘Baby We’ve Grown’ stamp set:
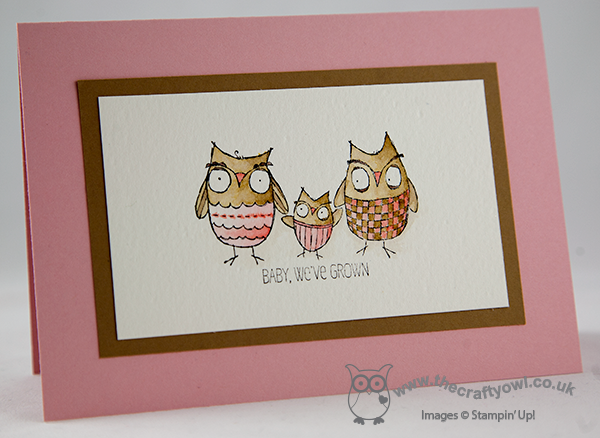
What can I say – I love this trio of owls! I’ve never purchased a dedicated baby-themed stamp set before, but I saw this set and it really appealed to me: a cute bunny, some of the sweetest baby shoes, some sentiments and well – those owls!
I simply stamped the image onto watercolour paper and coloured using my Aquapainter and a range of browns and pinks – this card is heading for my ‘baby girl’ pile – and mounted on a mat of Baked Brown Sugar and a card base of Blushing Bride. Well, this is ‘Less is More’ after all! I'm still a novice at this compared to some, yet I love the blending I get with an Aquapainter - here's a close up:
Back tomorrow with another project; until then, happy stampin’!
Stampin’ Up! Supplies Used:
by Joanne James27. March 2014 22:12It's all go in the office of The Crafty Owl - I've been busy finishing my last Mother's Day cards today and I've recorded two video tutorials, along with all of the other things mothers do in a day. I won't bore you with that list, but I'm sure lots of you are reading this thinking "I know what you mean!" :-) Anyway, today I have a Mother's Day card to share with you, which I made using this week's sketch over at The Paper Players. This is Sandy's sketch:
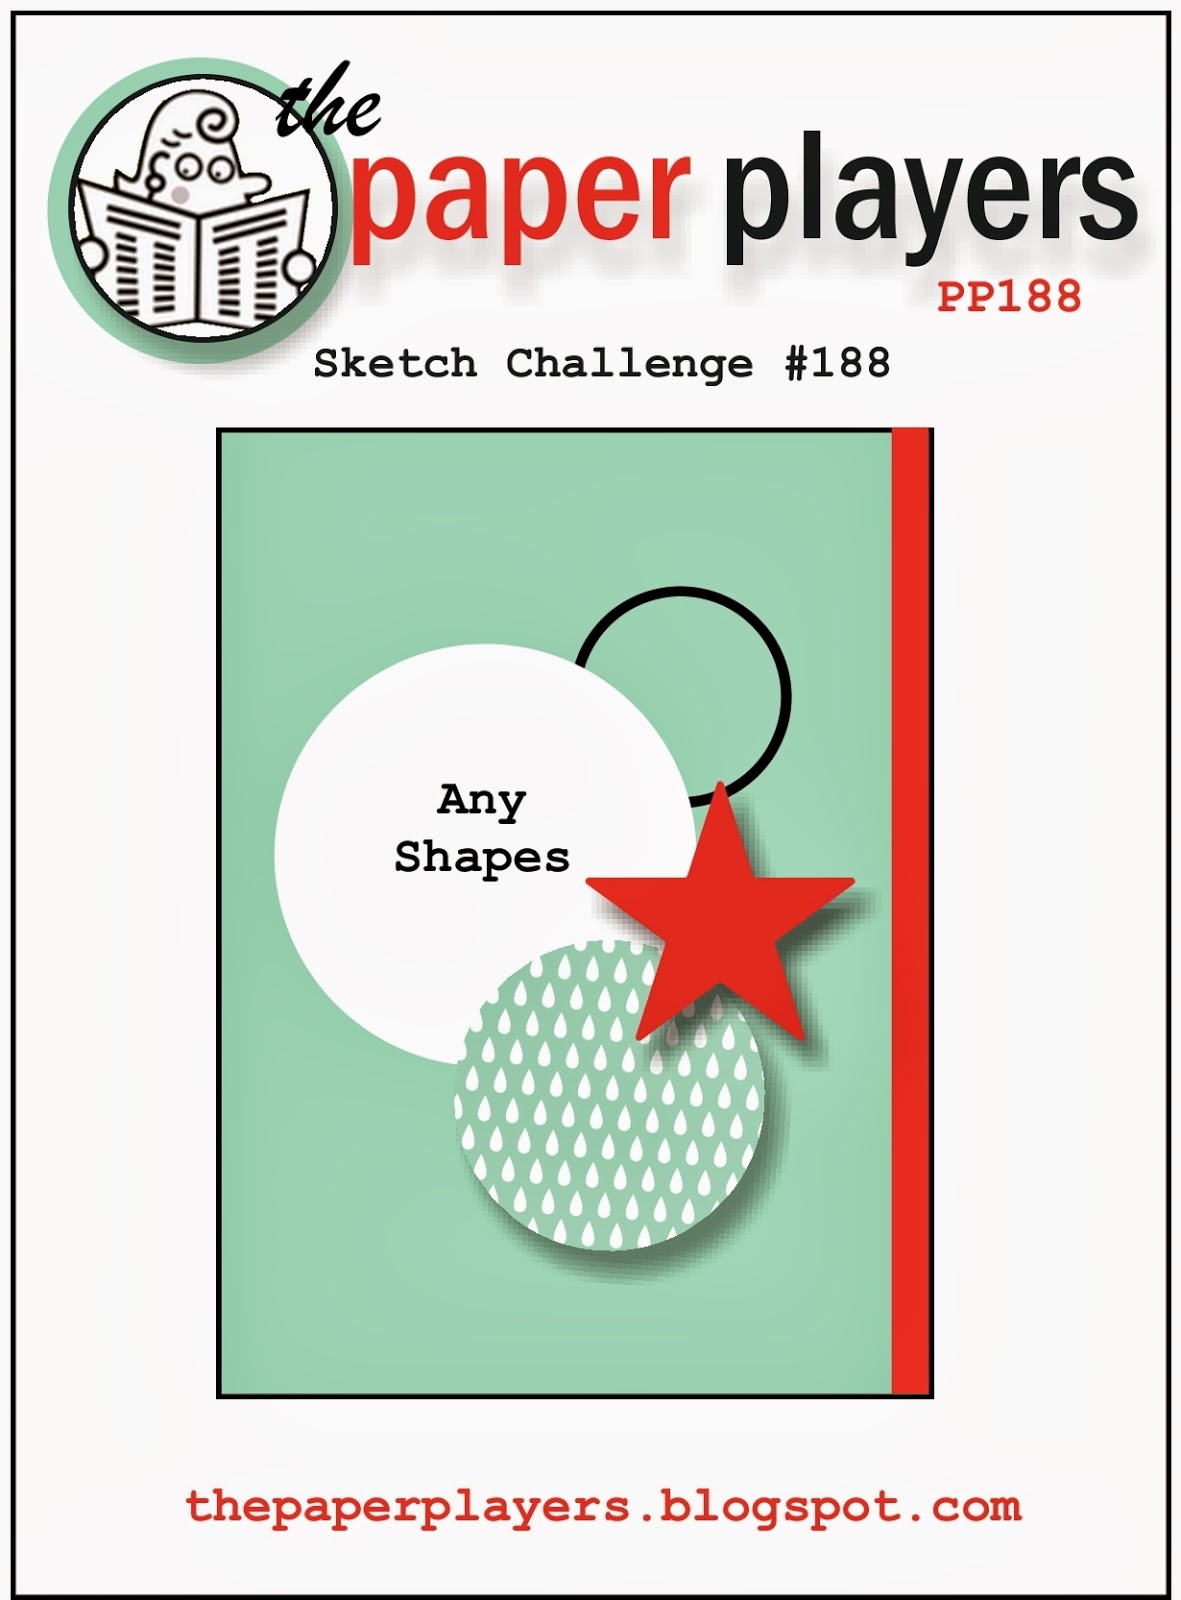
I loved the layered circles on this sketch and it allowed me to get out on paper an idea I've had floating around in my head for a while (love it when that happens!) So here is my card:
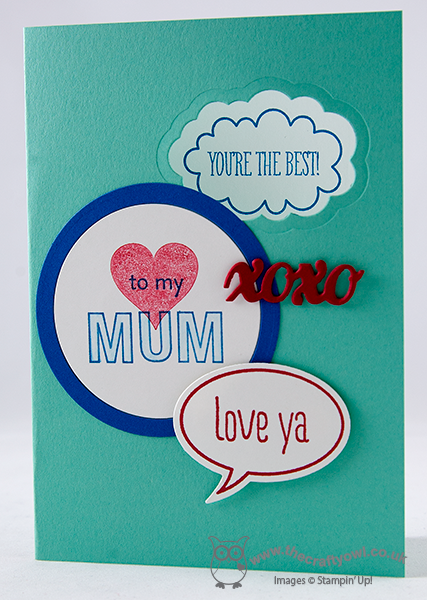
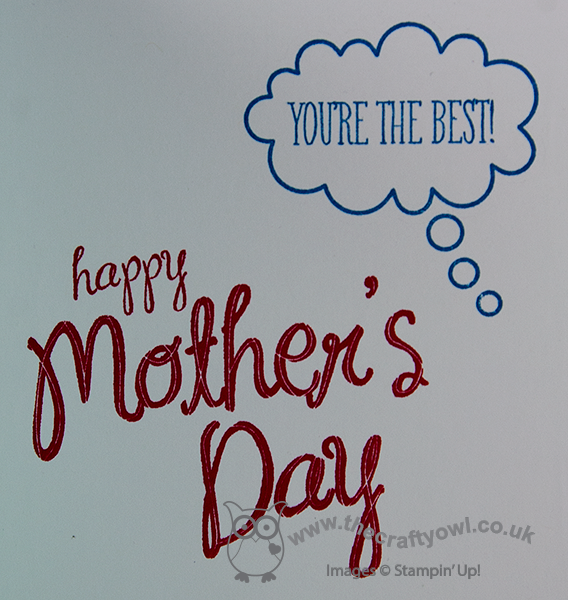
I used Coastal Cabana for my base, then cut out a 'window' using my Word Bubble framelits through to the stamped sentiment "You're the best!" on the inside, used my largest circle for my bespoke 'Mum' sentiment where I used two circles cut with my Circles framelits to create an inset so that I have a border without an extra layer here. I then added an ‘xoxo’ cut out with my Circle Card thinlit set, attached with rolled glue dots, and lastly my final layer with the ‘love ya’ word bubble, stamped, cut and mounted with dimensionals for height. The cut-out on the front gives a glimpse of what’s inside – here’s the close-up:
Now I know this is not such a typical Mother's Day card: not traditional colours, no flowers in sight. It's quite clean and graphic in nature, but I really like it! I think it’s a great card for a Mum who likes something a little different; I for one would be thrilled to receive this card (hint, hint James Juniors!)
That’s me for today; come back tomorrow to see my entry for this week’s Less is More challenge. Until then, happy stampin’!
Stampin’ Up! Supplies Used:
b7fea6a2-dd41-4749-bcf6-cf25637c1f2e|0|.0|96d5b379-7e1d-4dac-a6ba-1e50db561b04
Tags: Just Sayin', Magnetic Platform, ABC-123 Sketch Alphabet & Numbers, Big Shot, Perfect Pennants, Circles Framelits, My Mother, Mother's Day, Shop online, Stampin' Up, Stamp-a-ma-jig, Stampin' Up Card, Stampin' Up Card ideas, Stampin' Up Supplies
Cards | Stamping
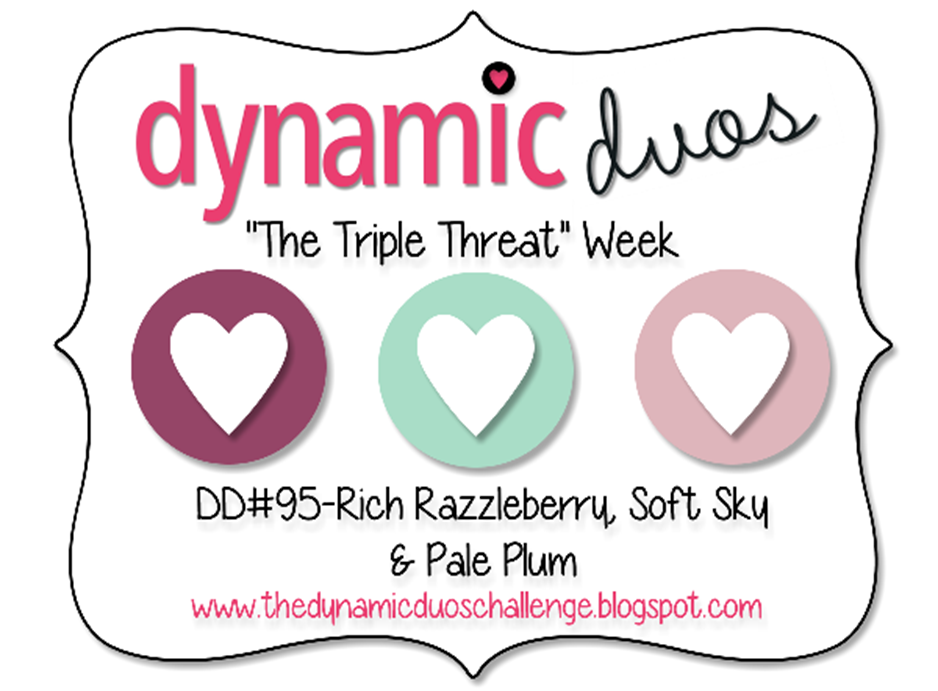
by Joanne James26. March 2014 21:28Another busy day today and my third night out in a row: today to a school concert, which was very entertaining with lots of singing and instrumentals. Now I'm back and today's card uses the colours over at Dynamic Duos this week, where it's actually 'Triple Threat' week and this week's sketch over at Retrosketches, which has an interesting decorative element:

And here is my card:
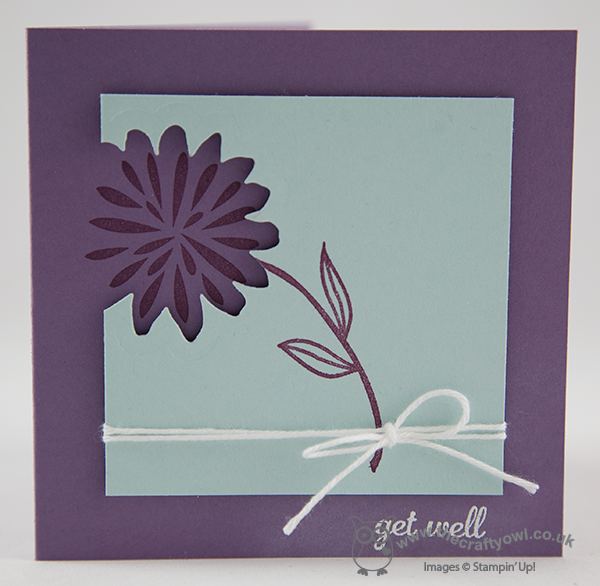
My card uses a single flower from the 'Simple Stems' stamp set and I printed the offset flower head on the base layer and the stem on a layer of Soft Sky, having cut out the area around the flower using the co-ordinating Secret Garden framelit. The Soft Sky layer was layered with dimensionals to give depth and allow a simple white baker's twine bow to be wrapped around the base.
As Pale Plum is a retired SU! colour, I substituted with Perfect Plum. I was a little concerned that it wouldn't have enough pink in it to work with the Rich Razzleberry, especially I had decided to experiment with stamping the Rich Razzleberry onto the contrasting Perfect Plum cardstock. I don't generally take two tones of the same colour and use them together in this way, but I quite like the effect - the Razzleberry 'warms' the Plum I think. I thought I would include a picture of my test card to show you how the effect differs depending on the colour ink you use:

The flowers are stamped clockwise from bottom left in Elegant Eggplant, Perfect Plum then Rich Razzleberry on Perfect Plum cardstock - it's interesting to see how different they each look, don't you think?
Anyway, back to my card! I finished it with a little 'get well' sentiment that I stamped in Versamark and heat embossed in white. This card will be sending get well wishes to one of my lovely customers who is having major surgery at the end of this week; if you're reading this Chris, I hope you're up and about again soon!
That's all from me today - I'm off to catch up on my beauty sleep! Back tomorrow with another project; until then, happy stampin'!
Stampin' Up! Supplies Used:
6ecb3bac-f56d-4451-8bd2-10848e8f6755|0|.0|96d5b379-7e1d-4dac-a6ba-1e50db561b04
Tags: Big Shot, Magnetic Platform, Stampin' Up Supplies, Stampin' Up Card ideas, Stampin' Up Card, Stampin' Up, Stamp-a-ma-jig, Shop online, Secret Garden Framelits, Simple Stems, Express Yourself
Cards | Stamping