Umbrella Weather - Not For a While Yet!

by Joanne James25. July 2016 07:00

Happy Monday everyone! For me this is officially the first day of the long school summer holiday! The James Juniors actually finished a couple of weeks ago, but having spent two weeks abroad on vacation today marks the start of our time at home - 6 weeks of no school runs, yay! So how long before I get cries of 'I'm booorrrreeeeedddd' do we think??!

I was pleasantly surprised to return home to the UK to find that summer has finally arrived, so I'm hoping that today's card doesn't tempt fate! I made it with a few challenges in mind:

       photo badge1_zpse398c447.jpg

The team over at CASology have a cue card of 'rough', which can mean many things; I decided to go with a 'get well soon' sentiment and also included some diecutting which the team over at TGIF are looking for this week and a little paper piecing for the team over at Just Add Ink. Take a look:


Here's the low-down on today's card:

Umbrella Weather - With the exception of the sentiment, which comes from the co-ordinating 'Weather Together' stamp set, my card is all about diecutting today. The umbrella, clouds and raindrops are all part of the Umbrella Weather Framelits set. I've been wanting an umbrella set for ages (you can see my previous punch art attempt at creating my own umbrella here) and this framelit set is perfect: it contains two different umbrella types and lots of border patterns that you can use to customise them, in addition to clouds, hearts and raindrops. The framelits are a great standalone set and you don't need the stamp set to get great use out of these, although given that together they can be purchased as one of the many discounted bundles in the catalogue, I'm not sure why you would buy them alone (just saying :-) )

Paper Piecing - Paper Piecing, the technique that uses small pieces of paper or card to create a pattern, originates from an old quilting technique where the quilter sews small pieces of fabric onto paper in order to make it easier to join them together. On my card I decided to paper-piece the sections of my umbrella. I cut one complete umbrella out of Real Red, then cut a further three umbrellas - one red, one yellow, and one out of a scrap of retired Cherry on Top DSP from my scrap box - and fussy cut each of these by hand into three sections, that I then paper-pieced together and glued to the red base to create my colourful brolly.

Minimal Layers, Maximum Interest - I wanted to create interest not only with my use of bright blocks of colour but also in terms of dimension, with the raindrops, sentiment, clouds and umbrella all completing for layer space on my card. In order to maintain my 'clean and simple' feel, I created a recess in my top mat for my sentiment and popped this layer up on dimensionals to add depth to my raindrops. I then adhered my umbrella directly onto this layer, arching the recess, and finally popped the clouds onto dimensionals for a little lift too. 

Here is the visual summary of the key products used on today's project for you to pin for easy reference:


You can see all of my 'How To' summaries on my 'How To - Tips and Techniques' Pinterest board in case you've missed any. 

A brightly coloured card that should cheer someone having the roughest of times!

That's all from me today; I have a date with a huge basket of post-vacation ironing along with some time outdoors with the James Juniors making the most of the nice weather whilst it lasts. I'll be back tomorrow with another project; until then, happy stampin'!


Stampin' Up! Supplies Used:

Table built using Product Table Builder by The Crafty Owl - Independent Stampin' Up! Demonstrator.

Hoping Your Day Goes Swimmingly By The Shore Nautical Card

by Joanne James24. July 2016 10:00

It's Sunday and time for a new challenge over at The Paper Players! It's the turn of my sweet friend LeAnne to host this week and she has my favourite, a sketch challenge for us to play along with:


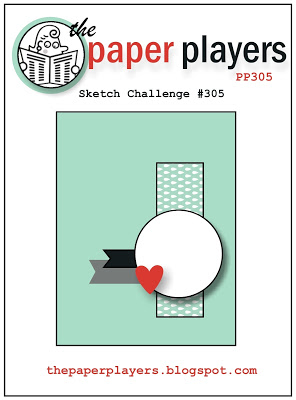
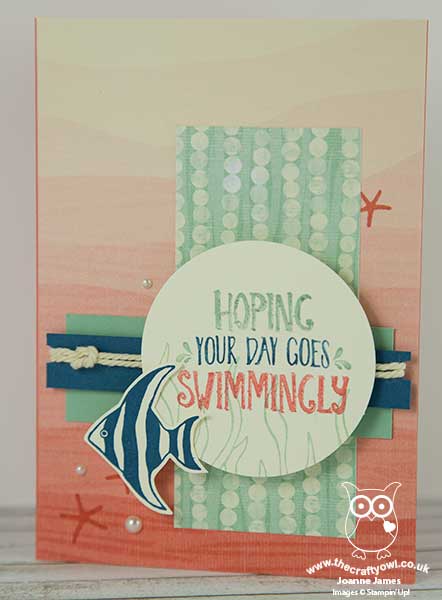
This is one of those sketches that has so many possibilities and when I sat down with my sketch book I came up with about six different cards straight off, there were just so many choices! In the end I decided to go with the soft and nautical By The Shore suite to create a rather fishy card today - take a look:


Here's the low-down on today's card:

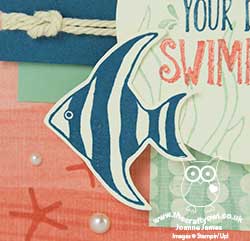
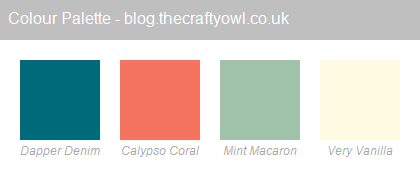
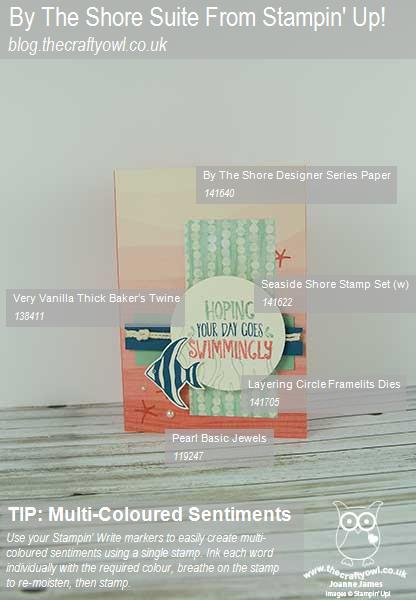
Under The Sea - My regular readers will know that the James' are a family of keen swimmers and scuba divers, so this was never going to be a set I could pass up for long! Fishes, seaweed, bubbles, an anchor, shells and starfish, along with some great sentiments and rope/border stamps - a veritable underwater cornucopia. I used the main sentiment on my card today, inked up using my Stampin' Write marker to easily incorporate each of the three colours that feature most strongly in this suite and cut out with my circle framelits and used the seaweed in Mint Macaron to add a little background interest, stamping off once first to give a paler colour. I used an all-blue angel fish (if there is such a thing!) as my embellishment element as per the sketch, popping it up slightly higher than my sentiment circle. Here is today's colour combination should you wish to save it to use again too:


By The Shore - The By The Shore Designer Series paper has some wonderful patterns, including two sheets of ombre in coral and denim blue. The Calypso Coral ombre worked perfectly for my card base, and I also used a piece with a circular pattern for my vertical banner - it reminded me of bubbles, in an abstract way, so it co-ordinates with the other elements of my card.

Nautical Details - In addition to my sentiment and fish, I added a few other nautical details: I stamped a trio of starfish on my card base directly onto the ombre paper, added some pearls and finally a sailor's reef knot in vanilla baker's twine around my horizontal banners. This adds a lot of dimension to my card, making it a little un-post friendly, but I like the added texture and detail it gives so I will just save this card for someone closer to home.  

Here is the visual summary of the key products used on today's project for you to pin for easy reference:


You can see all of my 'How To' summaries on my 'How To - Tips and Techniques' Pinterest board in case you've missed any. 

I love this fun set and just know I will get tons of use from it. The lovely Linda Callaghan also used this set this week - her card is beautiful and quite different to mine so be sure to check it out for additional nautical inspiration.

Before you reach for your ink and papers, check out what our amazing team has created to inspire you this week:

The Paper Players Design Team
 
 
Here's a quick recap of our challenge rules:
 
1.  Create a new paper project
2.  Upload your creation to your blog with a link back to us and provide a direct link to the post featuring your challenge submission.
3.  Please link your card to no more than four challenges, TOTAL.
4.  Have FUN! 


I look forward to seeing what you create with our sketch this week.

Back tomorrow with another project; until then, happy stampin'!


Stampin' Up! Supplies Used:

Table built using Product Table Builder by The Crafty Owl - Independent Stampin' Up! Demonstrator.

Fruit Stand Layered Thank You Card

by Joanne James23. July 2016 07:00

Today I have a card that I made a few weeks ago with a Connie and Mary challenge (you can see my actual challenge card here if you missed it) but didn't use at it was lacking in Cucumber Crush. I still think it's a lovely card though so thought I would share it with you today:


Isn't that just the peachiest?! Here's the low-down on today's card:

The Art of Layering - Today's card is a simple design but one that really works the layers to combine two alternative patterns and produce a colourful card. I used Peekaboo Peach for my card base and mat and interspersed my main panel with a double layer, using the Pear Pizzazz to add a fresh edge. 

Watercolour Words - I stamped my bright sentiment in Tangerine Tango using the Watercolour Words stamp set on a circle of Whisper White cut using my Layered Circles Framelits and trimmed to fit the edge of my card - I think this makes a nice thank you card.

You're A Peach - The star of this card is the Fruit Stand Designer Series Paper though - don't those peaches look good enough to eat?! Even without the co-ordinating Fresh Fruit stamp set, this paper adds a burst of fresh, summery fruitfulness. A touch of Peekaboo Peach in-colour ruched ribbon to finish co-ordinates perfectly. 

Here is the visual summary of the key products used on today's project for you to pin for easy reference:


You can see all of my 'How To' summaries on my 'How To - Tips and Techniques' Pinterest board in case you've missed any. 

Enjoy your day and I'll be back tomorrow with this week's new challenge over at The Paper Players; until then, happy stampin'!


Stampin' Up! Supplies Used:

Table built using Product Table Builder by The Crafty Owl - Independent Stampin' Up! Demonstrator.

Tags: , , , , , , ,

Cards | Shop Online | Stamping

Oh Happy Day Card Kit - The Best One Yet

by Joanne James22. July 2016 07:00


My regular readers will know what a fan I am of Stampin' Up!'s kits and today I want to share with you the latest all-inclusive kit offering - the Oh Happy Day Card Kit. Here's one of the finished cards from the set:


And here's a catalogue image that shows all of the cards that can be made with this kit:


Here's the low-down on the Oh Happy Day Kit and why I think they are perfect for just about anyone and everyone:

All Inclusive - The Oh Happy Day card kit is one that contains everything you need to create 20 unique cards: card bases, co-ordinating envelopes, die cut images and shapes, a Stampin' Spot ink pad, set of 13 photopolymer stamps and an acrylic block and a range of accessories and embellishments. Simply add your choice of adhesive and you are good to go. 

Great Value For Money - At £31.50, this kit offers exceptional value for money - where else could you buy 20 handcrafted greetings cards at less than £1.60 each and have a stamp set, ink spot, block and a range of embellishments left over to create even more things with too? Not to mention the creative fun you will have putting them together along the way!

The Perfect Gift -  Whether young or old, experienced crafter or new to crafting, this kit is perfect for you. Follow the instructions included or unleash your own creativity and do your own thing - and if you're trying to buy for 'the person who has everything' - I bet they don't have one if these! The kit comes in a lovely gift box too, so all you need is some ribbon and a tag and you are done.

Here is a reminder of this fantastic kit if you are getting organised and want to pin it to your Pinterest 'Christmas Gifts' board to pin for easy reference:


You can see all of my 'How To' summaries on my 'How To - Tips and Techniques' Pinterest board in case you've missed any. 

Also the lovely people at Stampin' Up! have also produced a video showing this kit in more detail if you'd like a close look:

I truly do think that this is one of the best kits yet - it's the bright and colourful equivalent of the equally good Watercolour Wishes kit - you can read all about that one here. Enjoy your day and I'll be back tomorrow with another project; until then, happy stampin'!


Stampin' Up! Supplies Used:

Table built using Product Table Builder by The Crafty Owl - Independent Stampin' Up! Demonstrator.

Bella and Friends Just For You

by Joanne James21. July 2016 08:05

Today it's time for a new challenge over at Create With Connie and Mary and this week we have a colour combination for you:


As I pondered these colours, I decided that another Bella and Friends card was the way to go - Tip Top Taupe seemed like a good colour for a puppy. Here's my card:


Here's the low-down on today's card:

Bella And Friends Just For You - Another of the adorable images in this set, I stamped the puppy and his feathered pal in Archival Black ink and this time coloured them using the challenge colour inks and a blender pen onto Whisper White cardstock. I added a liberal coat of clear Wink of Stella to the balloon, although it's difficult to see the sparkle on the photograph - trust me, it's there!

Swirly Scribbles Background - As I was about to assemble my card, I decided that my base layer looked rather plain. I considered the options for adding interest and settled on creating my own random pattern using the small swirl in the Swirly Bird set, stamping it all over in Mint Macaron for a tone-on-tone look. I for one am pleased with the result! 

Envelope Paper is not just for Envelopes - Are you wondering which designer series paper stack I got my Dapper Denim strip from? Well, the answer would be 'none' as it's actually a piece of the new In Colour Envelope Paper. The great thing is though, whilst it's perfect for envelopes it also makes great designer paper to use on cards. It means your card then is also guaranteed to co-ordinate with your custom envelope should you choose to make one - and why wouldn't you? :-)

Here is the visual summary of the key products used on today's project for you to pin for easy reference:


You can see all of my 'How To' summaries on my 'How To - Tips and Techniques' Pinterest board in case you've missed any. 

Do visit the other Design Team members to see what they did with this week's colours; there's lots of inspiration over on their blogs too!

Enjoy your day and I'll be back tomorrow with another project; until then, happy stampin'!


Stampin' Up! Supplies Used:

Table built using Product Table Builder by The Crafty Owl - Independent Stampin' Up! Demonstrator.

Jar of Love Freestanding Pop Up Card

by Joanne James20. July 2016 07:00

Today I'm sharing the third and final card from my second of this month's technique class featuring the very on-trend Jar of Love stamp set and co-ordinating Everyday Jars Framelits Dies. Each of the ladies received the bundle and as always I was on a mission to use as wide a variety as possible of the stamps in this set to showcase its versatility.

This card is a lovely freestanding pop-up card that was inspired by this card created by Lou Kitzelman. I loved it so much I had to have a go at making my own so here's my version:


Here's the low-down on today's card:

Jar of Flowers - Here I've used the Jar of Love set to create a jam jar full of pretty flowers. I love the little flowers in this set and the co-ordinating Everyday Jar Framelits make light work of cutting them out. Each flower is done in a single colour, with the base flower stamped off once to give the contrast with the smaller piece. I chose a mix of purples, pink and orange for my little posy - feel free to hover and pin this colour combination if it's one that appeals to you too:


Kraft Hardwood Table - I used some retired pre-embossed kraft cardstock in my class, however by stamping the Hardwood stamp in Versamark and clear embossing on plain kraft cardstock you can achieve a similar woodgrained effect for your 'table' base.

Another Fun Fold - This freestanding pop-up card is easier to re-create than it looks. It is a great statement card that also folds completely flat for postage which is always a bonus. 

Here's a quick step-by-step tutorial should you wish to have a go:

Freestanding Pop-Up Jar of Love card - Metric Version

Using the diagram below as your guide:

  • Cut a piece of kraft cardstock to 10.5cm wide x 28cm long
  • Stamp the cardstock in Versamark with the Hardwood stamp and heat emboss with clear embossing powder for a woodgrain effect.
  • LANDSCAPE score as per dotted lines:
  • 2.5cm, 7cm, 9.5cm, 18.5cm, 21cm and 25.5cm
  • At 14cm, punch a small hole using a 1/8" punch or crop-a-dile 1.5cm in from both ends and cut a narrow channel approx. 2mm wide between them (i.e. 1.5-9cm)
  • Fold each of the score lines with mountain folds
  • Cut a small strip of Whisper White measuring 3cm x 8cm and attach this using fast fuse in the centre of the end panel on the front (right side)
  • Turn the base over, and folding the end section in a mountain fold from the front back on itself, feed this white piece through the slit from the back of the card to the front.
  • Folding the base in on itself to form a figure 8 shape, adhere both of the front ends together, making sure the white card is through the slit as this is what your jar will be stuck to. As you pull this piece upwards, your freestanding table mechanism forms.
  • This completes your base - you then need to adhere your jars and flowers to the front of the white piece of card, and add a plain jar to the back when complete to neaten things up and give you space to write your sentiment.
 
Isn't this such a fun way to create a pop-up? I'm sure there are lots of other ways that this design could be used too.

Here is the visual summary of the key products used on today's project for you to pin for easy reference:


You can see all of my 'How To' summaries on my 'How To - Tips and Techniques' Pinterest board in case you've missed any. 

The Jar of Love and Everyday Jars Framelits bundle is another of those that has just has so many creative possibilities! If you haven't bought yours yet, this month would be the perfect time to do so; if you purchase the bundle at £48.50 you will earn yourself a £4.50 money-off coupon any purchases next month too - bargain! Just click on the links below to hop on over to my online store to order yours today - and don't forget to add this month's hostess code 63RNATE3 to get a little thank you in the post from me too.

I'll be back tomorrow with the second of the cards from my Jar of Love class; come back then, you won't want to miss it! Until then, happy stampin'!


Stampin' Up! Supplies Used:

Table built using Product Table Builder by The Crafty Owl - Independent Stampin' Up! Demonstrator.

Jar of Love Mini Centre Step Easel Card

by Joanne James19. July 2016 07:00

Today I'm sharing the second of the cards from my second of this month's technique class featuring the very on-trend Jar of Love stamp set and co-ordinating Everyday Jars Framelits Dies. Each of the ladies received the bundle and as always I was on a mission to use as wide a variety as possible of the stamps in this set to showcase its versatility.

This card was a punny fun-fold card using the goldfish and a feline friend - take a look:


Here's the low-down on today's card:

Here Fishy, Fishy - I wanted to create something using the punny 'Best Fishes' sentiment and decided to have a little fun. Whilst my goldfish is swimming innocently in his jar, he is being watched by a mischievous pussy cat - and he has no idea! I stamped both my goldfish and my stalking kitty directly onto a panel of Whisper White (I stamped and punched his tail separately so that it would overhang) then stamped my jar separately and using the framelit cut out the centre too. To this I adhered a piece of window sheet that I had coloured with one of my retired Blendabilities - a light blue Sharpie or similar would also do the job - and stuck this over the top of the stamped panel. Lastly, I added a few bubbles with my white gel pen.

Serene Scenery Parquet - I used a couple of the patterned papers from the Serene Scenery DSP stack to decorate my card: a spotted one to highlight my greetings label, and one of the photographic images with a pattern that reminds me of a wooden parquet floor to the sides. 

A Fun Fold - I chose to create a centre step easel card to showcase my kitty and jar. I have admired a number of versions of this type of card create by my fellow demonstrator, the talented Amanda Bates at the Craft Spa however I wanted a card that would still fit into a C6 envelope when complete, so I created my own mini version.

Here's a quick step-by-step tutorial should you wish to have a go:

Mini Centre Step Easel Card (portrait) - Metric Version

Using the diagram below as your guide:

  • Cut A4 cardstock to 10.5cm wide ( xA4L i.e. 29.7cm long)
  • PORTRAIT at 2cm on Top Bar RHS ( i.e. to Right Hand Side)
  • Cut 2.5 to 13cm
  • PORTRAIT at 2cm on Top Bar LHS ( i.e. to Left Hand Side)
  • Cut 2.5 to 13cm 
  • LANDSCAPE With cuts to Left Hand Side, score as per dotted lines:
  • 2.5 cm on Top Bar (LHS) Score outside sections ( i.e. 0-2cm; LIFT; 8.5 to 10.5cm)
  • 5cm on Top Bar (LHS) Score outside sections ( i.e. 0-2cm; LIFT; 8.5 to 10.5cm)
  • 13cm on Top Bar (LHS) Score outside sections ( i.e. 0-2cm; LIFT; 8.5 to 10.5cm)
  • LANDSCAPE With cuts to Left Hand Side:
  • 10.5cm on Top Bar (LHS) Score across middle section. ( i.e. 2 to 8.5cm)
  • 21cm on Top Bar (LHS) Score across whole card drop ( i.e. 0 to 10.5cm)
  • Fold lightly:
  • Outer Sections – 2.5cm Mountain, 5cm Valley, 13cm Mountain
  • Middle Section at 10.5cm – Mountain
  • Whole Section at 21cm – Mountain
This then gives you the basic shape to which you can add your Designer Series Paper and stamped panels. 
 
Here is the visual summary of the key products used on today's project for you to pin for easy reference:


You can see all of my 'How To' summaries on my 'How To - Tips and Techniques' Pinterest board in case you've missed any. 

The Jar of Love and Everyday Jars Framelits bundle is another of those that has just has so many creative possibilities! If you haven't bought yours yet, this month would be the perfect time to do so; if you purchase the bundle at £48.50 you will earn yourself a £4.50 money-off coupon any purchases next month too - bargain! Just click on the links below to hop on over to my online store to order yours today - and don't forget to add this month's hostess code 63RNATE3 to get a little thank you in the post from me too.

I'll be back tomorrow with the second of the cards from my Jar of Love class; come back then, you won't want to miss it! Until then, happy stampin'!


Stampin' Up! Supplies Used:

Table built using Product Table Builder by The Crafty Owl - Independent Stampin' Up! Demonstrator.

Pop Of Pink Jar of Love Shaker Card

by Joanne James18. July 2016 07:00

Today I'm sharing the first of the cards from my second of this month's technique class featuring the very on-trend Jar of Love stamp set and co-ordinating Everyday Jars Framelits Dies. Each of the ladies received the bundle and as always I was on a mission to use as wide a variety as possible of the stamps in this set to showcase its versatility.

This was the easiest cards of the three - a fun 'pop of pink' shaker card:


Here's the low-down on today's card:

Pop of Pink - The colour scheme for my fun shaker is inspired by the Pop of Pink Suite of Products; I used some of the Pop of Pink washi tape to embellish with a little gold ribbon - here's the colours if you'd like to save them for inspiration too:


A Sweet Sentiment - This card uses one of the many sweet sentiments from the 'Jar of Love' stamp set and is perfect for the loveheart theme of my card. I added a Brights enamel heart too for added shine.

Confetti Fun - My confetti is a mix of Melon Mambo hearts, cut out with the little framelit in the Everyday Jars set, and the hearts in the metallic sequins assortment; I usually pick these out when I do other projects, so I had quite the collection for my shaker! 

Here is the visual summary of the key products used on today's project for you to pin for easy reference:


You can see all of my 'How To' summaries on my 'How To - Tips and Techniques' Pinterest board in case you've missed any. 

The Jar of Love and Everyday Jars Framelits bundle is another of those that has just has so many creative possibilities! If you haven't bought yours yet, this month would be the perfect time to do so; if you purchase the bundle at £48.50 you will earn yourself a £4.50 money-off coupon any purchases next month too - bargain! Just click on the links below to hop on over to my online store to order yours today - and don't forget to add this month's hostess code 63RNATE3 to get a little thank you in the post from me too.

I'll be back tomorrow with the second of the cards from my Jar of Love class; come back then, you won't want to miss it! Until then, happy stampin'!


Stampin' Up! Supplies Used:

Table built using Product Table Builder by The Crafty Owl - Independent Stampin' Up! Demonstrator.

Simple Watercolouring With Bella And Friends

by Joanne James17. July 2016 09:00

It's Sunday and time for a new challenge over at The Paper Players! It's the turn of the lovely Jaydee to host this week and she has a clean and simple challenge for us to play along with:


As I was working through trying to get my cards done before my impending vacation, I was grateful for Jaydee's choice of clean and simple theme this week - watercolouring. For my card this week I decided to use my new 'Bella and Friends' stamp set and create a truly 'clean and simple card. Take a look: 


Here's the low-down on today's card:

Bella and Friends - Ok, so hands up who doesn't think this cute puppy dog set is adorable?! As my regular readers will know I am not really a pet person and so I don't have many of those kinds of stamps (read the trouble that got me into in this post earlier in the year!). With the retirement of my beloved 'Giggle Greetings', I needed an animal stamp - and the minute I saw this stamp set, I was in love! The cute puppy dog so reminds me of my brother-in-law's dog Ollie and he was the colour inspiration for my puppy today - a mix of Soft Suede and Delightful Dijon. This set is perfect for colouring, whether with an aquapainter or markers, and is also great for clean and simple cards. I like it so much, I may even be tempted to purchase the 'Pretty Kitty' cat equivalent too!

Have aquapainter, will watercolour - My favourite way to colour images like this is to use my aquapainters. I simply stamped the image in Stazon onto watercolour paper, and got right to it! I coloured the images then added a little Soft Sky and Wild Wasabi for the landscape and was done. This kind of card is good for the soul - whether it takes minutes or hours, I find colouring with my aquapainters wonderfully theraputic. How about you?

Clean and Simple - This card ticks all the boxes for a clean and simple card: minimal layers and embellishments, one simple focal image focused on one third of the card and easy to recreate - yay! 

Here is the visual summary of the key products used on today's project for you to pin for easy reference:


You can see all of my 'How To' summaries on my 'How To - Tips and Techniques' Pinterest board in case you've missed any. 

Before you reach for your ink and papers, check out what our amazing team has created to inspire you this week:

The Paper Players Design Team
 
 
Here's a quick recap of our challenge rules:
 
1.  Create a new paper project
2.  Upload your creation to your blog with a link back to us and provide a direct link to the post featuring your challenge submission.
3.  Please link your card to no more than four challenges, TOTAL.
4.  Have FUN! 


I look forward to seeing your clean and simple watercoloured creations this week. I'm off for another day of fun in the sun!

Back tomorrow with another project; until then, happy stampin'!


Stampin' Up! Supplies Used:

Table built using Product Table Builder by The Crafty Owl - Independent Stampin' Up! Demonstrator.

Moroccan Tile Square Layered Framelits Card

by Joanne James16. July 2016 07:00


Today I'm sharing the third and final card from my recent technique class featuring the Moroccan Suite of products. Each of the ladies received a share of the products in the suite - designer series papers, ribbon and twine as well as the Moroccan Nights stamp set and the aim was to create a trio of cards that showcased each of the elements.

This card is all about the paper and features a different way to showcase one of the wonderful patterns of the Moroccan Designer Series Paper - take a look:


Here's the low-down on today's card:

Moroccan Tiles - The papers in this set contain some colourful traditional Moroccan-inspired mosaic patterns, some of which work for backgrounds and some which deserve to be a feature in their own right; the paper on this card today is, in my view, one such pattern. There is no stamping required, as the wonderful rustic colours of the paper do all the hard work for you. I didn't even include a sentiment on the front of my card, as I didn't want it to spoil the geometrical layout - there is plenty of space inside the card to stamp a sentiment of your choosing. 

It's Hip To Be Square - Having spent much time considering the patterns in the Moroccan Designer Series Paper pack, I finally decided today's paper was the one that I wanted to showcase in a feature frame. I made my frame by overlaying two of the square framelits from the Layered Square Framelits set; I used the framelits measuring and - this image shows you how I decided which ones would give me the aperture I needed:

Framelits are great for creating windows and apertures, in addition to the perfect square mat or layer. I simply centred mine onto my card front and cut them one at a time, cutting the square one first then overlaying the second one in an offset diamond shape. You can create a corner frame piece to help you line up your framelits and ensure they are perfectly central if you need to.

Medallion Centre - To finish my card I punched out a co-ordinating circle from the remainder of my paper (highlighted by the small square in the image above), backed it with another punched circle of Cajun Craze and mounted it on a dimensional with a twist of the Delightful Dijon 5/8" Mini Striped Ribbon and some metallic gold thread. 

Here is the visual summary of the key products used on today's project for you to pin for easy reference:


You can see all of my 'How To' summaries on my 'How To - Tips and Techniques' Pinterest board in case you've missed any. 

I hope you like this trio of cards using the Moroccan Suite of products. If you live in or around Northampton and would like to join me for some creative fun, you can check out my schedule of forthcoming classes here - I would love you to join me!

Enjoy your day and I'll be back tomorrow with this week's card for our new challenge over at The Paper Players; until then, happy stampin'!


Stampin' Up! Supplies Used:

Table built using Product Table Builder by The Crafty Owl - Independent Stampin' Up! Demonstrator.

Tags: , , , , , , ,

Cards | Shop Online | Stamping

Mini Catalogue

BROWSE THE CATALOGUE

The mini catalogue is now live! Read and download your copy here.

Shop Online

Access my online shop 24 x 7, 365 days of the year:

Current April hostess code:

VDKNV7BH

Shop Online

Join My Team

It's always a great time to join Stampin’ Up! New team members can get £130 worth of products for only £99 + free business supplies + free shipping + all the fun being a part of Stampin’ Up! Stampin' Up! has something for everyone: join my growing team and benefit from my support to enjoy Stampin' Up! however you choose.

If you're interested, call me for a chat to understand how I can help you realise your goals. Alternatively, if you have already decided to sign up and you just can't wait, please click here for the link to the online form where you can sign up and order your starter kit right away! 

Latest Kit!

Stampin Cut and Emboss

The Rock Legend Kit has all you need to make 8 cards with coordinating envelopes. Along with the new Panda Friends Kit, both are available from January 4th for just £14 each - get yours here!

2023-24 Annual Catalogue

BROWSE THE CATALOGUE

Click on the catalogue for a full list of current SU! supplies - if you would like to order any of the items featured, please drop me a line at [email protected] or give me a call on 07773 421446 - I'd be happy to help.

New Online Exclusives

There are new products available exclusively in the online store from 5 March - check them out here.

About Me

Hi I'm Joanne and live in Northampton and when I'm not looking after my husband and two beautiful children, am an avid crafter with a passion for all things Stampin' Up!

I must confess that I have never been a big rubber stamper - until I discovered Stampin' Up! that is. I love the fact that I can get such great results with co-ordinating stamps, inks, papers and punches - the possibilities are endless! Join me on my stamping journey as I share the things I love and be inspired to create amazing things yourself!

Follow Me

Monthly Newsletter

Box Builder

Click the button above to use Box Buster to create your custom box design using the Envelope Punch Board!

Kits Collection Now Available!

Stampin Cut and Emboss

The new Kits Collection from Stampin' Up! is now available!

Click here to see the current kits available and order yours online today.

I Design For


Stampin' Up Stuff

This is my personal blog and is not endorsed by Stampin’ Up! I hope you find it a plentiful source of ideas and personal inspiration but please don't copy my designs for contest submission or use for classes, publication or sale without express permission.